Are you looking to repair the damaged fabric on your RV awning? Don’t worry, we’ve got you covered! In this step-by-step guide, we will walk you through the process of repairing your RV awning fabric with ease. Whether your awning fabric has been torn, frayed, or simply needs a refresh, we have all the tips and tricks you need to get it looking as good as new. So grab your tools and let’s get started on transforming your RV awning into a stunning outdoor oasis.
Table of Contents
Introduction to RV Awning Repair
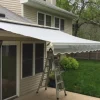
Are you the proud owner of an RV? If so, you know that the awning is a vital part of your outdoor experience. It provides much-needed shade and protection from the elements. But what happens when your awning fabric gets damaged? Don’t worry, repairing your RV awning fabric is easier than you might think.
First, start by assessing the damage. Is it a small tear or a more significant rip? Once you have determined the extent of the damage, you can move on to repairing it. If it’s a small tear, using a repair tape designed for awnings can do the trick.
Simply apply the tape over the tear, making sure to smooth out any wrinkles. For larger rips, you may need to replace the entire fabric. To do this, start by removing the damaged fabric from the roller tube.
Then, measure and order a replacement fabric that matches the size of your awning. Finally, attach the new fabric to the roller tube and secure it with the necessary hardware. With a little time and effort, you can have your RV awning fabric looking as good as new in no time.
Understanding the Common Causes of Damage
RV awnings can be a great addition to your motorhome, providing shade and protection from the elements. However, like any part of your RV, awnings can experience damage over time. Understanding the common causes of damage can help you avoid costly repairs and keep your awning in good condition for years to come.
One of the main causes of damage to RV awnings is excessive wind. Awning fabric is designed to be lightweight and flexible, but strong winds can put too much stress on the material, causing tears or even complete detachment from the RV. Another common cause of damage is improper use or installation.
For example, retracting the awning before it is fully dry can lead to mold and mildew growth, which can weaken the fabric over time. Additionally, using the awning to hang heavy objects or failing to properly secure it can cause structural damage. Regular maintenance, such as inspecting the awning for signs of wear and tear, cleaning it regularly, and ensuring it is properly rolled up and secured when not in use, can help prevent damage and prolong the life of your RV awning.
Importance of Timely Repairs
RV awnings are a great addition to any recreational vehicle, providing shade and protection from the elements. However, like any part of your RV, awnings can experience wear and tear over time. It’s important to address any damage or issues with your awning in a timely manner to prevent further damage and ensure the longevity of your investment.
A damaged or malfunctioning awning not only looks unsightly but can also pose safety risks. For example, a torn awning fabric may not provide adequate shade or protection, leaving you vulnerable to the sun’s harmful rays or sudden rain showers. Additionally, a faulty awning mechanism can be a safety hazard, potentially causing injury to you or your loved ones.
By addressing any repairs or issues with your RV awning promptly, you can avoid these risks and ensure that your awning is functioning properly for all your outdoor adventures.
Assessing the Damage
If your RV awning fabric has been damaged, don’t worry! There are steps you can take to repair it and get it looking like new again. The first thing you’ll want to do is assess the damage. Look for any tears, holes, or fraying in the fabric.
Once you’ve identified the areas that need repair, you’ll need to gather some supplies. You’ll want to have a repair kit specifically designed for awning fabric, which typically includes patching material and adhesive. The next step is to clean the damaged area.
Use a mild detergent and a soft brush to gently scrub away any dirt or debris. Once the area is clean and dry, you can begin the repair process. Cut a piece of patching material that is slightly larger than the damaged area, and then apply adhesive to the back of the patch.
Press the patch firmly onto the damaged area, making sure that all edges are securely attached. Allow the adhesive to dry completely before using the awning again.
Identifying the Type of Damage
assessing the damage, identifying the type of damage, types of damage When it comes to assessing the damage on your property, it’s important to take a closer look and identify the type of damage that has occurred. This will help you determine the necessary steps for repairs and ensure that the right professionals are involved. There are several types of damage that can occur, ranging from water damage and fire damage to structural damage and mold growth.
Each type of damage requires a different approach and expertise to resolve. By properly assessing the damage, you can make informed decisions and get your property back to its pre-damaged state.
Checking for Additional Issues
After a natural disaster, it’s important to thoroughly assess the damage to your property. This includes not only the obvious signs of destruction but also checking for any additional issues that may have been caused by the disaster. One such issue is water damage.
Even if your property hasn’t been flooded, there could still be hidden water damage that can lead to further problems down the line. This can include dampness in walls, ceilings, or floors, which can promote the growth of mold and mildew. Another issue to look out for is structural damage.
The force of a natural disaster can weaken the structure of a building, making it more susceptible to collapsing or further damage in the future. It’s important to have a professional assess the structural integrity of your property to ensure it is safe to inhabit. Additionally, it’s important to check for any electrical issues that may have been caused by the disaster.
Exposed wiring or damaged electrical systems can pose a serious safety hazard. It’s essential to have a qualified electrician inspect your property and address any potential electrical problems. By thoroughly assessing the damage and addressing any additional issues, you can ensure the safety and integrity of your property after a natural disaster.
Determining if DIY Repair is Feasible
DIY Repair, assessing the damage So, you’ve encountered a repair issue in your home, but you’re not quite sure if you can tackle it on your own. Before you grab your tools and jump in headfirst, it’s important to assess the damage and determine if DIY repair is feasible. This will help you avoid potential pitfalls and ensure that you’re making the right decision for your situation.
Assessing the damage is the first step in determining if DIY repair is feasible. Take a close look at the problem and consider its complexity. Is it a small, straightforward issue that you feel confident in fixing, or does it require a more advanced set of skills and tools? Sometimes, what may seem like a simple repair on the surface can turn out to be a much bigger job once you start investigating.
Consider the materials involved in the repair as well. Are they easily accessible and affordable, or will you need speciality items that may be difficult to find? Factor in the cost of materials and any additional tools you may need to purchase, as this can influence the overall feasibility of a DIY repair. Think about your own skill level and experience with home repairs.
Have you successfully completed similar projects in the past, or is this your first attempt at tackling something of this nature? Be honest with yourself about your abilities and whether or not you feel comfortable taking on the repair. Lastly, consider the time and effort you’re willing to invest in the DIY repair. Some projects may require days or even weeks to complete, depending on your availability and the complexity of the task.
If you have a busy schedule or limited free time, it may be more practical to hire a professional who can get the job done faster. By carefully assessing the damage, considering the complexity of the repair, the availability of materials, your own skill level and experience, and the time and effort required, you can make an informed decision about whether DIY repair is feasible. Remember, it’s always better to be safe than sorry, so don’t hesitate to call in the experts if you’re uncertain about your abilities or the scope of the repair.
Preparing for the Repair
If you own an RV, you probably understand the importance of having a functioning awning. It provides shade and protection from the elements, making your outdoor experience much more enjoyable. However, over time, the fabric of your awning may become worn or damaged, requiring repair.
So, how do you repair RV awning fabric? The first step is to assess the extent of the damage. Is it a small tear or a major rip? Once you have determined the size of the problem, you can gather the necessary materials, such as fabric repair tape, a patch kit, and a sturdy ladder. It’s essential to follow the manufacturer’s instructions when using these products and to take safety precautions.
With a little bit of time and effort, you can have your RV awning looking as good as new and ready to provide shade for your next adventure.
Gathering the Necessary Tools and Materials
Preparing for the repair of your device requires gathering the necessary tools and materials. Before you start tearing your device apart, it’s important to make sure you have everything you need to successfully complete the repair. So, what tools and materials should you have on hand? Firstly, you’ll need screwdrivers that are suitable for the type of screws used in your device.
Different devices may require different types of screwdrivers, so it’s a good idea to do some research or consult the device’s manual to determine which screwdrivers you’ll need. Additionally, you may need a pry tool or spudger to help remove parts or disconnect cables without damaging them. Other tools that may come in handy include tweezers, a heat gun or hairdryer for loosening adhesive, and an anti-static wrist strap to protect your device from electrostatic discharge.
In terms of materials, it’s a good idea to have some cleaning solution or isopropyl alcohol on hand to clean any dirty or corroded parts. You may also need replacement parts such as screens, batteries, or buttons, depending on what you’re repairing. By gathering all the necessary tools and materials before you start, you’ll minimize the risk of running into any unexpected obstacles and ensure a smoother repair process.
Choosing the Right Replacement Fabric
When it’s time to replace the fabric on your furniture, it’s important to be prepared for the repair process. First, you’ll need to gather the necessary tools and supplies. This may include a staple gun, fabric scissors, and a sewing machine if you plan to make any alterations to the fabric.
Next, you’ll want to remove the old fabric from your furniture. This can be done by carefully pulling out any staples or nails that are holding it in place. Once the old fabric is removed, you’ll have a better idea of the size and shape of the pieces you’ll need to replace.
Take measurements and make note of any special features or details that need attention. With your measurements in hand, you can begin the process of selecting a replacement fabric. Consider the overall style of your furniture and the level of durability you require.
Are you looking for a soft, luxurious fabric for a cozy chair or a more durable material for a high-traffic sofa? Also, take into account factors such as color, pattern, and texture to ensure the new fabric complements your existing decor. By taking the time to prepare for the repair and choosing the right replacement fabric, you can breathe new life into your furniture and enjoy years of comfort and style.
Clearing the Work Area
Clearing the work area is an essential step in preparing for a repair. Before you start working on your project, it’s important to create a clean and organized space. This not only helps you stay focused but also ensures that you have everything you need within reach.
Start by removing any unnecessary items from the work area. Clear away any clutter, such as tools or materials from previous projects. This will give you a clean slate to work with and prevent any distractions.
Next, gather all the tools and materials you will need for the repair. Lay them out in an organized manner so that you can easily access them when needed. This will save you time and frustration as you won’t have to search for what you need in the middle of a project.
Consider setting up a workbench or table where you can place your tools and materials. This will provide a designated space for your project and keep everything organized. It will also help you maintain a clear work area as you won’t have to worry about items getting mixed up or misplaced.
Lastly, think about the lighting in your work area. Make sure you have adequate lighting to see what you’re doing. This will help prevent accidents and ensure that you can complete the repair with precision.
Consider using a combination of natural and artificial light sources to create the optimal working environment. Taking the time to clear the work area before starting your repair will make the process much smoother and more efficient. By creating a clean and organized space, you’ll be able to stay focused and have everything you need readily available.
Repairing RV Awning Fabric
If you own an RV, one of the most important features is the awning. It provides shade and protection from the elements, making outdoor living more enjoyable. However, over time, the awning fabric can begin to wear and tear, eventually needing repairs.
The good news is that repairing RV awning fabric isn’t as daunting as it may seem. With a few simple steps, you can have your awning looking as good as new. First, start by identifying the areas that need repairing.
Look for any holes, tears, or frayed edges. Once you’ve identified the problem areas, you can begin the repair process. There are a few options for repairing RV awning fabric, depending on the severity of the damage.
For small tears or holes, you can use a patch kit specifically designed for awning fabric. These kits usually include adhesive patches that you can apply directly to the damaged area. Simply clean the area, apply the patch, and allow it to dry before using your awning again.
For larger tears or rips, you may need to replace the entire section of fabric. This can usually be done by removing the damaged section and sewing in a new piece of fabric. Depending on your skill level, this may be a DIY project or something best left to the professionals.
Just remember, when repairing or replacing your RV awning fabric, be sure to take the necessary safety precautions and follow the manufacturer’s instructions carefully. By doing so, you can ensure your awning will provide years of shade and protection for your outdoor adventures.
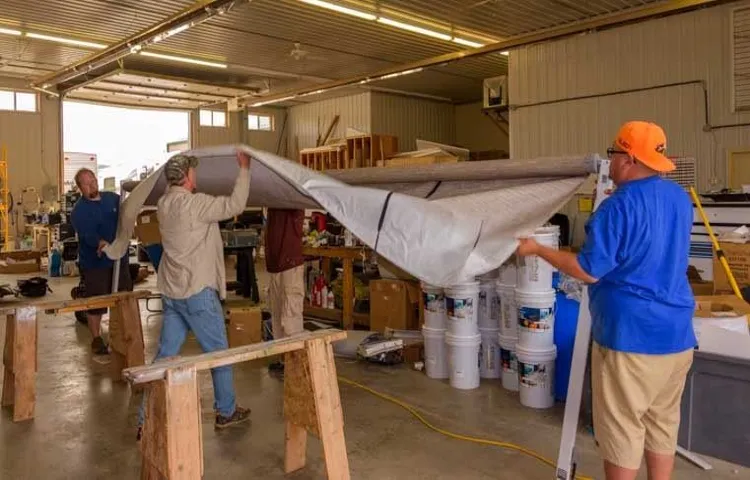
Step 1: Removing the Old Fabric
RV awning repair can be a daunting task, but with the right steps, it can be a relatively simple task. One of the first steps in repairing RV awning fabric is to remove the old fabric. When doing this, it’s important to take your time and be gentle to avoid causing any further damage.
Start by extending the awning fully and securing it in place. Next, locate the screws or rivets that are holding the fabric in place and remove them using a screwdriver or rivet tool. Once all the fasteners are removed, carefully peel away the old fabric from the awning frame.
Take note of how the fabric was attached so you can use this as a guide when installing the new fabric. By taking the time to properly remove the old fabric, you will set yourself up for success in the next steps of the repair process.
Step 2: Cleaning the Awning Frame
RV awnings are a great addition to any motorhome or camper, providing shade and protection from the elements. However, over time, the fabric may become damaged, torn, or just worn out. Luckily, repairing RV awning fabric is a relatively simple process that can be done with a few basic tools and some patience.
The first step in repairing RV awning fabric is to clean the awning frame. Over time, dirt, debris, and other contaminants can build up on the frame, which can cause additional wear and tear on the fabric. To clean the frame, start by removing any loose dirt or debris with a broom or brush.
Next, use a mild detergent and water solution to scrub the frame, paying attention to any particularly dirty or stained areas. Rinse the frame thoroughly with clean water, and allow it to dry completely before proceeding to the next step. Cleaning the awning frame not only improves the overall appearance but also removes any potential sources of further damage to the fabric.
By removing dirt and debris from the frame, you create a clean surface for the fabric to rest on, reducing friction and preventing unnecessary wear and tear. Additionally, cleaning the frame helps to ensure that any repairs or replacements you make to the fabric will adhere properly and last longer. So, take the time to thoroughly clean the awning frame before moving on to the next step in repairing your RV awning fabric.
Your awning will thank you for it!
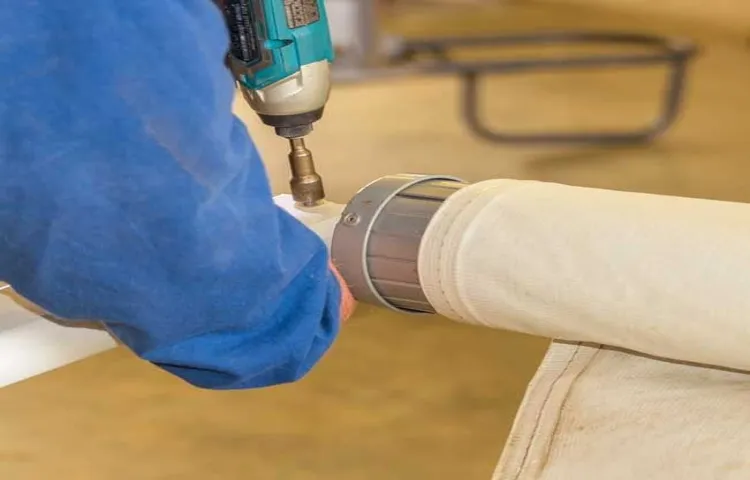
Step 3: Attaching the New Fabric
repair RV awning fabric
Step 4: Adjusting and Stretching the Fabric
Adjusting and stretching the fabric is an important step in repairing RV awning fabric. Once you have cleaned and patched any tears or holes, it’s time to make sure the fabric is properly aligned and tensioned. To do this, start by attaching one end of the fabric to the awning roller and rolling it out completely.
Next, adjust the tension by tightening or loosening the tension knobs or braces on the supporting arms. This will allow you to stretch the fabric just enough to remove any sagging or wrinkles. It’s important not to overstretch the fabric, as this can cause it to become too tight and potentially tear.
Once you have adjusted the tension, secure the fabric to the supporting arms using the provided clips or hooks. Take your time to ensure that the fabric is evenly stretched and aligned along the entire length of the awning. This will not only improve its appearance but also help to prevent any further damage from occurring.
Step 5: Securing the Fabric in Place
RV awning fabric repair can be a straightforward process if you follow the right steps. One important step in securing the fabric in place is ensuring that it is properly aligned. To do this, you’ll want to make sure that the fabric is centered and lined up with the awning arms.
This will help prevent any future sagging or tearing. Once the fabric is aligned, you can use a rope or bungee cords to secure it to the awning arms. These can be tied or attached with clips or hooks.
However, keep in mind that the method of attachment may vary depending on the type of awning you have. It’s important to check the manufacturer’s instructions for the recommended method of securing the fabric. By taking proper care of your RV awning fabric, you can ensure its longevity and prevent any future damage.
Additional Tips for Successful Repairs
Repairing the fabric on your RV awning can be a daunting task, but with a few additional tips, you can ensure a successful repair. Firstly, before attempting any repairs, it’s important to thoroughly clean the fabric to remove any dirt or debris that may prevent adhesives from sticking properly. Once the fabric is clean, make sure to choose the right type of adhesive for your specific awning fabric.
Some adhesives are better suited for vinyl fabrics, while others work best with canvas. It’s also a good idea to reinforce the damaged area with a patch to provide extra durability. This can be done by using a piece of fabric that matches the awning and gluing it over the damaged area.
Finally, always follow the instructions provided by the adhesive manufacturer and allow ample time for the adhesive to dry before using the awning. By following these additional tips, you can ensure a successful repair that will extend the life of your RV awning.
Sealing and Waterproofing the Awning
Sealing and waterproofing the awning is an important step in maintaining the functionality and durability of your outdoor space. While it may seem like a daunting task, there are a few additional tips that can help make your repairs successful. Firstly, it’s important to thoroughly clean the awning before applying any sealant or waterproofing product.
This will remove any dirt, debris, or mildew that may have accumulated over time. Use a mild detergent and a soft-bristled brush to gently scrub the surface and rinse it off with water. Allow the awning to dry completely before moving on to the next step.
Next, choose a high-quality sealant or waterproofing product that is specifically designed for awnings. There are many different options available, so be sure to read the instructions and choose one that is suitable for your awning material. Apply the product according to the manufacturer’s instructions, making sure to cover the entire surface of the awning.
In addition to sealant or waterproofing products, consider using a patch kit to repair any tears or holes in the fabric. These kits typically include adhesive patches that can be applied to the damaged area. Make sure to clean the damaged area and allow it to dry before applying the patch.
Follow the instructions on the kit for best results. Finally, regularly inspect your awning for any signs of damage or wear. This will help you catch any issues early on and prevent further damage.
Pay attention to areas where the fabric may be pulling away from the frame or where the stitching may be coming undone. Promptly repair any damage to ensure the longevity of your awning. Overall, sealing and waterproofing your awning doesn’t have to be a complicated task.
Regular Maintenance and Inspection
Regular maintenance and inspection are crucial for any type of repair work, whether it’s a car, a home, or even a computer. In order to ensure successful repairs, there are some additional tips to keep in mind. First and foremost, it’s important to have a clear understanding of the problem.
This means taking the time to inspect the item thoroughly and identifying any potential issues. It’s also a good idea to do some research and gather as much information as possible about the repair process. This will help you make the best decisions when it comes to purchasing any necessary parts or tools.
Additionally, it’s important to take your time and not rush through the repair process. This will allow for a more thorough and precise repair job, increasing the chances of success. Finally, don’t be afraid to ask for help if you need it.
Whether it’s consulting a professional or reaching out to a knowledgeable friend, getting a second opinion can be invaluable in ensuring a successful repair. By following these additional tips, you can greatly increase your chances of successfully completing any repairs you may encounter.
Seeking Professional Help if Needed
seeking professional help, successful repairs Seeking professional help if needed is crucial for successful repairs. While DIY repairs can be satisfying and may save you money, it’s essential to know when it’s time to call in the experts. If you encounter a problem that is beyond your skills or requires specialized knowledge and tools, it’s best to leave it to the professionals.
They have the necessary expertise and experience to handle complex repairs efficiently and effectively. Hiring a professional not only ensures that the repair is done correctly but also minimizes the risk of further damage or problems down the line. So, don’t hesitate to reach out to a professional if you’re not confident in your abilities or if the repair is beyond your scope.
It’s better to be safe than sorry and end up spending more money and time trying to fix it yourself.
Conclusion
In conclusion, repairing RV awning fabric is a task that requires both patience and know-how. Just like a master seamstress serenading a broken zipper, we must delicately weave our way through the fabric of the problem, thread by thread, until it is seamlessly restored. Armed with a needle and thread as our trusty tools of the trade, we navigate through the intricate web of tears and frays, stitching together a tapestry of renewal.
It’s a dance of precision and artistry, where we tango with the elements and waltz with the wind, all in order to restore the beauty and functionality of our beloved RV awning. So, fear not fellow adventurers, for with a little ingenuity and a touch of panache, you too can conquer the unruly fabric and wield the power to repair. Happy mending and may your awning always be a stylish shade in the dazzling camping symphony of life.
“
Enjoying Your RV Awning for Years to Come
RV awnings are a great addition to your vehicle that allows you to enjoy the outdoors while still protecting yourself from the elements. However, like any other part of your RV, awnings can experience wear and tear over time. To ensure that you can continue enjoying your awning for years to come, it’s important to know how to make successful repairs when needed.
Here are some additional tips to help you with your RV awning repairs.
FAQs
Can RV awning fabric be repaired?
Yes, RV awning fabric can be repaired using various methods such as patching or sewing.
What are common causes of RV awning fabric damage?
Common causes of RV awning fabric damage include wind, rain, sun exposure, or accidental tears.
Can I repair the RV awning fabric myself or should I hire a professional?
You can repair the RV awning fabric yourself if you have the necessary skills and tools, but hiring a professional can ensure a more professional and long-lasting repair.
What materials do I need to repair RV awning fabric?
Materials required to repair RV awning fabric may include patching materials, thread, needle, scissors, and adhesive.
How do I patch a tear in RV awning fabric?
To patch a tear in RV awning fabric, clean the area, apply adhesive, and place a patch over the tear. Make sure to smooth out any wrinkles and let it dry completely.
Can I use duct tape to repair RV awning fabric?
While duct tape may provide a temporary fix, it is not a long-term solution for repairing RV awning fabric. It is best to use proper patching materials for a more durable repair.
How often should I inspect my RV awning fabric for damage?
It is recommended to inspect your RV awning fabric at least once a month, or before and after each trip, to ensure any damage is caught early on and can be repaired promptly.