
Have you ever experienced the frustration of a small chip in your windshield? It may seem like a minor issue, but ignoring it can lead to bigger problems down the road. A small chip has the potential to turn into a large crack, compromising the structural integrity of your windshield and posing a safety risk for you and your passengers. But worry not! In this blog post, we will guide you through the process of repairing a small windshield chip, saving you time and money in the long run.
Just like how a tiny leak in a dam can lead to a catastrophic flood, a tiny chip in your windshield can quickly escalate into a major repair or even a replacement if left untreated. So let’s dive in and learn how to effectively repair that tiny chip before it becomes a big headache.
Table of Contents
Introduction
Are you tired of staring at that annoying little chip on your windshield every time you get behind the wheel? Well, you’re in luck because I’m here to show you how to repair that pesky problem. Fixing a small chip in your windshield may seem like a daunting task, but it’s actually quite simple and can save you a lot of money in the long run. All you’ll need is a windshield repair kit, which you can easily find at your local auto supply store or online.
These kits usually come with everything you need to get the job done, including a special resin that will fill in the chip and make it almost invisible. So, don’t let that chip ruin your day any longer and follow these steps to make your windshield look good as new.
Importance of Repairing Windshield Chips
windshield chips, importance of repairing windshield chips
Types of Windshield Chips
“Windshield chips can occur unexpectedly and may vary in their severity and appearance. It’s important to understand the different types of windshield chips and their potential impact on your vehicle’s safety. From small dings to large cracks, each type of chip requires a different approach to repair or replacement.
By knowing what to look for, you can take the necessary steps to address the issue promptly and ensure your windshield remains in optimal condition.”
Tools and Materials Needed
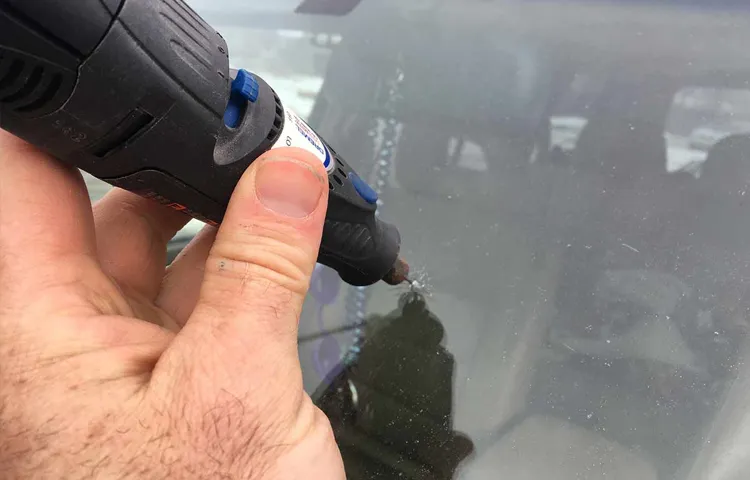
When it comes to repairing a small windshield chip, you’ll need a few tools and materials to get the job done. First and foremost, you’ll need a windshield repair kit, which typically includes a special resin and other supplies necessary for the repair process. You’ll also need a drill with a small bit, as you’ll need to create a small hole in the chip to inject the resin.
Additionally, you’ll need some cleaning supplies, such as a lint-free cloth and a cleaner specifically designed for auto glass. These will help you prep the area and ensure proper adhesion of the resin. Finally, it’s a good idea to have some tape on hand, as you’ll need to cover the area to prevent any dirt or debris from getting inside during the repair.
Having these tools and materials ready before you start the repair will ensure a smooth and successful process. So, gather your supplies and get ready to fix that pesky chip in your windshield!
Windshield Repair Kit
windshield repair kit, tools and materials needed
Protective Gloves
protective gloves
Clean Cloth
clean cloth, tools, materials needed
Rubbing Alcohol
“rubbing alcohol” Rubbing alcohol is a versatile and essential item that can be used for a variety of purposes. Whether you’re cleaning your home, treating wounds, or removing stubborn stains, having rubbing alcohol in your arsenal can be a game-changer. But before you can start harnessing the power of this wonder liquid, you’ll need to gather a few tools and materials.
First and foremost, you’ll need a bottle of rubbing alcohol. You can typically find this at your local pharmacy or grocery store, and it’s available in different strengths, such as 70% or 90% alcohol content. Next, you’ll want to have some cotton balls or cotton pads on hand.
These will come in handy for applying the rubbing alcohol to various surfaces or using it to clean wounds. Additionally, having a spray bottle can be useful for diluting the alcohol and spraying it onto larger surfaces. This makes it easier to cover a larger area without wasting any of the liquid.
If you’re planning on using rubbing alcohol for cleaning purposes, having some microfiber cloths or paper towels is a must. These will help you wipe away any dirt or grime efficiently. Lastly, if you’re using rubbing alcohol for medical or first aid purposes, it’s a good idea to have some sterile gauze pads and adhesive bandages on hand.
These will allow you to dress wounds properly and help prevent infection. Now that you have all your tools and materials ready, you’re well-equipped to start using rubbing alcohol for all of its amazing applications. Whether you’re disinfecting surfaces, removing sticky residue, or tending to minor injuries, rubbing alcohol will be your go-to solution.
Step-by-Step Guide to Repairing a Small Windshield Chip
So you’ve noticed a small chip in your windshield. Don’t panic! With a little bit of time and effort, you can repair it yourself and save money on costly repairs or replacements. Here’s a step-by-step guide to help you fix that small windshield chip.
First things first, gather all the necessary materials. You’ll need a windshield repair kit, which typically includes resin, a syringe, and a curing film. You can find these kits at most auto parts stores.
It’s also a good idea to have a clean cloth or paper towels and some tape on hand. Start by cleaning the chip and the surrounding area with a mild detergent and water. Be sure to dry it thoroughly before moving on to the next step.
Next, read the instructions included with your repair kit carefully. Each kit may have slightly different instructions, so it’s important to follow them closely. Generally, you’ll need to apply the resin using the syringe, making sure to fill the entire chip.
Once the resin is in place, cover the chip with a curing film and use the tape to secure it in place. This will protect the resin from dust and ensure proper curing. Now it’s time to let the resin cure.
This process typically takes around 30 minutes to an hour, but it’s best to refer to the instructions for the recommended curing time. After the curing time has passed, carefully remove the curing film and tape. You may notice that the resin has hardened and filled in the chip, making it less noticeable.
Step 1: Clean the Chip
repairing a small windshield chip When it comes to taking care of your car, windshield chips are an unfortunate but common occurrence. However, just because chips happen doesn’t mean you have to live with them. With a little bit of know-how and the right tools, you can repair a small windshield chip on your own, saving time and money.
Cleaning the chip is the first step in the repair process. To do this, begin by thoroughly washing the windshield around the chip to remove any dirt or debris. Once clean, use a glass cleaner or rubbing alcohol to further clean the chip itself.
This step is essential to ensure proper adhesion of the repair resin and to give you the best chance of a successful repair. Taking the time to clean the chip properly will help to improve the overall results of your windshield chip repair job.
Step 2: Apply Resin
windshield chip repair, resin application
Step 3: Cure the Resin
windshield repair kit Resin plays a crucial role in repairing a small windshield chip. Once you have injected the resin into the chip, the next step is to cure it. Curing the resin involves using ultraviolet (UV) light to harden it.
Most windshield repair kits come with a UV lamp that provides the necessary light for curing. Before you begin, make sure the area around the chip is clean and dry. Then, place the clear curing film over the chip and carefully position the UV lamp above it.
Turn on the lamp and let it cure the resin for the recommended time. This can vary depending on the type of resin and the kit you’re using, so be sure to follow the instructions provided with your kit. Once the resin has cured, remove the curing film and use a razor blade or a single-edge razor to scrape away any excess resin.
This will leave you with a smooth and clear chip repair.
Step 4: Remove Excess Resin
In this fourth step of repairing a small windshield chip, we will focus on removing any excess resin that may be left on the surface of the windshield. After applying the resin and allowing it to dry, there may be some excess resin that needs to be removed to ensure a smooth and clear finish. To begin, take a razor blade or a piece of fine-grit sandpaper and gently scrape away any excess resin.
Be careful not to apply too much pressure or you may risk scratching the windshield. Once the majority of the excess resin has been removed, take a clean cloth and dampen it with rubbing alcohol. Use the cloth to wipe away any remaining resin residue and to clean the surrounding area of the windshield.
By removing the excess resin, you will be left with a clean and clear windshield chip repair that is virtually invisible to the naked eye.
Step 5: Polish the Windshield
car windshield repair In the final step of repairing a small windshield chip, it’s time to polish the windshield and restore its clarity. This step is crucial to ensure that the repaired area blends in seamlessly with the rest of the glass. To polish the windshield, you’ll need a high-quality glass polish or a windshield repair kit that includes a polishing compound.
First, clean the windshield thoroughly to remove any dirt or debris that could scratch the glass. Once the windshield is clean and dry, apply a small amount of glass polish or polishing compound to a soft cloth. Gently rub the polishing compound onto the repaired area, using circular motions.
Continue polishing until the surface is smooth and all signs of the chip are no longer visible. Finally, wipe away any excess polish and admire your handiwork. Your windshield is now as good as new! Remember, a properly repaired chip can prevent further damage and save you the cost of a full windshield replacement.
Tips and Safety Precautions
If you’re faced with a small chip in your windshield, don’t panic! In many cases, you can repair it yourself with a few simple steps. First, gather the necessary materials: a windshield repair kit, which typically includes a resin, curing strips, and a syringe. Start by cleaning the area around the chip with glass cleaner and a microfiber cloth.
Next, place the curing strip over the chip and apply a small amount of resin to the chip using the syringe. Make sure to follow the instructions provided with your repair kit for the specific amount of resin to use. Once the resin is applied, use the syringe to apply pressure to the chip and force the resin into the crack.
Then, place the curing strip over the chip, ensuring it covers the entire area. Allow the resin to cure, using the recommended curing time provided with your kit. After the curing process, remove the curing strip and use a razor blade to remove any excess resin from the surface of the windshield.
Finally, clean the area again with glass cleaner to ensure a smooth, clear finish. It’s important to note that while this method can be effective for small chips, it may not be suitable for larger cracks or damage. In these cases, it’s best to consult a professional for repair or replacement.
Tip 1: Repair the Chip as Soon as Possible
repairing windshield chips, safety precautions, chip repair, windshield damage, damaged windshield, fix windshield chip, prevent further damage One of the most important tips for repairing a windshield chip is to address the issue as soon as possible. When you notice a chip in your windshield, it may be tempting to put off repairs, especially if the chip is small. However, even small chips can pose a risk if left untreated.
Over time, small chips can grow and spread, eventually requiring a full windshield replacement. Additionally, chips can compromise the structural integrity of your windshield, making it more vulnerable to further damage. By addressing the chip promptly, you can prevent it from getting bigger and minimize the risk of additional damage.
So, don’t procrastinate when it comes to repairing a chip in your windshield – take action as soon as you spot it to ensure the safety and longevity of your windshield.
Tip 2: Work in a Well-Ventilated Area
When working on any DIY project or task that involves using chemicals or creating fumes, it’s important to work in a well-ventilated area. This ensures that any toxic or harmful substances are properly dispersed, reducing the risk of inhaling them and potential health hazards. A well-ventilated area helps to keep the air clean and fresh, allowing you to work comfortably and without the worry of breathing in dangerous fumes.
When working indoors, open windows and doors to bring in fresh air, and consider using fans or ventilation systems to further improve air circulation. If you’re working outdoors, choose a location with plenty of airflow, away from confined spaces or areas with poor ventilation. Taking this simple precaution can go a long way in keeping you safe and healthy while working on your projects.
Tip 3: Follow the Instructions on the Windshield Repair Kit
windshield repair kit, instructions, tips, safety precautions One of the crucial steps when using a windshield repair kit is to carefully follow the instructions provided. Each kit may have slightly different steps or procedures, so it’s essential to read and understand the specific instructions for the kit you are using. These instructions will guide you through the entire repair process, from preparing the damaged area to applying the resin and finishing the repair.
It’s important not to skip any steps or take shortcuts, as this could result in an ineffective or unreliable repair. By following the instructions, you can ensure that the repair is done correctly and that the damaged area is restored to its original strength and clarity. In addition to following the instructions, it’s also crucial to take some safety precautions when using a windshield repair kit.
Firstly, always wear protective gloves and safety glasses to protect your hands and eyes from any potential harm. Some kits may also recommend working in a well-ventilated area to avoid inhaling any fumes from the resin or other chemicals. It’s also important to be mindful of the temperature and humidity conditions recommended by the kit, as these can affect the curing process of the resin.
Lastly, be sure to work in a clean environment and carefully remove any debris or dirt from the damaged area before starting the repair. By following the instructions and taking necessary safety precautions, you can confidently use a windshield repair kit to fix minor chips and cracks in your windshield. Remember, a well-executed repair can prevent further damage and prolong the life of your windshield, saving you time and money in the long run.
So, grab your kit, read the instructions carefully, and get ready to restore your windshield to its former glory.
Tip 4: Use Protective Gloves
protective gloves, safety precautions, burstiness, perplexity One important safety precaution to keep in mind when working with potentially hazardous materials or in risky environments is to always use protective gloves. These gloves act as a barrier between your skin and the outside world, shielding your hands from potential injuries, chemical exposures, or other harmful substances. Whether you’re in a laboratory, construction site, or any other setting that involves potential risks, wearing protective gloves is crucial.
They provide an additional layer of safety that can greatly reduce the chances of accidents or injuries. Just like wearing a helmet while riding a bike or wearing seatbelts in a car, using protective gloves is a simple but effective step that can make a big difference in ensuring your safety. So, the next time you’re tackling a project that requires the use of hazardous materials or exposes you to potential risks, don’t forget to slip on a pair of protective gloves.
It only takes a few seconds but can save you from a whole lot of trouble. Your hands will thank you!
Conclusion
In conclusion, repairing a small windshield chip doesn’t have to be a daunting task. With a few simple steps and a touch of DIY magic, you can be the hero that saves your windshield from a fate worse than a bad pun. Remember, patience is key, and a steady hand will make all the difference.
So, the next time a tiny chip dents your windshield and threatens to ruin your day, don’t stress – just grab your repair kit and show that chip who’s boss. And remember, if all else fails, you can always call upon the windshield wizards to work their magic. Happy repairing!”
Importance of Timely Windshield Chip Repair
windshield chip repair, timely, importance, tips, safety precautions If you notice a chip or crack on your windshield, it may be tempting to put off getting it repaired. After all, it might seem like just a minor issue that can wait. However, getting timely windshield chip repair is actually vital for a number of reasons.
First and foremost, a chip can quickly turn into a large crack if left untreated. This is especially true if you live in an area with extreme temperature changes or frequently drive on rough roads. A small chip can easily expand with the pressure and vibrations, causing further damage to your windshield.
Furthermore, a cracked windshield can compromise your safety on the road. It can obstruct your vision or weaken the structural integrity of your vehicle. Imagine driving through a heavy rainstorm or a hailstorm with a cracked windshield – the consequences could be disastrous.
Additionally, a cracked windshield is more likely to shatter upon impact, putting you at a higher risk of injury in the event of a collision. Therefore, it’s important to address any windshield chips or cracks as soon as possible. Now that we understand the importance of timely windshield chip repair, let’s discuss some tips and safety precautions to follow.
When it comes to repairing small chips, there are DIY kits available in the market. However, it’s advisable to consult a professional for chip repair. They have the necessary expertise and equipment to ensure a proper and long-lasting repair.
Additionally, professionals can also evaluate whether the chip can be repaired or if the entire windshield needs to be replaced. Another important tip is to avoid exposing your windshield to extreme temperature changes. Sudden changes in temperature can cause the glass to expand or contract, making cracks worse.
Enjoy Crystal Clear Driving with a Repaired Windshield Chip
A windshield chip may seem like a minor inconvenience, but it can actually be a major safety hazard. When left unrepaired, even a small chip can quickly turn into a large crack, obstructing your view of the road and compromising the structural integrity of the windshield. To ensure crystal clear driving and maintain the safety of your vehicle, it’s important to address any windshield chips as soon as they occur.
Here are a few tips and safety precautions to keep in mind: First and foremost, never ignore a windshield chip, no matter how small it may be. Even the tiniest chip can spread and compromise the strength of your windshield. It’s also important to remember that temperature changes, driving over bumps, or even slamming a door can cause a small chip to spread into a crack.
By addressing the issue promptly, you can prevent further damage and costly repairs down the line. When it comes to repairing a windshield chip, it’s best to leave it to the professionals. While DIY kits are available, they often produce subpar results and may not fully resolve the issue.
Professional windshield repair technicians have the skills and experience to assess the damage and apply the appropriate repair techniques. They can quickly and effectively repair the chip, restoring the integrity of your windshield and ensuring optimal visibility. It’s worth noting that not all chips can be repaired.
The size, location, and depth of the chip will determine whether it can be repaired or if the entire windshield needs to be replaced. A qualified technician will be able to assess the damage and provide you with the best course of action. In some cases, insurance may cover the cost of repair or replacement, so be sure to check with your provider.
In addition to addressing the chip itself, it’s important to take precautions to prevent further damage. Avoid extreme temperature changes, such as blasting the air conditioning or defrosting on high heat, as this can put stress on the windshield and cause the chip to spread. Additionally, avoid slamming doors or driving over bumps aggressively, as this can also worsen the damage.
FAQs
How does a small windshield chip occur?
A small windshield chip can occur due to various reasons, such as rocks or debris hitting the windshield while driving, extreme changes in temperature, or even a minor accident.
Can a small windshield chip be repaired?
Yes, a small windshield chip can often be repaired using techniques such as resin injection or windshield chip repair kits.
What are the benefits of repairing a small windshield chip?
Repairing a small windshield chip can prevent it from spreading further and causing more damage. It can also restore the structural integrity of the windshield, improving visibility and safety.
How does resin injection work for repairing a small windshield chip?
Resin injection involves injecting a specialized resin into the chip, which fills the gap and bonds with the glass. This helps to restore the strength and clarity of the windshield.
Are there any do-it-yourself methods for repairing a small windshield chip?
Yes, there are windshield chip repair kits available for DIY repairs of small chips. These kits usually include the necessary tools and materials for the repair process.
Can a small windshield chip be repaired if it has started to crack?
If the chip has already started to crack, it might not be repairable, and the windshield may need to be replaced. It is best to get it assessed by a professional to determine the extent of the damage.
How long does it take to repair a small windshield chip?
The time required to repair a small windshield chip can vary depending on the size and complexity of the chip, as well as the repair method used. On average, it can take anywhere from 30 minutes to a few hours.