
Spider cracks on windshields can be a real headache for drivers. These pesky little fractures can appear out of nowhere, leaving you wondering how to fix them and whether your windshield is still safe. But fear not, because I’m here to guide you through the process of repairing a spider crack windshield.
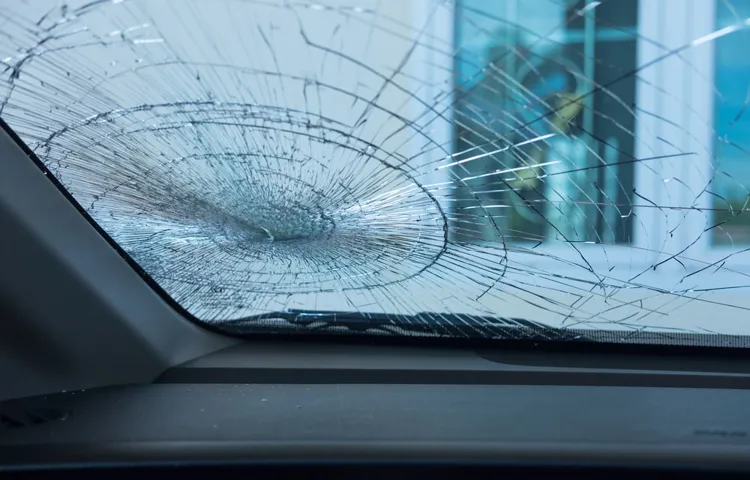
First of all, let’s talk about what exactly a spider crack is. Unlike a chip or a star crack, which usually result from a single impact, spider cracks are a network of small cracks that spread out from a central point. They resemble the intricate web of a spider, hence the name.
These cracks can be caused by a number of factors, such as temperature changes, stress from impact, or the natural aging of the glass. So, how can you repair a spider crack windshield? Well, there are a few methods you can try. One popular option is using a windshield repair kit, which usually contains a special resin that can fill in the cracks and prevent them from spreading further.
This method is relatively simple and can be done at home, as long as you follow the instructions carefully. Another option is taking your car to a professional windshield repair shop. These experts have the tools and expertise to tackle even the most complex spider cracks.
They may use techniques such as injecting resin into the cracks or applying a special adhesive to reinforce the glass. While this option may be more expensive, it is often the most effective way to ensure a long-lasting repair. Of course, prevention is always better than cure.
To avoid spider cracks in the first place, make sure to take good care of your windshield. Avoid slamming your car doors, as the vibrations can put stress on the glass. Park your car in shaded areas to protect it from extreme temperature changes.
Table of Contents
Introduction
If you’ve ever found yourself with a spider crack in your windshield, you know how frustrating it can be. These small cracks, which resemble the intricate pattern of a spider web, can be caused by a number of factors such as a flying stone or even changes in temperature. While spider cracks may seem minor at first, they can quickly worsen and spread across your windshield, compromising its integrity and your safety.
However, before rushing to replace your entire windshield, it’s worth exploring some options for repairing the crack. In this blog post, we will explore some tips and tricks on how to repair a spider crack in your windshield, helping you save time and money in the process.
Understanding Spider Cracks
spider cracks

Causes of Spider Cracks
spider cracks Introduction: Spider cracks are a common problem that can occur on various surfaces, including cars, boats, and even home appliances. These small, interconnected cracks resemble the web of a spider, hence the name. They can be unsightly and frustrating to deal with, but understanding the causes of spider cracks can help prevent them from occurring in the first place.
In this article, we will explore some of the primary reasons why spider cracks may appear and provide you with valuable information on how to avoid them. So, if you are tired of dealing with those pesky spider cracks, keep reading to find out more.
Assessing the Damage
The damage caused by a disaster can be devastating, leaving communities in turmoil and individuals struggling to rebuild their lives. Assessing the extent of the damage is a crucial step in the recovery process, as it helps identify the areas that require immediate attention and resources. It involves evaluating the physical infrastructure, such as buildings and roads, as well as the social and economic impacts on the affected population.
By understanding the full scope of the damage, emergency responders, government agencies, and humanitarian organizations can better allocate resources and prioritize assistance to those most in need.
Tools and Materials
If you’ve noticed a spider crack on your windshield, don’t panic! This type of crack, which typically resembles a spider web pattern, can be repaired with the right tools and materials. First, you’ll need a windshield repair kit, which can be purchased at any auto parts store. These kits usually come with a resin that is specifically designed to repair cracks in windshields.
You’ll also need a razor blade or glass scraper to remove any loose glass or debris from the crack. Once you’ve gathered your tools, you can begin the repair process. Start by cleaning the crack with a glass cleaner and a soft cloth.
This will ensure that the resin adheres properly. Next, apply the resin to the crack using the applicator provided in the kit. Make sure to follow the instructions carefully to ensure proper application.
Once the resin is in place, use a curing light, also provided in the kit, to cure the resin. This will harden it and make it virtually invisible. With a little patience and the right tools, you can easily repair a spider crack in your windshield and prevent it from spreading further.
Safety Precautions
safety precautions, tools and materials
Tools Needed
For any project, having the right tools and materials is essential. When it comes to DIY projects or home improvements, having the necessary tools can make the job much easier and more efficient. Some of the basic tools that are often needed include a hammer, screwdriver set, tape measure, level, and pliers.
These tools will help you with a wide variety of tasks, from hanging picture frames to assembling furniture. It’s also important to have safety equipment on hand, such as gloves, safety glasses, and a dust mask, to protect yourself while working. Additionally, depending on the specific project you’re working on, you may need additional tools like a power drill, saw, or paintbrushes.
Having a well-stocked toolbox will save you time and frustration in the long run, allowing you to tackle any project that comes your way. So before you start your next DIY endeavor, make sure you have all the tools and materials you need to get the job done right.
Materials Needed
In order to successfully complete a DIY project, it is important to have the right tools and materials at hand. Depending on the specific project, the tools required can vary greatly. However, there are a few basic tools that every DIY enthusiast should have in their toolbox.
These include a hammer, screwdrivers (both flathead and Phillips), a tape measure, an adjustable wrench, and a utility knife. These tools will come in handy for a wide range of projects, from hanging pictures to assembling furniture. In addition to the necessary tools, it is also important to have the appropriate materials.
This can include anything from wood and nails for building projects, to paint and brushes for a fresh coat of color. It is always a good idea to plan ahead and make a list of the tools and materials needed before starting a project. This way, you can ensure that you have everything you need and avoid any unexpected trips to the hardware store.
Repairing the Spider Crack
If you’re noticing a spider crack on your windshield, don’t panic! While it may look alarming, there are steps you can take to repair it. Spider cracks are a network of small cracks that resemble a spider web, and they usually occur when there is impact or stress on the windshield. To repair a spider crack, you can use a windshield repair kit.
These kits usually contain a resin that can fill in the cracks and prevent them from spreading. First, clean the area around the crack with a glass cleaner and allow it to dry completely. Then, apply the resin to the crack using the tools provided in the kit.
Make sure to follow the instructions carefully and allow the resin to cure. Once it has hardened, you can use a razor blade to carefully remove any excess resin. Remember, while this method can help prevent the crack from spreading, it may not completely eliminate it.
If the crack is large or spreading, it’s best to consult a professional for windshield replacement.
Step 1: Clean the Windshield
“windshield crack repair” If you’ve ever had the misfortune of that dreaded spider crack appearing on your car’s windshield, you know how frustrating it can be. Not only is it unsightly, but it can also impair your vision while driving and compromise the structural integrity of the glass. But don’t panic just yet! With a little bit of know-how and the right tools, you can actually repair that pesky spider crack yourself.
The first step in repairing a spider crack is to clean the windshield thoroughly. This may seem like a simple task, but it’s essential for a successful repair. Any dirt or debris on the surface of the glass can interfere with the adhesive used to seal the crack.
Start by washing the windshield with a mild soap and water solution, being sure to scrub away any grime or smudges. Then, use a glass cleaner and a lint-free cloth to remove any remaining streaks or residue. Make sure the windshield is completely dry before moving on to the next step.
Cleaning the windshield not only ensures that the adhesive will adhere properly, but it also allows you to get a clear view of the crack. This is important because a spider crack can have multiple branches, and it’s crucial to identify all of them before proceeding with the repair. By thoroughly cleaning the windshield, you’ll be able to see the crack more clearly and assess the extent of the damage.
So, grab your cleaning supplies and get to work! A clean windshield is the first step toward successfully repairing that annoying spider crack. Once you’ve cleaned the glass and assessed the crack, you’ll be ready to move on to the next step in the repair process. Stay tuned for our next blog post, where we’ll cover the next steps in detail.
You’ll be amazed at how easy it is to fix that spider crack and restore your windshield to its former glory.
Step 2: Prepare the Crack
spider crack repair, preparing the crack
Step 3: Applying the Resin
resin for spider crack repair, repairing spider cracks, how to fix a spider crack, applying resin to fix spider cracks When it comes to repairing a spider crack, applying resin is often the most effective solution. Spider cracks are small, intricate cracks that resemble a spiderweb, and they can occur in a variety of materials such as glass, fiberglass, and plastic. These cracks can be unsightly and potentially compromise the integrity of the object.
However, with the right materials and technique, you can easily restore the object to its original condition. To begin the process, you will need a few essential tools: a resin repair kit, which typically includes resin, hardener, and any necessary applicators or supplies, as well as a clean, dry surface to work on. Start by carefully examining the spider crack, noting any areas that may require additional attention.
It’s important to clean the crack thoroughly, removing any debris or loose fragments that may interfere with the bonding process. Next, prepare your resin by carefully following the instructions provided with the repair kit. The resin and hardener are typically mixed together in a specific ratio and then applied to the crack.
Depending on the size of the crack, you may need to use a small brush or applicator to carefully spread the resin over the affected area. It’s important to apply enough resin to fill the crack completely but not so much that it overflows or creates a mess. Once the resin has been applied, you will need to wait for it to cure.
The curing time will vary depending on the specific product you are using, so be sure to refer to the instructions for guidance. During this time, it’s important to keep the object in a safe and secure location, away from any potential disturbances or movement that could disrupt the curing process. After the resin has cured, you can carefully inspect the repaired area.
In most cases, the spider crack should be significantly improved, if not completely gone. However, if there are any remaining imperfections or areas that require additional attention, you may need to repeat the process, applying additional layers of resin as needed. Overall, applying resin to repair a spider crack is a straightforward process that can yield excellent results.
Step 4: Curing the Resin
resin curing process, spider crack repair, repairing cracked windshield Now that we’ve successfully injected the resin into the spider crack, it’s time to move on to the next step: curing the resin. This is a crucial part of the repair process because it ensures that the resin hardens and forms a strong bond with the glass. So, how exactly do we cure the resin? The first thing you’ll need is a curing light.
This specialized tool emits ultraviolet (UV) light, which helps to speed up the curing process. Simply place the curing light over the repaired area and turn it on. Make sure to follow the manufacturer’s instructions on how long to cure the resin for.
Typically, it takes about 5 to 10 minutes for the resin to fully cure. During the curing process, the resin will go through a chemical reaction that transforms it from a liquid to a solid. This is what creates the strong bond between the resin and the glass, effectively repairing the spider crack.
The UV light helps to catalyze this reaction and ensure that it happens in a timely manner. It’s important to note that curing times may vary depending on factors such as the type of resin used and the temperature and humidity in your environment. If you’re unsure about how long to cure the resin for, it’s best to consult the instructions provided by the resin manufacturer or seek professional advice.
Once the resin has cured, you can remove the curing light and inspect the repaired area. If done correctly, the spider crack should now be virtually invisible or significantly reduced in appearance. However, keep in mind that some cracks may still be slightly visible, especially if they were extensive or severe.
In such cases, additional layers of resin may be needed to further improve the repair. In conclusion, curing the resin is a crucial step in repairing a spider crack on a windshield. By using a curing light, you can speed up the resin’s curing process and ensure a strong bond with the glass.
Step 5: Removing Excess Resin
windshield repair, spider crack, excess resin, repair process Now that you have filled the spider crack in your windshield with resin and allowed it to cure, it’s time to move on to the next step: removing any excess resin. This is an important step in the repair process that will ensure a smooth and seamless finish. To begin, you’ll want to take a look at the area where the crack was filled.
You may notice that there is some dried resin on the surface of the windshield around the crack. This excess resin can be unsightly and can potentially interfere with the clarity of your windshield. To remove the excess resin, you’ll need a razor blade or a similar tool with a sharp edge.
Gently slide the razor blade across the surface of the windshield, being careful not to apply too much pressure. The goal here is to scrape off the excess resin without scratching the windshield. As you scrape, you may notice that the resin is coming off in small flakes.
This is completely normal, and it’s a sign that the resin is being removed effectively. Continue scraping until all of the excess resin has been removed. Once you have finished scraping, take a close look at the area and make sure that all of the excess resin has been removed.
If you notice any remaining resin, you can repeat the scraping process until the windshield is clean and free of any excess material. After you have removed all of the excess resin, take a moment to clean the windshield. Use a glass cleaner and a soft, lint-free cloth to wipe away any residue or smudges.
This will help to restore the clarity of your windshield and ensure that the repair is virtually invisible. By removing the excess resin from the spider crack in your windshield, you are taking an important step towards a successful repair. Not only will this step improve the appearance of your windshield, but it will also help to ensure that the repaired area is strong and durable.
Preventing Future Cracks
If you’ve ever had a spider crack on your windshield, you know how frustrating it can be. These small cracks can quickly spread and become a bigger problem if not addressed promptly. But don’t worry, there are a few ways to prevent future cracks and keep your windshield in good condition.
First, be mindful of where you park your car. Parking in shaded areas can help protect your windshield from direct sunlight, which can cause stress and lead to cracks. Additionally, avoid slamming your car doors and trunk as the impact can transfer to your windshield and create cracks.
Lastly, maintain a safe distance from other vehicles on the road, as flying debris from their tires can also cause damage. By taking these preventative measures, you can reduce the risk of spider cracks and keep your windshield looking clear and crack-free.
Tips for Windshield Maintenance
One of the most important aspects of windshield maintenance is preventing future cracks. No one wants to deal with a cracked windshield, as it can be both costly and dangerous. When it comes to preventing cracks, there are a few key tips to keep in mind.
First and foremost, always keep your windshield clean. Dirt and debris can weaken the glass, making it more susceptible to cracks. Regularly cleaning your windshield with a mild detergent and water can help to remove any grime or dirt that could potentially cause damage.
Additionally, be mindful of the temperature. Extreme cold or heat can cause your windshield to expand or contract, increasing the risk of cracks. If you live in an area with extreme weather conditions, consider parking in a garage or shaded area to minimize exposure to these temperature changes.
Finally, be cautious when driving on gravel or uneven roads, as flying rocks or debris can easily cause cracks in your windshield. By following these simple tips, you can help to maintain the integrity of your windshield and prevent future cracks.
Using Windshield Covers
windshield covers, preventing future cracks
Avoiding Extreme Temperatures
When it comes to preventing future cracks in your home, one important factor to consider is avoiding extreme temperatures. Drastic changes in temperature can cause materials to expand and contract, leading to cracks and other structural damage. So how can you protect your home from the effects of extreme temperatures? One solution is to ensure proper insulation and ventilation.
This will help regulate the temperature inside your home and minimize the impact of external temperature changes. Another tip is to be mindful of temperature fluctuations during the construction or renovation process. Rapid changes in temperature can put added stress on materials and increase the risk of cracks.
By taking these precautions, you can help ensure the long-term stability and durability of your home, and avoid costly repairs in the future. So, let’s keep our homes safe from extreme temperatures and keep cracks at bay!
Conclusion
In conclusion, repairing a spider crack in your windshield is not rocket science but it does require a little bit of know-how and some patience. Just like tackling any DIY project, it’s all about having the right tools for the job and following the steps carefully. Your windshield might be feeling a little vulnerable right now, like a damsel in distress, but fear not! With a little bit of time and effort, you can transform that spider crack into a distant memory.
So grab your superhero cape and get ready to rescue your windshield from the clutches of despair. Remember, a repaired windshield not only keeps you safe on the road, but it also shows those pesky spiders who’s boss! So go forth, my fellow fixers, and let’s put those spider cracks in their place – the rearview mirror of history!”
FAQs
What causes spider cracks in a windshield?
Spider cracks in a windshield are typically caused by a combination of factors, including temperature changes, stress, and impact damage.
Can spider cracks in a windshield be repaired?
Yes, spider cracks in a windshield can often be repaired. However, the extent and severity of the damage will determine whether a repair is possible or if a windshield replacement is necessary.
How much does it cost to repair spider cracks in a windshield?
The cost of repairing spider cracks in a windshield can vary depending on the size and location of the cracks, as well as the type of vehicle. On average, the cost can range from $50 to $150 for a repair.
Is it safe to drive with spider cracks in a windshield?
While spider cracks may not immediately impair your visibility, they can weaken the structural integrity of the windshield. It’s recommended to have them repaired as soon as possible to ensure your safety on the road.
How long does it take to repair spider cracks in a windshield?
The time required to repair spider cracks in a windshield can vary depending on the extent of the damage and the repair method used. In most cases, repairs can be completed within an hour or two.
Can I repair spider cracks in a windshield myself?
There are DIY repair kits available for small spider cracks, but it’s recommended to have a professional assess the damage and perform the repair. They have the expertise and specialized tools to ensure a proper repair.
Will insurance cover the repair of spider cracks in a windshield?
Whether insurance will cover the repair of spider cracks in a windshield depends on your specific policy and deductible. It’s best to contact your insurance provider to understand your coverage options.
Can spider cracks spread and worsen over time? A8. Yes, spider cracks have the potential to spread and worsen over time, especially if they are not repaired promptly. Factors such as temperature changes and vibrations from driving can contribute to their progression.
How can I prevent spider cracks in my windshield?
To help prevent spider cracks in your windshield, it’s important to avoid driving too closely to other vehicles, especially larger ones that can cause debris to fly up. You should also try to park in shaded areas to minimize the impact of extreme temperature changes.
Are spider cracks in a windshield a sign of a more significant problem?
Spider cracks in a windshield are often the result of isolated incidents, such as impact damage. However, they can also indicate an underlying issue with the structural integrity of the windshield. It’s best to have a professional inspect the windshield to determine the cause.