
Hey there! Have you recently noticed a stone chip in your windshield? Don’t panic, because I’ve got you covered! It’s not uncommon for small rocks or debris to hit your windshield while driving, causing those annoying little chips. While they may seem like a minor issue, ignoring them can lead to much bigger problems down the road (pun intended!). Think of your windshield as a shield against the elements, protecting you from wind, rain, and other hazards.
Just like any other shield, it can get weakened and compromised over time. That’s why it’s crucial to address those stone chips as soon as possible to prevent further damage. But how exactly do you go about repairing a stone chip in your windshield? Well, you’re in the right place! In this blog post, we’re going to walk you through the step-by-step process of repairing a stone chip all by yourself, saving you time and money.
We’ll start by explaining why it’s important to fix stone chips promptly, as they can quickly escalate into cracks that require a complete windshield replacement. Then, we’ll guide you through the necessary materials you’ll need for the repair, such as a windshield repair kit and some basic tools you probably have lying around. Next, we’ll delve into the actual repair process, breaking it down into simple and easy-to-follow steps.
From cleaning the chip and applying the resin to curing it with UV light and leveling the surface, we’ll cover it all. Along the way, we’ll provide handy tips and tricks to ensure that your repair job looks as good as new. We understand that not everyone is a DIY enthusiast, so we’ll also discuss cases where professional help might be the better option.
After all, safety always comes first, and sometimes a trained professional might be better equipped to handle certain chip repairs. By the end of this blog post, you’ll feel confident tackling that stone chip in your windshield head-on, armed with the knowledge and tools necessary to get the job done. So, stay tuned for our upcoming blog posts, where we’ll dive into each step in detail.
Say goodbye to those unsightly chips and hello to a pristine windshield once again!
Table of Contents
Introduction
So you’re driving down the road, minding your own business, when suddenly a stone from a passing vehicle smacks right into your windshield, leaving behind an annoying little chip. It may seem like a minor issue at first, but leaving that stone chip unattended can lead to bigger problems down the line. Luckily, there are ways to repair that chip without having to replace the entire windshield.
In this article, we’ll walk you through the steps on how to repair a stone chip in your windshield, saving you time and money in the process.
What Causes Stone Chips in Windshields
stone chips, windshield damage, causes of stone chips
Why You Should Repair Stone Chips Right Away
“Why You Should Repair Stone Chips Right Away” Introduction: We’ve all been there – driving down the road, minding our own business, when a stone suddenly flies up and chips our windshield or paint. It’s frustrating, but it’s also tempting to just ignore it and carry on with our day. After all, it’s just a small chip, right? Wrong.
Neglecting to repair stone chips can have serious consequences for both the appearance and integrity of your vehicle. In this blog post, we’ll explore why it’s important to repair stone chips right away and how it can save you from bigger headaches down the road. So buckle up and let’s dive in!
Materials You Will Need
Repairing a stone chip in your windshield may seem like a daunting task, but with the right materials, it can be done easily and effectively. Here are the materials you will need to repair a stone chip in your windshield: a windshield repair kit, which typically includes a resin, an injector, and a curing film; a drill with a small drill bit; a can of compressed air; a razor blade or utility knife; and a clean cloth or paper towels. With these materials on hand, you’ll be able to tackle that unsightly chip in your windshield and restore its clarity and strength in no time.
Glass Repair Kit
Glass repair kits are a handy tool to have when you need to fix a crack or chip in your glass. But before you can start repairing your glass, you will need to gather a few materials. The first thing you will need is the repair resin.
This is the substance that will fill in the cracks and hold the glass together. You will also need a syringe or applicator to apply the resin onto the cracked area. This will allow you to have more control over the amount of resin you use and ensure that it is evenly spread throughout the crack.
Additionally, you will need a UV light or sunlight to cure the resin and make it harden. This light source will activate the chemicals in the resin and transform it from a liquid to a solid. Finally, you may also need a razor blade or a drilling tool to smooth out the surface of the repaired glass and remove any excess resin.
By gathering these materials before you begin, you can ensure that you have everything you need to successfully repair your glass. So, the next time you have a crack or chip in your glass, don’t panic! Just gather your glass repair kit and get ready to fix it up.
Protective Gloves
“Protective Gloves: Materials You Will Need for DIY Projects” When it comes to DIY projects, it’s important to prioritize safety, and that starts with protecting your hands. One of the best ways to do that is by using protective gloves. But with so many different materials to choose from, which ones should you use? Let’s take a look at some of the most common materials you will need when it comes to protective gloves.
Firstly, latex gloves are a popular choice for many DIY enthusiasts. These gloves are made from natural rubber, providing a high level of flexibility and dexterity. They are also resistant to a wide range of chemicals, making them ideal for tasks that involve handling liquids or substances.
If you have a latex allergy or prefer a more eco-friendly option, nitrile gloves are a great alternative. These gloves are made from a synthetic rubber that is resistant to punctures and tears, providing excellent protection against chemicals and abrasive materials. They are also more durable than latex gloves, making them suitable for longer and more intensive DIY projects.
For tasks that require a higher level of tactile sensitivity, such as intricate woodworking or electrical work, consider using vinyl gloves. Made from PVC (polyvinyl chloride), these gloves provide a snug fit and allow for more precise movements. While they may not provide as much protection as latex or nitrile gloves, they are still a good option for lighter DIY tasks.
Lastly, for heavy-duty projects that involve sharp tools or intense heat, leather gloves are the way to go. These gloves are made from a durable material that offers excellent resistance against cuts, abrasions, and punctures. They also provide insulation against heat, making them ideal for welding or working with hot objects.
In conclusion, choosing the right materials for your protective gloves is essential for ensuring your safety during DIY projects. Whether you opt for latex, nitrile, vinyl, or leather gloves, each material has its own advantages and is suited for different tasks. So make sure to consider the specific requirements of your project and select the appropriate gloves to keep your hands well protected.
Safety Glasses
Safety glasses are an essential piece of protective equipment that is designed to keep your eyes safe from potential hazards. When working on projects that involve chemicals, flying debris, or intense light, it is crucial to wear safety glasses to prevent any potential eye injuries. In order to create a pair of safety glasses, you will need a few key materials.
First and foremost, you will need a pair of impact-resistant lenses. These lenses are typically made from polycarbonate, which is a durable and shatterproof material. Additionally, you will need a frame to hold the lenses in place.
Frames for safety glasses are typically made from materials such as plastic or metal, providing a strong and stable structure. Finally, you will need a set of temple arms and a nose bridge to ensure a comfortable fit. These components are usually made from materials such as rubber or silicone to provide flexibility and cushioning.
By having all of these materials, you can create a pair of safety glasses that will effectively protect your eyes from any potential harm.
Clean Cloth
“clean cloth” Are you tired of using paper towels or disposable wipes to clean up messes? Look no further than a simple, clean cloth! Not only is it a more eco-friendly option, but it’s also more economical in the long run. So, what do you need to get started? Well, first and foremost, you’ll need a high-quality cloth. Opt for microfiber or cotton as they are absorbent and quick-drying.
These materials also work well for both wet and dry cleaning. You can find these cloths at your local grocery store or online. Additionally, having a few different sizes on hand is helpful for tackling different tasks.
Whether it’s wiping down countertops, cleaning windows, or dusting surfaces, a clean cloth is a versatile tool that can handle it all. So, ditch the disposable options and make the switch to a clean cloth for all your cleaning needs. You’ll be doing your part for the environment while also saving some money along the way.
Step-by-Step Guide
If you have a stone chip in your windshield, don’t panic – repairing it yourself is easier than you might think. Here’s a step-by-step guide on how to repair a stone chip in your windshield. First, gather the necessary supplies.
You’ll need a windshield repair kit, which typically includes a resin, an applicator, and a curing film. You’ll also need a clean cloth and some transparent tape. Once you have your supplies ready, start by cleaning the chip and the surrounding area.
Use a glass cleaner and a cloth to remove any dirt or debris. This will ensure that the resin adheres properly to the glass. Next, apply the resin to the chip.
Most windshield repair kits come with a special applicator that makes this step easy. Simply place the applicator over the chip and squeeze the resin into it. Make sure to fill the chip completely, but avoid overfilling.
After the resin is applied, cover it with a curing film. This film helps the resin to cure and harden, so it’s important not to skip this step. Place the film over the chip and use transparent tape to hold it in place.
Now, it’s time to let the resin cure. The curing time can vary depending on the brand and type of resin you’re using, so be sure to check the instructions on your kit. Generally, it takes around 30 minutes to an hour for the resin to fully cure.
1. Clean the Windshield
clean windshield, Step-by-Step Guide
2. Prepare the Glass Repair Kit
glass repair kit
3. Fill the Stone Chip
fill stone chip, stone chip repair, step-by-step guide, fix stone chip, how to repair a stone chip So you’ve noticed a stone chip on your car’s windshield, and you’re wondering how to fix it. Well, don’t worry, because I’m here to guide you through the process step-by-step. The first thing you’ll need is a stone chip repair kit, which you can easily find at any auto parts store.
These kits usually include a resin, a syringe, and some curing strips. Once you have your kit, start by cleaning the chip and the surrounding area with a glass cleaner. This will ensure that there’s no dirt or debris interfering with the repair process.
Next, attach the syringe to the resin and carefully inject it into the chip. Make sure you fill the chip completely, but be careful not to overfill it. Once the chip is filled, cover it with one of the curing strips provided in the kit.
These strips help protect the resin from UV rays and allow it to cure properly. Leave the strip on for the recommended amount of time specified in the kit’s instructions. After the curing time is up, carefully remove the strip and use a razor blade to remove any excess resin.
Finally, clean the area again with glass cleaner to remove any residue. And voila! Your stone chip is now repaired, and your windshield is as good as new.
4. Cure the Resin
After completing the resin pour, the next crucial step is to cure the resin. Curing is the process of hardening the resin, allowing it to reach its full strength and durability. While curing can take some time, it is an essential step to ensure the longevity of your resin project.
So, how exactly do you cure resin? Let’s break it down step by step. Step 1: Prepare a clean and dust-free area where you can leave your resin project undisturbed for the curing process. Step 2: If you are using a resin that requires UV light for curing, place your project under a UV lamp or in direct sunlight for the recommended amount of time.
UV curing is usually a faster process compared to other curing methods, but always follow the manufacturer’s instructions for the specific resin you are using. Step 3: If you are curing your resin without UV light, the process may take longer. Start by covering your resin project with a box or plastic container to protect it from dust and debris.
This will also help prevent any potential damage from accidentally touching or moving the project during the curing process. Step 4: Find a suitable location for your resin project to cure. Ideally, it should be a temperature-controlled area with low humidity levels.
Avoid areas with excessive heat or cold, as extreme temperatures can affect the curing process. Step 5: Leave your resin project to cure for the recommended amount of time. This can vary depending on the resin brand, thickness of your project, and curing method.
Some resins may take a few hours to cure, while others may require several days. Step 6: Once your resin project has cured, carefully remove it from the curing area and inspect it for any imperfections. If there are any air bubbles or uneven surfaces, you can sand them down and apply a clear coat or another layer of resin to achieve the desired finish.
5. Finishing Touches
In the final stage of your home renovation project, it’s time to add those finishing touches that will bring everything together and make your space truly shine. One of the first things to consider is the lighting. The right lighting can completely transform a room and set the mood you’re looking for.
Whether you want bright and airy or warm and cozy, choosing the right fixtures and bulbs is key. Next, think about the little details that can make a big impact. This could be anything from adding decorative molding or trim to painting an accent wall.
Don’t forget about the power of accessories, too. A few carefully chosen pieces can really tie a room together and add that personal touch. Finally, take some time to step back and evaluate your space as a whole.
Does everything flow and harmonize? If not, you may want to make a few tweaks here and there. By attending to these finishing touches, you’ll be able to fully enjoy and appreciate the fruits of your labor.
Tips for Successful Repair
Has a small stone chip appeared on your windshield? Don’t panic, repairing it yourself is possible! Here’s a step-by-step guide on how to repair a stone chip in your windshield. Start by cleaning the area around the stone chip.
Use a mild soap and water solution, and gently scrub the area with a soft cloth. This will remove any dirt or debris that may interfere with the repair process.
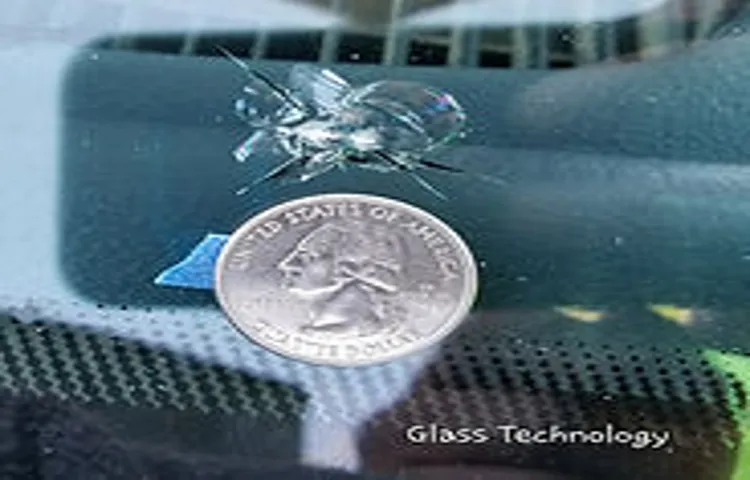
Once the area is clean, assess the size and depth of the chip. If it’s smaller than a quarter and the damage doesn’t extend through the entire windshield, you can proceed with the repair on your own.
Purchase a windshield repair kit from your local auto parts store. These kits usually come with a resin that fills the chip and a syringe-like applicator to apply the resin. Follow the instructions provided with the kit carefully.
Before applying the resin, ensure the area is completely dry. Any moisture can affect the adhesion of the resin.
Apply a small amount of resin to the applicator and carefully fill the chip. Use the applicator to spread the resin evenly over the entire chipped area.
Apply the Repair Kit in a Shaded Area
Applying a repair kit to your damaged item can be a simple and effective solution. However, it’s important to ensure that you apply the repair kit in a shaded area. Why? Well, when you’re working in direct sunlight, the heat can cause the repair kit to dry too quickly, which could impact its effectiveness.
By finding a shaded area, you can allow the repair kit to set at the right pace, ensuring a successful repair. So, whether you’re fixing a crack in your windshield or patching up a hole in your favorite pair of jeans, remember to find a shady spot to apply the repair kit. It may seem like a small detail, but it can make a big difference in the overall outcome of your repair job.
So take a break under a tree or set up a makeshift awning, and give your repair kit the ideal environment it needs to work its magic.
Avoid Touching the Resin with Bare Hands
When it comes to repairing resin-based materials, one of the key tips for success is to avoid touching the resin with bare hands. Resin is a sticky substance that can leave behind oils and residue from your hands, which can interfere with the bonding process. It’s important to wear gloves or use tools to handle the resin to ensure a clean and effective repair.
By keeping your hands off the resin, you can prevent any unwanted substances from contaminating the surface and ensure a smooth and seamless repair. So, next time you’re working with resin, remember to keep your hands clean and avoid any direct contact with the material.
Use a Vacuum Cleaner to Remove Any Loose Glass Pieces
vacuum cleaner, remove glass pieces, successful repair When it comes to repairing broken glass, it’s important to start by removing any loose pieces. One easy and effective method is to use a vacuum cleaner. But before you start vacuuming, make sure to take proper precautions.
First, put on a pair of heavy-duty gloves to protect your hands from any sharp edges. Then, carefully sweep up any large pieces of glass using a broom and dustpan. Once you’ve done that, use the vacuum cleaner to pick up any remaining shards or fragments.
Make sure to use the hose attachment and move slowly and carefully over the affected area. This will help ensure that you remove all the glass, preventing any potential injuries or further damage. Remember, safety is key when dealing with broken glass, so take your time and be thorough in your clean-up process.
Don’t Drive the Vehicle for at Least 1 Hour after the Repair
“Don’t Drive the Vehicle for at Least 1 Hour after the Repair” When it comes to vehicle repairs, timing is everything. After all, you want to ensure that the work done on your car is not only successful but also long-lasting. That’s why one important tip for a successful repair is to avoid driving the vehicle for at least 1 hour after the repair is completed.
You may be eager to hit the road and get back to your daily routine, but it’s crucial to give the repair enough time to settle and fully take effect. Just like a cake needs time to cool before you can frost it, your car needs a little time to “cool down” before you can put it to the test. Driving the vehicle right away can put unnecessary stress on the recently repaired parts, potentially causing more damage or undoing the work that was done.
By giving it at least an hour, you allow the components to settle in and bond properly, ensuring a more successful and long-lasting repair. It’s like letting a pot of soup simmer on the stove to let all the flavors blend together – taking the time to let things settle can make a world of difference. So, when you get your car repaired, remember to be patient and wait at least an hour before hitting the road.
It may seem like a small step, but it can greatly impact the success and longevity of the repair. Take this time to sit back, relax, and let your car have its own little “cooling-off” period. Your patience will be rewarded with a smoother, more reliable ride in the long run.
Conclusion
In the winding road of life, sometimes we encounter a small pebble that tries to leave its mark on our windshield. But fear not, for with a little bit of know-how and a dash of ingenuity, you can repair that stone chip like a true windshield warrior. First, gather your materials: a windshield repair kit, a sunny day, and a can-do attitude.
Now, let’s dive into the depths of this repair process like a deep-sea diver searching for treasure. Step one: clean the chip like a surgeon preparing for surgery. Remove any dirt or debris with a gentle touch, as if caressing the delicate petals of a flower.
A clean surface is the canvas upon which we shall work our magic. Next, apply the magic potion from your windshield repair kit. This concoction has the power to bond together the broken pieces of your windshield, much like the glue that holds our lives together.
Gently massage it into the chip, spreading it with the precision of an artist creating a masterpiece. Now, release your inner magician and summon the power of the sun. Let the golden rays of light work their wonders on your windshield, magically curing the repair solution.
As the minutes pass, you can imagine your stone chip transforming into a distant memory, like a forgotten ex-lover. Finally, when the time is right, wipe away any excess solution, revealing a repaired stone chip that would make even the greatest sculptor shed a tear of awe. You have conquered the chip, turning it into a battle scar that only adds to the charm and character of your windshield.
So, dear reader, let this be a lesson in resilience and resourcefulness. When life throws a pebble your way, do not fret. Embrace the challenge, armed with your trusty windshield repair kit, and transform that chip into a badge of honor.
FAQs
What is a stone chip in a windshield?
A stone chip is a small crack or damage caused by a stone or other debris hitting a windshield.
How does a stone chip happen?
Stone chips typically occur when a stone or other debris is picked up by the tires of a vehicle and thrown against the windshield at high speed.
Why is it important to repair stone chips in a windshield?
It is important to repair stone chips in a windshield because they can quickly worsen and turn into larger cracks, compromising the structural integrity of the windshield and potentially obstructing the driver’s view.
Can I repair a stone chip in my windshield myself?
While there are DIY windshield repair kits available, it is recommended to have a professional repair stone chips in a windshield to ensure it is done properly and to prevent further damage.
How long does it take to repair a stone chip in a windshield?
The time it takes to repair a stone chip in a windshield can vary depending on the size and severity of the chip, but it typically takes around 30 minutes to an hour.
Will my insurance cover the cost of repairing a stone chip in a windshield?
Many insurance policies cover the cost of repairing stone chips in windshields, often with no deductible. It is best to check with your insurance provider to confirm coverage.
What happens if I don’t repair a stone chip in my windshield?
If a stone chip is not repaired, it can quickly spread and turn into a larger crack, compromising the safety of the windshield. Additionally, driving with a damaged windshield may be considered illegal in some areas.
Can a stone chip in a windshield be repaired if it has already started to crack? A8. In some cases, a stone chip that has started to crack can still be repaired. However, the chances of a successful repair decrease as the crack gets longer and more severe, so it is best to have it repaired as soon as possible.
How much does it cost to repair a stone chip in a windshield?
The cost of repairing a stone chip in a windshield can vary depending on factors such as the size of the chip and your location. On average, the cost can range from $50 to $150.
Will a windshield repair completely remove the visibility of a stone chip?
While a windshield repair can greatly reduce the visibility of a stone chip, it may not completely eliminate it. However, it will prevent the chip from spreading and causing further damage.
Can a windshield repair make the chip invisible?
In some cases, a windshield repair can make the chip nearly invisible. However, the visibility of the repair may depend on factors such as the size and location of the chip, as well as the skill of the technician performing the repair.
How long will a windshield repair last?
A properly done windshield repair can last for many years. However, if the area around the repair becomes damaged or if the windshield is subjected to extreme stress or temperature changes, the repair may need to be reevaluated or redone.