
Have you ever been driving down the road, minding your own business, only to hear that dreaded sound of a rock hitting your windshield? It’s an all too common occurrence, and before you know it, you’re left with a chip in your windshield that needs to be repaired. While it may be tempting to take your car to a professional and have them take care of it, did you know that you can actually repair a windshield chip at home? That’s right, with a little bit of know-how and the right tools, you can fix that chip in no time. In this blog, we’ll walk you through the process of repairing a windshield chip at home, step by step.
We’ll cover everything from identifying the type of chip you have, to gathering the right materials, to actually making the repair itself. By the time you’re done reading, you’ll feel confident and empowered to tackle this DIY project on your own. So, if you’re ready to save some money and learn a new skill, let’s get started on repairing that windshield chip!
Table of Contents
Introduction
Have you ever gotten a chip in your windshield and wondered if there was a way to repair it at home? Well, the good news is that you can! Fixing a windshield chip at home is a cost-effective option that can save you time and money. Whether it’s caused by a small rock or a flying piece of debris, a windshield chip can be an annoying eyesore and may even compromise the strength of your windshield. But don’t worry, with a few simple steps, you can repair that chip in no time.
All you need is a windshield repair kit, which can be easily purchased online or at your local auto parts store. These kits usually include everything you need to repair the chip, including a glass repair resin, a curing strip, and a syringe or applicator device. With these tools in hand, you’ll be able to fill in the chip and prevent it from spreading.
So why wait? Grab a repair kit and fix that windshield chip at home today!
Why Repairing a Windshield Chip is Important
Introduction When it comes to maintaining the condition of our vehicles, windshield care often takes a backseat. We may be diligent about keeping our cars clean and performing regular maintenance, but little attention is paid to small chips or cracks on the windshield. However, repairing a windshield chip is not only important for the appearance of our vehicle, but it also plays a crucial role in our safety on the road.
In this blog post, we will explore why repairing a windshield chip is important and the potential consequences of neglecting it. So, let’s dive in and understand why taking action sooner rather than later can save us from bigger problems down the road.
Safety Precautions
“Safety Precautions” Introduction When it comes to our well-being, safety should always be a top priority. Whether we’re at home, work, or out and about, taking precautions to protect ourselves and others is essential. We live in a world where accidents and emergencies can happen unexpectedly, so being prepared is crucial.
This blog section will explore different safety precautions that we can take in various situations to prevent accidents, minimize risks, and ensure a safer environment for everyone. From practicing fire safety at home to staying safe on the road, let’s dive into the world of safety precautions and learn how we can protect ourselves and others.
Tools and Materials Needed
If you have a windshield chip and want to save some money by repairing it yourself at home, you’ll need a few tools and materials to get started. First, you’ll need a windshield repair kit, which typically includes a resin, a bridge or suction cup device, and curing strips. These kits can be found at auto parts stores or online.
You’ll also need a clean cloth or towel for wiping the windshield, a razor blade or scraper to remove any loose glass or debris from the chip, and a pair of gloves to protect your hands during the repair process. Additionally, you may want to have a small flashlight or penlight on hand to help you see the chip more clearly as you work. With these tools and materials, you’ll be well-equipped to repair your windshield chip at home and restore the strength and integrity of your windshield.
List of Required Tools
List of Required Tools: Tools and Materials Needed When it comes to completing a project, having the right tools and materials is essential. Whether you’re a DIY enthusiast or a professional contractor, having the right equipment can make all the difference in the final result. So, what are some of the tools and materials that you’ll need for your next project? First and foremost, a reliable set of hand tools is a must-have.
This includes items such as a hammer, screwdrivers, wrenches, pliers, and a tape measure. These tools will come in handy for a variety of tasks, from putting up shelves to fixing a leaky faucet. Investing in quality tools will save you time and frustration in the long run.
Next, you’ll need power tools for those bigger jobs. A power drill is a versatile tool that can be used for drilling holes and driving screws. A circular saw is essential for cutting lumber and other materials.
If you’re planning on doing any woodworking, a router and a jigsaw are also great tools to have. In addition to hand and power tools, you’ll also need safety equipment. This includes items such as safety goggles, gloves, and a dust mask.
Safety should always be a top priority, so make sure you have the right protective gear for the job. Finally, don’t forget about materials such as nails, screws, and adhesive. These are often overlooked but essential for completing your project.
Make sure you have a variety of sizes and types to fit your needs. In conclusion, having the right tools and materials is crucial for a successful project. Investing in high-quality tools and safety equipment will not only make your job easier but also ensure that you achieve the best results.
List of Required Materials
When it comes to tackling a new project, having the right tools and materials is essential. Whether you’re a seasoned DIYer or just starting out, here is a list of the essential items you’ll need to successfully complete your project. Firstly, you’ll need basic tools like a hammer, screwdrivers in multiple sizes, pliers, and a tape measure.
These tools are versatile and can be used for a wide range of projects. Additionally, it’s a good idea to have a set of power tools on hand. A drill, circular saw, and a sander will make your job much easier and faster.
Next, you’ll need a variety of materials such as nails, screws, and fasteners. It’s important to have different sizes and types on hand to accommodate different surfaces and materials. Another important material is wood.
Whether you’re building furniture or a deck, having a supply of lumber is crucial. Don’t forget about safety equipment! Wearing gloves, goggles, and a dust mask will protect you while working on your project. Finally, having a sturdy workbench or table will provide a stable surface to work on.
With these tools and materials, you’ll be well-equipped to tackle any project that comes your way!
Step-by-Step Guide
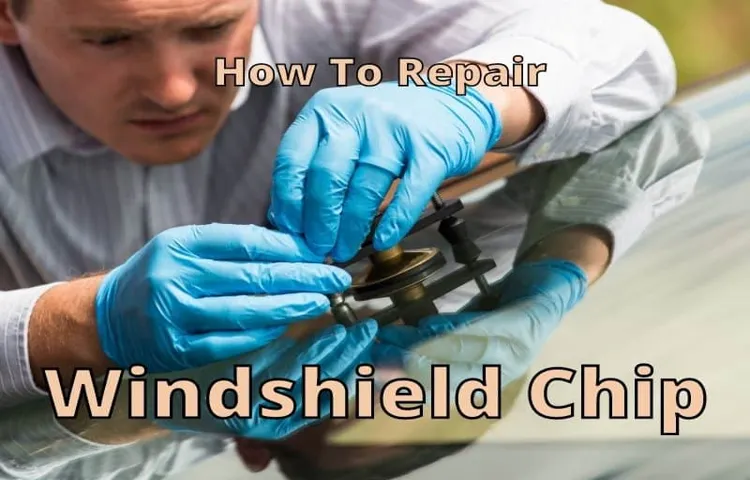
Repairing a windshield chip at home is a simple and cost-effective solution that can save you time and money. With just a few tools and materials, you can easily fix the chip in your windshield without having to take it to a professional. First, you’ll need to gather the necessary supplies, which include a windshield repair kit, a razor blade or pin, rubbing alcohol, and a clean cloth.
Start by cleaning the damaged area with the rubbing alcohol and cloth to remove any dirt or debris. Then, carefully use the razor blade or pin to remove any loose glass around the chip. Next, follow the instructions on the windshield repair kit to apply the resin to the chip and cover it with a curing film.
Allow the resin to dry and then remove the film. Finally, use a razor blade to carefully scrape off any excess resin and polish the area with a glass cleaner. With a little patience and the right tools, you can easily repair a windshield chip at home and prevent it from spreading into a larger crack.
Step 1: Clean the Chip and Surrounding Area
The first step to fixing a chip in your car’s paint is to clean the affected area. This may seem like a simple task, but it is crucial in ensuring a successful repair. Start by thoroughly washing the chip and the surrounding area with soap and water.
Use a soft sponge or cloth to gently scrub away any dirt or grime that may be present. It’s important to be thorough during this step, as any remaining dirt or debris can interfere with the adhesion of the paint. Once the area is clean, dry it thoroughly with a clean towel or let it air dry.
This will prevent any water from getting trapped under the paint and causing further damage. Taking the time to properly clean the chip and surrounding area will set a solid foundation for the rest of the repair process.
Step 2: Apply the Windshield Repair Kit
windshield repair kit, apply, step-by-step guide, windshield, cracked, damage, repair, sealant, resin, chip, DIY, process, prevent, professional, tools, materials, instructions, successful, result. Now that you have gathered all the necessary tools and materials for repairing your cracked windshield, it’s time to dive into the repair process. Applying a windshield repair kit may sound intimidating at first, but fear not! With this step-by-step guide, you will be able to successfully repair the damage and prevent it from spreading further.
First, make sure to carefully read the instructions provided with your windshield repair kit. This will give you a clear understanding of the entire process and help you avoid any mistakes along the way. Once you are familiar with the instructions, it’s time to get started.
Clean the damaged area of your windshield using a glass cleaner and a lint-free cloth. This will ensure that there are no dust or debris particles that could interfere with the repair process. Next, take the sealant and carefully apply it over the chip or crack.
Make sure to fill the entire damaged area with the sealant. This will help create a strong and sturdy foundation for the repair. Now, it’s time to apply the resin.
Take the resin syringe provided in your kit and insert it into the sealant. Gently squeeze the syringe to release the resin into the damaged area. This will fill up the crack or chip and create a smooth and transparent surface.
After applying the resin, use a razor blade or a similar tool to remove any excess resin from the surface of the windshield. This will make the repair less noticeable and give it a more professional finish. Finally, let the repair cure according to the instructions provided with your kit.
Step 3: Allow the Resin to Cure
Allowing the resin to cure is an essential step in the resin casting process. Once you have poured the resin into your mold and completed any required steps for removal of air bubbles, it’s time to let the resin cure. Curing is the process by which the resin hardens and solidifies, creating a durable and long-lasting finished product.
This step is crucial for ensuring the strength and integrity of your resin castings. To allow the resin to cure, you will need to follow the manufacturer’s instructions regarding the curing time and conditions. Generally, the resin will need to cure for a certain period of time, usually ranging from 24 to 72 hours.
During this time, it’s important to keep the resin in a controlled environment that is free from dust, dirt, and humidity. This will help to prevent any imperfections or flaws from forming in the curing resin. While waiting for the resin to cure, it’s a good idea to cover your mold with a protective cover or place it in a safe location to prevent any disturbances or damage.
It’s also important to be patient during this step, as rushing the curing process can lead to less-than-ideal results. Once the resin has fully cured, you can remove it from the mold and admire your finished product. Depending on the type of resin used, you may need to remove any excess resin or make any necessary touch-ups before the final result is achieved.
At this stage, you can also consider adding any additional finishes or decorations to enhance the appearance of your resin casting. In conclusion, allowing the resin to cure is a critical step in the resin casting process. By following the manufacturer’s instructions and providing the resin with a controlled environment, you can ensure that your resin castings cure properly and result in strong, durable, and beautiful finished products.
Remember to be patient and allow the resin the time it needs to fully cure before handling or finishing your castings.
Step 4: Remove Excess Resin and Polish the Area
concrete crack repair, remove excess resin, polishing concrete In this final step of repairing a concrete crack, it’s time to remove any excess resin that may be left behind and polish the area for a smooth finish. Once the resin has fully dried and hardened, you’ll notice that it may have spread beyond the actual crack. Don’t worry, this is completely normal.
To remove the excess resin, you can use a scraper or putty knife to gently scrape away the excess. Be careful not to apply too much pressure, as you don’t want to damage the surrounding area. Once you’ve removed the excess resin, you can begin the polishing process.
This will not only help to blend in the repaired area but also give it a nice, polished finish. You can use a concrete polisher or a hand-held rubbing stone, depending on the size of the area you’re working on. Start by using a coarse grit and gradually work your way up to a finer grit to achieve a smooth surface.
It’s important to take your time during this step and make sure that the repaired area matches the surrounding concrete. Once you’re satisfied with the result, give it a final wipe with a clean cloth and you’re done! Your concrete crack repair project is now complete, leaving you with a seamless and polished surface. With these easy-to-follow steps, anyone can successfully repair a concrete crack and restore the beauty and functionality of their concrete surfaces.
Tips and Tricks for Successful Chip Repair
Looking to repair a windshield chip but don’t want to spend a fortune at the auto shop? Well, you’re in luck! With a little bit of know-how and the right tools, you can actually repair a windshield chip at home. First off, you’ll need to make sure you have the right materials. A windshield repair kit, which can be easily found online or at your local automotive store, will usually include a resin, a syringe, and a curing film.
Once you have all your materials gathered, it’s time to get to work. Start off by cleaning the chip and the surrounding area thoroughly. Then, carefully fill the syringe with the resin and insert it into the chip.
Slowly inject the resin, making sure to fill the entire chip. Finish off by placing the curing film over the chip and allowing it to dry under direct sunlight for the recommended duration. Once the resin has hardened, remove the film and give the area a final clean.
Voila! Your windshield chip is good as new. So, why pay someone else to do it when you can easily do it yourself and save some money in the process?
Tip 1: Repair Small Chips as Soon as Possible
One of the best tips for successful chip repair is to take care of small chips as soon as possible. While it may be tempting to put off repairing small chips, it’s important to address them promptly to prevent further damage. This is because small chips can quickly turn into bigger ones, especially if they are exposed to harsh weather conditions or if the vehicle is driven on rough roads.
By repairing small chips early on, you can prevent them from spreading and causing more extensive damage to your windshield. When left unattended, small chips can also collect dirt and debris, making them more difficult to repair. So, if you notice a small chip in your windshield, it’s best to take action right away and get it repaired before it becomes a bigger problem.
Tip 2: Avoid Direct Sunlight During the Repair Process
In the process of repairing a chip on your car’s windshield, it’s important to keep in mind that direct sunlight can be your worst enemy. Sunlight can cause the resin used to repair the chip to dry too quickly, which can lead to a compromised repair. The heat from the sun can also cause the glass to expand, making it more difficult for the resin to bond properly.
Therefore, it’s best to find a shaded area or even work indoors if possible when conducting a windshield chip repair. This will ensure that the resin has enough time to cure properly and bond with the glass, resulting in a successful repair that will be strong and long-lasting. So, next time you find yourself needing to repair a chip, be sure to avoid direct sunlight for the best results!
Tip 3: Use Clear Nail Polish to Prevent Chip from Spreading
In the quest for a flawless manicure, nothing is more frustrating than discovering a chip in your newly painted nails. But fear not, because I have a simple and effective tip to share with you: clear nail polish. Yes, that’s right, the same nail polish you use to add shine to your nails can actually be used to prevent a chip from spreading.
Here’s how it works. When you notice a chip in your nail polish, grab a bottle of clear nail polish and apply a coat over the chipped area. This will act as a protective barrier, preventing the chip from getting any bigger.
It’s like placing a patch on a hole in your favorite jeans to stop it from ripping further. The key to making this tip work is to act quickly. As soon as you notice a chip, grab your clear nail polish and get to work.
The longer you wait to address the chip, the more likely it is to spread and ruin your manicure. Using clear nail polish in this way is a great trick to have up your sleeve, especially if you don’t have time to do a full manicure touch-up. It allows you to quickly fix a chip and keep your nails looking presentable until you can give them a proper touch-up.
So there you have it, a simple and effective trick to prevent a chip from spreading. Keep a bottle of clear nail polish handy in case of emergencies and say goodbye to chipped nails. Your manicure will thank you!
Tip 4: Practice on a Small Chip before Attempting a Larger Repair
So you’ve got a chip on your windshield, and you’re ready to tackle the repair yourself. That’s great! But before you jump into the deep end, it’s a good idea to practice on a smaller chip first. This will not only give you a chance to get a feel for the repair process but also allow you to perfect your technique before attempting a larger repair.
Plus, it’s always better to make mistakes on a small chip that can be easily fixed rather than on a larger chip that may require professional help. So grab a small chip repair kit and start practicing. You’ll be a pro in no time!
When to Seek Professional Help
If you have a small chip or crack on your windshield, you may be wondering if you can repair it at home. While there are DIY windshield repair kits on the market, it’s important to consider the severity of the damage before attempting to fix it yourself. If the chip or crack is larger than a quarter, or if it is in your line of sight while driving, it’s best to leave the repairs to the professionals.
DIY kits can sometimes be effective for small chips, but they are not always able to provide a long-lasting repair. Additionally, attempting to fix a larger crack or chip at home may actually make the damage worse. Professional windshield repair technicians have the tools and expertise to properly repair and restore your windshield, ensuring your safety on the road.
Signs That the Chip Is Beyond DIY Repair
“Do you consider yourself a DIY enthusiast when it comes to repairing electronics? While it’s great to have the skills and knowledge to fix things on your own, there are times when it’s better to seek professional help. One such situation is when dealing with a chip that is beyond DIY repair. How can you tell when this is the case? One sign is if the chip is completely shattered or cracked.
Attempting to repair a chip in this condition could actually do more harm than good. The damage may be too extensive for a DIY repair to be effective. Another sign is if the chip has extensive corrosion or has been exposed to moisture.
This can cause irreversible damage to the internal components of the chip, making it nearly impossible to repair without professional equipment and expertise. So if you’re faced with a shattered chip or one that has been damaged by corrosion, it’s best to leave it to the professionals.”
Finding a Reputable Auto Glass Repair Shop
auto glass repair shop, professional help, reputable, finding, seeking
Conclusion
In conclusion, repairing a windshield chip at home is not only feasible but also a cost-saving and time-efficient solution. With just a few household items and a little bit of patience, you can restore your windshield to its former glory in no time. Now, you may be wondering why tackle this task at home when there are professional auto repair shops readily available? Well, let me explain it to you in a way that will surely leave an impression.
Think of your windshield chip as a tiny crack in the seemingly impenetrable armor of your car. It’s like a battle scar, a badge of honor earned in the trials and tribulations of the road. But just like a mighty warrior, your car deserves to be properly cared for and patched up when injured.
So, instead of surrendering to the seductive call of a professional repair shop, why not take matters into your own hands? By repairing the chip at home, you seize the opportunity to don your metaphorical armor and become a DIY knight in shining armor for your beloved vehicle. Not only will you save money, but you’ll also gain a sense of accomplishment, knowing that you battled that annoying chip and emerged victorious. Plus, think of all the bragging rights you’ll earn among your friends and family as the hero who fearlessly faced the windshield chip challenge.
So, grab a cup of coffee (or your preferred beverage of choice) and gather your supplies, because it’s time to embark on a journey of automotive DIY greatness. With a steady hand, a touch of finesse, and a sprinkle of determination, you’ll have your windshield chip repaired in no time. Remember, my fellow DIY warriors, repairing a windshield chip isn’t just about fixing a minor imperfection.
It’s about showing your car some love, giving it the TLC it deserves, and proving that with a little bit of know-how, you can conquer any challenge that comes your way. So, go forth, my brave DIY aficionados, and let your windshield chips tremble in fear of your undeniable prowess. Repair them at home, because your car deserves nothing but the best.
Happy fixing!”
Importance of Timely Windshield Chip Repair
windshield chip repair, timely, professional help
Save Money and Time with DIY Chip Repair
chip repair, DIY chip repair, professional help, save money, save time, car maintenance. [Blog Section] Chip repair is a common issue for many car owners, and it can be a hassle to deal with. While there are options available for professional chip repair, many people are opting for the do-it-yourself (DIY) approach.
Why? Well, there are several reasons why DIY chip repair can save you both money and time. Firstly, when you choose to repair the chip yourself, you don’t have to wait for an appointment with a professional, which can often take days or even weeks. Instead, you can tackle the repair at your own convenience.
Additionally, DIY chip repair kits are easily accessible and affordable, costing a fraction of what you would pay a professional. Moreover, with the proper tools and materials, repairing a chip yourself can be a straightforward process that doesn’t require any special skills or expertise. So, if you’re looking to save some money and time on car maintenance, DIY chip repair is definitely worth considering.
But when should you seek professional help for chip repair? While DIY chip repair can be a cost-effective and convenient option, there are certain situations where it’s best to leave the job to the professionals. If the chip is large or deep, it may require professional attention to ensure proper repair. Additionally, if the chip is in a particularly vulnerable area, such as near the edge of the windshield or in the driver’s line of sight, it’s important to have a professional assess the damage and determine the best course of action.
Furthermore, if you’ve attempted a DIY repair and it hasn’t yielded satisfactory results, it’s time to bring in the experts. Remember, when it comes to important aspects of car maintenance like chip repair, safety should always be the top priority. So, while DIY chip repair can be a great option in many cases, don’t hesitate to seek professional help when necessary.
Final Thoughts
mental health, professional help, seeking help, therapy, counseling, support
FAQs
What causes windshield chips to occur?
Windshield chips can be caused by various factors such as flying debris, temperature changes, and even small accidents.
Can a windshield chip be repaired at home?
Yes, it is possible to repair a windshield chip at home using a DIY windshield repair kit.
How long does it take to repair a windshield chip at home?
The time it takes to repair a windshield chip at home can vary depending on the size of the chip and the specific repair kit being used. However, it typically takes around 30 minutes to an hour.
Is it safe to drive with a windshield chip?
It is generally not recommended to drive with a windshield chip as it can compromise the structural integrity of the windshield and impair visibility. It is best to get the chip repaired as soon as possible.
Can a windshield chip spread and turn into a crack?
Yes, a windshield chip can spread and turn into a crack if left untreated. Temperature changes, road vibrations, and other factors can cause the chip to expand, leading to further damage.
Can windshield chip repairs be covered by insurance?
In some cases, windshield chip repairs may be covered by insurance, depending on the specific policy. It is recommended to check with your insurance provider to determine coverage.
Are DIY windshield chip repair kits effective?
DIY windshield chip repair kits can be effective in repairing small chips and preventing further damage. However, for larger or more severe chips, it is best to consult a professional for proper repair or replacement.