
Welcome to our blog on the topic of “Introduction”! Whether you’re a seasoned writer or just starting your journey into the world of blogging, understanding the importance of a strong and captivating introduction is crucial. Think of your introduction as the gateway to your content, the first impression that can either hook your audience or leave them scrolling past your article. It’s the moment where you have the opportunity to captivate your readers and make them want to read more.
So, what makes a great introduction? Well, first and foremost, it needs to be unique and engaging. Avoid using cliché phrases or generic statements that can be found in countless other articles. Instead, try to think outside the box and come up with a creative hook that will grab your readers’ attention right from the start.
Consider using rhetorical questions or metaphors to pique their curiosity and make them want to delve deeper into your content. Another important aspect of a successful introduction is its ability to clearly convey what your article is about. You want to set the tone and give your readers a taste of what they can expect to find in the rest of your piece.
Think of it as a roadmap that guides your audience through your content and helps them understand the value they will gain by reading further. It’s also worth mentioning the importance of optimizing your introduction for search engines. By incorporating relevant keywords and phrases, you can increase the visibility of your article and attract more organic traffic.
However, remember to use these keywords naturally and avoid stuffing them into your introduction, as this can result in a clunky and awkward reading experience for your audience. In conclusion, the introduction may be just a small part of your overall article, but it’s a crucial one. It’s your chance to make a strong first impression and entice your readers to keep reading.
So take your time, be creative, and craft an introduction that captures the essence of your content while leaving your audience craving more.
Table of Contents
What Causes Windshield Chips
Have you ever wondered what causes those annoying windshield chips? Well, let me fill you in on the details. There are actually several factors that can lead to windshield chips, and understanding them can help you take better care of your car. One common cause is flying debris on the road.
This can include rocks, pebbles, or even small pieces of debris kicked up by other vehicles. When these objects hit your windshield at a high speed, they can cause small chips or cracks to form. Another common cause is temperature changes.
Extreme hot or cold temperatures can cause the glass to expand or contract, putting stress on the windshield and making it more prone to chips. Additionally, road vibrations can also contribute to windshield chips. Constant bumps and vibrations can weaken the glass over time, making it more susceptible to damage.
Overall, it’s important to be aware of the potential causes of windshield chips and take steps to protect your windshield, such as maintaining a safe following distance, avoiding rough roads, and getting any chips repaired as soon as possible to prevent them from spreading further. Remember, a small chip today could turn into a big crack tomorrow if left untreated. So, take care of your windshield and keep those chips at bay!
Weather Conditions
windshield chips, causes windshiled chips
Road Debris
windshield chips
Types of Windshield Chips
Windshield chips can occur for a variety of reasons, and it’s important to know the different types in order to effectively repair them. One common type of chip is a bullseye chip, which is characterized by a dark circle in the center surrounded by a white outer ring. This type of chip is often caused by a small object hitting the windshield at high speed.
Another type of chip is a star chip, which has multiple legs branching out from a central point. These chips are typically caused by a larger object hitting the windshield. A combination chip is a mix of a bullseye and star chip, with both a circular center and branching legs.
Finally, there is the crack chip, which is a single line fracture in the glass. This type of chip can vary in length and severity. No matter the type of chip, it’s crucial to address it promptly to prevent further damage to the windshield.
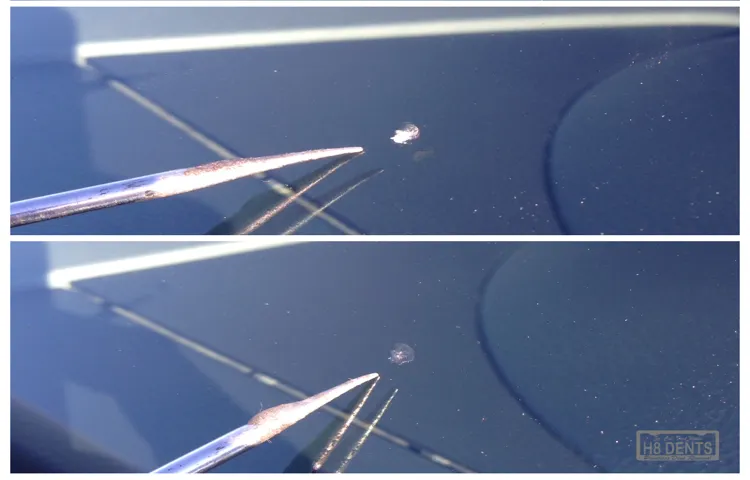
Bullseye Chip
windshield chip, bullseye chip When it comes to windshield chips, one common type is the bullseye chip. You might have seen it on your own windshield or on someone else’s car. But what exactly is a bullseye chip and how does it differ from other types of chips? Well, a bullseye chip is a type of windshield chip that is shaped like a bullseye, hence the name.
It usually has a round shape with a dark spot in the center and concentric circles around it. This type of chip is typically caused by a direct impact from a rock or other debris on the road. It can vary in size and depth, with some bullseye chips being deeper and more severe than others.
The important thing to note about bullseye chips is that they can spread and crack over time if not repaired promptly. That’s why it’s essential to address any windshield chip as soon as possible to prevent further damage and ensure your safety on the road. So, if you notice a bullseye chip on your windshield, don’t wait – get it repaired quickly and efficiently.
Star Break Chip
windshield chip, star break chip
Crack Chip
Crack chip” is a term commonly used to describe the damage that can occur to a windshield. Windshield chips can happen for a variety of reasons, from small stones or debris hitting the glass to extreme temperature changes causing the glass to expand and contract. There are several different types of windshield chips that can occur, each with its own characteristics and potential for spreading.
One common type of chip is a star chip, which looks like a small circular spot with lines radiating out from the center. Another type is a bullseye chip, which is a round chip with a dark center and a lighter outer ring. Combination chips are a mixture of both star and bullseye chips, with a dark center and radiating lines.
Finally, there are also surface chips, which are small, shallow chips that do not penetrate the entire thickness of the windshield. Understanding the different types of chips is important because it can help determine the best course of action for repair or replacement. Some chips can be easily repaired, while others may require the entire windshield to be replaced.
It’s always a good idea to have any chips or cracks in your windshield inspected by a professional to determine the best course of action. Ignoring a chip or crack can lead to further damage and compromise the structural integrity of the windshield. So, if you notice any chips or cracks in your windshield, be sure to have them addressed promptly to ensure your safety on the road.
Assessing the Damage
Are you tired of looking at that annoying chip in your windshield? Well, you’re in luck because I’m here to tell you how to repair windshield chips. Don’t worry, it’s not as difficult as it may seem. First, assess the damage.
Take a close look at the chip and determine its size and depth. If it’s smaller than a quarter and the crack is not too deep, you may be able to fix it yourself. However, if the damage is larger or the crack goes through the entire glass, you may need to take it to a professional.
Either way, repairing the chip early on is essential to prevent it from spreading further and causing more damage. So don’t wait, get that chip fixed and enjoy a clear, unobstructed view of the road ahead!
Size and Depth
When it comes to assessing the damage caused by a natural disaster, one of the key factors to consider is the size and depth of the event. Size refers to the physical dimensions or extent of the disaster, while depth refers to the intensity or severity of its impact. Understanding these aspects is crucial for emergency response teams, policymakers, and affected communities to effectively plan and allocate resources for recovery efforts.
Imagine a storm that covers a wide geographic area, affecting multiple cities and towns. The size of this storm would indicate the scale of destruction and the number of people and properties that may be affected. On the other hand, the depth of the storm refers to the intensity of the wind, the amount of rainfall or snowfall, and the resulting damage.
A deeper storm with high winds and heavy precipitation can cause more significant damage, such as flooding, landslides, or structural collapses. By accurately assessing the size and depth of a disaster, decision-makers can better understand the implications and prioritize response efforts accordingly.
Location
The location of a property plays a crucial role in determining the extent of damage it may experience during a natural disaster. Assessing the damage caused by a hurricane, for example, can vary greatly depending on whether the property is situated in a coastal area or inland. Coastal areas are more vulnerable to storm surges and high winds that can cause significant destruction to buildings and infrastructure.
On the other hand, properties located further inland may be less impacted by these direct effects, but can still suffer from flooding or heavy rainfall. Additionally, the elevation and topography of the location also play a role in the damage assessment. For instance, properties situated in low-lying areas or near bodies of water are more susceptible to flooding.
Understanding the geographical characteristics of a location can help homeowners and insurance providers better prepare for potential damage and minimize the risks associated with natural disasters.
Extent of Spread
Extent of Spread: Assessing the Damage The COVID-19 pandemic has spread rapidly across the globe, affecting millions of people and causing significant damage to economies and healthcare systems worldwide. To assess the extent of the spread, it is important to consider several factors. One key metric is the number of confirmed cases, which gives us an idea of how prevalent the virus is in a particular region.
This data allows us to track the progression of the disease and understand its impact on different populations. However, it’s important to note that the actual number of cases is likely higher than reported, as testing capacity varies across countries, and many people may have mild or asymptomatic symptoms and go undetected. Another important factor to consider is the rate of hospitalizations and intensive care admissions.
This metric provides insight into the severity of the disease and helps us understand the strain on healthcare systems. The higher the number of hospitalizations and ICU admissions, the more overwhelmed healthcare facilities become, potentially leading to a higher mortality rate. Additionally, tracking the number of deaths attributed to COVID-19 gives us a clearer picture of the impact of the virus on overall mortality rates.
However, it’s important to consider the demographics of the affected population, as older adults and individuals with underlying health conditions are more vulnerable to severe illness and death. Measuring the spread of the virus also requires analyzing the reproductive rate or R0, which indicates the average number of individuals that one infected person will transmit the virus to. A high R0 suggests the virus is spreading rapidly, while a low R0 indicates that the spread is under control.
Understanding the rates of transmission helps inform public health interventions and strategies to mitigate the spread. In conclusion, assessing the damage caused by the COVID-19 pandemic involves considering multiple factors, including the number of confirmed cases, hospitalizations, deaths, and the reproductive rate. These metrics provide valuable insights into the extent of the spread and the impact on communities and healthcare systems.
The data helps inform public health measures to control the spread of the virus and protect vulnerable populations.
DIY Repair Steps
Have you ever found yourself with a small chip in your windshield and wondered how to fix it? Well, don’t worry! Repairing windshield chips is easier than you might think. With a few simple steps, you can have your windshield looking as good as new in no time. First, gather the necessary materials.
You’ll need a windshield repair kit, which can be purchased at any auto supply store. These kits usually include a resin, a syringe, and a curing film. You’ll also need a clean cloth and some glass cleaner to prepare the chip for repair.
Next, clean the chip and the surrounding area with the glass cleaner and cloth. This will ensure that the resin adheres properly to the glass. It’s important to remove any dirt or debris that could interfere with the repair process.
Once the chip is clean, it’s time to apply the resin. Take the syringe from the repair kit and fill it with the resin. Then, carefully insert the syringe into the chip, making sure it is securely in place.
Gently inject the resin into the chip, filling it completely. Be sure to follow the instructions provided with the repair kit for the proper amount of resin to use. After you’ve injected the resin, place the curing film over the chip to protect it from any remaining debris or dirt.
Allow the resin to cure for the recommended amount of time, usually around 15-20 minutes. During this time, the resin will harden and bond with the glass, restoring its strength and integrity. Once the resin has cured, remove the curing film and inspect the repair.
Gather the Necessary Tools and Materials
“When it comes to tackling a DIY repair project, having the right tools and materials on hand is essential. Before you start, take some time to gather everything you’ll need. This will not only make the process smoother, but it will also help ensure a successful outcome.
Depending on the specific repair you’re undertaking, the tools and materials required will vary. However, here are a few basics that are commonly needed for many DIY projects: a screwdriver set, pliers, a tape measure, a utility knife, a level, a hammer, safety gloves, safety goggles, and a flashlight. Additionally, you may need specific materials such as screws, nails, glue, or paint.
Taking inventory of what you already have and making a list of what you still need is a good idea. Once you have everything ready, you’ll be well-prepared to tackle your DIY repair project with confidence.”
Clean the Affected Area
clean the affected area
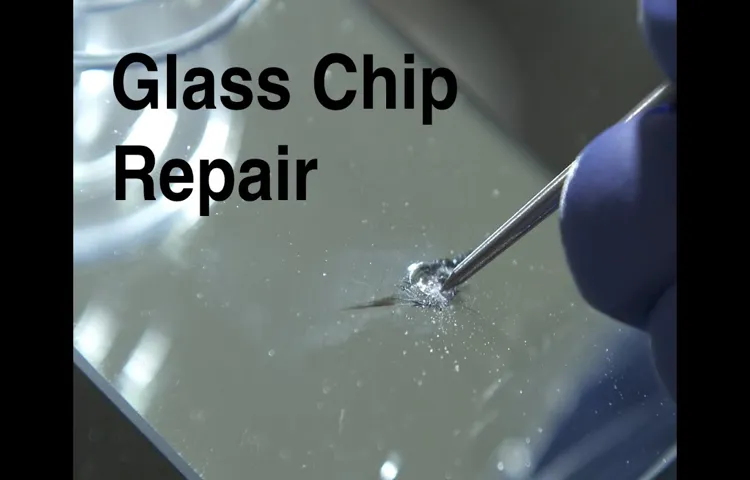
Fill the Chip with Resin
“fill the chip with resin” So you’ve identified that pesky chip in your windshield and you’re ready to take matters into your own hands. Well, you’re in luck because fixing a chip in your windshield is totally doable with a little DIY know-how! One of the first steps in the repair process is filling the chip with resin. This step is important because it helps to stabilize the damaged area and prevent further cracking.
But how exactly do you go about filling the chip with resin? Let me break it down for you. First things first, you’ll need to gather your supplies. You’ll want to have a windshield repair kit on hand, which usually includes a syringe filled with resin, a curing strip, and a razor blade or other tool for cleaning the chip area.
With your kit in hand, you can begin the repair process. Start by cleaning the chip area with the provided tool or a razor blade. You want to remove any debris or dirt that may be in the chip.
This step is crucial to ensure that the resin adheres properly and that you get a nice, clean repair. Once the chip is clean, you can move on to the next step: injecting the resin. Take the syringe filled with resin and place the tip over the chip.
Apply gentle pressure and slowly fill the chip with resin. Be sure to follow the instructions provided with your kit, as the amount of resin needed may vary depending on the size of the chip. After the chip is filled with resin, you’ll want to place the curing strip over the top.
This strip helps to protect the resin from UV rays and aids in the curing process. Carefully place the strip over the chip, making sure it covers the entire area. Now comes the waiting game.
Cure the Resin
When it comes to fixing any kind of resin, whether it’s a small chip or a major crack, the process can seem intimidating. But don’t worry, with a little bit of patience and the right tools, you can easily repair the resin yourself. The first step is to clean the area around the resin using a mild soap and water.
This will remove any dirt or debris that could interfere with the repair process. Once the area is clean and dry, you can move on to the next step, which is applying the resin repair kit. These kits usually come with a clear resin and a syringe for easy application.
Simply fill the syringe with the resin and carefully apply it to the damaged area. You want to make sure you fill in the entire crack or chip with the resin, as this will prevent it from spreading further. Once the resin is applied, you will need to cure it using either sunlight or a UV lamp.
This process can take anywhere from a few minutes to a couple of hours, depending on the brand of resin you are using. Once the resin is fully cured, you can use a razor blade to carefully scrape off any excess resin. Finally, use a polishing compound to buff the repaired area, and your resin should look good as new.
Smooth and Polish the Repair
diy repair, smooth and polish, repair process, steps, refinishing furniture So you’ve successfully made the necessary repairs to your furniture, and now it’s time to smooth and polish the surface to create a flawless finish. This step will not only ensure that your repair work is seamlessly integrated, but it will also enhance the overall appearance of the piece. To begin, you’ll need some sandpaper or a sanding block with different grits.
Start with a coarse grit to roughen up the surface and remove any bumps or imperfections. Once you’re satisfied with the level of smoothness, move on to a finer grit to further refine the surface. Sand in the direction of the wood grain to avoid any unsightly scratch marks.
After sanding, wipe down the surface with a clean cloth to remove any dust or debris. This will ensure that the polish adheres properly. Next, choose a suitable polish or finish for your furniture.
There are many options available, such as wax, varnish, or polyurethane. Consider the type of furniture and the desired level of sheen when making your selection. Apply the polish or finish according to the manufacturer’s instructions, using a clean cloth or brush.
Allow the polish or finish to dry completely before applying additional coats. Depending on the product you choose, you may need to apply multiple coats for optimal results. Be sure to sand lightly between coats to ensure a smooth finish.
Once you’re satisfied with the smoothness and polish of your repaired furniture, take a step back and admire your handiwork. You’ve successfully brought new life to a cherished piece, and it’s ready to be proudly displayed in your home once again.
When to Seek Professional Help
If you notice a chip in your windshield, it’s important to address it as soon as possible. Small chips can often be repaired without replacing the entire windshield, saving you time and money. But how do you know when to seek professional help? While there are DIY kits available, it’s usually best to leave the job to the experts.
Professional windshield repair technicians have the necessary skills and tools to properly fix the chip and prevent it from spreading. They also have access to high-quality materials that can provide a long-lasting repair. Additionally, professional technicians can assess the severity of the damage and determine if the chip can be repaired or if a full windshield replacement is necessary.
So, if you want to ensure the safety and integrity of your windshield, it’s best to consult with a professional for any repair or replacement needs.
Preventing Future Windshield Chip Damage
So you’ve noticed a small chip in your windshield, and you’re wondering what to do next. Don’t worry, you’re not alone – plenty of drivers have dealt with this issue before. The good news is that repairing windshield chips is something you can do yourself, without needing to visit a professional.
There are several do-it-yourself repair kits available on the market that can help you fix the chip and prevent it from turning into a larger crack. These kits usually include a special resin that is applied to the chip, which helps to bond the glass back together. By repairing the chip as soon as possible, you can prevent it from spreading and potentially causing further damage to your windshield.
So don’t let a small chip ruin your day – take action and repair it before it becomes a bigger problem.
Maintain a Safe Following Distance
windshield chip damage
Avoid Driving Over Loose Gravel
“windshield chip damage” Driving can be a thrilling experience, but it also comes with its fair share of risks. One of the most common problems you may encounter is windshield chip damage. This can happen when small debris, like loose gravel, hits your windshield while driving.
To prevent future chip damage, it’s essential to avoid driving over loose gravel whenever possible. Loose gravel on the road can easily be kicked up by passing vehicles or even the wind, leading to chips and cracks in your windshield. By keeping an eye out for areas with loose gravel and taking alternative routes when necessary, you can significantly reduce the risk of windshield damage caused by these tiny projectiles.
It’s always better to be safe than sorry when it comes to protecting your windshield from chips and cracks.
Use Windshield Sunshades
windshield chip damage, windshield sunshades
Conclusion
So now you know the secret to repairing windshield chips like a pro. Armed with a few household items and a bit of patience, you can save yourself time and money by fixing those pesky little cracks before they turn into huge headaches. Remember, a cracked windshield is like a broken heart – it’s better to mend it sooner rather than later.
So grab your tools, put on your DIY cap, and show that windshield who’s boss! And if all else fails, just remember what my grandpa always said: “When life gives you windshield chips, make windshield chip dip!” Just kidding, that’s terrible advice. Good luck and happy chip-fixing!”
FAQs
Can a windshield chip be repaired?
Yes, a windshield chip can be repaired using a special resin and a repair kit.
How much does it cost to repair a windshield chip?
The cost of repairing a windshield chip can vary depending on the size and location of the chip. On average, it can cost between $50 and $150 to repair a chip.
How long does it take to repair a windshield chip?
The time it takes to repair a windshield chip can depend on the technician and the complexity of the chip. Generally, it can take around 30 minutes to 1 hour to complete the repair.
Does insurance cover windshield chip repair?
Many comprehensive insurance policies cover the cost of repairing windshield chips, with little to no deductible. It is best to check with your insurance provider to confirm your coverage.
Can I repair a windshield chip myself?
Yes, there are DIY windshield repair kits available that allow you to repair small chips on your own. However, it is recommended to have a professional repair larger or more complex chips.
Can a repaired windshield chip still crack?
While a repaired windshield chip is significantly stronger, there is still a possibility that it could crack further due to external factors such as temperature changes or impact.
How long will a repaired windshield chip last?
A properly repaired windshield chip can last for the remaining lifespan of the windshield. However, it is important to regularly check for any signs of further damage or cracking.
Can a windshield chip be invisible after repair? A8. While a windshield chip repair can greatly improve the appearance of the chip, it may still be slightly visible depending on the severity of the initial damage. However, professional repairs are aimed at making the chip as unnoticeable as possible.
Will a repaired windshield chip affect the structural integrity of the windshield?
A properly repaired windshield chip should not affect the structural integrity of the windshield. However, it is recommended to consult with a professional to assess the severity of the damage and ensure its safe repair.
Can I drive with a windshield chip before getting it repaired?
It is generally safe to drive with a small windshield chip, but it is recommended to get it repaired as soon as possible. Small chips can quickly spread and compromise the integrity of the windshield, potentially causing further damage or even shattering.
How can I prevent windshield chips in the first place?
To prevent windshield chips, be cautious while driving on gravel or rough roads. Maintain a safe distance from large vehicles that can kick up debris. In addition, avoid extreme temperature changes that can cause the glass to expand or contract rapidly, leading to potential damage.
Can windshield chips be repaired in cold weather?
Yes, windshield chips can be repaired in cold weather. However, the process may take longer as the resin used for the repair can take longer to cure in low temperatures. It is best to consult with a professional to assess the feasibility of repair in cold weather conditions.