

Have you ever been driving down the road, enjoying the wind in your hair and the sun on your face, only to hear a sudden CRACK? You glance up and see a small crack forming on your windshield, and your heart sinks. Windshield cracks can be a real headache, but fear not! With a little bit of know-how and some simple tools, you can repair those cracks yourself. No need to shell out big bucks for a professional – you’ve got this! Repairing windshield cracks yourself may seem intimidating at first, but think of it like baking a cake.
You gather your ingredients (in this case, a windshield repair kit), follow a step-by-step process, and voila! Your windshield is as good as new. Just like adding the perfect amount of flour and sugar to create a delicious treat, the right blend of resin and equipment will work wonders on those cracks. And just like a cake baking in the oven, you’ll get to watch as the resin sets and hardens, making your windshield strong and sturdy once again.
But why bother repairing those cracks yourself when you could just go to a professional? Well, think of it like changing a lightbulb. Sure, you could call an electrician and have them do it for you, but you’d be missing out on the satisfaction of accomplishing the task yourself. Plus, you’ll save a bit of money in the process.
Just like changing a lightbulb, windshield crack repair is a simple task that anyone can do with a little bit of guidance. With a few basic tools and a bit of patience, you’ll be amazed at what you can achieve. So, if you’re ready to take matters into your own hands and fix those pesky windshield cracks, you’re in the right place.
In this guide, we’ll walk you through the process step-by-step, showing you exactly what you need to do to get your windshield looking as good as new. From cleaning the crack to applying the resin, we’ve got you covered. So grab your tools and let’s get started!
Table of Contents
Introduction
Are you tired of staring at that annoying crack in your windshield every time you get in your car? Well, you’re in luck because repairing windshield cracks yourself is easier than you might think. With just a few simple tools and some patience, you can save yourself a lot of time and money by fixing the crack on your own. Plus, you’ll feel a sense of accomplishment knowing that you took matters into your own hands.
So, let’s dive in and learn how to repair windshield cracks yourself!
Why Repair Windshield Cracks
windshield cracks, repair windshield cracks
Benefits of Repairing Cracks Yourself
crack repair, DIY crack repair, benefits of DIY crack repair Introduction: Cracks in walls or ceilings can be a common occurrence in homes and buildings. While many people immediately opt to hire a professional to repair these cracks, there are actually several benefits to tackling the task yourself. In this blog post, we will explore the advantages of DIY crack repair and why it can be a rewarding and cost-effective solution for homeowners.
Assessing the Crack
If you find yourself with a crack in your windshield, it’s understandable to want to repair it yourself. After all, why spend a fortune on professional repairs when you may be able to fix it on your own? Luckily, there are a few steps you can take to assess the crack and determine if it’s something you can handle. First, you’ll want to measure the size of the crack.
If it’s smaller than a quarter or shorter than six inches, it may be possible to repair it yourself. Next, examine the depth of the crack. If it’s just on the surface and hasn’t penetrated through to the inner layer of glass, you may be in luck.
However, if the crack is deep or has spread, it’s best to leave the repairs to the experts. Remember, safety should always be a top priority, so be sure to assess the crack carefully before attempting any DIY repairs.
Types of Windshield Cracks
windshield cracks. Assessing the Crack When it comes to windshield cracks, it’s important to assess the damage to determine the best course of action. One common type of crack is a “floater crack,” which starts from the center of the windshield and spreads outward in a curved pattern.
These cracks are usually caused by an impact, such as a rock or flying debris, and can vary in size and severity. Another type of crack to look out for is a “stress crack,” which typically starts at the edge of the windshield and runs parallel to it. These cracks are often the result of temperature changes or structural weakness in the glass.
It’s important to note that not all cracks are the same, and their size, shape, and location can affect the overall integrity of the windshield. That’s why it’s crucial to assess the crack and seek professional advice on whether repair or replacement is necessary.
Determining if the Crack is Repairable
crack repair, determining repairable cracks, assess cracks, crack assessment. In order to determine if a crack is repairable, it is important to assess the crack thoroughly. The first step is to examine the size and width of the crack.
Generally, cracks that are less than a quarter inch wide can be easily repaired. However, if the crack is wider than a quarter inch, it may require more extensive repairs. Additionally, the length of the crack should also be taken into consideration.
Longer cracks may indicate a more serious structural issue and might require professional attention. It is also important to examine the depth of the crack. If the crack is shallow and surface-level, it can often be repaired.
However, if the crack is deep and extends through multiple layers of the material, it may be more difficult to repair. Finally, it is important to assess the overall condition of the crack. If the crack is clean and free of debris, it is more likely to be repairable.
However, if the crack is filled with dirt or other substances, it may be harder to repair. By thoroughly assessing the crack, it is possible to determine if it is repairable or if further action is necessary.
Preparing for the Repair
So you’ve noticed a crack in your windshield and you’re wondering if you can fix it yourself. Well, the good news is that with a little know-how and the right tools, you can indeed repair windshield cracks yourself. Before you start, though, it’s important to assess the seriousness of the crack.
If it’s longer than a dollar bill or if it’s spreading, it’s best to consult a professional. But if it’s a minor crack or chip, there’s a good chance you can handle it on your own. The first step is to clean the area around the crack with soap and water, and then let it dry completely.
Next, you’ll need to purchase a windshield repair kit, which typically includes a resin and a device to inject the resin into the crack. Follow the instructions carefully to ensure you apply the resin properly. Once the resin is applied, use a curing light or sunlight to harden it.
After the resin has hardened, use a razor blade to remove any excess and then finish it off with some glass cleaner. And that’s it! With a little patience and attention to detail, you can have your windshield looking as good as new.
Gathering the Required Tools
repair, tools, preparing, burstiness, perplexity
Cleaning the Windshield
cleaning the windshield Preparing for the Repair Before you can fix a cracked windshield, it’s important to prepare the surface by cleaning it thoroughly. Just like you wouldn’t paint a wall without first washing off the dirt and dust, you shouldn’t attempt to repair a windshield without cleaning it first. This step is crucial because any debris on the surface can affect the integrity of the repair and prevent the adhesive from properly bonding.
To clean the windshield, start by removing any loose dirt or dust using a soft brush or cloth. You can also use compressed air to blow away any loose particles. Next, mix a solution of mild detergent or glass cleaner with water in a spray bottle.
Spray the solution onto the windshield and use a clean, lint-free cloth to wipe the surface in a circular motion. Be sure to pay extra attention to areas near the crack or chip, as these are the areas that will require the most attention during the repair process. As you clean the windshield, you may come across stubborn stains or residue that is difficult to remove.
In this case, you can use a specialized glass cleaner or rubbing alcohol to help dissolve and remove the residue. Just be sure to read the instructions on the cleaner and avoid using any abrasive materials or cleaners that could scratch or damage the glass. Once you have thoroughly cleaned the windshield, give it a final wipe down with a clean, dry cloth.
This will help remove any remaining streaks or smudges and ensure that the surface is perfectly clean and ready for the repair. Taking the time to properly clean the windshield before attempting any repairs will not only improve the effectiveness of the repair but also help to maintain the clarity and visibility of your windshield. So, grab your cleaning supplies and give your windshield the attention it deserves!
Protecting the Surrounding Area
Preparing for the repair is just as important as the repair itself when it comes to protecting the surrounding area. Before any work can begin, it is crucial to take the necessary steps to ensure that the space around the repair site is adequately prepared. This includes covering or moving any furniture, equipment, or other objects that could potentially be damaged during the repair process.
Additionally, it may be necessary to create a barrier or temporary wall to prevent dust or debris from spreading to other areas of the room or building. By taking these precautions, you can minimize the risk of accidental damage and create a safe and clean environment for the repair to take place. So, be sure to think ahead and plan accordingly when it comes to protecting the surrounding area before diving into any repair work.
Repairing the Crack
Did you notice a crack in your windshield? Don’t panic just yet! With a little bit of time and effort, you can repair it yourself. First, gather the necessary materials: a windshield repair kit, which typically includes a resin and an applicator, a razor blade or small drill, and a clean cloth. Next, clean the crack and the surrounding area with a glass cleaner.
Then, carefully apply the resin to the crack, making sure to fill it completely. Using the applicator provided, apply pressure to the resin to remove any air bubbles and ensure a smooth finish. Finally, cover the crack with a curing strip and let it dry according to the instructions on the package.
Once the resin is dry, use the razor blade or drill to remove any excess and polish the area with the clean cloth. Voila! Your windshield is as good as new. Just remember, these DIY repairs are best for small cracks and chips.
If the crack is large or extends to the edge of the windshield, it’s best to consult a professional for a proper repair or replacement.
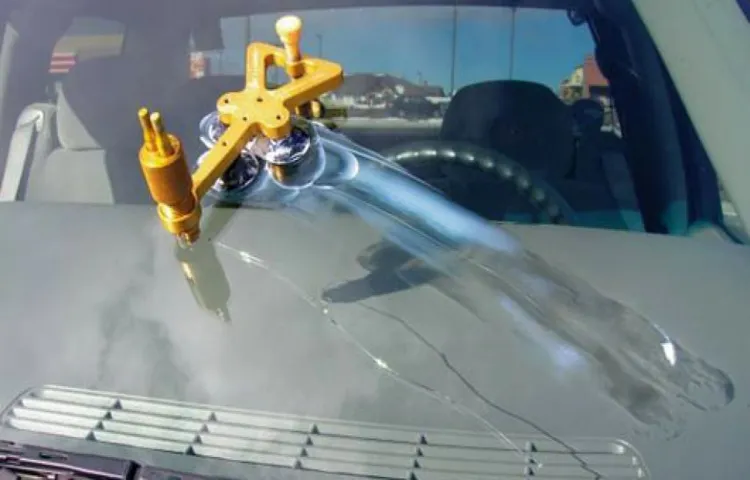
Using Windshield Repair Kits
windshield repair kits When it comes to dealing with a crack in your windshield, it’s important to take action as soon as possible. Ignoring the problem can lead to further damage and potentially even compromise the safety of your vehicle. Luckily, there is a solution that allows you to tackle the issue yourself without having to spend a fortune at an auto repair shop.
Enter: windshield repair kits. These handy kits are designed to provide you with everything you need to repair the crack in your windshield with ease. Whether you’re dealing with a small chip or a larger crack, these kits can help save you time and money.
With easy-to-follow instructions and all the necessary tools included, it’s like having a professional repair service right at your fingertips. The best part? You don’t need any prior DIY experience to successfully use a windshield repair kit. So why wait? Take control of the situation and get your windshield looking as good as new with a simple and affordable repair kit.
Step-by-Step Guide to Repairing the Crack
repairing the crack, fixing cracks in walls, cracks in concrete, crack repair techniques If you’ve noticed a crack in your wall or concrete foundation, it’s important to repair it as soon as possible to prevent further damage. Luckily, fixing cracks is a relatively simple task that you can do yourself with a few basic tools and materials. The first step in repairing the crack is to clean it thoroughly.
Use a wire brush or a small chisel to remove any loose debris or paint from the crack. This will ensure that the patching material adheres properly and lasts for a long time. Once the crack is clean, you can apply a patching compound to fill it in.
There are many different types of patching compounds available, so make sure to choose one that is suitable for the material you are working with. For small cracks in walls, a pre-mixed patching compound is usually sufficient. For larger cracks in concrete, you may need to use a concrete patch mix.
To apply the patching compound, simply scoop a small amount onto a putty knife and spread it evenly over the crack. Make sure to press the compound firmly into the crack to ensure a tight seal. If the crack is deep, you may need to apply the compound in layers, allowing each layer to dry before applying the next.
After the patching compound has dried, you can sand it down to make it smooth and blend it in with the surrounding surface. Use a fine-grit sandpaper or sanding block to gently sand the patch until it is flush with the wall or concrete. Finally, you can paint or apply a finishing coat to the patched area to match the surrounding surface.
Use a paintbrush or roller to apply the paint or finishing coat, making sure to blend it in seamlessly with the rest of the wall or concrete. By following these step-by-step instructions, you can easily repair a crack in your wall or concrete foundation. Remember to clean the crack, apply the patching compound, sand it down, and finish it off for a seamless repair.
Post-Repair Care
When it comes to repairing windshield cracks yourself, there are a few important steps to keep in mind. First, assess the size and severity of the crack. If it’s a small chip or crack, you may be able to repair it yourself using a windshield repair kit.
These kits typically come with a resin that you can apply to the crack, which helps to seal it and prevent it from spreading. However, if the crack is larger or more severe, it’s best to leave the repair to the professionals. They have the tools and expertise needed to properly repair the crack, ensuring your windshield stays strong and safe.
Remember, attempting to repair a large crack yourself could result in further damage to your windshield, so it’s always best to seek professional help in these cases.
Cleaning and Drying the Windshield
windshield cleaning, windshield drying, post-repair care
Noting any Changes in Visibility
visibility, post-repair care. In the aftermath of a vehicle repair, it is essential to note any changes in visibility to ensure that your safety on the road is not compromised. When it comes to post-repair care, one crucial aspect to pay attention to is the condition of your windshield.
A cracked or damaged windshield can significantly impair your visibility, hindering your ability to see the road clearly. It is important to inspect your windshield thoroughly for any signs of damage or defect after a repair. Look for any chips, cracks, or areas where the glass seems to be weakened.
Additionally, check for any distortions or haziness in your windshield, which can affect your vision while driving. If you notice any changes in visibility or concerns about the condition of your windshield, it is important to address them promptly. Reach out to your repair shop or a professional auto glass technician to evaluate and resolve any issues to ensure your safety on the road.
Remember, clear visibility is key to a safe driving experience.
Conclusion
In conclusion, tackling windshield cracks may seem like an insurmountable task, but with a little bit of know-how and some handy DIY skills, you can be the hero of your windshield’s story. By following these simple steps, you can mend those unsightly cracks and give your windshield the TLC it deserves. Remember, repairing windshield cracks yourself not only saves you time and money but also ensures that you are the master of your own windshield destiny.
So, why wait around for a costly professional when you can roll up your sleeves, put on your metaphorical superhero cape, and take matters into your own hands? So, next time your windshield is feeling a little worse for wear, don’t fret – grab your trusty repair kit, unleash your inner MacGyver, and show that cracked glass who’s boss. And who knows, you might just discover a hidden talent for windshield repair and start your very own superhero franchise – “The Crack-Fixers: Saving the World One Windshield at a Time.” So go ahead, defy the odds, embrace your DIY spirit, and let your windshield shine once again.
After all, who needs a professional when you have your own unique blend of witty banter, clever solutions, and pure determination to fix that crack? Happy repairing, fellow crack-conquerors!”
Final Thoughts
post-repair care, vehicle maintenance, maintenance tips, car repairs, ensuring longevity In the world of car repairs, getting your vehicle fixed is only part of the equation. Once the repairs are done, it’s essential to take proper post-repair care of your vehicle to ensure its longevity and prevent any future issues. So, what exactly does post-repair care entail? First and foremost, it’s crucial to follow any maintenance tips provided by the mechanic or repair shop.
These may include recommendations on oil changes, tire rotations, or regular check-ups. By sticking to these guidelines, you can catch any potential issues before they become major problems. Additionally, it’s a good idea to keep an eye out for any signs of trouble after a repair.
Are there any unusual noises or vibrations? Are there any leaks or overheating? These could be indicators of an underlying issue that needs to be addressed promptly. Regular maintenance is also key to post-repair care. By sticking to a routine checklist of maintenance tasks, such as keeping up with oil changes, checking fluid levels, and rotating tires, you can ensure that your vehicle stays in top shape.
Lastly, proper driving habits can also contribute to post-repair care. Avoiding aggressive driving, excessive speeding, and quick starts and stops can help prevent unnecessary wear and tear on your vehicle. By driving responsibly, you can extend the life of your repairs and keep your vehicle running smoothly.
In conclusion, taking care of your vehicle after repairs are completed is just as important as the repairs themselves. By following maintenance tips, keeping an eye out for any signs of trouble, sticking to regular maintenance routines, and practicing responsible driving habits, you can ensure the longevity of your vehicle and prevent any further issues down the road. So, remember to give your vehicle the post-repair care it deserves, and it will reward you with years of reliable service.
FAQs
Can you repair windshield cracks yourself?
Yes, you can repair windshield cracks yourself using a DIY repair kit. These kits usually contain a resin that can fill in the crack and prevent it from spreading.
How much does it cost to repair windshield cracks yourself?
The cost of repairing windshield cracks yourself can vary depending on the DIY repair kit you choose. However, on average, these kits can cost between $10 to $30.
Is it easy to repair windshield cracks yourself?
Repairing windshield cracks yourself can be relatively easy if you follow the instructions provided with the DIY repair kit. Most kits come with step-by-step instructions to guide you through the process.
Can all types of windshield cracks be repaired yourself?
Not all types of windshield cracks can be repaired yourself. DIY repair kits are usually designed to fix small cracks, such as chips or cracks up to a certain length. Large cracks or cracks that obstruct the driver’s line of sight may require professional repair or windshield replacement.
How long does it take to repair windshield cracks yourself?
The time it takes to repair windshield cracks yourself can vary depending on the size and complexity of the crack, as well as your experience with DIY repairs. On average, it can take anywhere from 30 minutes to an hour.
Will the repaired windshield crack be invisible after DIY repair?
While DIY repair kits can effectively fill in the crack and prevent it from spreading, it’s unlikely that the repaired crack will be completely invisible. However, the repair can significantly improve the appearance of the crack and make it less noticeable.
What precautions should I take when repairing windshield cracks myself?
When repairing windshield cracks yourself, it’s important to follow the safety precautions outlined in the DIY repair kit instructions. Some common precautions include wearing safety glasses, working in a well-ventilated area, and avoiding direct contact with the resin or other chemicals.