
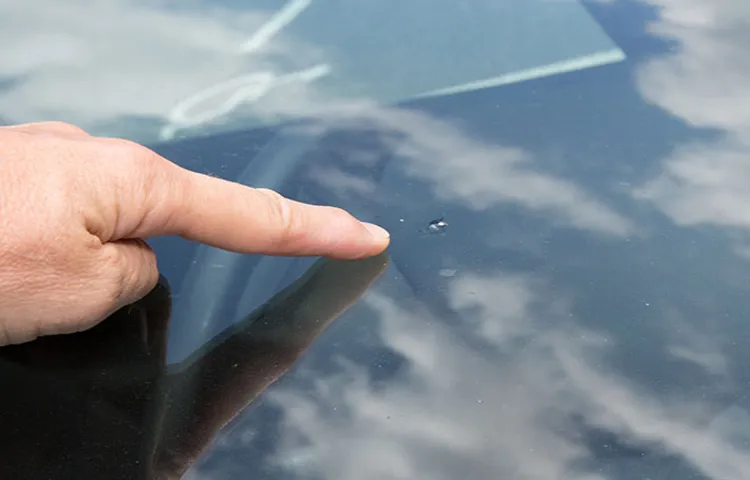
Do you have a pesky little chip on your car’s windshield? Maybe it happened when a loose piece of gravel kicked up from the road, or perhaps a small object fell from a higher place and left a mark. Whatever the case may be, dealing with a chip in your windshield can be annoying and potentially dangerous if left unattended. But fear not! In this blog post, we will guide you through the process of repairing a windshield surface chip, ensuring that your car’s windshield looks as good as new in no time.
Table of Contents
Introduction
Are you tired of staring at that unsightly chip in your windshield? Luckily, repairing the surface chip is easier than you might think. Rather than shelling out big bucks for a complete windshield replacement, you can fix the chip yourself and restore your windshield to its former glory. In this blog post, we’ll walk you through the steps of how to repair a windshield surface chip.
Whether you’re a seasoned DIYer or a novice homeowner, you’ll be able to tackle this project with ease and save money in the process. So grab your tools and let’s get started!
What is a Surface Chip?
surface chip, computer chip, electronic component, semiconductor, integrated circuit Introduction: Have you ever wondered what makes your electronic devices work? The answer lies in the tiny, but powerful, surface chips that are at the heart of almost every electronic device we use today. A surface chip, also known as a computer chip or an integrated circuit, is a crucial electronic component that plays a vital role in processing and storing data. It is made of a semiconductor material and contains millions, or even billions, of microscopic electronic components.
These surface chips are responsible for executing the instructions of a computer program and performing calculations, making them the brains behind our devices.
Why Should You Repair a Chip?
Introduction: Chips in windshields can be a common occurrence, whether it’s from a small rock kicking up from the road or a falling branch. While it may seem like a small cosmetic issue, ignoring a chip in your windshield can lead to bigger problems down the road. Repairing a chip not only improves the appearance of your windshield but also ensures its structural integrity.
In this blog post, we’ll explore why you should consider repairing a chip in your windshield and the potential consequences of leaving it untreated. So, let’s get started and dig into the details!
Importance of Immediate Action
immediate action In our fast-paced world, time is of the essence. When it comes to addressing a problem or issue, taking immediate action is crucial. Whether it is a personal matter or a business-related situation, delaying action can often lead to more complications and negative consequences.
Imagine a leaking pipe in your house. If you wait too long to fix it, the water damage could spread, causing even more expensive repairs. The same concept applies to various aspects of life.
When faced with a challenge, acting promptly can prevent further damage and help find a resolution more efficiently. So, why is immediate action so important? Let’s explore this further.
Materials You’ll Need
If you have a small chip in your windshield, you may be wondering how to repair it yourself. Fortunately, it is possible to fix a surface chip on your windshield without having to replace the entire thing. To do this, you’ll need a few materials.
First, you’ll need a windshield repair kit, which can be easily purchased online or at an automotive store. These kits usually come with a resin and an applicator that you’ll use to fill in the chip. Additionally, you’ll need a piece of clear tape to hold the applicator in place while the resin sets.
Some kits also include a suction cup device that can be helpful for positioning the applicator correctly. With these materials in hand, you’ll be well-equipped to tackle the task of repairing your windshield chip.
Glass Repair Kit
glass repair kit
Clean Cloth
clean cloth, materials needed
Rubbing Alcohol
“Rubbing alcohol” Rubbing alcohol is a versatile and handy product that can be found in almost every household. Whether you need to clean wounds, disinfect surfaces, or remove stubborn stains, rubbing alcohol can get the job done. But before you go ahead and start using it, there are a few materials you’ll need to ensure you’re using it correctly and effectively.
First and foremost, you’ll need the rubbing alcohol itself. You can easily find this in most drugstores or supermarkets, usually in the first aid aisle. Look for a bottle that has a high percentage of isopropyl alcohol, as this will provide the most effective cleaning and disinfecting power.
Additionally, you’ll need some clean cotton balls or gauze pads to apply the rubbing alcohol. These will help you control the amount of alcohol you’re using and prevent any cross-contamination. Lastly, make sure to have some disposable gloves on hand.
Rubbing alcohol can be drying to the skin, and wearing gloves will protect your hands from any irritation or dryness. With these materials at hand, you’re ready to start using rubbing alcohol for all your cleaning and disinfecting needs.
Safety Gloves
safety gloves, materials
Step-by-Step Guide
So you’ve noticed a little chip in your windshield, huh? Don’t panic! With a few simple steps, you can repair it yourself and save some money. First off, you’ll need a windshield repair kit, which you can find at most automotive stores. These kits typically come with a special resin that will fill in the chip and prevent it from spreading.
Begin by thoroughly cleaning the area around the chip with a glass cleaner. Next, take the applicator tool from your kit and inject the resin into the chip. Make sure to follow the instructions on your kit carefully, as the process may vary slightly depending on the brand.
Once you’ve injected the resin, cover the area with a small piece of clear plastic and hold it in place with some tape. This will help the resin to dry evenly and prevent any dirt or debris from getting in. Leave it to cure for the specified amount of time, then remove the plastic and scrape away any excess resin with a razor blade.
Finally, give your windshield a good clean to remove any leftover residue. And that’s it – your windshield is now as good as new! Just remember, if the chip is larger than a quarter or if the crack extends beyond the surface of the glass, it’s best to leave the repair to the professionals. But for those small surface chips, this step-by-step guide should do the trick.
Happy repairing!
Step 1: Clean the Chip
cleaning a chip, how to clean a chip, cleaning computer chips, cleaning electronic chips
Step 2: Apply the Glass Repair Resin
glass repair resin Once you have prepared the damaged area of your glass and ensured it is clean and dry, it’s time to apply the glass repair resin. This step is crucial in repairing any cracks or chips in your glass, as the resin will fill in the damaged area and restore its structural integrity. To apply the resin, you will need to carefully follow the instructions provided with your glass repair kit.
Typically, you will start by using a dropper or syringe to release a few drops of resin onto the damaged area. Make sure to only use the amount specified in the instructions, as using too much resin can result in a messy repair. After applying the resin, you will need to spread it evenly over the damaged area using a small brush or toothpick.
This will ensure that the resin fills in the cracks or chips completely and bonds well with the glass. Take your time during this step and be thorough to achieve the best results. Once the resin is spread evenly over the damaged area, you may need to use a UV light or curing agent to harden the resin.
This step is important as it will solidify the resin and make it durable. Follow the instructions provided with your kit to determine the correct amount of time needed for the resin to cure. After the resin has cured, you can further smooth out the repaired area using a razor blade or glass polishing compound.
This will help blend the repaired area with the rest of the glass, making it nearly invisible. In conclusion, applying the glass repair resin is a crucial step in fixing any cracks or chips in your glass. By following the instructions provided with your kit and taking your time, you can achieve a successful repair that restores the structural integrity of your glass.
Step 3: Cure the Resin
curing the resin, curing resin process, resin curing technique In this step, we will focus on curing the resin to achieve a strong and durable final product. Curing is a process of hardening the resin through the use of heat, light, or chemicals. Proper curing is essential to ensure that the resin is fully cured and therefore stable and long-lasting.
There are different techniques and methods for curing resin, and the choice depends on the type of resin used and the desired outcome. The two most common methods are heat curing and UV curing. Heat curing involves using heat to accelerate the curing process.
This can be done by placing the resin in a heated chamber or using a heat gun or oven. The resin is heated to a specific temperature for a certain amount of time to ensure complete curing. Heat curing is often used for thermosetting resins, such as epoxy, which require heat to activate the curing agent and create strong chemical bonds.
UV curing, on the other hand, involves the use of ultraviolet (UV) light to cure the resin. UV curing is mainly used for UV-curable resins, such as certain types of acrylics and polyesters. The resin is exposed to UV light, which initiates a chemical reaction that leads to curing.
UV curing is a fast and efficient method, as it only takes a few seconds to minutes to cure the resin. Regardless of the curing method used, it is crucial to follow the manufacturer’s instructions and guidelines. This includes the recommended curing temperature, curing time, and any other specific instructions.
It is also important to ensure proper ventilation during the curing process to prevent any harmful fumes from building up. Curing the resin is a critical step in the resin crafting process, as it determines the strength and durability of the final product. It is essential to follow the correct curing technique to ensure that the resin cures properly and achieves optimal performance.
Step 4: Polish the Repair Area
When it comes to repairing a vehicle, the final step is to polish the repair area. This step is crucial in order to achieve a smooth and seamless finish. To start, you will need to clean the repair area thoroughly to remove any dust, dirt, or debris.
This can be done using a microfiber cloth and a gentle cleaning solution. Once the area is clean, you can begin the polishing process. Begin by applying a small amount of polishing compound to a foam pad or a soft cloth.
You will then need to work the compound into the repair area using circular motions. This will help to remove any imperfections and create a smooth surface. After polishing, it is important to wipe away any excess compound using a clean cloth.
Finally, you can apply a coat of wax or a clear coat to protect the repaired area and give it a glossy finish. Polishing the repair area is the final step in the repair process, and it is essential for achieving a professional-looking result.
Tips for a Successful Repair
If you’ve noticed a small chip on the surface of your windshield, it’s important to take action right away to prevent further damage. Luckily, repairing a windshield surface chip is a relatively straightforward process that you can do yourself. Here are a few tips to ensure a successful repair.
First, gather all the necessary materials, including a windshield repair kit, which typically includes a resin, adhesive strips, and a curing lamp. Next, clean the chip and surrounding area with a mild detergent and water. Make sure the surface is completely dry before proceeding.
Then, apply the resin to the chip, making sure to fill it completely. Use the adhesive strip to cover the surface, and then apply the curing lamp to set the resin. Afterward, remove the adhesive strip and use a razor blade to smooth any excess resin.
Finally, polish the surface using a glass cleaner or a microfiber cloth. Remember, the key to a successful repair is to act quickly and follow the instructions included in the kit. With a little patience and attention to detail, you can have your windshield looking as good as new in no time.
Repair in Moderate Temperature
temperature, repair, successful Moderate temperature is ideal for conducting repairs as extreme heat or cold can adversely affect the outcome. When it comes to repairing various objects, whether it’s electronics, appliances, or even vehicles, it is important to consider the temperature in which the repair is taking place. Moderate temperatures provide a stable environment that allows for more precise and accurate repairs.
Extreme heat can cause components to overheat and potentially damage them, while extreme cold can make certain materials brittle and prone to breaking. By conducting repairs in moderate temperatures, you increase the chances of success and ensure that the repaired object will function optimally. So, the next time you need to repair something, make sure to choose a moderate temperature environment for the best results.
Keep the Surface Dry
surface repair, successful repair, keep the surface dry
Avoid Direct Sunlight
Avoid Direct Sunlight to Protect Your Repairs When it comes to making repairs, it’s important to consider the environment you’re working in. One factor that can greatly affect the success of your repair is direct sunlight. That’s right, the sun’s rays can have a detrimental impact on your repairs.
Exposing your repair job to direct sunlight can cause materials to warp, fade, or become brittle. For example, if you’re working with adhesives or sealants, the heat from the sun can cause them to dry out too quickly or not adhere properly. And if you’re working with paint or finishes, the UV rays from the sun can fade or discolor them over time.
To avoid these issues, it’s best to work in a shaded or indoor area whenever possible. If you can’t avoid direct sunlight, consider using a UV-resistant material or applying a protective coating to your repair. You can also try covering the repair with a tarp or sheet to provide temporary shade.
By taking these precautions, you can ensure that your repairs will last and look their best for years to come. So remember, when working on repairs, always avoid direct sunlight to protect your hard work.
Follow Instructions on the Kit
Follow Instructions on the Kit When it comes to repairing things around the house, it can be tempting to just dive in headfirst and hope for the best. But if you want to have a successful repair, it’s important to take the time to read and follow the instructions on the kit. Whether you’re fixing a leaky faucet, patching a hole in the wall, or assembling a piece of furniture, the instructions provided can be a valuable resource.
Following the instructions ensures that you have a step-by-step guide to follow, so you know exactly what you need to do. It can save you time and frustration by preventing you from making mistakes or missing important steps. Plus, the instructions often include tips and tricks to help make the repair process easier and more efficient.
Taking the time to read the instructions also gives you the opportunity to gather all the necessary tools and materials before you start. This can help prevent any delays or interruptions during the repair and ensure that you have everything you need to complete the job. In addition, following the instructions on the kit can help you avoid potential hazards or safety risks.
Some repairs may require specific precautions or safety equipment, and the instructions will guide you on how to safely complete the repair without putting yourself or others at risk. So, next time you have a repair to tackle, take a moment to read and follow the instructions on the kit. It may seem like a small step, but it can make a big difference in the success and efficiency of your repair.
Inspect the Repair
“‘Inspect the Repair” is a critical step in ensuring a successful repair. Once the repair has been completed, it’s important to carefully inspect the work to make sure everything is in order. Start by giving the repaired area a visual examination, checking for any obvious defects or inconsistencies.
Next, test the functionality of the repair to ensure that it is working as intended. This could involve turning a device on and off, running a diagnostic test, or simply using the repaired item as you normally would. It’s also a good idea to double-check any replacement parts to ensure they are the correct ones and are installed correctly.
By thoroughly inspecting the repair, you can catch any potential issues early on and address them before they become bigger problems. Remember, a successful repair is not just about fixing the issue, but also ensuring that the repair is of high quality and will stand the test of time.”
Conclusion
In conclusion, repairing a windshield surface chip is like performing delicate surgery on your car’s face. With the right tools, patience, and a steady hand, you can restore your windshield to its former glory and say goodbye to those unsightly chip scars. Just remember to channel your inner windshield wizard and fix that chip like a boss.
Because, let’s face it, you don’t want your car to look like it just escaped a rock onslaught. So, go forth and conquer that chip – your windshield will thank you for it!”
Protect Your Windshield
windshield repair, protect windshield, successful repair, cracked windshield fix, windshield replacement The windshield of your car is one of its most vulnerable parts and can easily get damaged due to a variety of reasons. However, a cracked or chipped windshield doesn’t always mean that it needs to be replaced. In many cases, a successful repair can be done to fix the issue and save you both time and money.
So, how can you ensure a successful repair for your windshield? First and foremost, it’s crucial to act quickly. The longer you wait to address the issue, the more likely it is to spread and worsen. Cracks and chips can quickly turn into larger problems that require a full replacement.
By addressing the issue promptly, you increase the chances of a successful repair. Secondly, make sure to choose a reputable and professional windshield repair service. An experienced technician will have the necessary skills and tools to effectively fix your windshield.
Additionally, they will be able to provide you with expert advice on whether a repair or replacement is the best course of action for your specific situation. Finally, take steps to protect your windshield from further damage. Avoid driving on rough roads or slamming your car doors, as these actions can cause the crack or chip to worsen.
Additionally, consider parking your car in a covered area to protect it from hail or falling objects. By following these tips, you can increase the chances of a successful repair and prolong the lifespan of your windshield. Remember, a small crack or chip doesn’t have to mean a full windshield replacement.
Take action and protect your windshield today.
Safety First
“Tips for a Successful Repair” When it comes to repairing something, whether it’s a leaky faucet or a broken gadget, safety should always be your number one priority. Here are some essential tips for a successful repair while ensuring your well-being. First and foremost, make sure to turn off the power before attempting any electrical repairs.
This not only protects you from electrocution but also prevents any accidental damage to the electrical components. Similarly, when working with gas appliances, remember to shut off the gas supply and ventilate the area to avoid the risk of gas leaks or explosions. Next, it’s crucial to have the right tools for the job.
Using the wrong tools can not only make the repair process more difficult but also increase the risk of injury. Invest in a good quality tool set that includes screwdrivers, pliers, wrenches, and other essential tools. Additionally, always use the correct size and type of tool for the task at hand.
Take your time and follow the instructions carefully. Rushing through a repair can lead to mistakes and accidents. If you’re unsure about any step, don’t hesitate to consult the instruction manual or seek advice from professionals.
It’s better to be safe than sorry. Always wear appropriate safety gear, such as safety goggles, gloves, and a dust mask, depending on the nature of the repair. These protective equipment help shield you from potential hazards like flying debris, harmful chemicals, or accidental spills.
Lastly, if the repair seems beyond your capabilities or involves complex systems, it’s best to call in a professional. There’s no shame in seeking help, especially when it comes to safety. Professionals have the knowledge and expertise to tackle repairs that are beyond the average person’s skill level.
Consult a Professional If Needed
washing machine repair, consult a professional, successful repair Hey there, DIY enthusiasts! We all love a good repair project, especially when it saves us some money. Whether it’s a leaky faucet or a clogged drain, there’s a certain satisfaction that comes from fixing it ourselves. But when it comes to more complex appliances like our beloved washing machines, sometimes it’s best to call in the professionals.
When you find yourself faced with a washing machine repair, it’s important to assess the situation. Are you dealing with a simple issue like a loose hose or a minor leak? If so, then go ahead and give it a shot – with caution, of course. But if you’re not sure what’s causing the problem or you don’t have the necessary tools and expertise, it’s best to consult a professional.
A professional repair service not only has the knowledge and experience to diagnose the problem correctly, but they also have the right tools and replacement parts on hand. They can ensure that the repair is done correctly and efficiently, saving you time and frustration in the long run. Plus, if your washing machine is still under warranty, attempting a DIY repair could void it.
In addition to saving you time and potential headaches, consulting a professional can also help prevent further damage to your washing machine. Sometimes what seems like a simple fix can turn into a major repair job if not handled properly. By allowing an expert to assess and repair your washing machine, you can avoid the risk of making the problem worse.
So, while it’s great to tackle DIY projects around the house, it’s important to know when to call in the professionals. Washing machine repair can be complex and requires specific knowledge and tools. By consulting a professional, you can ensure a successful repair that lasts.
FAQs
What causes surface chips on a windshield?
Surface chips on a windshield are typically caused by flying debris, such as rocks or pebbles, striking the glass while driving.
How do I know if a surface chip on my windshield can be repaired?
Surface chips on windshields can often be repaired if they are smaller than a quarter in size and not in the driver’s line of sight.
Can surface chips on a windshield be repaired without professional help?
While some DIY windshield repair kits are available, it is generally recommended to seek professional help for repairing surface chips on a windshield to ensure a proper and long-lasting fix.
What are the potential risks of driving with a surface chip on a windshield?
Driving with a surface chip on a windshield can pose risks, as the chip can weaken the integrity of the glass and potentially lead to further damage or shattering if left untreated.
How long does it take to repair a surface chip on a windshield?
The time required to repair a surface chip on a windshield can vary depending on the size and extent of the damage, but it can typically take around 30 minutes to an hour.
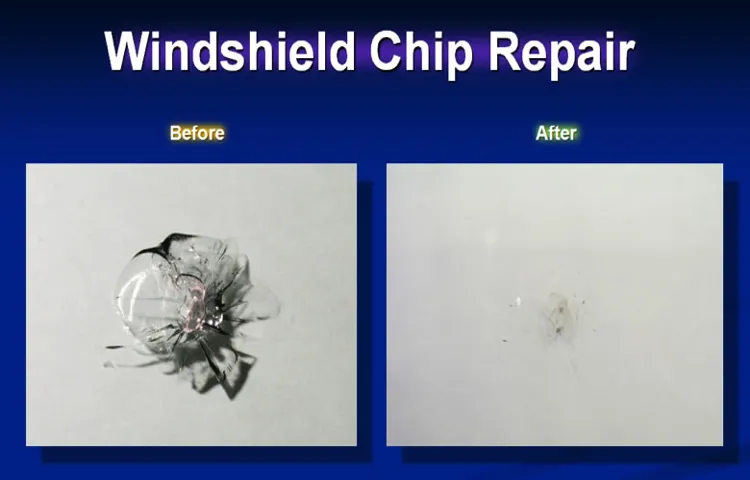
Will a repaired surface chip on a windshield be completely invisible?
While windshield repair techniques have advanced, it is not guaranteed that a repaired surface chip will be completely invisible. However, professional repairs can greatly minimize the visibility of the chip.
Can a surface chip on a windshield spread and turn into a crack?
Yes, if left untreated, a surface chip on a windshield has the potential to spread and turn into a crack, which can significantly compromise the structural integrity of the glass.
How much does it cost to repair a surface chip on a windshield? A8. The cost of repairing a surface chip on a windshield can vary depending on factors such as the size and location of the chip, as well as the service provider. On average, it can range from $50 to $150.
Are there any temporary measures I can take to prevent further damage to a surface chip on a windshield?
Applying clear nail polish or a windshield chip repair kit can help temporarily seal the chip and prevent dirt and moisture from entering. However, it is still important to seek professional repair as soon as possible.
Can I claim insurance for the repair of a surface chip on my windshield?
Many insurance policies cover windshield repairs, including surface chips, without affecting your premiums. It is advisable to check with your insurance provider to see if your policy covers windshield repairs.
Is it necessary to repair a surface chip on a windshield if it does not obstruct my view?
It is still recommended to repair a surface chip on a windshield, even if it does not obstruct the view, as the chip can worsen over time and compromise the overall strength and safety of the glass.