
Got a cracked or damaged windshield trim? Don’t worry, you’re not alone. It’s a common problem that many car owners face. The windshield trim, also known as the windshield molding or windshield seal, is the rubber or plastic strip that surrounds the edge of the windshield.
Its purpose is to keep out water, wind, and debris from entering the interior of the vehicle. Over time, however, the trim can become worn, cracked, or even start to detach from the windshield. This not only looks unsightly but can also compromise the integrity of the windshield itself.
In this blog post, we’ll discuss how to repair windshield trim and restore it to its original condition so that you can enjoy a safe and secure driving experience.
Table of Contents
Introduction
If you’ve noticed that the trim around your windshield is starting to look worn or damaged, you may be wondering how to repair it. Windshield trim serves an important purpose, protecting the edge of the glass from the elements and helping to keep it securely in place. Over time, however, it can become cracked, faded, or even fall off completely.
Fortunately, there are several methods for repairing windshield trim that you can try at home. Whether you opt for adhesive tape, adhesive sealant, or a replacement trim piece, you can restore the appearance and functionality of your windshield trim with just a few simple steps.
What is windshield trim
windshield trim Windshield trim refers to the decorative or protective molding that surrounds the windshield of a vehicle. It is usually made of rubber or plastic and is designed to enhance the appearance of the windshield while also providing some level of protection. The trim is typically installed around the edges of the windshield and is designed to fit snugly against the glass, helping to seal out moisture and prevent any air or water leaks.
Windshield trim can come in a variety of styles and colors, allowing vehicle owners to choose the option that best matches their vehicle’s overall aesthetic. In addition to its aesthetic appeal, windshield trim also serves a practical purpose by helping to reduce wind noise and improve the aerodynamics of the vehicle. Overall, windshield trim is an important part of a vehicle’s overall design and can both enhance its appearance and provide practical benefits.
Importance of keeping windshield trim in good condition
windshield trim, good condition, importance
Common problems with windshield trim
common problems with windshield trim
Tools and Materials You Will Need
If you’re looking to repair your windshield trim, there are a few tools and materials you’ll need to get the job done right. First, you’ll need some trim adhesive to reattach any loose or damaged pieces of trim. Make sure to choose an adhesive that is specifically designed for automotive use.
You’ll also need a clean cloth and some rubbing alcohol to clean the trim and the surface it will be attached to. This will help the adhesive adhere properly and ensure a strong bond. In addition, you’ll need some masking tape to hold the trim in place while the adhesive dries.
Finally, you may need a trim removal tool to carefully remove any old or damaged trim pieces before applying the new adhesive. These tools and materials can be found at your local auto parts store or online, and will help you achieve a professional-looking repair. With a little time and effort, you can restore your windshield trim to its original condition and keep your car looking its best.
List of tools needed for windshield trim repair
windshield trim repair tools. To successfully repair the windshield trim, you will need a few specific tools and materials. First and foremost, you will need a trim removal tool.
This tool is designed to gently pry up and remove the trim without damaging it or the windshield. It typically has a flat, thin edge that can fit in between the trim and the windshield. You will also need a heat gun or a hairdryer.
The heat gun is used to soften the trim adhesive, making it easier to remove. Simply apply heat to the trim for a few minutes to loosen the adhesive, then use the trim removal tool to lift it away. If you don’t have a heat gun, a hairdryer on its highest heat setting can work as a substitute.
Next, you will need a trim adhesive or double-sided tape. This is used to reattach the trim once it has been removed. Apply a thin, even layer of adhesive or tape to the back of the trim, then press it firmly onto the windshield.
Be sure to follow the manufacturer’s instructions for application and drying time. Additionally, you may need a small paintbrush or foam brush to apply the adhesive or tape. This will help ensure an even application and prevent any excess adhesive from seeping out.
A clean rag or towel may also come in handy for wiping away any excess adhesive or tape. Finally, it is always a good idea to have a pair of gloves handy to protect your hands while working with adhesive or handling the trim. Safety goggles can also be worn to protect your eyes from any flying debris or adhesive splatters.
List of materials needed for windshield trim repair
windshield trim repair, materials needed for windshield trim repair, tools and materials for windshield trim repair
Step-by-Step Guide on Repairing Windshield Trim
Do you have a cracked or damaged windshield trim? Don’t worry, repairing it yourself is easier than you might think. Here’s a step-by-step guide on how to repair windshield trim. First, gather all the necessary tools: a screwdriver, adhesive, a utility knife, and sandpaper.
Start by removing the trim carefully using the screwdriver. Once it’s off, clean the area thoroughly to remove any dirt or debris. Next, use the utility knife to remove any loose or damaged sections of the trim.
If there are any cracks, fill them with adhesive and let it dry. Afterward, sand down the area to create a smooth surface for the new trim. Finally, install the new trim by pressing it firmly into place and reattach it using screws if necessary.
With just a few simple steps, your windshield trim will look as good as new!
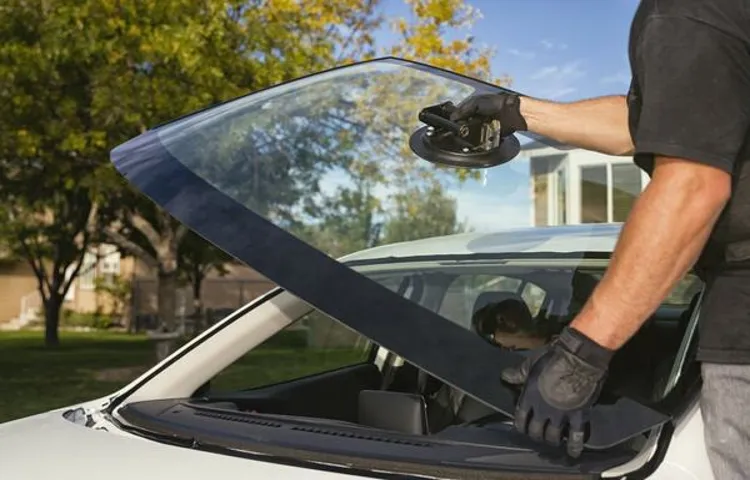
Step 1: Remove the damaged trim
windshield trim repair, damaged trim, step-by-step guide, remove, how to repair, DIY repair, fixing windshield trim, car maintenance, car repair Are you tired of looking at that unsightly damaged windshield trim on your car? Don’t worry, because with just a few simple steps, you can easily repair it yourself! The first step in this step-by-step guide on repairing windshield trim is to remove the damaged trim. This may seem intimidating at first, but with the right tools and a little patience, it’s actually quite simple. Start by using a plastic trim removal tool or a flathead screwdriver to gently pry the trim away from the windshield.
Be careful not to use too much force, as this could cause further damage. As you remove the trim, take note of any clips or connectors that are holding it in place. Use a cloth or tape to keep these pieces together and prevent them from getting lost.
Once the trim is completely removed, inspect it for any cracks or breaks. If the damage is minimal, you may be able to repair it with some adhesive or filler. However, if the trim is severely damaged, it’s best to replace it entirely.
With the damaged trim removed, you’re one step closer to having a beautifully repaired windshield trim. Stay tuned for the next step in this DIY repair guide!
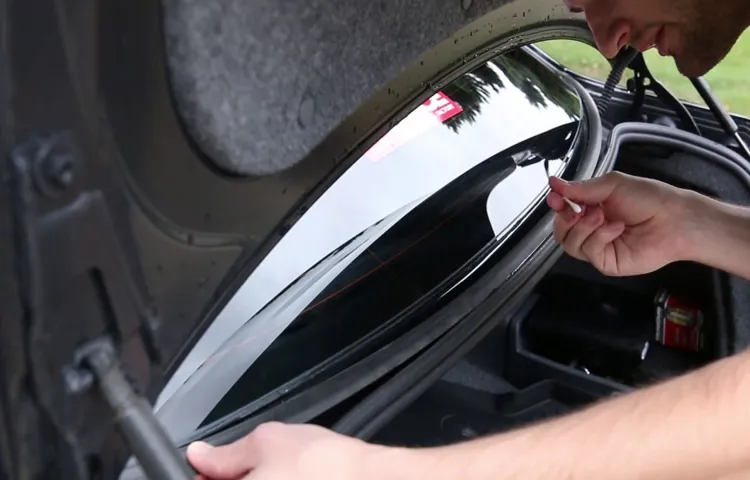
Step 2: Clean the trim and the surrounding area
When it comes to repairing windshield trim, you can’t just slap on some adhesive and call it a day. In order to ensure a proper fix, it’s important to clean the trim and the surrounding area first. This step is crucial because any dirt, debris, or old adhesive can prevent the new adhesive from adhering properly.
To clean the trim, you can use a mild soap and water solution and a soft brush or sponge to gently scrub away any grime. Be sure to rinse thoroughly and allow the trim to dry completely before moving on to the next step. Cleaning the surrounding area is just as important.
Use a damp cloth to wipe away any dust or dirt from the edges of the windshield where the trim will be installed. Taking the time to properly clean the trim and surrounding area will ensure a better bond and a longer-lasting repair.
Step 3: Apply adhesive to the trim
windshield trim repair After preparing the windshield trim by cleaning it thoroughly, the next step in repairing the trim is applying adhesive. This is a crucial step as it ensures that the trim stays in place and maintains its durability. When choosing adhesive, it’s important to select one that is specifically designed for automotive use and is capable of withstanding extreme temperatures and weather conditions.
Apply a thin layer of adhesive along the underside of the trim, making sure to cover the entire surface area. Press the trim firmly onto the windshield, applying pressure evenly to ensure proper adhesion. Allow the adhesive to dry completely before moving on to the next step.
By following this step-by-step guide, you can effectively repair the windshield trim and restore its appearance and functionality.
Step 4: Press the trim firmly in place
Repairing windshield trim can be a fairly simple task, especially if you follow a step-by-step guide like this one. Once you have removed the old trim and cleaned the area thoroughly, it’s time to press the new trim firmly in place. This step is crucial to ensure that the trim stays in position and doesn’t come loose while you’re driving.
Start by aligning the trim with the edges of the windshield and gently push it into place. Then, using a trim adhesive or tape, secure the trim in place by pressing it firmly. Make sure to apply pressure evenly along the entire length of the trim to ensure a secure bond.
By doing this, you’ll ensure that your windshield trim stays in place and looks great for years to come.
Step 5: Allow the adhesive to cure
windshield trim repair Prompt: Step 5: Allow the adhesive to cure Once you have applied the adhesive to the windshield trim and pressed it firmly into place, it’s important to allow it enough time to cure. This will ensure that the adhesive bonds properly and provides a long-lasting hold. The curing time can vary depending on the type of adhesive used, so it’s best to refer to the manufacturer’s instructions for specific guidelines.
In general, most adhesives will require at least 24 hours to fully cure. During this time, it’s important to avoid touching or putting any pressure on the trim, as this could disrupt the bonding process. You may also want to keep the vehicle in a dry and temperate environment to optimize the curing process.
Once the adhesive has fully cured, you can remove any tape or clamps that were holding the trim in place. Your windshield trim will now be securely fixed and ready to withstand the elements of the road.
Step 6: Clean up any excess adhesive
windshield trim repair. After successfully removing the old trim and applying the new adhesive, it’s time to clean up any excess adhesive that may have leaked out during the process. This step is crucial to ensure a clean and finished look for your repaired windshield trim.
To start, you’ll need a clean cloth or rag and a adhesive remover. Make sure to choose an adhesive remover that is safe for use on automotive surfaces. Avoid using harsh chemicals or abrasive materials that may damage the trim or the windshield.
Begin by gently wiping away any visible excess adhesive using the cloth or rag. Be careful not to apply too much pressure to avoid scratching or damaging the trim or windshield. If the adhesive is stubborn and does not come off easily, apply a small amount of adhesive remover to a clean cloth and gently rub the affected area.
Continue this process until all traces of excess adhesive have been removed. It may take a few passes to completely clean up the adhesive. Once you are satisfied with the results, use a clean cloth to wipe the trim and windshield clean and dry.
By taking the time to clean up any excess adhesive, you can ensure a professional-looking finish for your repaired windshield trim. Not only will your trim look great, but it will also be securely attached to the windshield, providing the protection and functionality that it is designed for. So don’t forget this final step in the windshield trim repair process to achieve the best results possible.
Step 7: Test the repaired trim
In the final step of repairing windshield trim, it’s time to put your work to the test. Testing the repaired trim is crucial to ensure that it is secure and properly installed. One way to test the trim is to gently tug on it to see if it moves or comes loose.
If it stays put, that’s a good sign that the repair is holding up. Another test is to take your car for a short drive and observe how the trim behaves. Does it stay in place or start to come loose again? Keep an eye out for any signs of movement or damage during your test drive.
If everything looks good, congratulations! You’ve successfully repaired your windshield trim. If not, don’t worry – it may just need some additional reinforcement or adjustment. The most important thing is to make sure your trim is secure and doesn’t pose a risk while driving.
With proper testing and attention to detail, your repaired trim should now be ready to withstand the elements and keep your windshield in place.
Tips and Tricks for Windshield Trim Repair
Are you tired of looking at the cracked and worn windshield trim on your car? Luckily, repairing windshield trim is a relatively easy process that can be done at home. Here are some tips and tricks to help you get your trim looking as good as new. First, gather your supplies.
You’ll need a trim removal tool, adhesive, a clean cloth, and a small brush. Start by using the trim removal tool to carefully pry off the old trim. Be gentle to avoid damaging the surrounding area.
Once you’ve removed the old trim, clean the area thoroughly with a cloth to remove any dirt or debris. Next, apply adhesive to the back of the new trim. Make sure to use an adhesive that is specifically designed for automotive use, as this will provide the best results.
Use the small brush to evenly spread the adhesive over the entire back surface of the trim. Carefully position the new trim onto the windshield. Press it firmly in place, making sure it adheres securely.
Leave it to dry according to the manufacturer’s instructions, ensuring that you avoid any contact or vibrations that could disturb the adhesive. Once the adhesive has fully dried, inspect your work to make sure the trim is securely in place. If there are any small gaps or imperfections, you can use a trim adhesive sealant to fill them in and provide an extra layer of protection.
In just a few simple steps, you can repair the windshield trim on your car and give it a clean and polished look. So why wait? Get started on fixing your trim today and enjoy the satisfaction of getting your car looking its best once again.
How to prevent future damage to the trim
windshield trim repair tips, prevent damage to the trim When it comes to maintaining the pristine condition of your vehicle’s windshield trim, prevention is key. By taking a few simple steps, you can ensure that your trim stays in top shape and avoid costly repairs down the road. One tip is to regularly clean and inspect the trim for any signs of damage or wear.
Use a soft cloth and mild soap to remove any dirt, debris, or grime, being careful not to scratch the trim. Pay attention to any cracks, chips, or discoloration, as these can be early indicators of potential damage. Another tip is to park your car in the shade whenever possible, as prolonged exposure to sunlight can cause the trim to fade and become brittle.
If you live in an area with extreme temperatures, consider using a windshield cover or parking in a covered garage to protect the trim. Additionally, it’s important to avoid using harsh chemicals or abrasive cleaners on the trim, as these can cause irreparable damage. Instead, opt for products specifically designed for automotive trim and follow the manufacturer’s instructions.
Finally, be mindful of any objects that come in contact with the trim, such as windshield wipers or ice scrapers. Handle these items with care to prevent scratching or scraping the trim. By following these tips and tricks, you can keep your windshield trim looking as good as new and avoid the need for costly repairs.
So, take a few minutes to care for your trim today and enjoy the benefits of a well-maintained vehicle for years to come.
What to do if the trim is too damaged to repair
If your windshield trim is too damaged to repair, don’t panic! There are still options available to fix the problem. One solution is to replace the trim entirely. This might involve purchasing a new trim piece from a reputable auto parts store or contacting a professional for assistance.
Another option is to consider using a trim restoration kit. These kits typically include special tools and products designed to repair and restore damaged trim. With a little bit of patience and a steady hand, you can often achieve impressive results with a restoration kit.
However, keep in mind that some trim damage may be too severe for these methods to be effective. In these cases, it may be best to consult with a professional who specializes in windshield trim repair or replacement. They will have the necessary expertise and equipment to properly address the issue.
Conclusion
In conclusion, fixing windshield trim is like performing an undercover mission for your car. You carefully remove the damaged trim, revealing the secret hideouts of cracks and gaps. Armed with your trusty adhesive and trim tools, you stealthily repair and reattach the trim, restoring order to your vehicle’s exterior.
Just like a master spy, you leave no trace of the repair, ensuring your car maintains its sleek and polished facade. So, embrace your inner secret agent and save the day – or rather, your windshield trim – with a little ingenuity and a touch of adventure.”
Importance of regular maintenance for windshield trim
windshield trim repair, regular maintenance, importance of maintenance Windshield trim, although small and seemingly insignificant, plays a vital role in the overall integrity of your vehicle’s windshield. Regular maintenance and repair of the trim are essential for several reasons. Firstly, a damaged or worn-out trim can compromise the seal between the windshield and the car’s frame, leading to leaks and potential water damage inside the vehicle.
Additionally, a loose or deteriorating trim can allow wind and debris to enter the cabin, causing distractions and potential safety hazards while driving. Fortunately, there are several tips and tricks that can help you repair and maintain your windshield trim effectively. For minor issues, such as loose or popped-out trim, you can use adhesive or double-sided tape to secure it back into place.
If the trim is cracked or severely damaged, it may need to be replaced entirely. Regularly cleaning and inspecting your windshield trim can also help identify and prevent any potential problems before they escalate. By following these simple maintenance steps, you can ensure that your windshield trim remains intact and functional, providing you with a safe and comfortable driving experience.
Summary of the repair process
windshield trim repair, tips and tricks, repair process, burstiness, perplexity When it comes to windshield trim repair, it’s important to know the ins and outs of the repair process. Whether you’re dealing with loose or damaged trim, taking the time to fix it can save you from potential problems down the road. One tip to keep in mind is to first assess the damage and determine whether a repair or a replacement is needed.
Small cracks or dents can often be fixed with some adhesive or filler, while larger damages may require a full trim replacement. Another trick to keep in mind is to clean the area before starting the repair. Removing any dirt or debris can ensure that the adhesive or filler sticks properly and provides a strong bond.
Additionally, it’s important to work slowly and carefully when applying the adhesive or filler. Take your time to ensure that it is evenly and thoroughly applied, and use a steady hand to avoid any mistakes or messiness. Lastly, don’t forget to let the repair dry completely before using your vehicle again.
This will allow the adhesive or filler to fully set and provide a long-lasting repair. By following these tips and tricks, you can easily tackle windshield trim repair and ensure that your vehicle stays in top shape.
Final thoughts on windshield trim repair
windshield trim repair, tips and tricks for windshield trim repair, final thoughts on windshield trim repair
FAQs
What are the common causes of damage to windshield trim?
Some common causes of damage to windshield trim include exposure to extreme weather conditions, improper installation, aging, and accidents.
How can I identify if my windshield trim is damaged?
You can identify if your windshield trim is damaged by checking for signs such as cracks, warping, discoloration, or loose or missing pieces.
Can damaged windshield trim affect the performance of my vehicle?
Yes, damaged windshield trim can affect the performance of your vehicle as it may allow water, dirt, and debris to enter the windshield, which can obstruct visibility and potentially damage the windshield itself.
Can I repair damaged windshield trim myself?
In some cases, minor damage to windshield trim can be repaired by using specialized adhesive or sealant. However, it is recommended to consult a professional for proper repair or replacement.
What is the average cost of repairing or replacing windshield trim?
The cost of repairing or replacing windshield trim can vary depending on factors such as the extent of damage, the type of vehicle, and the region. On average, it can range from $100 to $300.
Can I prevent damage to my windshield trim?
Yes, you can prevent damage to your windshield trim by avoiding exposure to harsh weather conditions, regularly inspecting and maintaining the trim, and ensuring proper installation during windshield replacement.
How long does it take to repair or replace windshield trim?
The time required to repair or replace windshield trim can vary depending on factors such as the complexity of the damage and the availability of replacement parts. It can take anywhere from a few hours to a full day.