
Have you ever been driving down the road, and suddenly realized that your windshield washer fluid is not spraying as it should? It can be frustrating and dangerous to have a dirty or obstructed windshield while driving. The culprit behind this issue is often a malfunctioning windshield washer fluid reservoir. In this blog post, we’ll discuss how to repair your windshield washer fluid reservoir and get your wipers working properly again.
Whether you’re a DIY enthusiast or just looking to save some money, this guide will provide you with step-by-step instructions on how to fix this common automotive problem. So grab your tools and let’s get started on fixing your windshield washer fluid reservoir!
Table of Contents
Introduction
Are you having trouble with your windshield washer fluid not spraying properly? One possible solution to this issue is to repair the windshield washer fluid reservoir. The reservoir holds the washer fluid and supplies it to the washer pump, which then sprays the fluid onto your windshield. Over time, the reservoir can become damaged or develop leaks, causing the washer fluid to not reach the pump.
To repair the reservoir, you will need to locate the source of the leak or damage and either patch it up or replace the reservoir altogether. This can be a fairly simple DIY project that can save you money on labor costs. By following a few simple steps, you can have your windshield washer fluid reservoir back in working order in no time.
Overview of the windshield washer fluid reservoir
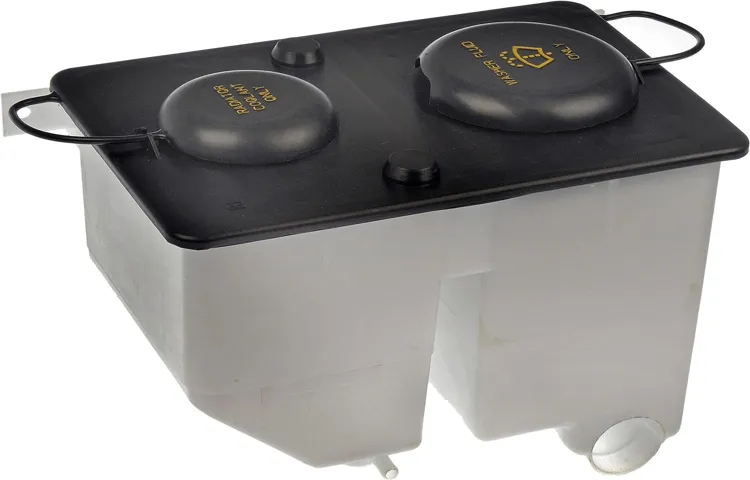
windshield washer fluid reservoir Introduction The windshield washer fluid reservoir is a vital component of a car’s windshield washing system. It is where the washer fluid is stored until it is needed to clean the windshield. This reservoir holds a specific amount of fluid, usually several liters, and is designed to be easily accessible for refilling.
The reservoir is typically made of a durable plastic material that is resistant to corrosion and can withstand the various temperatures and conditions that it is exposed to. Without a properly functioning reservoir, the windshield washing system would not be able to effectively clean the windshield, which could compromise visibility and safety while driving. In this blog section, we will explore the features and functions of the windshield washer fluid reservoir in more detail.
Importance of a functioning windshield washer fluid reservoir
windshield washer fluid reservoir, importance
Common problems with the reservoir
common problems with the reservoir
Tools and Materials
If your windshield washer fluid reservoir is cracked or leaking, it’s important to repair it as soon as possible to ensure your windshield wipers can effectively clear your view. The good news is that repairing the reservoir is a simple task that you can do yourself with just a few tools and materials. To start, you’ll need a replacement reservoir, which you can easily find online or at an auto parts store.
You’ll also need a screwdriver, pliers, and a hose clamp. First, locate the reservoir under the hood of your car and disconnect the negative battery cable. Then, use the screwdriver to remove the screws holding the reservoir in place.
Once the reservoir is removed, disconnect any hoses or wiring connected to it. After that, use the pliers to remove any hose clamps holding the hoses in place. Once the old reservoir is removed, install the new one by reversing the steps.
Connect the hoses and wiring, tighten the hose clamps, and secure the reservoir with the screws. Finally, reconnect the negative battery cable and test the windshield washer system to ensure it’s working properly. With just a bit of time and effort, you can easily repair your windshield washer fluid reservoir and keep your windshield clear of dirt and debris.
List of tools needed for the repair
When it comes to repairing something, having the right tools is essential. Before you begin any repair project, it’s important to know what tools and materials you’ll need. Here is a list of some of the most commonly used tools for repairs.
First off, you’ll need a basic set of hand tools. This includes screwdrivers, both flathead and Phillips head, as well as a set of adjustable wrenches. These tools are essential for loosening and tightening screws and bolts.
Next, you’ll want to have a good pair of pliers, such as needle-nose pliers and slip-joint pliers. These tools are great for gripping and bending wires and other small objects. Depending on the project, you may also need a hammer.
Whether it’s driving in nails or removing stubborn parts, a hammer is a versatile tool that every repair person should have in their arsenal. In addition to hand tools, having a power drill can make many repair jobs much easier. A drill allows you to quickly and efficiently drill holes and drive screws into various materials.
Be sure to have a set of drill bits and screwdriver bits to accompany your drill. Lastly, it’s important to have safety gear on hand. This includes safety glasses to protect your eyes from debris, as well as gloves to protect your hands.
Safety should always be a top priority when working on any repair project. Having the right tools and materials is crucial for a successful repair. By being prepared and having the necessary tools on hand, you’ll be ready to tackle any repair project that comes your way.
List of materials needed for the repair
List of materials needed for the repair To successfully complete a repair, you’ll need a variety of tools and materials. These are essential for any DIY project, and it’s important to gather everything you need before you start. Here is a list of the most common tools and materials you might need:
Screwdrivers: Various sizes and types of screwdrivers are essential for many repairs. Make sure you have a set that includes both flathead and Phillips head screwdrivers.
Pliers: Pliers are useful for gripping, bending, and cutting various materials. You’ll want a couple of different types, such as regular pliers and needle-nose pliers.
Hammer: A hammer is a must-have tool for many repairs. Make sure you have a sturdy hammer with a comfortable grip.
Measuring tape: Accurate measurements are crucial for many repairs. A retractable measuring tape is the best tool for the job.
Level: When you need to ensure that something is perfectly straight or level, a level is needed. Utility knife: A sharp utility knife is essential for cutting various materials, including tape and packaging.
Step-by-Step Guide
If your windshield washer fluid reservoir is leaking or damaged, don’t fret! Repairing it yourself can be a straightforward and cost-effective solution. Here’s a step-by-step guide on how to repair your windshield washer fluid reservoir. First, locate the reservoir under the hood of your car.
It is typically a small, plastic container with a cap. Once you have found it, remove the cap and inspect the reservoir for any cracks or leaks. If you find any, it’s time to move on to the next step.
Next, drain the washer fluid from the reservoir. You can do this by either disconnecting the hose from the bottom of the reservoir and letting the fluid drain into a container or using a suction pump to remove the fluid. Make sure to properly dispose of the fluid according to local regulations.
After draining the fluid, clean the reservoir thoroughly with warm, soapy water. Remove any dirt, debris, or residue that may be present. Rinse the reservoir with clean water and allow it to dry completely.
Once the reservoir is dry, it’s time to repair the cracks or leaks. If the damage is minor, you can use a plastic repair kit or epoxy to seal the cracks. Follow the instructions on the product carefully and apply the repair material evenly over the damaged area.
Allow it to dry according to the manufacturer’s instructions. If the damage is more severe or the reservoir cannot be repaired, you may need to replace it. Visit your local automotive store or dealership to purchase a replacement reservoir.
Step 1: Prepare the workspace
workspace, setup, organize, productivity, work environment Are you looking to increase your productivity and make the most of your workday? One of the first steps you can take is to prepare your workspace. Having an organized and well-designed work environment can make a significant difference in your focus and overall efficiency. So, where do you start? The first step is to declutter your workspace.
Remove any unnecessary items that are taking up space and creating distractions. Sort through your papers and files, and create a system for organizing them. Consider investing in storage solutions such as file organizers, shelves, or bins to keep everything in its place.
Next, arrange your desk in a way that maximizes your comfort and efficiency. Position your computer monitor at eye level to avoid straining your neck, and keep essential items within reach to minimize the need for constant movement. Finally, add some personal touches to make your workspace more inviting and inspiring.
Plants, pictures, or motivational quotes can help create a positive work atmosphere. Remember, a well-prepared workspace sets the foundation for a productive workday.
Step 2: Drain the windshield washer fluid
windshield washer fluid, car maintenance Have you noticed that your windshield washer fluid is running low? It’s important to regularly check and refill the fluid in order to maintain clear visibility while driving. But what if you need to completely drain the windshield washer fluid? Whether you’re changing the fluid or preparing your car for storage, draining the fluid is a simple process that can be done at home. In this step-by-step guide, we’ll walk you through the process of draining the windshield washer fluid from your car.
So grab your tools and let’s get started!
Step 3: Remove the reservoir from the vehicle
In this step-by-step guide, we will now move on to the third step of removing the reservoir from the vehicle. This step is crucial in the process of replacing or repairing the reservoir. To begin, locate the reservoir in your vehicle.
It is usually located near the windshield, on the passenger side of the engine compartment. Once you have located the reservoir, you will need to disconnect it from any hoses or connectors that are attached to it. You can do this by using a wrench or a pair of pliers to loosen the clamps and carefully detach the hoses.
Once the hoses are disconnected, you can then remove the bolts or screws that are securing the reservoir in place. Once the bolts or screws are removed, you can then carefully lift the reservoir out of the engine compartment. It is important to be gentle when removing the reservoir to avoid any damage to the surrounding components.
Step 4: Inspect the reservoir for damage
“reservoir inspection” Inspecting the reservoir for damage is a crucial step in maintaining the functionality and longevity of your system. It’s important to regularly check for any signs of wear and tear to ensure that the reservoir is in good working condition. Start by visually inspecting the exterior of the reservoir for any cracks, leaks, or signs of corrosion.
Pay close attention to the areas around the seals and fittings, as these are common areas of vulnerability. If you notice any damage, it’s important to address it immediately to prevent further problems down the line. Additionally, you should also check the interior of the reservoir for any debris or contamination that could affect its performance.
This can be done by flushing the reservoir with clean water and inspecting the drained water for any signs of particles or sediment. By regularly inspecting your reservoir, you can catch any potential issues early on and take the necessary steps to resolve them, ensuring that your system continues to function optimally.
Step 5: Repair or replace the damaged parts
Once you have identified all the damaged parts in your car, it’s time to take action and either repair or replace them. This step is crucial for restoring your vehicle to its original condition and ensuring its optimal performance. First, you need to determine if the damaged part can be repaired or if it needs to be replaced altogether.
In some cases, minor damages can be fixed through repairs, saving you both time and money. However, if the damage is extensive or irreparable, it’s best to opt for a replacement instead. This may involve purchasing a new part or finding a compatible used one.
It’s important to choose high-quality parts that are designed for your specific make and model to ensure a proper fit and function. Once you have the necessary parts, you can either attempt the repairs yourself if you have the knowledge and skills or take the vehicle to a professional mechanic for assistance. Remember, the goal is to restore your car’s functionality and appearance, so don’t compromise on the quality of the replacement parts or the expertise needed for the repairs.
Step 6: Reinstall the reservoir
“reinstall the reservoir” Once you have completed the previous steps of draining the coolant and removing the reservoir, it’s time to reinstall it back into your vehicle. This step is crucial as the reservoir plays an important role in the proper functioning of your vehicle’s cooling system. To start, make sure the reservoir is clean and free from any dirt or debris.
Then, position the reservoir back into its mounting bracket or location, ensuring it is secure and properly aligned. Next, reattach any necessary hoses or connections, making sure they are tight and secure. Finally, refill the reservoir with the appropriate coolant according to your vehicle’s specifications.
Remember to follow the manufacturer’s guidelines and properly bleed the cooling system if necessary. By reinstalling the reservoir correctly, you will ensure that your vehicle’s cooling system is functioning optimally and prevent any potential issues.
Step 7: Refill the windshield washer fluid
windshield washer fluid, fill, refill, step-by-step guide
Tips and Precautions
If you’re experiencing issues with your windshield washer fluid reservoir, there are a few tips and precautions you can take to repair it. First, it’s important to identify the source of the problem. Check for any visible cracks or leaks in the reservoir.
If you notice any, you can try using a strong adhesive or epoxy to seal them. However, keep in mind that this may only be a temporary fix and it’s best to replace the reservoir if it’s severely damaged. Additionally, make sure that all the connections and hoses are securely attached and not clogged.
If you’re unsure how to proceed, it’s always a good idea to consult a professional to avoid any further damage. Remember to always follow the manufacturer’s instructions and take safety precautions when working with any automotive fluids or components. By properly maintaining and repairing your windshield washer fluid reservoir, you can ensure that it functions effectively and keeps your windshield clean for safe driving.
Safety precautions to follow during the repair
When it comes to repairing electronic devices, it’s important to prioritize safety. Following proper precautions can help prevent accidents and potential damage to yourself or your equipment. One crucial tip is to always disconnect the device from its power source before starting any repairs.
This includes unplugging it from the wall outlet or removing the battery if applicable. Additionally, wearing protective gear such as gloves and goggles can protect you from any unforeseen hazards. It’s also a good idea to work in a well-ventilated area to avoid inhaling any potentially harmful substances.
Lastly, be sure to follow the manufacturer’s instructions and guidelines for proper handling and repair procedures. By taking these simple yet essential precautions, you can ensure a safe and successful repair experience.
Tips for preventing future damage to the reservoir
reservoir, prevent damage, tips, precautions Reservoirs play a crucial role in supplying water for various purposes, but they are also susceptible to damage if not properly cared for. To prevent future damage to the reservoir, there are several tips and precautions you can follow. Firstly, regularly inspect the reservoir for any signs of wear or damage, such as cracks or leaks.
This can help identify potential issues before they escalate. Secondly, ensure proper maintenance by cleaning the reservoir regularly to remove sediment and debris that can cause blockages and reduce its capacity. Additionally, avoid placing heavy objects or equipment on the reservoir’s surface, as this can lead to structural damage.
It is also important to monitor the water levels in the reservoir and implement measures to prevent overfilling, which can put excessive pressure on the structure. Finally, be mindful of the surrounding environment and avoid introducing harmful substances into the reservoir, such as chemicals or pollutants, as these can damage the water quality and ecosystem. By following these tips and precautions, you can help prolong the lifespan of your reservoir and ensure its continued functionality for years to come.
Conclusion
So, there you have it, a step-by-step guide on how to repair your windshield washer fluid reservoir. Now you have no excuse for driving around with a dirty windshield, blaming it on a broken reservoir. And remember, a clear windshield means a clear path to your destination, so take the time to fix this important piece of your car’s puzzle.
After all, you wouldn’t want to be known as the person with the perpetually dirty windshield, would you? So, roll up your sleeves, grab your tools, and get to work on fixing that reservoir. Your future self will thank you as you cruise down the road with a sparkling clean windshield and a newfound sense of pride in your DIY repair skills. Happy fixing!
Summary of the repair process
“smartphone repair process”
Importance of maintaining a well-functioning windshield washer fluid reservoir
windshield washer fluid reservoir, maintain, Importance
Final thoughts and recommendations
Final thoughts and recommendations: When it comes to buying a new car, there are a few tips and precautions to keep in mind. First and foremost, it’s important to do your research before making a purchase. This includes reading reviews, comparing prices, and researching the reliability and safety ratings of different models.
It’s also a good idea to consider your budget and determine how much you can afford to spend on a car. Once you have a budget in mind, stick to it and don’t be swayed by sales pitches or flashy features that you don’t really need. Additionally, it’s crucial to take a test drive before making a decision.
This will give you a feel for how the car handles and whether or not it’s comfortable for you. Finally, be prepared to negotiate. Car dealerships often have some wiggle room in the prices of their vehicles, so don’t be afraid to haggle a bit to get the best deal possible.
By following these tips and taking the necessary precautions, you can ensure that you make a smart and informed decision when buying your next car.
FAQs
How do I know if my windshield washer fluid reservoir is damaged?
If you notice a leaking fluid or if the reservoir is visibly cracked or broken, it may be damaged.
Can I repair a windshield washer fluid reservoir myself?
It is possible to repair minor cracks or leaks in a reservoir using epoxy or plastic repair kits.
Is it necessary to replace the entire windshield washer fluid reservoir if it is damaged?
In some cases, depending on the extent of the damage, it may be necessary to replace the reservoir to ensure proper functionality.
How much does it cost to replace a windshield washer fluid reservoir?
The cost of replacing a windshield washer fluid reservoir can vary depending on the make and model of your vehicle, but it typically ranges from $50 to $150.
Can a damaged windshield washer fluid reservoir affect the performance of my wipers?
Yes, if the reservoir is leaking or not holding enough fluid, it can result in insufficient windshield washer fluid reaching the wipers, impacting their performance.
Are there any safety concerns associated with a damaged windshield washer fluid reservoir?
While a damaged reservoir itself may not pose a direct safety risk, it can hinder your visibility on the road if you’re unable to properly clean your windshield.
How often should I check my windshield washer fluid reservoir for damage?
It’s a good idea to visually inspect your windshield washer fluid reservoir during routine maintenance checks or whenever you notice any issues with your washer fluid system.