
Picture this: you’re driving down the road on a rainy day, struggling to see through the streaks and smudges on your windshield. As the rain beats down harder, you realize that your windshield wiper arm is not functioning properly. Your heart starts racing as you try to maneuver your way through the blurry mess in front of you.
This scenario highlights the importance of a functioning windshield wiper arm in ensuring clear visibility and safe driving. It may seem like a small component, but it plays a crucial role in maintaining your visibility on the road. Without it, you could be putting yourself and others at risk.
In this blog, we will explore the significance of a functioning windshield wiper arm and how it contributes to your overall safety on the road. So buckle up, and let’s dive in!
Table of Contents
Signs of a damaged windshield wiper arm
If you’ve noticed that your windshield wipers aren’t clearing the rain or debris off your windshield as effectively as they used to, it could be a sign of a damaged windshield wiper arm. The wiper arm is responsible for holding the wiper blade in place and moving it across the windshield. Over time, the wiper arm can become worn or bent, leading to poor performance.
So, how can you repair a damaged windshield wiper arm? Well, the first step is to identify the problem. Look for any visible signs of damage, such as cracks or bends in the arm. If you see any damage, you may be able to repair it by gently bending the arm back into its proper shape or replacing it altogether.
Additionally, make sure the wiper blade itself is in good condition, as a worn or damaged blade can also affect performance. By inspecting and repairing your windshield wiper arm, you can ensure clear visibility on the road, especially during inclement weather.
Reduced visibility during rain or snow
If you’ve ever driven in heavy rain or snow, you know how important it is to have functioning windshield wipers. Reduced visibility during inclement weather can be extremely dangerous, increasing the risk of accidents. One sign that you may have a damaged windshield wiper arm is if your wipers are not moving smoothly across the windshield.
Instead, they may skip or stutter, leaving streaks of water or snow behind. Another sign is if the wiper arm is loose or wobbly, indicating that it may be damaged or worn out. If you notice any of these signs, it’s important to address the issue as soon as possible to ensure safe driving conditions.

Inconsistent or skipping movement of the wiper blade
Inconsistent or skipping movement of the wiper blade can be a sign of a damaged windshield wiper arm. When your wiper blades start behaving erratically, it can be frustrating and even dangerous when you’re driving in inclement weather. But what causes these issues with the wiper arm? Well, there are a few possible culprits.
One common problem is a bent or warped wiper arm. This can happen if the arm gets jammed or stuck while in use. Additionally, the wiper arm can become worn out over time, which can lead to it not making proper contact with the windshield.
Another issue could be a loose or worn-out wiper blade attachment. If the attachment is not secure, the wiper blade may not move smoothly across the windshield, resulting in inconsistent or skipping movement. Whatever the cause may be, it’s important to address the issue promptly to ensure your visibility on the road remains clear.
If you notice any signs of a damaged windshield wiper arm, it’s best to have it inspected and repaired by a professional.
Noisy or vibrating wiper blade operation
“Noisy or vibrating wiper blade operation” When it comes to a noisy or vibrating wiper blade operation, it’s important to understand the signs of a damaged windshield wiper arm. One of the key indicators is if your wiper blades make a loud squeaking or screeching noise as they move across the windshield. This could be a sign that the wiper arm is not properly aligned with the windshield, causing it to scrape against the glass.
Another sign to look out for is if your wiper blades are vibrating excessively while in use. This can be a result of a bent or warped wiper arm, which can disrupt the smooth movement of the blades. Both of these issues can not only be annoying but can also affect the effectiveness of your wiper blades, making it harder for them to clear your windshield during rain or snowstorms.
If you notice any of these signs, it’s best to have your windshield wiper arm checked and potentially replaced by a professional to ensure safe and efficient operation.
Tools and materials needed for the repair
When it comes to repairing a windshield wiper arm, there are a few tools and materials that you will need. First, you will need a screwdriver, preferably a Phillips head, to remove any screws holding the wiper arm in place. Additionally, you may need a socket wrench or pliers to loosen any nuts or bolts that are securing the arm.
Next, you will need a replacement wiper arm. It’s important to make sure you get the correct size and type for your vehicle. You may also need a new wiper blade if the old one is worn or damaged.
Finally, you may need some lubricant, such as WD-40, to help loosen any rust or corrosion that may be preventing the wiper arm from moving properly. With these tools and materials on hand, you’ll be ready to tackle the repair and get your wiper arm working like new again.
Wrench or socket set
When it comes to tackling a repair job, having the right tools and materials is essential. One of the most common decisions you’ll have to make is whether to use a wrench or a socket set. Both tools have their advantages and can be used in a variety of situations.
A wrench, with its adjustable head, allows for a snug fit on bolts and nuts of various sizes. This makes it a versatile option that can be used in tight spaces. On the other hand, a socket set is specifically designed to work with nuts and bolts and provides a more secure grip.
It also allows for faster and more efficient work, as you can easily switch between different sizes. Ultimately, the choice between a wrench and a socket set will depend on the specific task at hand. If you need versatility and maneuverability, a wrench may be the way to go.
However, if speed and efficiency are important, a socket set may be the better option. Whichever tool you choose, be sure to also have other essential materials on hand, such as lubricant, safety goggles, and gloves to ensure a successful repair job.
Replacement windshield wiper arm
replacement windshield wiper arm, tools and materials needed, repair So you’ve noticed that your windshield wiper arm is not working properly. It’s not wiping your windshield clean and it’s making an annoying scraping sound. No worries! This is a relatively simple repair that you can do yourself with just a few tools and materials.
First, let’s talk about the tools you’ll need. You’ll want to have a socket wrench set handy, as well as a pair of pliers. These tools will help you remove the old wiper arm and install the new one.
As for materials, you’ll obviously need a replacement windshield wiper arm. You can find these at most auto parts stores or online. Make sure you know the make and model of your car so you can get the right size and style of wiper arm.
Once you have your tools and materials gathered, you’re ready to start the repair. First, raise the wiper arm up and away from the windshield. This will give you easier access to the base of the arm.
Now, using your socket wrench set, loosen and remove the nut that is holding the wiper arm in place. Be sure to keep track of the nut so you don’t lose it. Next, grab your pliers and gently wiggle the old wiper arm back and forth until it comes loose from the wiper motor.
Once it’s free, set it aside. Now, take your new wiper arm and slide it onto the wiper motor. You may need to align it with a specific notch or groove in the motor.
Torque wrench (optional)
One of the tools that may be useful in repairing certain parts of your vehicle is a torque wrench. While not necessarily essential for every repair, a torque wrench can come in handy when it comes to tightening bolts and ensuring that they are properly secured. Using a torque wrench allows you to apply a precise amount of torque to a bolt, which is important for both safety and the longevity of the repair.
Without a torque wrench, you run the risk of either overtightening or undertightening the bolts, which can lead to issues down the line. So, while not necessary for every repair, having a torque wrench in your toolbox can be a valuable addition.
Clean cloth or paper towels
When it comes to cleaning up a mess or tackling a repair project, having the right tools and materials can make all the difference. One essential item that you’ll definitely need is a clean cloth or paper towels. These are not only handy for wiping up spills and messes but also for applying cleaning solutions or polish.
Whether you’re cleaning a countertop, wiping down surfaces, or fixing a leak, having a cloth or paper towels on hand will help you get the job done quickly and efficiently. Plus, they’re disposable, so you can simply toss them in the trash when you’re done. So, stock up on these handy cleaning essentials and be prepared for any mess or repair that comes your way.
Steps to repair a windshield wiper arm
If your windshield wiper arm is not working properly, there are a few steps you can take to repair it. First, you’ll need to identify the issue. Is the arm not moving at all, or is it skipping across the windshield? If it’s not moving, it could be due to a faulty motor or wiring.
In this case, you may need to consult a professional for repairs. However, if the arm is skipping, it’s likely a problem with the wiper blade itself. You can start by checking the blade for any damage or debris that may be causing it to skip.
If you notice any issues, you can replace the blade with a new one. Additionally, you should also check the connection between the arm and the blade. Sometimes, they can become loose or worn out, which can affect the wiper’s performance.
If this is the case, you can tighten or replace the connections to ensure a proper fit. Overall, repairing a windshield wiper arm can be a fairly simple process, as long as you identify the issue and take the necessary steps to fix it.
Step 1: Remove the old wiper arm
windshield wiper arm replacement If you find that your windshield wipers aren’t working as efficiently as they should, it might be time to replace the wiper arm. The wiper arm is the metal component that connects the wiper blade to the wiper motor and controls its movement across the windshield. Replacing the wiper arm can help improve your visibility and ensure that your windshield wipers are functioning properly.
To start the process, the first step is to remove the old wiper arm. Begin by lifting the wiper arm away from the windshield so that it is in a perpendicular position. Then, locate the small tab or latch near the base of the wiper arm.
This tab is used to secure the arm to the wiper motor. Depress the tab or release the latch, and while doing so, gently slide the wiper arm off the wiper motor. Be cautious not to apply too much force, as this could damage the wiper arm or the wiper motor.
Once the old wiper arm is removed, it’s important to inspect it for any signs of wear or damage. Look for any cracks, bends, or corrosion that could indicate it needs replacement. A damaged wiper arm can cause uneven wiper blade pressure, resulting in streaks or missed areas on your windshield.
If you notice any issues with the old wiper arm, it is highly recommended to replace it with a new one. In conclusion, step one of repairing a windshield wiper arm involves removing the old wiper arm. This can be done by lifting the wiper arm away from the windshield and releasing the latch or depressing the tab near the base of the arm.
It is important to inspect the old wiper arm for any signs of wear or damage, as this could affect the efficiency of your windshield wipers. By replacing the wiper arm, you can ensure that your wipers are functioning properly and improve your visibility while driving.
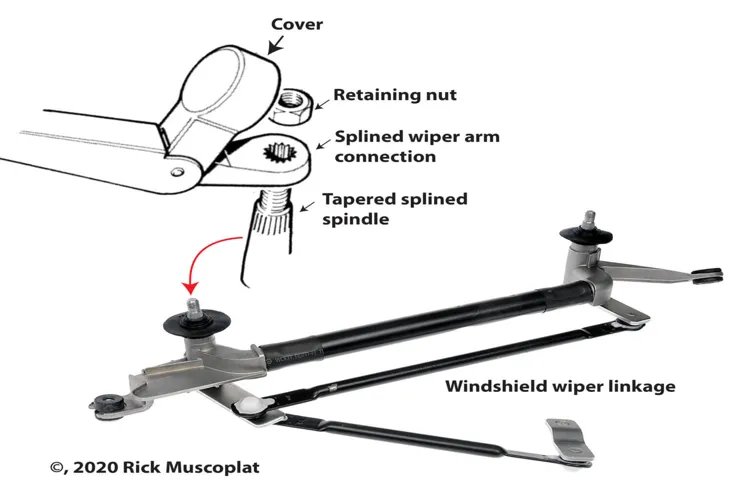
Step 2: Inspect the wiper arm connector
windshield wiper arm, inspect, connector, repair, step 2
Step 3: Install the new wiper arm
In Step 3, it’s time to install the new wiper arm for your windshield. This is an important step in repairing your wiper system and ensuring clear visibility on the road. To start, locate the mounting hole on the wiper shaft and align it with the hole on the wiper arm.
Once aligned, insert the bolt or nut through the holes and tighten it using a wrench or pliers. Make sure to secure it tightly, but not too tight to avoid damaging the wiper arm or shaft. After tightening, give the wiper arm a gentle tug to ensure it is securely in place.
Once you’re confident that it’s properly installed, move on to the next step.
Step 4: Test the new wiper arm
windshield wiper arm, repair, damage, replacement, test In step 4 of repairing a windshield wiper arm, it’s time to test the new arm to ensure that it is functioning properly. After removing the old damaged arm and installing the replacement, you want to make sure everything is in working order before you hit the road. First, turn on your vehicle’s ignition and activate the windshield wiper control.
Start with the lowest setting to see if the arm moves smoothly across the windshield without any hitches or jitters. Pay attention to how it clears the water or debris from the glass. Next, increase the speed of the wiper control to the intermediate setting and then the highest setting.
Observe the wiper arm’s movements at these higher speeds, making sure it maintains a consistent and fluid motion across the windshield. While the wiper arm is in motion, take note of any odd noises, vibrations, or jerky movements. These could be signs that the arm is not securely attached or that there may be another issue that needs to be addressed.
Also, it’s important to check the wiper arm’s range of motion. Make sure it covers the entire windshield without missing any spots. If you notice any areas that are not being cleared properly, adjust the arm as necessary to ensure full coverage.
Lastly, test the wiper arm in different weather conditions. Spray some windshield washer fluid onto the glass and see how effectively the arm clears it away. If there are any areas where the fluid is not being removed, it may indicate that the arm needs further adjustment or that there is damage to the wiper blades.
By thoroughly testing the new windshield wiper arm, you can ensure that you have successfully repaired any damage and that your wipers will provide the visibility you need on the road.
Tips and precautions
If you find that your windshield wiper arm is not working properly, it may be time to repair or replace it. The windshield wiper arm is responsible for moving the wiper blades across the windshield to clear away rain, snow, and debris. Over time, the arm can become worn, bent, or damaged, leading to poor wiper performance.
One tip for repairing a windshield wiper arm is to first identify the problem. Is the arm not moving at all? Is it skipping or dragging across the windshield? Once you know the issue, you can take the appropriate steps to fix it. In some cases, a simple adjustment may be all that’s needed, such as tightening a mounting nut or repositioning the arm.
If the arm is bent or damaged, however, it may need to be replaced. When working on your windshield wiper arm, it’s important to take precautions to ensure your safety. Turn off your vehicle and remove the ignition key to avoid any accidental movement of the wiper blades.
Use protective gloves to safeguard your hands and eyes, and be careful not to put too much pressure on the arm as you work on it. Following these tips and precautions will help you repair your windshield wiper arm effectively and safely, ensuring clear visibility during inclement weather.
Disconnect the battery before starting the repair
In any DIY repair work, it’s always important to take the necessary precautions to ensure your safety. When it comes to working on your car’s electrical system, one of the most crucial steps is to disconnect the battery before you start the repair. This may seem like common sense, but it’s a step that many people overlook, leading to potential accidents and damage.
By disconnecting the battery, you eliminate the risk of electrical shocks or short circuits that could potentially occur while working on the car. It’s a simple step that can save you from a lot of trouble down the line. So, before you dive into any electrical repair work, always remember to disconnect the battery and stay safe.
Refer to the vehicle’s manual for specific instructions
When it comes to maintaining and taking care of your vehicle, the owner’s manual is your best friend. It contains all the specific instructions and guidelines for your particular vehicle, ensuring you know exactly what to do and how to do it. Whether it’s changing the oil, replacing a headlight, or checking the tire pressure, the manual will have all the information you need.
It’s like having a personal guide to help you navigate the ins and outs of your car. So, the next time you’re not sure how to perform a certain task or are unsure about a specific feature of your vehicle, don’t rely on guesswork or search the internet endlessly. Instead, refer to the vehicle’s manual for specific instructions that are tailored to your car’s make and model.
It will save you time, effort, and potential headaches down the road.
Ensure the wiper arm is properly aligned
wiper arm alignment When it comes to maintaining your car’s windshield wipers, proper alignment of the wiper arm is essential for optimal performance. The wiper arm is the metal piece that connects the wiper blade to the wiper motor. Over time, the wiper arm can become misaligned due to various factors like wear and tear, harsh weather conditions, or accidental damage.
If the wiper arm is not aligned correctly, it can cause streaking, skipping, or even scratching of your windshield, compromising your visibility on the road. To ensure that your wiper arm is properly aligned, there are a few tips and precautions you can take. First, always refer to your car’s owner’s manual for specific instructions on how to align the wiper arm for your particular make and model.
The manual will provide step-by-step guidance on how to remove the wiper arm and adjust its position to achieve proper alignment. Before attempting to align the wiper arm, make sure to park your car in a safe and open space where you have enough room to maneuver. This will prevent any accidental damage to your car or injuries to yourself.
It’s also a good idea to clean the wiper arm and blade thoroughly to remove any dirt, debris, or residue that could interfere with the alignment process. Once you have removed the wiper arm and cleaned it, carefully position it back onto the wiper motor shaft. Take note of any markings or indicators on the wiper arm and the motor shaft that can help you align them correctly.
Use gentle pressure to secure the wiper arm in place, making sure it is snug but not overly tight. After aligning the wiper arm, test it out by turning on your windshield wipers and observing their movement. They should move smoothly and evenly across the windshield, without any skipping or scratching.
If you notice any issues, repeat the alignment process or consider replacing the wiper arm altogether. In conclusion, proper alignment of the wiper arm is crucial for ensuring the effectiveness of your car’s windshield wipers. By following the tips and precautions outlined above, you can ensure that your wiper arm is aligned correctly, resulting in clear visibility and safer driving conditions.
Tighten the wiper arm bolt or nut to the recommended torque
“wiper arm bolt torque” When it comes to tightening the wiper arm bolt or nut, it’s important to follow the recommended torque. This is crucial because if the bolt or nut is not tightened properly, it can lead to issues with the wiper arm’s performance. The recommended torque can usually be found in the vehicle’s owner’s manual or in a service manual.
It’s important to use a torque wrench to ensure that the bolt or nut is tightened to the correct specification. Over-tightening can cause damage to the wiper arm or windshield, while under-tightening can cause the wiper arm to become loose and not function properly. By following the recommended torque, you can ensure that the wiper arm is securely fastened and will work effectively when you need it most.
So, next time you need to tighten the wiper arm bolt or nut, make sure to check the recommended torque and use a torque wrench for a job well done.
Conclusion: Enjoy clear visibility with a repaired windshield wiper arm
And there you have it! A step-by-step guide on how to repair a malfunctioning windshield wiper arm. Just remember, fixing your wiper arm is like solving a puzzle – you have to carefully analyze the problem, gather the right tools, and apply just the right amount of elbow grease. So next time your wipers start acting up and Mother Nature decides to test your patience with a torrential downpour, you’ll be well-equipped to handle the situation like a true windshield warrior.
Happy fixing and may clear skies always be in your forecast!”
FAQs
How do I know if my windshield wiper arm needs repair?
If your windshield wiper arm is not able to move smoothly or is making unusual noises, it may be in need of repair.
Can I repair a windshield wiper arm myself?
Yes, you can repair a windshield wiper arm yourself. However, it is important to have the necessary tools and knowledge to do so safely.
What are the common causes of windshield wiper arm damage?
Common causes of windshield wiper arm damage include worn-out wiper blades, excessive force, and exposure to harsh weather conditions.
How much does it cost to repair a windshield wiper arm?
The cost of repairing a windshield wiper arm can vary depending on the extent of the damage and the type of vehicle. It is best to consult a professional for an accurate estimate.
How long does it take to repair a windshield wiper arm?
The time it takes to repair a windshield wiper arm can vary depending on the complexity of the issue. Simple repairs can be completed in a few minutes, while more complex repairs may take longer.
Can I drive with a broken windshield wiper arm?
It is not recommended to drive with a broken windshield wiper arm, as it can affect your visibility during bad weather conditions.
What are the signs of a faulty windshield wiper motor?
Signs of a faulty windshield wiper motor include the wiper blades not moving at all or moving at an inconsistent speed, unusual noises coming from the motor, and the wiper blades not returning to their resting position properly.
How often should I replace my windshield wiper arm? A8. It is recommended to replace your windshield wiper arm every 1 to 2 years or as soon as you notice any signs of damage or wear.
Can a damaged windshield wiper arm scratch my windshield?
Yes, a damaged windshield wiper arm can potentially scratch your windshield if the metal or plastic parts come in contact with the glass surface. It is important to address any damage promptly to avoid further issues.
What should I do if my windshield wiper arm is stuck?
If your windshield wiper arm is stuck, you can try gently moving it back and forth with your hand to see if it frees up. If that doesn’t work, it may require professional repair or replacement.
Can I prevent windshield wiper arm damage?
While some causes of windshield wiper arm damage are unavoidable, you can help prevent damage by regularly inspecting your wiper blades for signs of wear, avoiding using excessive force when operating the wipers, and parking in a sheltered area during severe weather conditions.
Where can I get professional help to repair my windshield wiper arm?
You can get professional help to repair your windshield wiper arm at any reputable auto repair shop or dealership. They will have the necessary expertise and tools to ensure proper repairs are made.