

Looking to enhance your RV experience? Look no further than RV awnings! These versatile extensions offer an array of benefits, making them a must-have for any road trip enthusiast. Whether you’re seeking shade from the scorching sun or protection from a sudden downpour, an RV awning has got you covered – literally. Just like a trusty umbrella, an RV awning unfurls to shield you from the elements, creating a cozy outdoor living space for you to relax and unwind.
Picture yourself lounging under the shade, sipping your morning coffee or hosting a barbecue with friends, all while staying protected from the glaring sun or an unexpected rain shower. With an RV awning, you can enjoy the great outdoors in all its glory, come rain or shine. But an RV awning is more than just a simple shelter; it’s also a design statement.
Available in a variety of styles, colors, and materials, RV awnings can be customized to suit your personal taste and the aesthetic of your vehicle. From traditional striped patterns to modern contemporary designs, the choices are endless. Your RV awning can add a touch of personal flair to your home on wheels, making it truly feel like your own.
So, if you’re ready to take your RV adventures to the next level, it’s time to invest in an RV awning. From providing shade and protection to adding a dash of style, these versatile extensions offer endless possibilities for outdoor living. Get ready to turn your campsite into a cozy oasis and make memories that will last a lifetime.
Table of Contents
- 1 What is an RV awning?
- 2 Importance of maintaining your RV awning
- 3 Signs that your RV awning needs to be replaced
- 4 Gather the necessary tools and materials
- 5 Choose the right replacement awning
- 6 Measure your RV awning for the replacement
- 7 Remove any attachments or accessories from the awning
- 8 Disconnect any electrical connections
- 9 Remove any screws or bolts securing the awning in place
- 10 Detach the fabric from the awning frame
- 11 Carefully remove the awning arms
- 12 Attach the new awning arms to the RV
- 13 Secure the fabric to the awning frame
- 14 Reconnect any electrical connections
- 15 Test the functionality of the new awning
- 16 Regularly clean the awning fabric
- 17 Check for any signs of damage or wear
- 18 Properly store the awning when not in use
- 19 Schedule regular inspections and maintenance
- 20 Conclusion
- 21 FAQs
What is an RV awning?
Replacing an RV awning may seem overwhelming at first, but with a little know-how and some basic tools, it can be a relatively easy DIY project. First, let’s understand what an RV awning is. An RV awning is a retractable cover that extends over the side of an RV to provide shade and protection from the elements.
It is typically made of a durable fabric material and is supported by a metal frame. Over time, the awning fabric may become faded, torn, or damaged, necessitating a replacement. To replace an RV awning, start by measuring the width of the existing awning and purchasing a replacement fabric that matches the size.
Then, remove the existing awning fabric by unscrewing it from the RV and carefully sliding it out of the awning rail. Next, attach the new fabric by sliding it into the awning rail and securing it with screws. Lastly, extend and retract the awning a few times to ensure it is functioning properly.
With these simple steps, you can easily replace your RV awning and enjoy the benefits of a refreshed and functional outdoor space.
Importance of maintaining your RV awning
If you’re an RV owner, you know that the awning is an essential part of your outdoor experience. It provides shade, protection from the elements, and adds to the overall aesthetic appeal of your RV. However, like any other part of your RV, the awning needs regular maintenance to ensure its longevity and functionality.
One way to maintain your RV awning is by regularly cleaning it and checking for any signs of wear and tear. This includes removing any debris or dirt that may have accumulated on the fabric and inspecting the hardware for any loose or damaged parts. If you notice any tears or holes in the fabric, it’s important to address them as soon as possible to prevent further damage.
In some cases, you may need to replace the entire awning. Luckily, replacing a RV awning is a relatively simple process that can be done with basic tools and a little bit of know-how. By following a few steps, you can easily replace your RV awning and ensure that it continues to provide you with the shade and protection you need on your outdoor adventures.
Signs that your RV awning needs to be replaced
If you’re an avid adventurer and own an RV, chances are that you’ve encountered various issues with your awning. Over time, awnings can get damaged or worn out due to exposure to the elements and regular use. One of the signs that your RV awning needs to be replaced is excessive fading or discoloration.
If you notice that your awning has lost its original vibrant color and looks dull or faded, it’s a clear indication that it’s time for a replacement. Another sign to look out for is tears or holes in the fabric. If your awning has started to develop small tears or holes, it’s best to replace it as soon as possible before they become bigger and more difficult to repair.
Additionally, if you notice that your awning is sagging or not retracting properly, it’s a sign that the awning’s mechanism might be damaged and needs to be replaced. When replacing your RV awning, be sure to choose a high-quality replacement that fits your specific model. It’s also a good idea to consult with an expert or follow a step-by-step guide to ensure you do the replacement correctly.
Preparing for the Replacement Change is inevitable. Whether it’s in our personal lives or in our professional careers, there will always come a time when things need to be replaced. And when it comes to our work, preparing for the replacement can be a daunting task.
How do you ensure a smooth transition? How do you make sure the new person is set up for success? These are the questions that often linger in our minds as we approach this transitional period. Imagine you’re the captain of a ship. You’ve been sailing for years, navigating through rough waters and smooth sailing alike.
But now, it’s time for you to step down and hand over the helm to a new captain. How do you prepare them for the journey ahead? You make sure they have all the charts and tools they need, you share your knowledge and experiences, and you instill in them the confidence to take charge. The same principles apply when preparing for a replacement in the workplace.
As the outgoing employee, it’s your responsibility to ensure that the new person coming in has all the resources and information they need to succeed. This includes providing them with a comprehensive handover document, introducing them to key stakeholders, and offering your support and guidance during the transition period. But preparing for the replacement goes beyond just sharing information.
It’s about setting the stage for success. It’s about creating an environment where the new person can thrive and make their mark. Just like a gardener prepares the soil before planting new seeds, you must prepare the workplace by fostering a culture of collaboration, open communication, and trust.
This will lay the foundation for a successful transition and encourage the new person to bring fresh ideas and perspectives to the table. So, as you approach the time to pass the torch, remember that preparing for the replacement is not just about transferring knowledge and responsibilities. It’s about creating an empowering and supportive environment for the new person to step into.
Gather the necessary tools and materials
Replacing an RV awning may seem like a daunting task, but with the right tools and materials, it can be a relatively straightforward process. Before you begin, gather all the necessary equipment. You will need a ladder or step stool to reach the awning, a screwdriver or drill to remove the old awning, and a new awning fabric or replacement kit.
Additionally, you may need a helper to assist in holding or stabilizing the awning while you work. Once you have all your tools and materials ready, you can proceed with confidence to replace your RV awning.
Choose the right replacement awning
Replacing a RV awning might seem like a daunting task, but with the right information and tools, it can be a relatively straightforward process. First, you need to choose the right replacement awning for your RV. Take measurements of your existing awning and compare it to the dimensions of the replacements you are considering.
Make sure to also consider the type and style of awning that will best suit your needs. Whether you prefer a manual or electric awning, there are a variety of options available to choose from. Once you have selected the perfect replacement, follow the manufacturer’s instructions for installation.
With a little bit of patience, you can have a brand new awning that will provide shade and protection for your RV for years to come.
Measure your RV awning for the replacement
If you’re looking to replace your RV awning, the first step is measuring your current awning to ensure you get the right size replacement. To do this, you’ll need a tape measure and a helper. Start by extending your awning fully and securing it in place.
Measure the length of the roller tube from end to end, including any end caps. Next, measure the fabric, both the width and the length. Be sure to stay on the same side of the fabric as the roller tube during your measurements.
Once you have these measurements, you can start shopping for a replacement awning. Remember to double-check the measurements and consult the manufacturer’s instructions to ensure a proper fit. With a little bit of measuring and some careful shopping, you’ll have your RV looking good as new in no time! So, go ahead and take that first step of measuring, and soon you’ll be enjoying a fresh new awning on your RV.
Remove any attachments or accessories from the awning
One important step in replacing an RV awning is to remove any attachments or accessories that may be connected to it. This includes things like lights, wind deflectors, or any other add-ons. These items can get in the way and make it difficult to work on the awning.
Plus, you don’t want to risk damaging them during the replacement process. So, take the time to carefully detach these accessories before moving forward. This will make the job easier and ensure that everything is ready for the new awning to be installed.
So, let’s get started by removing those attachments and getting ready for a fresh new awning.
Do you have an old RV awning that’s seen better days? Perhaps it’s faded, torn, or just not operating smoothly. Whatever the reason, removing the old awning might be on your to-do list. But where do you start? Removing the old RV awning can seem like a daunting task, but with a little know-how, it can be a breeze.
Think of it as a fresh start for your RV, like replacing a worn-out carpet with beautiful new flooring. Or maybe it’s more like shedding old winter clothes and donning a fresh, light spring wardrobe. Either way, removing the old awning is a necessary step in the process of giving your RV a makeover and upgrading its appearance and functionality.
So, if you’re ready to take the plunge and remove that weathered, outdated awning, let’s dive in. In this guide, we’ll cover everything you need to know, from gathering the right tools to safely detaching the awning from your RV. By the end, you’ll be well-equipped to transform your RV into a true home away from home, with an upgraded awning that will have you living in style wherever you go.
Disconnect any electrical connections
One important step in replacing an RV awning is to disconnect any electrical connections. This is necessary because the awning may have a motor that controls its operation, and these electrical connections need to be disconnected before the old awning can be removed. To disconnect the electrical connections, locate the power source and turn off the power supply.
This may involve flipping a switch or unplugging the power cord. Once the power is off, you can safely disconnect the electrical connections from the motor or control panel. It’s always a good idea to double-check that the power is off before touching any electrical connections to ensure your safety.
By taking the time to disconnect any electrical connections, you can ensure a smooth and safe process when replacing your RV awning.
Remove any screws or bolts securing the awning in place
Replacing a RV awning may seem like a daunting task, but with a few simple steps, you can have your awning looking brand new in no time. One of the first steps in the process is to remove any screws or bolts that are securing the awning in place. This will allow you to easily take off the old awning and replace it with a new one.
Make sure to keep track of any hardware that you remove so that you can easily put everything back together when you’re finished. Removing the screws or bolts may require some tools, such as a screwdriver or wrench, depending on the type of fasteners used. Once you have removed all the screws or bolts, gently lift the awning out of its place and set it aside.
With the old awning removed, you can now move on to the next step in the replacement process.
Detach the fabric from the awning frame
So, you’ve decided it’s time to replace your RV awning. Maybe it’s seen better days, or perhaps you just want to upgrade to a newer model. Whatever the reason, replacing an RV awning is a task that you can tackle yourself with a little bit of know-how.
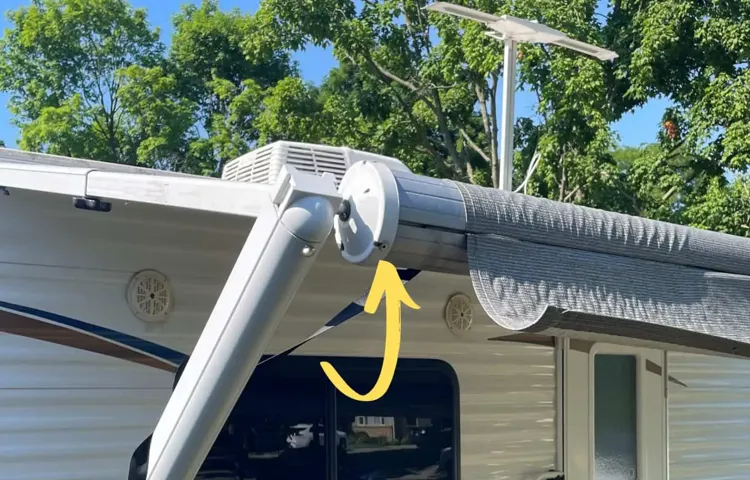
One of the first steps in replacing an RV awning is detaching the fabric from the awning frame. This can be done by locating the awning tension arms on either side of the awning and releasing the tension. Most awning tension arms will have a lever or knob that you can turn to loosen the tension.
Once the tension is released, you can slide the fabric out of the awning rail on the RV. Be careful not to damage the fabric as you remove it, as you’ll want to reuse it or sell it if it’s still in good condition. Once the fabric is detached, you can move on to the next step in replacing your RV awning.
Carefully remove the awning arms
Replacing an RV awning can be a simple and straightforward process if you follow the necessary steps. One of the first things you’ll need to do is carefully remove the awning arms. These arms are the support system for the awning, so it’s important to handle them with care.
Begin by locating the screws or bolts that attach the awning arms to the RV. Use a screwdriver or wrench to loosen and remove these fasteners. Once the screws or bolts are removed, gently slide the awning arms out, being mindful of any wiring or cables that may be attached.
It’s important to take your time and be cautious during this step to avoid any damage to the RV or the awning arms. By following these steps, you’ll be well on your way to successfully replacing your RV awning.
So you’ve finally purchased a new RV and you’re ready to hit the road and start making memories. But before you can fully enjoy your new mobile home, there’s one important step you need to take: installing the new awning. Awnings are a crucial feature of any RV, providing shade and protection from the elements.
But how exactly do you go about installing a new awning? Don’t worry, we’ve got you covered. In this blog post, we’ll walk you through the process of installing your new RV awning, step by step. From gathering the necessary tools to securely attaching the awning to your RV, we’ll share all the tips and tricks you need to know.
So grab your toolkit and let’s get started on making your RV even more comfortable and enjoyable.
Attach the new awning arms to the RV
Now that you have removed the old awning arms from your RV, it’s time to attach the new ones. This step is crucial to ensuring that your new awning will be secure and functional. Start by aligning the new arms with the brackets on the side of your RV.
Make sure that the holes on the arms line up with the holes on the brackets. Once they are aligned, insert the screws provided into the holes and tighten them using a screwdriver or a drill. It’s important to keep the arms straight and level while attaching them to prevent any issues with your awning later on.
Once the screws are tightened, give the arms a gentle tug to ensure that they are securely attached to the RV. If they feel loose, double-check that the screws are tightened properly. Congratulations, you have successfully attached the new awning arms to your RV! Now you can move on to the next step in replacing your RV awning.
Secure the fabric to the awning frame
Once you have removed the old awning fabric, it’s time to secure the new fabric to the awning frame. This is an important step in replacing an RV awning because it ensures that the fabric is securely attached and won’t come loose while you’re on the road. There are several methods you can use to secure the fabric to the frame, but one of the most common is to use awning tape.
This strong adhesive tape is specifically designed for this purpose and can easily hold the fabric in place. Simply apply the tape to the edge of the fabric and press it firmly onto the frame. Make sure to double-check that the fabric is aligned properly before securing it, as you don’t want it to be crooked or uneven.
Once the fabric is secured, give it a gentle tug to make sure it’s firmly attached. If it feels loose or comes off easily, you may need to apply additional tape or seek professional assistance. With the awning fabric securely fastened to the frame, your RV is ready for the road once again.
Reconnect any electrical connections
When it comes to replacing an RV awning, one important step is to reconnect any electrical connections. This is necessary because RV awnings often come with built-in lighting or power options, such as LED lights or remote-controlled operations. Before removing the old awning, be sure to disconnect any power sources or electrical connections.
Once the new awning is in place, you’ll need to reconnect these electrical components. This may involve simply plugging them back in or securing the wires with connectors or wire nuts. It’s important to follow the manufacturer’s instructions and consult any wiring diagrams to ensure everything is connected properly.
Taking the time to reconnect these electrical components will ensure that your new awning functions correctly and that you can enjoy all of its features.
Test the functionality of the new awning
Replacing a RV awning may seem like a daunting task, but with the right tools and instructions, it can be done relatively easily. One of the first steps is to test the functionality of the new awning. This involves opening and closing the awning to ensure it moves smoothly and without any obstructions.
It’s also important to check that the fabric is securely attached and that there are no tears or signs of wear. Another important aspect to consider is the awning’s ability to withstand different weather conditions. This can be tested by opening and closing the awning in various weather conditions, such as rain and wind.
By testing the functionality of the new awning, you can ensure that it is working properly and will provide the necessary shade and protection for your RV. So, don’t be afraid to give it a try and enjoy the benefits of a new and functional awning on your next RV adventure.
Congratulations on your new RV! Whether you’re a seasoned traveler or embarking on your very first adventure, having an RV awning is a game-changer. It provides shade, protection from the elements, and expands your living space. But like any part of your RV, your awning requires regular maintenance to keep it in tip-top shape.
After all, you wouldn’t want to be caught in a sudden rainstorm with a leaky or damaged awning, would you? In this blog post, we’ll share some maintenance tips to ensure your new RV awning lasts for many adventures to come. From cleaning and inspecting to proper storage techniques, we’ve got you covered. Let’s dive in and keep your RV awning in top-notch condition!
Regularly clean the awning fabric
One of the key maintenance tasks for your RV awning is regular cleaning of the fabric. Over time, the fabric can accumulate dirt, grime, and mold, which can not only make your awning look dirty but also damage the fabric. To clean your awning fabric, start by removing any loose dirt or debris by gently brushing or vacuuming it.
Then, mix a solution of mild dish soap and water and use a soft-bristle brush to scrub the fabric. Avoid using harsh chemicals or abrasive brushes, as they can damage the fabric. After scrubbing the fabric, rinse it thoroughly with clean water and allow it to air dry completely before retracting the awning.
By regularly cleaning your RV awning fabric, you can help prolong its lifespan and keep it looking great for years to come. So, how often do you clean your RV awning fabric?
Check for any signs of damage or wear
Replacing a RV awning may seem like a daunting task, but with the right approach, it can be a relatively straightforward process. Before you begin, it’s important to check for any signs of damage or wear on your current awning. Look for tears, holes, or weakened areas that may need to be addressed.
This will give you a better idea of what needs to be replaced and ensure that you have all the necessary materials on hand. Additionally, take note of any rust or corrosion on the hardware or mechanisms of the awning. These issues may also need to be addressed during the replacement process.
By thoroughly inspecting your current awning, you can ensure that you’re fully prepared to tackle the job and have a smooth replacement process. So, take the time to assess your awning’s condition before you dive into the replacement process. You’ll be glad you did!
Properly store the awning when not in use
If you own an RV, you probably love the convenience and flexibility it provides for camping and traveling. One important feature of an RV is the awning, which provides shade and protection from the elements. Over time, however, the awning may become worn or damaged and need to be replaced.
So, how do you go about replacing an RV awning? First, you’ll need to measure the length of your current awning, as this will determine the size of the new one you’ll need. Once you have the correct size, you’ll need to remove the old awning by unscrewing it from the RV. Once the old awning is removed, you can then install the new one by attaching it to the RV with screws.
Finally, make sure to properly store the awning when not in use to prevent damage and prolong its lifespan. This can be done by rolling it up tightly and securing it with straps or bungee cords. By following these steps, you can easily replace your RV awning and continue enjoying the benefits it provides during your travels.
Schedule regular inspections and maintenance
When it comes to maintaining your RV awning, regular inspections and maintenance are key to keeping it in good condition. Over time, the fabric of the awning can become worn or damaged from exposure to the elements. To replace a damaged RV awning, start by inspecting the fabric for any tears or holes.
If you notice any damage, you’ll need to remove the awning from the RV. This typically involves loosening the tension on the arms and carefully rolling up the fabric. Once the fabric is removed, you can then measure it to determine the size needed for the replacement.
When purchasing a new awning, it’s important to choose one that is compatible with your specific RV model. With the replacement awning in hand, you can then reattach the fabric to the RV using the same steps in reverse. Remember to always follow the manufacturer’s instructions and take necessary safety precautions when working with your RV awning.
By scheduling regular inspections and maintenance, you can ensure that your RV awning stays in good working condition for years to come.
Conclusion
And there you have it, a step-by-step guide on how to replace a RV awning. It may seem like a daunting task, but with the right tools and a little bit of patience, you’ll be able to enjoy the shade and protection of a brand new awning in no time. So don’t let that old, worn-out awning cramp your style on your next camping trip.
Take matters into your own hands and show that RV who’s in charge. Happy DIY-ing, and may your awning always be taut and your camping adventures be filled with shade and relaxation. Now go forth and conquer the RV awning world – you’ve got this!”
FAQs
How do I replace a RV awning?
To replace a RV awning, first, make sure to retract the awning fully. Then, remove the old awning fabric by detaching the screws or bolts that hold it in place. Next, measure the dimensions of the old fabric and purchase a new one that matches. Install the new fabric by attaching it to the roller tube and securing it onto the RV. Finally, extend the awning and test it to ensure it is working properly.
What tools do I need to replace a RV awning?
To replace a RV awning, you will need a few basic tools such as a screwdriver, a drill, a tape measure, a ladder, and a caulking gun. Additionally, it may be helpful to have a second person to assist with holding the awning fabric in place during installation.
Can I replace a RV awning myself or do I need professional help?
While it is possible to replace a RV awning yourself, it is recommended to seek professional help if you are not confident in your skills or if the awning system is complex. Professional assistance can ensure proper installation and prevent any potential damage to the RV.
How often should I replace my RV awning?
The lifespan of a RV awning can vary depending on usage, weather conditions, and overall maintenance. On average, RV awnings last between 5 to 10 years. However, if you notice any signs of damage, such as tears, fading, or mold/mildew growth, it may be time to replace the awning sooner.
Can I replace just the awning fabric on my RV awning?
Yes, it is possible to replace just the awning fabric on your RV awning without having to replace the entire system. This can be a cost-effective option if the awning frame and other components are still in good condition.
How much does it cost to replace a RV awning?
The cost of replacing a RV awning can vary depending on factors such as the type of awning, the size of the RV, and whether you choose to hire a professional for installation. On average, the cost can range from $500 to $1500, including both the awning fabric and installation.
Are there any specific maintenance tips to prolong the lifespan of a RV awning?
Yes, there are a few maintenance tips that can help prolong the lifespan of a RV awning. First, make sure to retract the awning during strong winds, heavy rain, or when you are not using it. Regularly inspect and clean the awning fabric to prevent any dirt or debris buildup. Additionally, applying a protective treatment, such as a fabric guard, can help repel water and UV rays, reducing the chances of fading or damage.