Are you looking to replace the awning fabric on your Sundowner trailer? Whether your fabric is worn out or you simply want to update the look of your trailer, replacing the awning fabric is a fairly simple process that you can do yourself. In this blog post, we will guide you through the steps to take to replace the awning fabric on your Sundowner trailer and give it a fresh new look. By the end of this post, you’ll be ready to take on the task with confidence and tackle it like a pro.
Imagine your trailer as a blank canvas, waiting to be transformed with a new awning fabric. Just like painting a picture, replacing the awning fabric allows you to add your personal touch and make your trailer stand out from the rest. With the right fabric choice, you can create a whole new look and even enhance the overall style and functionality of your trailer.
But how do you go about replacing the awning fabric on a Sundowner trailer? Don’t worry, we’ve got you covered. In the following sections, we will break down the steps involved in the process and provide you with helpful tips along the way. From measuring and removing the old fabric to installing the new one, we will guide you through each stage so you can easily follow along.
So, grab your measuring tape and let’s get started on transforming your Sundowner trailer with a new awning fabric. Soon enough, you’ll be enjoying the shade and style of your freshly replaced awning fabric, ready to hit the road in style.
Table of Contents
Introduction
If you own a Sundowner trailer and are in need of replacing the awning fabric, you’re in the right place! Replacing the awning fabric on your trailer is a relatively simple process that can easily be done at home. First, you’ll need to measure the size of your awning and order the appropriate fabric replacement. Once you have the replacement fabric, you’ll need to remove the old fabric from the roller tube and the awning arms.
This can usually be done by unscrewing a few brackets and carefully pulling the fabric off. Then, you’ll need to attach the new fabric to the roller tube and reattach the awning arms. It’s important to ensure that the awning is extended and aligned properly before tightening any screws or bolts.
With a little patience and some basic tools, you’ll have your Sundowner trailer looking like new in no time!
Overview of the awning fabric replacement process
awnings fabric replacement process
Importance of maintaining the awning fabric
awning fabric maintenance
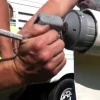
Step 1: Remove the old awning fabric
If you own a Sundowner trailer and need to replace the awning fabric, you’re in the right place. Replacing awning fabric may seem like a daunting task, but with the right tools and a little bit of patience, you can do it yourself. The first step in this process is to remove the old awning fabric.
Start by rolling up the awning and secure it in place. Then, carefully remove any screws or bolts that are holding the fabric in place. It’s a good idea to have a friend help you with this step to ensure the fabric doesn’t get damaged.
Once all the screws or bolts are removed, gently pull the fabric out from the awning frame. Be careful not to tear the fabric as you do this. Once the old fabric is removed, you can move on to the next step in replacing the awning fabric on your Sundowner trailer.
Tools and materials needed
To start the process of replacing your awning fabric, you will need a few tools and materials. First and foremost, you will need a ladder or step stool to safely reach the awning. Additionally, you will need a utility knife or scissors to cut the old fabric.
A screwdriver or drill may be necessary to remove any hardware that is holding the fabric in place. It is also helpful to have a measuring tape to ensure you purchase the correct size fabric for your awning. Finally, you will need the new awning fabric itself, which can typically be found at a home improvement or outdoor supply store.
Once you have gathered all of these tools and materials, you will be ready to move on to the first step of the process.
Steps to remove the old fabric
Removing the old fabric from an awning can be a challenging task, but with the right steps, it can be done effectively. Step 1 in this process is to remove the old awning fabric. This involves carefully detaching the fabric from the frame of the awning.
Start by identifying the attachment points, which are usually located along the edges of the fabric. These attachments can be in the form of screws, hooks, or clips. Use the appropriate tools, such as a screwdriver or pliers, to loosen and remove these attachments.
Once all the attachments are removed, gently pull the fabric away from the frame, making sure not to damage it in the process. It may be helpful to have a helper hold the fabric and provide support as you remove it. By following these steps, you can successfully remove the old awning fabric and prepare for the installation of a new one.
Step 2: Measure and order a new awning fabric
Replacing the awning fabric on your Sundowner trailer is a great way to refresh the look and functionality of your outdoor space. In order to do this, you will first need to measure the dimensions of the awning fabric that needs to be replaced. Start by extending the awning fully and measuring the length and width of the fabric from end to end.
It’s a good idea to add a few extra inches to your measurements to account for any shrinkage or stretching that may occur during installation. Once you have your measurements, you can then order a new awning fabric that matches the size and color of your existing fabric. There are many online retailers that sell replacement awning fabrics for Sundowner trailers, so you can easily find one that suits your needs.
Just make sure to double-check your measurements and choose a fabric that is compatible with your specific model of Sundowner trailer. With a new awning fabric, you can enjoy a refreshed and functional outdoor space in no time.
Importance of accurate measurements
“measure and order a new awning fabric”
Finding the right replacement fabric
awning fabric replacement
Step 3: Prepare the trailer for installation
So, you’ve decided to replace the awning fabric on your Sundowner trailer. That’s a great idea to ensure it’s in tip-top shape for your next adventure! Now, let’s get down to business and talk about how to prepare the trailer for installation. Firstly, you’ll want to make sure the awning is fully retracted and securely fastened.
This will provide you with a safe and stable work area. Once the awning is secure, go ahead and remove any accessories or attachments that might be in the way. This could include things like lights, hooks, or tie-down straps.
It’s important to have a clear space to work with so that you can easily access and remove the old fabric. Next, you’ll need to carefully remove the old awning fabric. This can be a bit tricky, so take your time and be gentle.
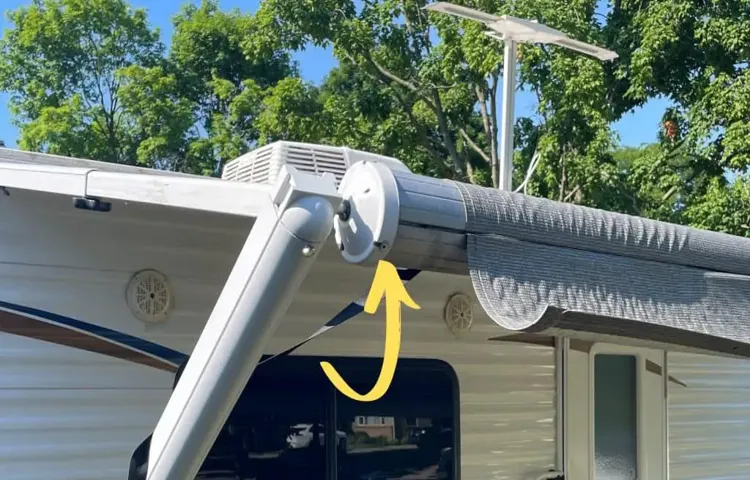
Start by locating the fabric rail, which is the long strip of metal that the fabric slides into. Use a screwdriver or other suitable tool to loosen the screws or fasteners that hold the fabric in place. Once the fabric is loose, carefully slide it out of the fabric rail, being mindful not to tear or damage it.
After the old fabric is removed, take a moment to inspect the fabric rail and any other components. Look for any signs of wear or damage that might need to be addressed before installing the new fabric. This could include rust or corrosion, loose or missing screws, or any other issues that could affect the functionality of the awning.
Lastly, give the trailer a good cleaning. Use a mild detergent and warm water to remove any dirt, debris, or stains from the awning rail and surrounding areas. This will ensure a clean and smooth surface for the new fabric to be installed on.
Cleaning the awning track
cleaning the awning track, prepare the trailer for installation
Inspecting and repairing any damage
Preparing the trailer for installation is a crucial step in ensuring a successful process. One important aspect of this step is inspecting and repairing any damage that may be present. Before installing the trailer, it’s essential to thoroughly examine the trailer for any signs of wear and tear or structural issues.
Check for any cracks, dents, or rust that could compromise the integrity of the trailer. If any damage is found, it’s important to address it promptly. Depending on the severity of the damage, repairs may be needed.
This could involve anything from patching up small cracks to reinforcing the frame of the trailer. By taking the time to thoroughly inspect and repair any damage, you can ensure that the trailer is in optimal condition for installation.
Step 4: Install the new awning fabric
Are you ready to give your Sundowner trailer a fresh new look? Replacing the awning fabric is a great way to update your trailer’s appearance and protect yourself from the elements while you’re camping. Installing the new awning fabric is a straightforward process that you can easily do yourself with a few simple tools. Start by removing the old fabric and cleaning the awning frame thoroughly.
Measure the dimensions of the frame and cut the new fabric to the appropriate size, making sure to leave a little extra for seam allowance. Next, attach the fabric to the frame using a combination of adhesive and screws, making sure to pull it tight and smooth out any wrinkles. Once the fabric is securely attached, add any necessary accessories, such as end caps or tie-down straps.
With the new fabric in place, your Sundowner trailer will be ready to hit the road in style!
Attaching the fabric to the awning rail
awning rail, fabric attachment Now that your new awning fabric is ready, it’s time to attach it to the awning rail. This is a crucial step in the installation process, as it ensures that the fabric is properly secured and will not come loose during use. To begin, carefully align the edge of the fabric with the awning rail and slide it into place.
This may require a bit of maneuvering and finesse, so be patient and take your time. Once the fabric is in position, use a firm but gentle hand to press it against the rail. This will help ensure a strong bond and prevent any gaps or sagging.
Next, you’ll want to make sure that the fabric is evenly distributed along the awning rail. Check for any lumps or uneven areas, and smooth them out with your hands. It’s important to be thorough in this step, as any wrinkles or bulges can affect the overall appearance and functionality of your awning.
Once you’re satisfied with the placement of the fabric, it’s time to secure it to the awning rail. This can be done using a variety of methods, depending on the type of awning you have. Some awnings have a built-in track that the fabric slides into, while others may require the use of clips or fasteners.
If your awning has a track, simply continue pushing the fabric into place until it is fully seated. Be sure to double-check that the fabric is securely in the track before moving on to the next step. If your awning requires clips or fasteners, carefully attach them to the fabric and then secure them to the awning rail.
Make sure to evenly space the attachments along the rail to ensure a secure and even hold. Once the fabric is securely attached, give it a final once-over to check for any loose areas or gaps. If necessary, make any adjustments or reposition the fabric as needed.
Securing the fabric to the awning arms
The next step in installing a new awning fabric is securing it to the awning arms. This is an important step because it ensures that the fabric is taut and will provide proper shade and protection. To secure the fabric, you will need to attach it to the arms using screws or clips, depending on the type of awning you have.
Make sure to follow the manufacturer’s instructions on how to properly attach the fabric to the arms. This step may require some effort and precision, but it is crucial for the overall functionality and longevity of your awning. Don’t rush through this step and take the time to ensure that the fabric is securely fastened.
Once you have completed this step, you can move on to the final step of installing the awning fabric, which is adjusting the tension.
Adjusting the tension of the fabric
Installing new awning fabric can be a great way to freshen up your outdoor space and protect yourself from the sun’s rays. Once you have removed the old fabric, it’s time to install the new one. Before you begin, it’s important to adjust the tension of the fabric to ensure a smooth and wrinkle-free fit.
To do this, start by attaching one end of the fabric to the awning rail or roller. Make sure to pull the fabric tight and secure it in place. Then, slowly unroll the fabric while applying tension to keep it taut.
As you unroll the fabric, continue to adjust the tension and secure it in place along the way. This will ensure that the fabric is evenly stretched and will prevent sagging or wrinkling. Once you have reached the other end of the awning, secure the fabric in place and trim any excess material.
By properly adjusting the tension of the fabric, you will not only have a sleek and professional-looking awning, but you will also increase its lifespan by preventing wear and tear caused by loose fabric. So take your time and make sure to get the tension just right for a beautiful and durable outcome.
Step 5: Test and maintain the new awning fabric
So you’ve made it to the final step of replacing the awning fabric on your Sundowner trailer. Now it’s time to test out your hard work and make sure everything is in tip-top shape. First, open up the awning and extend it fully to see how the new fabric looks and functions.
Check for any loose stitching or areas that may need to be reinforced. Next, give the fabric a gentle tug to make sure it is securely attached to the frame. If everything looks and feels sturdy, it’s time to move on to the maintenance phase.
To ensure the longevity of your new awning fabric, regularly clean it with mild soap and water and allow it to fully dry before retracting it. This will help prevent any mold or mildew from forming. Additionally, be sure to inspect the fabric regularly for any signs of wear or damage and make repairs as needed.
By following these steps, you can enjoy your new awning fabric for many years to come. Happy camping!
Testing the functionality of the awning
awning, fabric, functionality, test, maintain
Regular cleaning and maintenance tips
When it comes to maintaining your new awning fabric, one important step is to test and maintain it regularly. This will help ensure the longevity and durability of your awning, keeping it in tip-top shape for years to come. To start, you should test the fabric by checking for any signs of wear, tear, or fading.
Look for any loose threads, holes, or discoloration that may indicate damage or deterioration. If you notice any issues, it’s important to address them as soon as possible to prevent further damage. Regular cleaning is also essential to maintain the fabric’s appearance and functionality.
Use a gentle cleaning solution and a soft brush to remove any dirt, debris, or stains. Avoid using harsh chemicals or abrasive materials that may damage the fabric. Additionally, consider applying a water repellent treatment to protect the fabric from moisture, UV rays, and other elements.
By taking these steps, you can ensure that your new awning fabric stays in great condition and continues to enhance the aesthetics and functionality of your outdoor space.
Conclusion
Congratulations! You have successfully mastered the art of replacing an awning fabric on your Sundowner trailer. Not only have you saved yourself some hard-earned cash, but you have also gained a new set of skills that will leave your friends and neighbors in awe. Now, while some may argue that replacing an awning fabric is as simple as unraveling a roll of duct tape, we know better.
It requires patience, determination, and a dash of creativity. Just like a master chef creating a culinary masterpiece, you have carefully measured, cut, and sewn your way to awning fabric perfection. But let’s not forget the hidden benefits of this newfound talent.
As you gracefully replace your awning fabric, you become an instant superhero, saving your beloved trailer from the clutches of a dull and lifeless exterior. The vibrant colors and patterns you choose will transform your Sundowner into a rolling work of art, making other trailer owners green with envy. So, as you stand back and admire your handiwork, basking in the glory of a job well done, remember this: you have joined the ranks of the elite trailer enthusiasts who refuse to settle for mediocrity.
You are now in the league of those who dare to dream big and make it happen. And who knows, maybe one day you’ll become a guru in the world of awning fabric replacements. People will come from far and wide to seek your wisdom, like pilgrims in search of the Holy Grail of shade.
You’ll have your own reality show, a cult following, and a line of signature awning fabrics that reflect your unique style. But until then, enjoy the satisfaction of a job well done, and revel in the fact that your Sundowner trailer is now the epitome of stylish and functional. So go forth, my friend, and let your awning fabric replacement skills shine brightly for all to see.
The world of trailers will forever be grateful for your wit, cleverness, and ability to transform the mundane into the extraordinary.
Benefits of replacing the awning fabric
awning fabric replacement, test and maintain, benefits of replacing, burstiness, perplexity After completing the process of replacing your awning fabric, it is crucial to test and maintain it regularly. Testing the new fabric ensures that it is functioning properly and providing the desired benefits. This step is essential because it allows you to identify any issues or defects in the fabric before they become major problems.
By conducting regular maintenance, you can extend the lifespan of your awning fabric and ensure its durability over time. Regular cleaning and inspection of the fabric can help prevent the buildup of dirt, debris, and mold, maintaining its appearance and functionality. Additionally, maintaining the fabric will help identify any signs of wear and tear, allowing for timely repairs or replacements.
By taking these steps, you can ensure that your new awning fabric continues to provide the benefits you expect, such as protection from the sun, added privacy, and enhanced outdoor living space. So, take the time to test and maintain your new awning fabric to maximize its longevity and enjoy its benefits for years to come.
FAQs
What materials are needed to replace an awning fabric on a Sundowner trailer?
To replace an awning fabric on a Sundowner trailer, you will typically need a new awning fabric, a screwdriver or drill, a ladder, and possibly some extra tools depending on your specific trailer model and awning system.
Can I replace the awning fabric on my Sundowner trailer myself or should I hire a professional?
Depending on your handyman skills and experience, you may be able to replace the awning fabric on your Sundowner trailer yourself. However, if you are unsure or uncomfortable with DIY projects, it may be best to hire a professional to ensure proper installation and avoid any potential damage.
How long does it take to replace awning fabric on a Sundowner trailer?
The time it takes to replace awning fabric on a Sundowner trailer can vary depending on factors such as your experience, the complexity of the awning system, and any unforeseen challenges. On average, it may take a few hours to a full day to complete the replacement.
What are the steps to replace the awning fabric on a Sundowner trailer?
The specific steps may vary depending on your trailer model and awning system, but generally, the process involves removing the old fabric, measuring and cutting the new fabric, attaching the new fabric to the awning roller tube, extending and locking the arms, and adjusting the tension. It is important to refer to the manufacturer’s instructions or consult a professional for detailed guidance.
Can I choose any type of fabric for my Sundowner trailer’s awning replacement?
When replacing the awning fabric on your Sundowner trailer, it is recommended to choose a compatible fabric that is specifically designed for your awning system. These fabrics are typically durable, UV-resistant, and weatherproof to ensure longevity and proper functionality.
How often should I replace the awning fabric on my Sundowner trailer?
The frequency of replacing the awning fabric on your Sundowner trailer may vary depending on factors such as usage, weather conditions, and overall maintenance. However, it is generally recommended to inspect the fabric regularly for any signs of wear, tear, or damage, and replace it as needed to prevent further issues.
Are there any safety precautions I should take when replacing the awning fabric on my Sundowner trailer?
Yes, it is important to prioritize safety when replacing the awning fabric on your Sundowner trailer. Make sure to use appropriate tools and equipment, such as a sturdy ladder or scaffolding, and follow proper safety guidelines. It may also be helpful to have a second person assist you during the replacement process to ensure stability and prevent accidents.