
Hey there, fellow readers! Are you ready to embark on an exciting journey into the world of “Introduction”? Allow me to be your guide as we dive into the depths of this intriguing and often overlooked topic. But first, let me ask you a question: Have you ever thought about the significance of introductions in our lives? Introductions are like the opening lines of a novel; they set the tone, capture our attention, and leave a lasting first impression. Whether it’s meeting new people, starting a new job, or even beginning a new chapter in our lives, introductions play a crucial role in establishing connections and building relationships.
They have the power to make us feel welcomed, valued, and understood. Think about it this way: imagine you’re at a party, and someone walks up to you and says, “Hi, I’m John. Nice to meet you.
” Compare that to someone who approaches you and says, “Hey there! I’m Sarah, and I heard you love hiking. I just came back from a breathtaking hike in the mountains. Would you like to hear about it?” Which introduction do you think would intrigue you more and make you want to engage in conversation? Introductions have the ability to capture our attention, ignite our curiosity, and create a genuine connection.
They can be personal, professional, or even artistic, but their purpose remains the same – to break the ice, establish common ground, and set the stage for what’s to come. So, in this blog, we’ll explore the art of introductions, unravel the secrets behind a captivating opening line, and learn how to make a memorable first impression. Whether you’re a student writing an essay, a professional crafting a presentation, or simply someone who wants to enhance their communication skills, this blog is for you.
Get ready to dive into the captivating world of introductions and discover the power they hold in shaping our lives. Stay tuned for practical tips, thought-provoking insights, and inspiring examples that will help you master the art of introductions. Together, let’s unlock the potential of those first few words and make a lasting impact on those around us.
Are you ready? Let’s begin!
Table of Contents
Step 1: Gather Materials
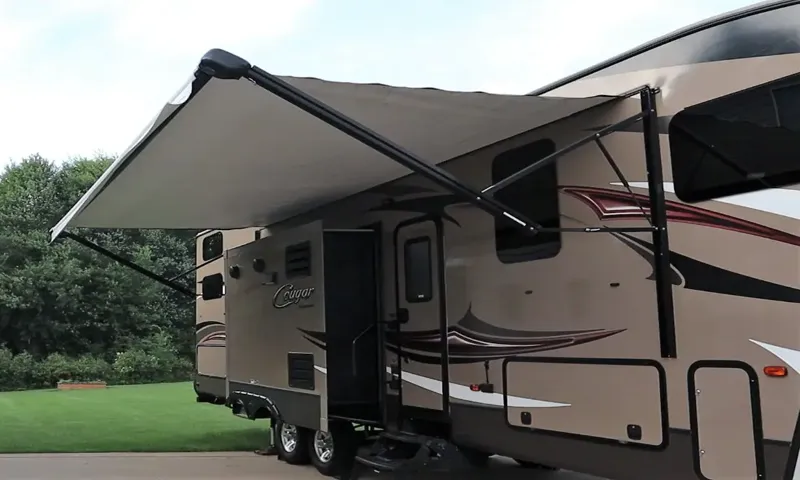
So you’ve decided it’s time to replace the awning on your RV. Whether it’s because of wear and tear or you simply want to upgrade to a newer model, the first step is to gather all the materials you’ll need for the job. The key materials you’ll need include a new awning fabric, a tension rod, a screwdriver or drill, screws, and a ladder.
Make sure you measure the length of your current awning to ensure you purchase the correct size fabric. It’s also a good idea to have someone to assist you during the process, as it can be challenging to handle the awning on your own. Once you have all the materials gathered, you’ll be ready to move on to the next step in replacing your RV awning.
List of materials needed
When it comes to starting a new DIY project, it’s always important to gather all the necessary materials before getting started. For this particular project, there are a few key items you’ll need to have on hand. First, you’ll need a pair of safety goggles to protect your eyes from any potential splatters or debris.
Next, you’ll need a respirator mask to keep you safe from any harmful fumes or dust particles. Additionally, you’ll need a set of paint brushes and rollers, as well as a paint tray and stir sticks. Don’t forget to have a drop cloth or plastic sheeting to protect the surrounding area from any spills or splatters.
And of course, you’ll need to have the paint itself, so be sure to choose the color and type that best suits your project. Finally, gather any additional tools or materials that may be required, such as sandpaper, masking tape, or primer. By gathering all of these materials ahead of time, you’ll be well-prepared to tackle your DIY painting project with ease.
So let’s move on to the first step of the process: preparing the surface.
Where to purchase materials
“One of the first steps in any DIY project is gathering the necessary materials. This can sometimes be a bit overwhelming as you try to figure out where to purchase everything you need. Luckily, there are plenty of options available to help you find what you’re looking for.
One option is to visit your local home improvement store, where you’ll find a wide variety of materials for almost any project. These stores often have knowledgeable staff members who can help you find exactly what you need and offer advice on how to use it. Another option is to shop online, where you can often find a wider selection and potentially better prices.
Many online retailers specialize in DIY materials and offer convenient shipping options. You can also look for specific suppliers that specialize in the type of materials you need, whether it’s lumber, paint, or plumbing supplies. Ultimately, the best place to purchase your materials will depend on the specific project you’re working on and your personal preferences.
Take some time to research your options and compare prices before making a decision. Remember, the goal is to find the materials that meet your needs and make your DIY project a success!”
Step 2: Remove the Old Awning
Now that you’ve gathered all the necessary tools, it’s time to dive into the actual process of replacing an awning on your RV. The second step is to remove the old awning. This might seem like a daunting task, but with a little patience and careful maneuvering, it can be done.
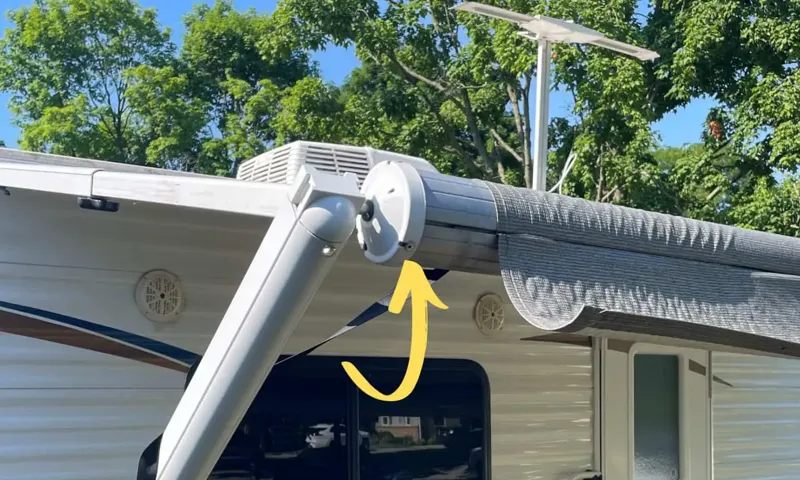
First, make sure your RV is parked on a level surface and that the awning is fully retracted. This will ensure that you have easy access to all the components. Begin by locating the awning’s end cap, which is usually located at the top end of the roller tube.
Use a screwdriver or a drill to remove the screws or bolts that secure the end cap in place. Once the end cap is removed, you will have access to the awning fabric and the roller tube. Carefully unroll the fabric, being mindful of any tension that may be present.
If the fabric is damaged or worn, take this opportunity to remove it and replace it with a new one. You may need to enlist the help of a friend or family member to hold the fabric as you remove it from the roller tube. Next, locate the awning arm brackets, which are attached to the RV.
These brackets will need to be unscrewed or unbolted in order to remove the old awning. Again, be sure to have someone hold the awning arm as you remove the brackets to prevent any sudden movements or damage. Once the brackets are removed, the old awning can be lifted away from the RV.
Take care not to drop it, as it may be heavy or unwieldy. Set it aside in a safe location for disposal or repair, depending on its condition. With the old awning removed, you are now ready to move on to the next step: installing the new awning.
Safety precautions
In this blog section, we will discuss step 2 of the process of installing a new awning: removing the old awning. This step is crucial for a successful installation and it is important to take the necessary safety precautions before starting. First and foremost, make sure to wear protective gear such as gloves and safety glasses to protect yourself from any potential injuries.
Additionally, it is important to check the weather conditions before starting the removal process. If it is a windy day, it is advisable to postpone the removal as strong winds can make the process more dangerous. It is always better to be safe than sorry.
Another important safety precaution to consider is to have a ladder or scaffold that is stable and secure. This will prevent any accidents or falls. Finally, it is important to have a clear workspace without any clutter or obstacles that could impede your progress or cause accidents.
Taking these safety precautions will ensure that the removal process is done safely and efficiently, setting the stage for a successful installation of your new awning.
How to safely remove awning
awning removal, remove old awning, safely remove awning
Step 3: Prepare the RV
Replacing an awning on an RV can be a daunting task, but with the right preparation, it can be a smooth and hassle-free process. Firstly, it’s important to gather all the necessary tools and materials needed for the job. This may include a wrench, a ladder, a new awning, and any specific hardware required for installation.
Once you have everything ready, it’s time to prepare the RV itself. Start by retracting the old awning completely and ensuring that it is securely locked in place. This will prevent any accidents or unnecessary damage during the replacement process.
Next, carefully remove any screws or bolts that are holding the awning in place. It may be helpful to have an extra set of hands to help support the weight of the awning as you remove it. Once the old awning is removed, take the time to clean the area where the new awning will be installed.
This will ensure a smooth and secure fit for the replacement awning. Finally, carefully follow the manufacturer’s instructions for installing the new awning, making sure to tighten all screws and bolts securely. With these steps completed, your RV will be ready to hit the road with a brand new awning!
Clean the area
“clean the area” Preparing your RV for a trip is an important step in ensuring a smooth and enjoyable adventure. One crucial aspect of this preparation is cleaning the area inside and outside of your RV. Before you start cleaning, take a moment to assess the condition of your RV and identify any areas that may need special attention.
Begin by removing any clutter or debris from the interior, such as loose items or trash. This will not only make cleaning easier but also help create a more organized living space for your trip. Next, tackle any surface dirt or dust by using a vacuum or broom to sweep the floors and wipe down countertops and tables.
Pay close attention to areas that are prone to collecting dirt, such as the corners of the floor or hidden nooks and crannies. Additionally, don’t forget to clean the windows and mirrors, as well as any upholstery or curtains that may be in need of refreshing. Finally, move outside to clean the exterior of your RV.
Use a gentle soap and water solution to wash away any dirt, grime, or road residue. Consider using a long-handled brush or sponge to reach higher areas, such as the roof or awning. Once your RV is clean and tidy, you’ll be ready to hit the road with confidence, knowing that your home away from home is clean and well-maintained.
Measure and mark the position for the new awning
To prepare your RV for the installation of a new awning, you first need to measure and mark the position where the awning will be mounted. This involves finding the ideal spot on your RV’s exterior where the awning will be most beneficial and functional. Start by determining the width and depth of the awning you plan to install.
Measure the length of your RV’s wall where the awning will be attached and mark the desired position. Take into consideration any existing windows, vents, or other obstructions that may affect the placement of the awning. Once you have measured and marked the position, you can proceed to the next step of the installation process.
Step 4: Install the New Awning
Now that you’ve removed the old awning from your RV, it’s time to install the new one. Before you begin, make sure you have all the necessary tools and materials, such as a ladder, a drill, screws, and a partner to help you. Firstly, position the new awning on the side of your RV where you want it to be installed.
Mark the placement of the brackets on the RV wall, making sure they are level and evenly spaced. Then, drill pilot holes into the marked spots and attach the brackets securely using screws. Once the brackets are in place, carefully attach the roller tube to the brackets using the provided hardware.
Make sure the awning is level and aligned properly before tightening all the screws. Lastly, extend the awning fully to ensure it functions properly and retract it back in. Congratulations, you’ve successfully installed a new awning on your RV!
Attach the brackets to the RV
install new awning, attach brackets to RV, RV awning installation
Attach the awning assembly to the brackets
install a new awning, attaching the awning assembly, brackets So you’ve decided to install a new awning to enhance your outdoor space. Great choice! Now it’s time to move on to step four – attaching the awning assembly to the brackets. This is an important step that ensures your awning is securely mounted and will provide the shade and protection you desire.
Start by locating the brackets that came with your awning. These brackets are typically made of sturdy metal and are designed to hold the weight of the awning. You’ll need to position the brackets in the desired location on your wall or roof, making sure they are level and properly aligned.
Once the brackets are in place, it’s time to attach the awning assembly. This assembly consists of the arms and fabric of the awning. Begin by sliding the arms into the brackets, ensuring that they fit snugly and securely.
You may need to use a screwdriver or wrench to tighten any screws or bolts that hold the arms in place. Next, carefully unroll the fabric of the awning and attach it to the arms. Most awnings have a track or groove along the edges of the fabric that allows it to be easily attached to the arms.
Simply slide the fabric into the track and make sure it is secured in place. Once the awning assembly is attached to the brackets and the fabric is secured to the arms, give it a test run. Extend and retract the awning to make sure it moves smoothly and without any obstructions.
If everything is working properly, congratulations! You’ve successfully installed your new awning. Remember, it’s important to follow the manufacturer’s instructions and safety guidelines throughout the installation process. If you’re unsure about anything or if you encounter any difficulties, don’t hesitate to reach out to a professional for assistance.
Step 5: Test and Adjust the Awning
Once you have successfully installed the new awning fabric, the next step is to test and adjust the awning to ensure it is working properly. Start by extending the awning fully to check if it rolls out smoothly and evenly. Inspect the fabric and frame for any signs of tension or sagging.
If you notice any issues, you may need to adjust the tension on the springs or tighten any loose bolts. It’s also a good idea to test the retracting function to make sure it retracts smoothly without any resistance or jamming. Adjust the tension on the springs if necessary to achieve the desired tension.
Additionally, check the angle of the awning by measuring it against the side of the RV. It should be slightly angled downward to allow water to run off. If it is not at the correct angle, make adjustments to the arms or brackets until it is leveled properly.
Overall, taking the time to properly test and adjust your newly replaced awning will ensure it functions smoothly and provides the desired shade and protection for your RV.
Extend and retract the awning
awning, extend, retract, test, adjust The fifth step in installing an awning is to test and adjust it. Once you have securely attached the awning to your home and properly connected any necessary cables or rods, it’s time to see if it functions correctly. Start by extending the awning fully to its maximum length.
This will allow you to check for any issues or malfunctions. As the awning extends, pay close attention to how smoothly it moves and if it gets stuck at any point. If everything appears to be working properly, retract the awning back to its original position.
Again, observe how smoothly it retracts and if there are any issues along the way. If you do encounter any problems, such as the awning sticking or moving unevenly, you may need to make some adjustments. This could involve tightening or loosening certain parts of the awning or checking the alignment of the arms.
It’s important to test and adjust the awning to ensure that it operates smoothly and reliably. After all, you want to be able to easily extend and retract the awning whenever you need shade or protection from the sun.
Make any necessary adjustments
“awning adjustments” Once you’ve installed your awning, it’s important to test it out and make any necessary adjustments to ensure it functions properly. Start by extending the awning fully to its maximum length. Check that it opens and closes smoothly without any resistance.
You should also make sure it locks securely in the open position to avoid any unexpected closures. Next, test the angle adjustment feature of the awning. This allows you to change the angle of the awning based on the position of the sun or your desired level of shade.
Adjust the angle and make sure it holds in place without any slippage. Additionally, check the tension and alignment of the awning fabric. It should be taut and evenly stretched across the frame.
If you notice any sagging or wrinkles, you can make adjustments using the tensioning knobs or by repositioning the awning brackets. Finally, don’t forget to test the retractable feature of the awning. Ensure that it retracts smoothly and evenly without any snags.
By taking the time to test and adjust your awning, you’ll be able to enjoy its benefits to the fullest and prolong its lifespan.
Conclusion
So there you have it, my dear aspiring RV enthusiasts! You now possess the knowledge and skills necessary to replace an awning on your beloved recreational vehicle. With some patience, a little bit of elbow grease, and perhaps a few choice words muttered under your breath, you can conquer this task with ease. Just remember, when it comes to awning replacement, it’s all about preparation and precision.
Measure twice, cut once, as they say. And don’t forget to enlist the help of a trusty sidekick to lend a hand or hold the ladder steady. After all, two minds – and sets of hands – are better than one, especially when it comes to RV repairs.
As you embark on this awe-inspiring journey of awning replacement, keep in mind that it’s not just the destination, but the process that truly matters. Embrace the challenges, relish the triumphs, and don’t be afraid to get your hands dirty. This DIY adventure will not only save you a pretty penny, but it will also earn you the admiration and envy of your fellow RV enthusiasts.
So go forth, dear friend, armed with your newfound knowledge and a gleaming determination. Your RV’s new awning awaits, and with it, a world of endless possibilities and adventures. And remember, should you ever find yourself in need of another repair, just channel your inner MacGyver and believe in the power of your own ingenuity.
Happy RVing and may your awnings always be sturdy, your travels memorable, and your roadside repair skills the stuff of legends!”
FAQs
How do I replace the awning fabric on my RV?
To replace the awning fabric on your RV, you will need to first remove the old fabric by releasing the tension and unwinding it from the roller. Then, measure the size of the old fabric so you can purchase a replacement of the same size. Finally, attach the new fabric to the roller and adjust the tension to ensure proper installation.
Can I replace the awning on my RV myself?
Yes, you can replace the awning on your RV yourself. However, it may require some basic DIY skills and tools. It’s important to follow the manufacturer’s instructions and take necessary safety precautions while working on your RV awning.
How long does it take to replace an awning on an RV?
The time it takes to replace an awning on an RV can vary depending on your experience and the specific awning model. On average, it may take a few hours to remove the old awning and install a new one. It’s always a good idea to allocate enough time and work at a comfortable pace to ensure a proper installation.
What are the common signs that an RV awning needs replacement?
Some common signs that an RV awning may need replacement include tears or holes in the fabric, difficulty in retracting or extending the awning, fading or discoloration of the fabric, and damage to the supporting arms or frame. If you notice any of these signs or have concerns about the condition of your RV awning, it may be time for a replacement.
Do I need any special tools to replace an awning on an RV?
While basic hand tools like a screwdriver and wrench may be necessary, you typically won’t need any special or specialized tools to replace an awning on an RV. However, it’s always a good idea to consult your awning’s manufacturer instructions and make sure you have the right tools for your specific model.
Can I replace just the awning fabric without replacing the entire awning?
Yes, in most cases, you can replace just the awning fabric without having to replace the entire awning. This can save you time and money, especially if the supporting arms and frame of your awning are still in good condition. Make sure to carefully measure your old fabric and purchase a replacement of the same size.
Are there any safety precautions to keep in mind when replacing an awning on an RV?
Yes, when replacing an awning on an RV, it’s important to take certain safety precautions. Make sure to disconnect any electrical power to the awning, wear appropriate protective gear such as gloves and safety glasses, and use caution when working at heights. It’s also a good idea to have someone assist you during the installation process to ensure safety.