
So, you’ve been enjoying the freedom and flexibility of traveling in your RV, but now you’re noticing that your awning is starting to show signs of wear and tear. Perhaps it’s been exposed to harsh weather conditions or it’s simply reached the end of its lifespan. Whatever the reason, you’re faced with the need to replace your RV awning.
But what exactly is an RV awning, and why would you need to replace it? An RV awning is a retractable cover that extends from the side of your RV, providing shade and protection from the elements. It’s like having a small outdoor living space that allows you to enjoy the outdoors while staying sheltered and comfortable. Just imagine sitting under your awning, sipping on a refreshing drink, and watching the world go by.
But as with anything that is constantly exposed to the elements, RV awnings can sustain damage over time. From sun exposure that fades the fabric and weakens the frame, to strong winds that can tear or bend the awning, there are many factors that can contribute to the need for a replacement. And when your awning becomes damaged or starts to show signs of wear, it’s important to address the issue sooner rather than later.
Replacing your RV awning not only ensures that you continue to have a shaded area to relax and unwind, but it also helps to protect the integrity of your RV. A damaged or worn out awning can allow water to seep into your RV, causing potential water damage and costly repairs. By replacing your awning promptly, you can prevent further damage and maintain the value and functionality of your RV.
So, whether you’re a full-time RVer or you’re just planning a weekend getaway, having a reliable awning is essential for maximizing your outdoor experience and protecting your investment. Don’t let a damaged or worn out awning put a damper on your adventures – it’s time to replace it and get back to enjoying the great outdoors in style and comfort.
Table of Contents
Understanding your Faulkner RV awning
If you’re an RV owner, you probably understand the importance of having a reliable awning to provide shade and protection from the elements. However, over time, your Faulkner RV awning may begin to show signs of wear and tear. If you find yourself in need of a replacement, don’t fret! Replacing a Faulkner RV awning is a fairly straightforward process that can be done with just a few tools and some basic knowledge.
So, how exactly do you go about replacing your Faulkner RV awning? First, you’ll want to make sure you have the correct size and style of awning for your RV. Once you have the replacement awning, carefully remove the old awning by unscrewing any brackets or supports that are holding it in place. Then, simply attach the new awning in the same way, making sure it is securely fastened.
Finally, test the awning to ensure it extends and retracts properly. With just a little bit of time and effort, you can have your Faulkner RV awning looking and functioning like new again!
Features and benefits of the Faulkner RV awning
Faulkner RV awning Faulkner RV awnings are a must-have for any RV owner who wants to maximize their outdoor living space. These awnings come in a variety of sizes and styles to fit any RV, and they offer a range of features and benefits that make them worth every penny. One of the great features of Faulkner RV awnings is their durability.
These awnings are made with high-quality materials that are designed to withstand the elements and hold up to everyday wear and tear. Whether you’re camping in the rain or soaking up the sun, you can trust that your Faulkner awning will keep you and your family protected and comfortable. Another benefit of Faulkner RV awnings is their ease of use.
These awnings are designed to be user-friendly, with simple setup and operation. With just a few simple steps, you can have your awning fully extended and ready to enjoy. And when it’s time to pack up and move on, the awning conveniently retracts and stores away without hassle.
Faulkner RV awnings also offer a great deal of versatility. Depending on the model you choose, you can adjust the angle and height of your awning to accommodate different weather conditions and provide the shade or privacy you desire. With the ability to customize your awning to meet your specific needs, you can create the perfect outdoor oasis wherever you go.
In addition to their durability, ease of use, and versatility, Faulkner RV awnings also provide added comfort and convenience to your RV experience. These awnings can extend your outdoor living space, giving you a cozy spot to relax, dine, or entertain. They also provide shade and protection from the sun’s harmful rays, allowing you to stay cool and comfortable on hot summer days.
Overall, investing in a Faulkner RV awning is a wise choice for any RV owner. With their durability, ease of use, versatility, and added comfort, these awnings are sure to enhance your outdoor experience and make your RV adventures even more enjoyable. So why wait? Get a Faulkner RV awning today and start enjoying the great outdoors in style.
Common issues with RV awnings and when to replace them
Faulkner RV awnings are a popular choice for many campers and RV enthusiasts. These awnings provide shade and protection from the elements, allowing you to enjoy the outdoors while still staying comfortable. However, like any other RV awning, Faulkner awnings can experience issues over time.
One common issue is fabric tearing or fraying. This can occur from exposure to harsh weather conditions or general wear and tear. In some cases, the fabric may be repairable, but if the damage is extensive, it may be time to consider replacing the awning altogether.
Another issue that can occur with Faulkner RV awnings is the arms or hardware becoming loose or damaged. This can cause the awning to sag or not retract properly. Again, depending on the extent of the damage, it may be more cost-effective to replace the awning rather than trying to repair it.
Additionally, over time, the motor or mechanism that operates the retractable feature of the awning may wear out or malfunction. If you find that your awning is no longer retracting properly or is making unusual noises, it may be time to replace it. Ultimately, the decision to replace your Faulkner RV awning will depend on the specific issues you are experiencing and the cost of repairs compared to the cost of a new awning.
It’s important to consider your budget and the overall longevity of the awning when making this decision.
Preparing for the replacement
Replacing an Faulkner RV awning might seem like a daunting task, but with a little preparation and the right tools, you can do it yourself. First, make sure you have the new awning and any necessary replacement parts on hand. It’s always a good idea to measure the old awning to ensure you order the correct size.
Next, gather your tools, which may include a ladder, a screwdriver or drill, a rubber mallet, and a helper to assist you. Before you start, be sure to consult the manufacturer’s instructions for your specific model of Faulkner RV awning, as they may have particular steps or requirements. Once you’re ready to begin, start by removing the old awning from your RV.
This may involve removing screws or other fasteners, so be sure to keep track of them for later. Once the old awning is removed, you can then install the new one using the manufacturer’s instructions. It’s important to take your time and follow each step carefully to ensure the installation is secure.
With the right tools and a little patience, you’ll have your Faulkner RV awning replaced and ready to enjoy in no time.
Gathering the necessary tools and materials
One of the key steps in replacing a part or component in any repair project is gathering the necessary tools and materials. Having the right equipment on hand will not only make the process smoother, but it will also ensure that the replacement is done correctly and efficiently. Before starting the project, it’s important to assess what tools and materials are needed.
This can be done by referencing the manufacturer’s instructions, consulting online resources, or seeking advice from professionals. Once you have a list of the required tools and materials, make sure to gather them all before beginning the repair. This will save you time and frustration in the long run, as you won’t have to pause the project to locate missing items.
Additionally, it’s a good idea to check that all the tools you have are in good working condition. Sharpen blades, replace worn-out parts, and clean any equipment that may require maintenance. By taking the time to gather the necessary tools and materials before starting the replacement, you are setting yourself up for success and ensuring a smooth repair process.
Safety precautions to take before starting the replacement process
When it comes to replacing a part in your car, it’s important to take certain safety precautions before getting started. Preparing for the replacement process can help ensure that you stay safe and avoid any potential accidents or injuries. First, make sure to wear protective gear such as gloves and safety goggles to protect your hands and eyes from any potential hazards.
Next, it’s important to disconnect the battery to avoid any electrical shocks or accidents while working on the car. Additionally, it’s a good idea to park the car on a flat surface and engage the parking brake to prevent any movement while you’re working. Finally, gather all the necessary tools and equipment before starting the replacement process.
By taking these safety precautions, you can have peace of mind and confidently start replacing the part in your car.
Step-by-step guide to replacing your Faulkner RV awning
Replacing a Faulkner RV awning may seem like a daunting task, but with the right steps, anyone can do it. First, gather all the necessary tools and materials like a ladder, a replacement awning, a wrench, and a screwdriver. Begin by retracting the old awning and removing any screws or bolts holding it in place.
Carefully slide the old awning out and set it aside. Next, measure the length of the new awning and cut it to the appropriate size if necessary. Attach the new awning to the RV, making sure it is aligned correctly and securely fastened with screws or bolts.
Extend the new awning and adjust the tension as needed. Finally, test the awning to ensure it opens and closes smoothly. With these step-by-step instructions, replacing your Faulkner RV awning will be a breeze.
Removing the old awning
Replacing an RV awning can be a daunting task, but with a step-by-step guide, it can be easier than you think. One of the first steps in this process is removing the old awning. Start by carefully retracting the awning, making sure to secure it in place.
Once the awning is retracted, use a ladder to access the top of your RV. Look for the mounting brackets that hold the awning in place and unscrew them using a wrench. Be careful not to drop any screws or hardware as you remove them.
Once the brackets are removed, carefully lift the old awning off of the RV, taking care not to damage the vehicle or yourself in the process. With the old awning removed, you can now move on to the next steps of replacing your Faulkner RV awning.
Cleaning and preparing the RV for the new awning installation
Faulkner RV awning, replacing Faulkner RV awning, awning installation, cleaning RV, preparing RV for awning installation. Now that you have decided to replace your Faulkner RV awning, it’s important to take the necessary steps to prepare your RV for the installation. First things first, you’ll want to give your RV a thorough cleaning.
This includes washing the exterior, removing any dirt or debris from the awning area, and making sure all surfaces are dry and free of any old adhesive or residue. Next, it’s time to measure the area where the new awning will be installed. Carefully measure the width and height, making sure to account for any variations in the size of the awning.
Take note of these measurements so that you can purchase the correct size awning for your RV. Once you have your measurements and the new awning in hand, it’s time to remove the old awning. Begin by carefully removing any screws or bolts that are holding the old awning in place.
Be sure to keep track of these fasteners, as you will need them later when installing the new awning. Once the old awning is removed, you may need to clean the area where the awning was attached. Use a mild detergent and warm water to remove any dirt or residue, and allow the area to dry completely before proceeding.
Now it’s time to install the new awning. Begin by carefully aligning the awning with the mounting brackets, making sure that it is properly centered and level. Use the screws or bolts that you removed from the old awning to secure the new awning in place, being careful not to overtighten.
Once the awning is securely attached, give it a test run by extending and retracting it a few times to ensure that it is operating smoothly. Finally, give your RV one final inspection to make sure that everything is secure and in place. By following these steps, you can easily replace your Faulkner RV awning and have your RV looking like new again.
Installing the new Faulkner RV awning
In this step-by-step guide, we’ll walk you through the process of installing your new Faulkner RV awning. Whether you’re replacing an old awning or adding one for the first time, this tutorial will help you get the job done right. First, gather all the necessary tools and materials for the installation.
You’ll need a ladder, a drill with a screwdriver bit, a measuring tape, and the new awning kit. Make sure to read the instructions provided with the awning kit before getting started. Next, assess the placement of the awning on your RV.
You’ll want to choose a location that provides enough coverage and is accessible for easy use. Measure the area to ensure that the awning will fit properly. The measurements will also help you determine where to install the brackets that will hold the awning in place.
Once you have determined the placement, use the measuring tape and pencil to mark the spots for the awning brackets. Be sure to follow the instructions provided with your kit for the specific spacing and placement requirements. After marking the spots, use the drill to screw in the brackets securely.
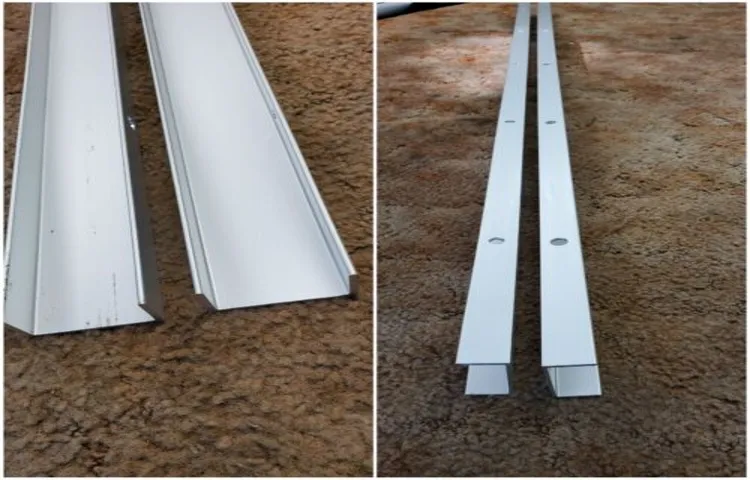
Make sure the brackets are level and properly aligned. This step is crucial for the stability and functionality of the awning. Next, attach the awning fabric to the roller tube.
Start by sliding the fabric into the groove of the roller tube, making sure it is centered and straight. Use the included screws or other fasteners to secure the fabric in place. Once the fabric is secure, carefully extend the awning to its full length, making sure it is evenly extended.
Tips and tricks for a successful awning replacement
Replacing an Faulkner RV awning can be a daunting task, but with the right tips and tricks, it can be a breeze. First and foremost, make sure you have all the necessary tools and materials before beginning the replacement process. This includes a ladder, a power drill, new awning fabric, and any additional hardware that may be needed.
Once you have everything ready, start by removing the old awning fabric by unscrewing it from the frame. Be sure to take note of how the old fabric was attached so you can replicate the process with the new fabric. Next, attach the new fabric by lining it up with the awning frame and using a power drill to screw it in securely.
It’s important to make sure the fabric is taut and wrinkle-free before tightening the screws. Lastly, double-check that all the screws are tightened and the awning is properly secured to the RV. Taking the time to properly replace your Faulkner RV awning will ensure that it functions properly and lasts for years to come.
Troubleshooting common issues during the replacement process
Having to replace your awning can be a daunting task, but with some tips and tricks, you can make the process go smoothly. One common issue that people face during the replacement process is a misalignment of the awning fabric. To troubleshoot this, you can double-check the measurements and ensure that the fabric is centered properly.
Another issue that may arise is difficulty in removing the old awning. If you’re struggling to remove it, try using a lubricant or heat gun to loosen any stuck components. Additionally, be mindful of any electrical connections that may need to be disconnected before removing the old awning.
Lastly, if you’re encountering problems with the installation, such as the awning not extending or retracting properly, check the tension and alignment of the springs. By following these tips and troubleshooting common issues, you’ll be well on your way to a successful awning replacement.
Maintaining your Faulkner RV awning for longevity
Replacing your Faulkner RV awning can be a daunting task, but with a few tips and tricks, you can ensure a successful replacement that will prolong the life of your awning. First, it’s important to regularly inspect your awning for any signs of wear and tear. Look for any rips, tears, or holes that may need to be repaired or replaced.
Additionally, check the hardware and make sure it is in good condition. Next, measure your awning to ensure you purchase the correct size replacement. This will prevent any issues with installation and ensure a proper fit.
When it comes time to replace your awning, it’s helpful to have a second person to assist with the process. This can make it easier to remove the old awning and install the new one without causing any damage. Finally, take your time during the installation process and follow the manufacturer’s instructions carefully.
This will help prevent any mistakes and ensure a successful replacement that will keep your RV awning looking great for years to come.
Conclusion: Enjoying your new Faulkner RV awning
So, there you have it – how to replace an RV awning in a few simple steps. It may seem daunting at first, but with the right tools and a little bit of patience, you can easily tackle this project on your own. And remember, even if it seems overwhelming, just think of it as an opportunity to embrace your inner handyman (or handywoman)! Replacing an RV awning is like replacing a beloved character in a Faulkner novel.
It may be a bit of a challenge, but the end result is worth it. Just like the protagonist in a Faulkner novel, your new awning will add a touch of style and personality to your RV, making it the envy of the campground. So, channel your inner Faulkner and dive headfirst into this DIY adventure.
You’ll feel a sense of accomplishment and pride as you stand back and admire your handiwork, just like Faulkner himself after finishing one of his epic tales. Remember, Faulkner once said, “Don’t bother just to be better than your contemporaries or predecessors. Try to be better than yourself.
” So, go ahead and challenge yourself to replace that awning with grace and finesse. Who knows, maybe someday someone will write a novel about your RV adventures, with your awning replacement as a pivotal moment! In conclusion, replacing an RV awning may not be as complicated as dissecting the depths of a Faulkner novel, but it still requires some attention to detail and a willingness to get your hands dirty. With a little bit of effort and a dash of Faulkner-esque determination, you’ll have your RV looking as good as new in no time.
Happy awning replacement, and may your travels be filled with literary inspiration and wonderful adventures!
FAQs
How do I replace the awning fabric on my Faulkner RV awning?
To replace the awning fabric on your Faulkner RV awning, follow these steps:
– Start by extending the awning fully and securing it in place.
– Remove the end caps on each side of the awning.
– Unroll the old fabric from the roller tube, taking note of how it was installed.
– Slide the new fabric onto the roller tube, making sure it is centered and aligned properly.
– Roll up the new fabric onto the roller tube, taking care to keep it even and neat.
– Reattach the end caps and secure them tightly.
– Test the awning by extending and retracting it a few times to ensure everything is functioning correctly.
Can I replace the awning fabric on my Faulkner RV awning myself or do I need professional help?
You can replace the awning fabric on your Faulkner RV awning yourself if you are comfortable with DIY projects and have some basic tools. However, if you are unsure or not confident in your abilities, it is always best to consult a professional who can ensure the replacement is done correctly and safely.
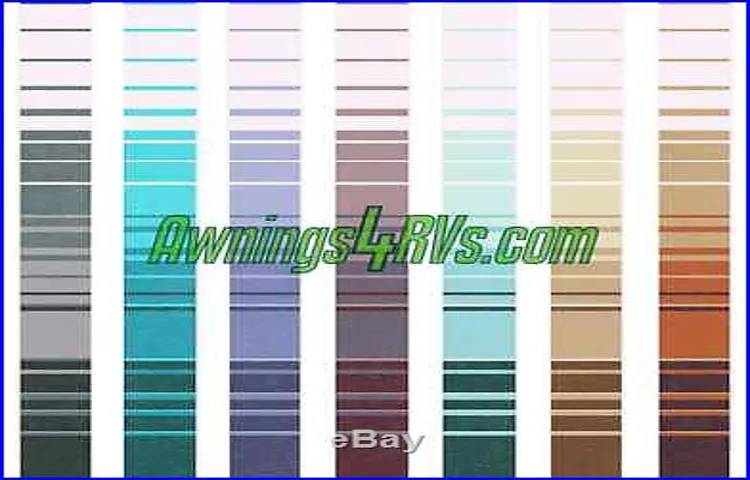
Where can I purchase replacement fabric for my Faulkner RV awning?
Replacement fabric for Faulkner RV awnings can be purchased from various sources, including online retailers, RV supply stores, and even directly from Faulkner. It is important to make sure you are purchasing the correct size and type of fabric for your specific awning model.
How often should I replace the awning fabric on my Faulkner RV awning?
The frequency of awning fabric replacement on your Faulkner RV awning will depend on various factors, such as usage, weather conditions, and overall maintenance. However, a general guideline is to inspect the fabric regularly for signs of wear, tears, or fading. If you notice significant damage or deterioration, it may be time to replace the fabric.
What are the benefits of replacing the awning fabric on my Faulkner RV awning?
Replacing the awning fabric on your Faulkner RV awning can provide several benefits, such as:
– Improved aesthetics: New fabric can instantly rejuvenate the look of your RV and enhance its overall appearance.
– Better protection: Fresh fabric can provide better protection from sun, rain, and other elements, keeping you and your RV more comfortable.
– Increased durability: Over time, fabric can become weakened or damaged, making it less effective at withstanding wind, rain, and other environmental factors. Replacing the fabric ensures optimal durability and longevity.
– Enhanced functionality: If your current fabric is difficult to roll up or retract, replacing it can restore proper functioning and make using the awning easier and more convenient.