Are you looking to upgrade the patio awning on your RV? Whether you’re a seasoned traveler or just starting out, a quality patio awning can enhance your outdoor experience by providing shade and protection from the elements. But over time, awnings can become worn out or damaged, and it’s important to replace them to ensure that your RV remains in top condition. In this blog, we will introduce you to the world of RV patio awning replacement and show you how it can be a game-changer for your road trips.
So, buckle up and get ready to discover the benefits of a new awning for your RV!
Table of Contents
Step 1: Gather the necessary tools and materials
Okay, so you’re ready to tackle replacing your RV patio awning fabric on your own. That’s awesome! The first step is to gather all the necessary tools and materials. Trust me, you don’t want to get halfway through the process only to realize you’re missing something crucial.
So here’s a checklist of what you’ll need: New awning fabric: Make sure you measure your existing awning so you can buy the correct size.
Awning rail lubricant: This will help you slide the new fabric into place smoothly. A ladder or scaffolding: You’ll need to access the top of your RV to remove the old fabric and install the new one.
A screwdriver or drill: Depending on the type of awning you have, you may need to remove screws or drill out rivets.
Pliers: These will come in handy for removing any staples or fasteners holding the old fabric in place. A utility knife: You’ll use this to carefully cut away the old fabric and any excess material.
Clothespins or clamps: These will help you hold the new fabric in place as you work.
What you’ll need to replace your RV patio awning fabric
RV patio awning fabric replacement
Safety precautions to consider before starting
Step 1: Gather the necessary tools and materials Before you start any project, it’s important to gather all the necessary tools and materials to ensure your safety and the success of your DIY venture. Safety should always be a top priority, so make sure you have the proper protective gear such as safety goggles, gloves, and a dust mask if needed. Next, take a look at the tools you’ll need for your specific project.
This could include anything from a hammer and screwdriver to more specialized tools like a saw or drill. It’s important to have the right tools for the job to avoid any accidents or damage to your materials. Once you have your safety gear and tools in order, take a look at the materials needed for your project.
This could include things like wood, nails, paint, or any other supplies you’ll need to complete your task. Make a list and double-check that you have everything on hand before you begin. By taking the time to gather the necessary tools and materials before you start, you’ll be setting yourself up for a successful and safe DIY project.
Don’t skip this step, as it can save you time, money, and potentially prevent any accidents or injuries along the way. Happy DIY-ing!
Step 2: Remove the old awning fabric
Once you’ve gathered all the necessary materials and tools for the job, it’s time to start removing the old awning fabric from your RV patio. Begin by retracting the awning completely. This will allow you to easily access the fabric and remove it without obstructions.
Locate the screws or bolts that hold the fabric in place and carefully remove them using a screwdriver or wrench. Be sure to keep track of the screws or bolts so you can easily reattach the new fabric later. Gently pull the fabric out of the awning rail, taking care not to damage it or the surrounding hardware.
If the fabric is old and worn, it may be more fragile and require extra caution. Once the fabric is removed, inspect the awning rail and hardware for any signs of damage or wear. If necessary, clean or repair these components before installing the new fabric.
With the old fabric removed, you’re now ready to move on to the next step of replacing your RV patio awning fabric yourself.
How to safely remove the old fabric without causing damage
When it comes to replacing or repairing your awning fabric, it’s important to approach the job with caution to avoid causing any further damage. In this step, we’ll discuss how to safely remove the old fabric without causing any harm. The first thing to do is to carefully examine the awning to locate any screws, bolts, or fasteners that are holding the fabric in place.
Once you’ve identified these, use the appropriate tools (such as a screwdriver or wrench) to remove them. It’s crucial to be gentle and patient during this process to prevent bending or breaking any parts. Once the fasteners are removed, you can start loosening the fabric from the awning frame.
Begin from one end and slowly work your way across, gently pulling the fabric away from the frame. If the fabric is stuck or adhesive is holding it in place, try using a heat gun or a hairdryer to soften the adhesive and make it easier to remove. Take your time and be careful not to tear the fabric.
With a bit of patience and care, you can safely remove the old fabric and prepare the awning for the next step in the replacement or repair process.
Tips for disassembling the awning hardware
When it comes to disassembling the awning hardware, removing the old awning fabric is a crucial step. Before you begin, make sure you have all the necessary tools handy, such as a ladder, pliers, and a screwdriver. Start by carefully removing any screws or bolts that are holding the fabric in place.
Be cautious and gentle to avoid causing any damage to the fabric or the awning frame. Once the screws or bolts are removed, you can start to detach the fabric from the frame. This may require a bit of pulling and tugging, as the fabric can sometimes be tightly secured.
Take your time and be patient to avoid tearing the fabric. Once the fabric is completely removed, you can then proceed with replacing it with a new one.
Step 3: Measure and order the new fabric
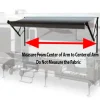
When it comes to replacing your RV patio awning fabric, one important step is to measure and order the new fabric. Getting the right measurements is crucial for ensuring that the replacement fits properly. To start, extend your awning fully and measure the distance from the center of one arm to the center of the other.
Make a note of this measurement, as it will be needed when ordering the new fabric. Additionally, measure the height from the roller tube to the ground. This measurement will help ensure that the replacement fabric is the correct size.
Once you have your measurements, you can search for a replacement fabric that matches your awning’s specifications. Many RV supply stores and online retailers offer a variety of fabric options to choose from. It’s important to make sure that the fabric you purchase is made specifically for awnings, as they are designed to withstand outdoor conditions.
With the new fabric ordered, you’ll be one step closer to completing your RV patio awning replacement project.
How to accurately measure your RV patio awning for replacement fabric
In step 3 of measuring and replacing your RV patio awning fabric, it’s time to get the new fabric ordered. After accurately measuring the width and projection of your awning, you’ll want to choose a fabric that fits your specific needs. There are a variety of fabrics available, including vinyl and acrylic options.
Consider factors such as durability, resistance to fading and weather, and ease of maintenance when selecting your fabric. Once you have determined the fabric you want, you can order it from a reliable supplier or manufacturer. Be sure to provide them with accurate measurements to ensure that you receive the correct size and fit for your awning.
With the new fabric on its way, you’ll be one step closer to enjoying a refreshed and functional RV patio awning.
Where to find and order high-quality RV awning fabric
RV awning fabric, measure, order, high-quality RV awning fabric
Step 4: Install the new awning fabric
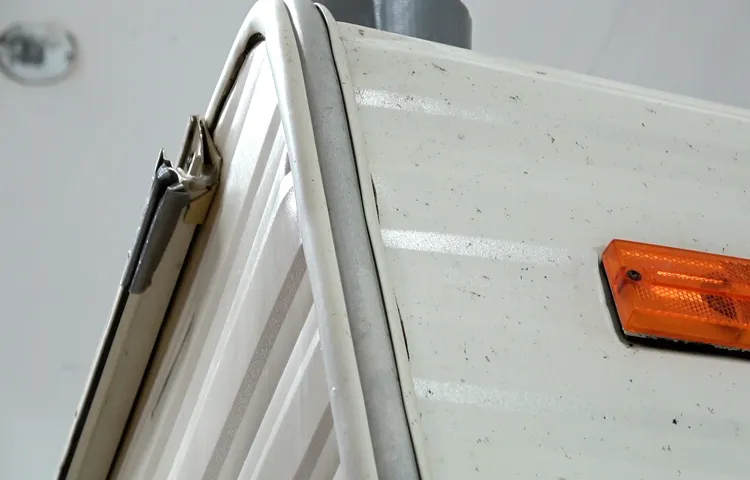
Installing the new awning fabric on your RV patio may seem like a daunting task, but with a little patience and some basic tools, you can do it yourself. Start by removing the old fabric from the roller tube and the awning arms. Carefully unroll the fabric and disconnect any velcro or zippers that are holding it in place.
Once the old fabric is removed, lay it flat on the ground and use it as a template to cut the new fabric to size. Make sure to leave a little extra fabric on all sides for a clean, secure fit. Next, slide the new fabric onto the roller tube and reattach any velcro or zippers.
Feed the fabric through the awning arms and secure it with screws or snaps, depending on the type of awning you have. Lastly, adjust the tension on the fabric to ensure a snug fit. Now you’re ready to enjoy your newly replaced RV patio awning fabric!
Preparing the new fabric for installation
awning installation, new fabric, preparing, bursting with freshness, high-quality materials, professional contractor
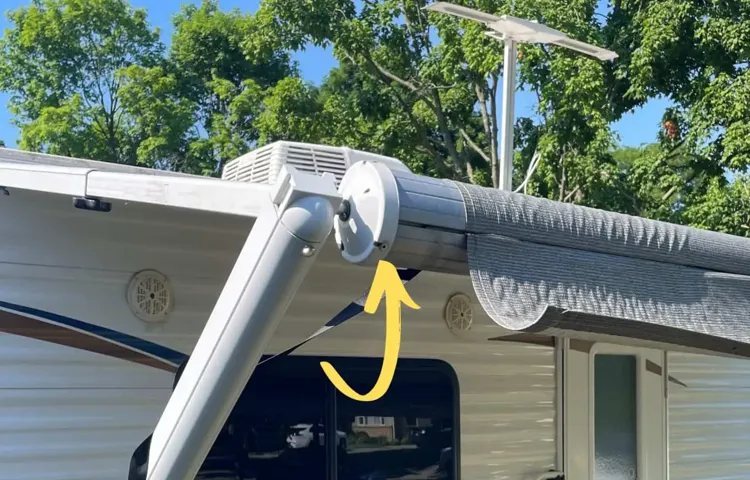
Attaching the new fabric to the awning roller and hardware
“With the old fabric removed, it’s time to attach the new fabric to the awning roller and hardware. This step is crucial, as it ensures that the awning will function properly and look great. Start by aligning the fabric with the roller tube and placing it on top.
Make sure the fabric is centered and evenly distributed. Next, secure the fabric to the roller tube by using adhesive or sewing it in place. This will ensure that the fabric stays in place even when the awning is rolled out.
Once the fabric is securely attached to the roller, it’s time to attach it to the hardware. This involves connecting the hooks or clips on the fabric to the corresponding slots on the hardware. This step may require some trial and error to ensure that the fabric is evenly tensioned and hangs properly.
Once everything is in place, give the awning a test run to make sure it rolls out smoothly and retracts without any issues. With the new fabric installed, you can now enjoy your outdoor space with a refreshed and functional awning.” 搋
Properly tensioning the fabric for a smooth, secure fit
Installing new awning fabric can give your outdoor space a fresh and updated look. Once you have chosen the right fabric for your awning, it’s time to install it properly to ensure a smooth and secure fit. This is an important step in the process, as how well you tension the fabric will determine how long it will last and how well it will perform.
To begin, you’ll want to remove the existing fabric from the awning frame. Lay the new fabric over the frame and make sure it is centered and aligned properly. Then, use clamps or straps to secure the fabric in place.
Next, you’ll need to tension the fabric to remove any wrinkles and ensure a tight fit. Start at one end of the awning and work your way to the other, gradually pulling the fabric and tightening it as you go. This may require the help of a friend or family member to ensure even tension across the entire awning.
One helpful tip is to periodically check the tension of the fabric as you go. This will ensure that it is evenly distributed and that there are no areas that are too loose or too tight. Once the fabric is tensioned properly, secure it in place by attaching it to the awning frame with screws or other fasteners.
Make sure to tighten the screws securely, but be careful not to over-tighten them as this can damage the fabric. Finally, give the fabric a final check to make sure it is smooth and wrinkle-free. If you notice any areas that need additional tensioning, go back and make the necessary adjustments.
By properly tensioning the fabric during the installation process, you can ensure a smooth and secure fit that will not only enhance the appearance of your outdoor space but also provide reliable protection from the elements. So take your time, follow these steps, and enjoy your newly installed awning fabric for years to come.
Step 5: Test and adjust the awning
Now that you have successfully installed the new fabric on your RV patio awning, it’s time to test it out and make any necessary adjustments. First, make sure all the hardware and mechanisms are securely fastened and in working order. Then, slowly extend the awning to its full length, paying attention to how smoothly it opens and closes.
Check for any sagging or unevenness in the fabric. If you notice any issues, you may need to tighten or adjust the tension settings on the awning’s arms. Additionally, inspect the fabric for proper alignment and straightness.
If it looks crooked or off-center, you can adjust the positioning by loosening the screws and gently sliding the fabric as needed. Once you are satisfied with the alignment and tension, continue testing the awning by opening and closing it several times to ensure it operates smoothly and without any issues. Finally, take a step back and admire your handiwork – your refurbished RV patio awning is now ready for some outdoor relaxation!
Testing the functionality of the new awning fabric
awning fabric, functionality, test, adjust, new fabric, durability, weather resistance, aesthetic appeal, UV protection, water repellency Paragraph: Now that the new awning fabric has been installed, it’s time to put it to the test. Testing the functionality of the fabric is an important step in ensuring that it meets all the necessary requirements. The first thing to check is the durability of the fabric.
Does it hold up well against wear and tear? Can it withstand wind, rain, and sun exposure without fading or tearing? Additionally, it’s crucial to assess the fabric’s weather resistance. Does it effectively repel water, preventing any leakage or damage to the underlying structure? Does it provide adequate UV protection, shielding the area beneath from harmful rays? The functionality of the awning fabric is not just about its technical performance but also its aesthetic appeal. Does the fabric complement the overall design of the space? Does it enhance the visual appeal of the area? These factors play a significant role in the overall satisfaction and enjoyment of the awning.
Adjustments to make for optimal performance
Adjustments to make for optimal performance Once you have installed your awning, it is important to test and adjust it to ensure optimal performance. This will help to ensure that it operates smoothly and effectively, providing the desired shade and protection. Testing and adjusting the awning involves checking its alignment, adjusting the tension of the fabric, and testing the opening and closing mechanisms.
To begin, check the alignment of the awning. Make sure that it is level and properly aligned with the wall or structure it is attached to. This will help to prevent any issues with opening and closing the awning later on.
You can use a level to ensure proper alignment. Next, adjust the tension of the fabric. The fabric should be taut when the awning is fully extended, but not overly tight.
If the fabric is too loose, it may sag or flap in the wind. On the other hand, if it is too tight, it can put unnecessary strain on the frame and mechanisms. Most awnings have a tension adjustment mechanism, which can be used to tighten or loosen the fabric as needed.
Once the alignment and tension are adjusted, test the opening and closing mechanisms of the awning. Make sure that it opens and closes smoothly, without any jerking or sticking. If there are any issues, such as difficulty in opening or closing, you may need to lubricate the moving parts or make further adjustments to the tension.
By testing and adjusting your awning, you can ensure that it functions properly and provides the desired shade and protection. It is a good idea to regularly check and make any necessary adjustments to maintain its optimal performance over time.
Conclusion and final tips
And there you have it – a step-by-step guide on how to replace your RV patio awning fabric all by yourself! Now, you may be thinking, “Why would I go through all this trouble when I could just hire a professional?” Well, my friend, let me explain it to you in a clever and witty way. Imagine this – you’re sitting outside in your cozy RV awning, enjoying a beautiful sunny day. Suddenly, a loud ripping sound breaks the peaceful atmosphere, and you’re left with a tattered and torn awning.
Now, you could call up a professional and wait for them to come to your rescue, but let’s be real here – where’s the fun in that? By replacing the awning fabric yourself, you not only save time and money but also embark on a new adventure of DIY wizardry. It’s like stepping into the shoes of a superhero, saving the day with your own handy skills and impressive knowledge. Sure, it may take a bit of effort and a few YouTube tutorials, but think of the satisfaction you’ll feel when you see your new, pristine awning unfurled before your awestruck eyes.
You’ll be the envy of the RV park, the talk of the town, admired by all for your resourcefulness and DIY prowess. But it doesn’t stop there. Oh no, my adventurous friend.
With this newfound confidence, you’ll tackle more DIY projects around your RV, transforming it into a personalized haven on wheels. From installing solar panels to crafting custom storage solutions, the possibilities are endless. So don’t hesitate.
Take the plunge into the world of DIY RV awning fabric replacement. Embrace the challenge, relish the victory, and show off your newfound skills to anyone who dares doubt your capabilities. And who knows, maybe one day, you’ll become the go-to person for all RV awning emergencies in your community.
Remember, in the world of patio awning fabric replacement, you are the hero – the DIY guru who emerges triumphantly from the battle of torn fabric and broken dreams. So grab your tools, put on your DIY cape, and let the awning fabric replacement extravaganza begin!
FAQs
How do I measure my RV patio awning fabric for replacement?
To measure your RV patio awning fabric for replacement, start by extending the awning fully. Measure the length of the roller tube from end to end, and then measure the width of the fabric from side to side. Make sure to add a few inches to your measurements to account for any necessary adjustments.
What tools do I need to replace my RV patio awning fabric?
To replace your RV patio awning fabric, you will need a few basic tools such as a ladder, a tape measure, a socket wrench or drill, screws or bolts, a utility knife, and a helper (if possible). Additionally, you may also need a ladder stabilizer, silicone spray, and sealant depending on the specific installation instructions for your awning model.
Can I replace my RV patio awning fabric myself, or do I need professional assistance?
It is possible to replace your RV patio awning fabric yourself, especially if you have some experience with DIY projects. However, it is important to carefully follow the manufacturer’s instructions and safety guidelines. If you feel unsure or uncomfortable with the process, it is always recommended to seek professional assistance to ensure the job is done correctly and safely.
How often should I replace my RV patio awning fabric?
The lifespan of your RV patio awning fabric can vary depending on factors such as the quality of the fabric, exposure to weather elements, and frequency of use. On average, RV patio awning fabric can last anywhere from 5 to 15 years. It is important to regularly inspect the fabric for signs of wear and tear, including fading, tears, or holes. If you notice significant damage or deterioration, it may be time to consider replacing the fabric.
Are there different materials available for RV patio awning fabric replacement?
Yes, there are different materials available for RV patio awning fabric replacement. The most common types of fabric used for RV awnings include vinyl and acrylic. Vinyl is a budget-friendly option that offers good durability and weather resistance. Acrylic is a higher-end material that is known for its fade resistance and breathability. When choosing a fabric type, consider your budget, climate, and personal preferences.
Can I customize the color or pattern of my RV patio awning fabric replacement?
Yes, many manufacturers offer a variety of color and pattern options for RV patio awning fabric replacement. This allows you to customize the look of your RV and match it to your personal style. When selecting a color or pattern, it is also important to consider factors such as visibility, heat reflection, and overall aesthetic appeal.
Are there any maintenance tips for prolonging the life of my RV patio awning fabric?
Yes, there are several maintenance tips that can help prolong the life of your RV patio awning fabric. Regularly clean the fabric with mild soap and water to remove dirt and debris. Avoid using harsh chemicals or abrasive cleaning tools that can damage the fabric. Keep the fabric dry and free from moisture to prevent mold and mildew growth. Additionally, retract or secure the awning during harsh weather conditions to avoid unnecessary stress on the fabric.