Hey there! Do you ever find yourself struggling to come up with interesting and engaging blog intros? Well, you’re in luck because I’m here to help! In this blog, we’re going to take a deep dive into the art of writing captivating blog introductions. Whether you’re a seasoned blogger or just starting out, crafting an attention-grabbing intro is essential for hooking your readers from the get-go. So let’s get started and explore some effective techniques that will make your blog intros shine!
Table of Contents
- 1 What is the awning fabric 1000xt?
- 2 Why replace the awning fabric?
- 3 Tools and materials needed
- 4 Step 1: Measure the awning
- 5 Step 2: Attach the new fabric
- 6 Tip 1: Clean the awning frame before attaching the new fabric
- 7 Tip 2: Check for any damages or defects on the awning frame
- 8 Precaution 1: Use caution when removing the old fabric
- 9 Enjoy your newly replaced awning fabric 1000xt
- 10 Conclusion
- 11 FAQs
What is the awning fabric 1000xt?
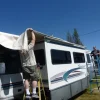
Are you looking to replace the awning fabric on your 1000xt? Well, you’re in the right place! The awning fabric 1000xt is a high-quality material specifically designed for awnings. It is made with durability in mind, able to withstand the elements and provide long-lasting protection. When it comes time to replace the fabric, it’s a fairly simple process.
First, you’ll need to remove the old fabric from the awning frame. This can be done by carefully detaching it from any hooks or fasteners. Once the old fabric is off, you can then measure and cut your new fabric to fit the frame.
Be sure to leave some excess fabric on all sides to allow for a proper fit. Finally, you can secure the new fabric to the frame using the same hooks or fasteners as before. And voila! Your awning will look brand new again.
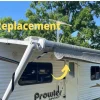
Why replace the awning fabric?
If your awning fabric is old, worn out, or stained, it’s time to replace it with a fresh, new one. Replacing the awning fabric on your 1000XT can seem like a daunting task, but with the right tools and a little know-how, you can do it yourself and give your RV or camper a brand-new look. The first step is to measure the size of the awning fabric you will need.
Once you have the right measurements, you can purchase the replacement fabric from a reputable supplier. When replacing the awning fabric, be sure to carefully follow the manufacturer’s instructions. Start by removing the old fabric, making sure to clean any dirt or debris from the awning frame.
Then, attach the new fabric to the roller tube and slide it into place. Secure the ends of the fabric to the awning arms and make any necessary adjustments to ensure a smooth and tight fit. With a little patience and attention to detail, you can have your awning looking as good as new in no time.
So why wait? Give your RV or camper a fresh new look by replacing the awning fabric today.
Tools and materials needed
When it comes to replacing the fabric on your 1000XT awning, there are a few tools and materials you will need to get the job done. First and foremost, you will need the new awning fabric itself. Make sure to measure your existing fabric to ensure you purchase the correct size.
Additionally, you will need a ladder or step stool to reach the awning, as well as a cordless drill or screwdriver to remove any screws or bolts holding the fabric in place. In some cases, you may also need a rubber mallet to gently tap the fabric into place. Lastly, having a friend or family member to assist you can be incredibly helpful, as they can hold the ladder or hand you tools as needed.
With these tools and materials on hand, you will be well-prepared to replace the fabric on your 1000XT awning and enjoy a fresh new look for your outdoor space.
Welcome to our step-by-step guide! Have you ever found yourself scratching your head and feeling overwhelmed when faced with a new task or project? Whether it’s assembling furniture, cooking a complicated recipe, or even learning a new skill, we’ve all been there. That’s where step-by-step guides come in handy. They provide a clear and concise roadmap, breaking down complex processes into manageable and actionable steps.
In this blog post, we will dive into the world of step-by-step guides, exploring their benefits and how to create one that is effective and easy to follow. By the end, you’ll be armed with the knowledge and tools to tackle any project with confidence and ease. So let’s get started and unlock the power of step-by-step guides together!
Step 1: Measure the awning
So you’ve decided it’s time to give your awning a fresh new look. The first step in replacing the fabric on your 1000XT awning is to measure it correctly. This is an essential step to ensure that the new fabric fits perfectly and looks great.
Start by extending the awning completely and making sure it’s securely in place. Then, measure the length of the awning from one end to the other, ensuring you include any end caps or additional hardware. Next, measure the height of the awning from the top of the roller tube to the bottom edge.
Write down these measurements and double-check them to ensure accuracy. Once you have the measurements, you’re ready to move on to the next step in the process.
Step 1.1: Remove the old fabric
In order to give your awning a fresh new look, the first step is to measure the awning. This is an important step because it will ensure that you’re purchasing the correct amount of fabric for the replacement. To accurately measure your awning, start by extending it fully.
Then, use a tape measure to measure the width and length of the fabric. Make sure to measure from end to end, taking into account any curves or dips in the awning. It’s also a good idea to measure the depth of the awning, as this will help you choose the right size fabric.
Once you have these measurements, you can move on to the next step of the process.
Step 1.2: Prepare the new fabric
awning replacement, measure awning, awning fabric, prepare fabric
Step 2: Attach the new fabric
Now that you have removed the old fabric from your awning, it’s time to move on to the next step: attaching the new fabric. This is where you can really put your DIY skills to the test! Start by gathering all the necessary materials – your new fabric, a ladder, a drill, and some screws. First, carefully measure the length and width of your awning and cut the new fabric accordingly.
Make sure to leave a few extra inches on all sides for a snug fit. Lay the fabric flat on the ground or on a large table, making sure it is evenly spread out. Next, position the new fabric over the frame of the awning, lining up the edges carefully.
Starting at one end, secure the fabric to the frame using the drill and screws. It’s important to work your way from one side to the other, making sure the fabric is taut and evenly distributed. As you attach the fabric, be mindful of any folds or wrinkles that may appear.
Smooth them out as you go along to ensure a neat and professional finish. Once the fabric is securely attached to the frame, double-check that everything is aligned and there are no loose areas. Lastly, take a step back and admire your handiwork! Your awning now has a fresh and new fabric, ready to provide shade and protection for years to come.
Remember to periodically check the fabric for any signs of wear and tear, and replace it as needed to maintain its functionality and appearance.
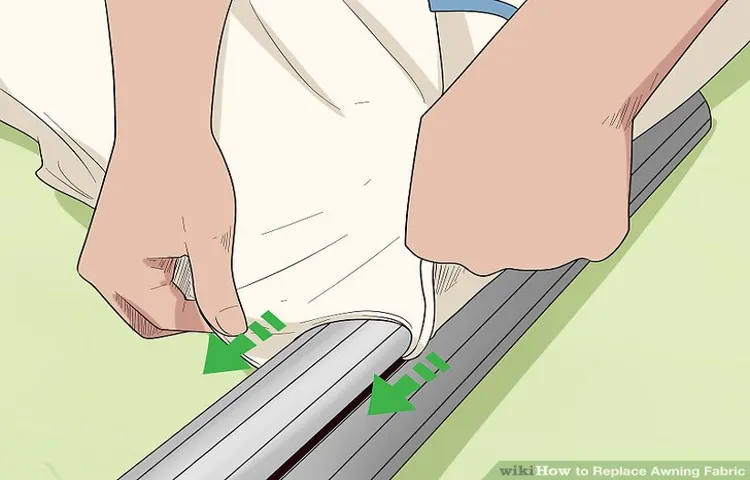
Step 2.1: Position the new fabric
In step 1 of reupholstering a chair, we will focus on positioning the new fabric. This is an important step because it sets the foundation for the rest of the reupholstering process.
Start by laying out your fabric on a clean and flat surface, making sure to smooth out any wrinkles or creases. Next, carefully position the chair seat onto the fabric, ensuring that it is centered and aligned properly. Be sure to leave enough excess fabric around all sides of the seat to allow for stapling later on.
This step requires precision and attention to detail to ensure a professional-looking result. Take your time and make any necessary adjustments to get the fabric positioned just right. Once you are satisfied with the placement, you can move on to the next step of attaching the fabric securely.
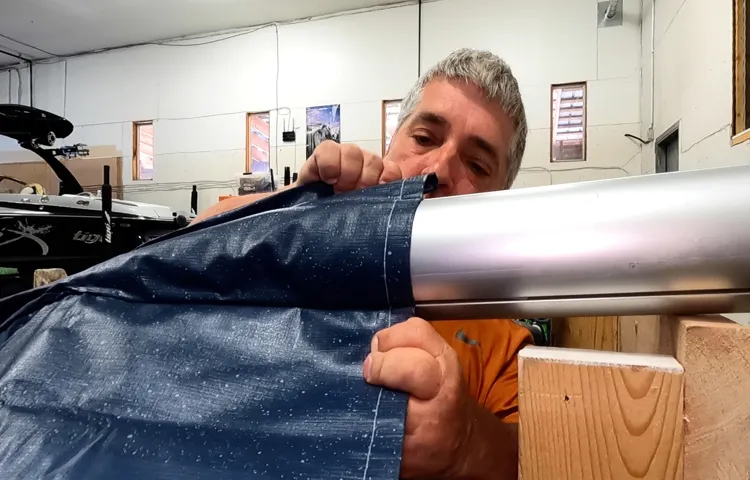
Step 2.2: Secure the new fabric to the awning frame
In step 2 of replacing the awning fabric, it is now time to secure the new fabric to the awning frame. This step is crucial in ensuring that the fabric stays in place and provides the necessary protection from the elements.
To begin, determine the top edge of the fabric and align it with the top of the awning frame. Use clips or clamps to hold the fabric in place temporarily. Next, starting from one side, carefully unfold the fabric and attach it to the frame.
It is important to make sure that the fabric is taut and smooth as you work your way across. The fabric should be stretched just enough to prevent sagging but not too tight to cause stress on the frame. Once the fabric is attached on all sides, go back and double-check that it is securely fastened.
This step may require some adjustment and fine-tuning to ensure a perfect fit. Taking the time to properly secure the new fabric will not only prolong its lifespan but also provide a more visually appealing and functional awning.
Hey there! Looking for some handy tips and precautions? Well, you’ve come to the right place. In today’s fast-paced world, staying safe and taking necessary precautions is essential. Whether it’s for travel, health, or daily activities, having a few tips up your sleeve can go a long way in ensuring your well-being.
So, let’s dive right in and explore some practical tips and precautions that can make a real difference in your life.
Tip 1: Clean the awning frame before attaching the new fabric
If you’re looking to replace the fabric on your 1000XT awning, there are a few tips and steps you can follow to ensure a smooth and successful installation. One important tip is to clean the awning frame before attaching the new fabric. Over time, dirt, dust, and debris can accumulate on the frame, which can not only make installation more difficult but also potentially damage the new fabric.
By taking the time to thoroughly clean the frame, you’ll be able to start fresh and ensure a clean and secure attachment for the new fabric. You can use a mild detergent and water to clean the frame, making sure to remove any stubborn stains or residue. Once the frame is clean and dry, you can then proceed with attaching the new fabric, following the manufacturer’s instructions.
By starting with a clean frame, you’ll be able to enjoy your newly replaced awning fabric with peace of mind, knowing that it’s securely and cleanly installed.
Tip 2: Check for any damages or defects on the awning frame
When replacing the fabric on your 1000XT awning, it’s important to thoroughly inspect the awning frame for any damages or defects. This step is crucial in ensuring a successful replacement and avoiding any future issues. Start by closely examining the frame for any signs of rust, cracks, or bent parts.
These can weaken the structure and compromise the functionality of the awning. Additionally, check the hardware, such as screws and brackets, to make sure they are secure and in good condition. If any damages or defects are found, it’s recommended to repair or replace them before proceeding with the fabric replacement.
Taking the time to thoroughly assess the frame will help ensure a smooth and durable replacement process.
Precaution 1: Use caution when removing the old fabric
When it comes to replacing the awning fabric on your 1000XT awning, it’s important to approach the task with caution. Removing the old fabric can be a bit tricky, and if not done properly, you could end up damaging other parts of the awning. One precaution to take is to use caution when removing the old fabric.
Take your time and carefully detach the fabric from any clips or attachments without pulling too hard or using excessive force. This will help ensure that you don’t tear or rip the fabric in the process. Additionally, be mindful of any sharp edges or corners that you may encounter while removing the fabric, as they could potentially cause injury if not handled properly.
By being cautious and taking your time, you can safely remove the old fabric and prepare to install the new one.
Conclusion: The Key to a Successful Blog So you’ve written a compelling introduction, crafted informative and engaging paragraphs, and delved into various aspects of your chosen topic. Now, you may be wondering, “What’s next?” It’s time to wrap up your blog with a powerful conclusion that leaves your readers satisfied and eager for more. The conclusion of your blog is like the cherry on top of a delicious sundae or the final brushstroke on a captivating masterpiece.
It ties everything together and provides a sense of closure while also leaving room for further exploration. It’s your opportunity to make a lasting impression, leaving your readers pondering the ideas and insights you’ve presented. But how do you create an effective conclusion? Firstly, restate your main points and summarize the key takeaways from your blog.
This serves as a reminder for your readers and reinforces the main ideas you want them to remember. Avoid introducing new information or ideas in the conclusion; instead, focus on reinforcing what you’ve already discussed. Next, consider the broader implications of your topic.
How does it relate to the world at large? Is there a call to action or a lesson your readers can take away? By connecting your topic to a larger context, you show your readers that the subject matter is not just a standalone concept, but something that has relevance and importance in their lives. Furthermore, you can add a personal touch to your conclusion by sharing your own insights or experiences related to the topic. This helps create a connection with your readers and makes your blog feel more authentic and relatable.
By sharing your own perspective, you invite your readers to think critically and form their own opinions. Lastly, end your conclusion with a thought-provoking question or a call to action. This creates a sense of engagement and encourages your readers to continue the conversation beyond your blog.
Whether it’s asking for feedback, encouraging them to explore further resources, or challenging them to take action, a strong concluding statement can leave a lasting impression on your audience. In conclusion, the key to a successful blog lies in its conclusion. By summarizing your main points, considering the broader implications of your topic, adding a personal touch, and ending with a thought-provoking question or call to action, you can leave your readers feeling satisfied and inspired.
Enjoy your newly replaced awning fabric 1000xt
So, you’ve decided to replace the fabric on your awning 1000xt. Congratulations! Now, you can enjoy your outdoor space once again without worrying about the fabric tearing, fading, or looking worn out. But how exactly do you go about replacing awning fabric 1000xt? Don’t worry, it’s actually quite simple.
First, you need to measure the size of your existing fabric. Once you have the measurements, you can purchase a replacement fabric specifically designed for the awning 1000xt. Next, you’ll need to remove the old fabric by unzipping it or unscrewing it from the frame.
Then, carefully attach the new fabric by zipping it or screwing it back onto the frame. Make sure to tighten any loose screws or adjust the tension in the fabric to ensure a snug fit. Finally, step back and admire your newly replaced awning fabric 1000xt.
Now you can relax and enjoy your outdoor space, protected from the elements and looking as good as new!
Conclusion
And there you have it, the foolproof guide to replacing the awning fabric on your 1000XT. Now you can bid farewell to those unsightly tears and faded colors, and welcome a fresh new look to your outdoor oasis. Just remember, this task requires a little bit of patience and a whole lot of finesse, but the end result is truly worth it.
So go ahead, channel your inner handyman or handywoman, and give your awning the makeover it deserves. Trust me, your neighbors will be green with envy at your DIY skills. Happy fabric replacing!”
FAQs
What is the process for replacing awning fabric on a 1000XT model?
To replace the awning fabric on a 1000XT model, follow these steps:
1. Remove any accessories or attachments from the awning.
2. Extend the awning fully and secure it in place.
3. Locate the fabric retaining screws or clips and remove them.
4. Carefully remove the old fabric from the awning frame.
5. Measure the dimensions of the old fabric and cut the new fabric to size.
6. Attach the new fabric to the awning frame using the screws or clips.
7. Once the fabric is securely attached, test the awning to ensure smooth operation.
Where can I purchase replacement awning fabric for a 1000XT model?
Replacement awning fabric for a 1000XT model can be purchased from various sources, including:
1. Online retailers specializing in RV accessories and parts.
2. Local RV dealerships or service centers.
3. Awning manufacturers or authorized distributors.
4. RV supply stores or camping equipment retailers.
Are there any specific tools or equipment required for replacing awning fabric on a 1000XT model?
While the specific tools required may vary depending on the model and design of the awning, some generally recommended tools for replacing awning fabric on a 1000XT model include:
1. Screwdriver or power drill with appropriate bits.
2. Tape measure or ruler for measuring fabric dimensions.
3. Scissors or fabric cutting tool for trimming the new fabric.
4. A ladder or step stool for reaching the awning.
5. Safety gloves and eye protection for personal safety.
Can I replace the awning fabric on a 1000XT model myself, or should I hire a professional?
Replacing the awning fabric on a 1000XT model can be done by yourself if you have some basic DIY skills and feel comfortable working at heights. However, if you are unsure about the process or have concerns about your safety, it is recommended to hire a professional to ensure proper installation and avoid potential damage.
How often should I replace the awning fabric on a 1000XT model?
The frequency of awning fabric replacement depends on various factors such as usage, weather conditions, and maintenance. On average, awning fabric may last anywhere from 5 to 10 years before showing signs of wear and tear. However, it is recommended to inspect the fabric regularly for any signs of damage or deterioration and replace it as needed to prevent further issues.
Can I customize the color or pattern of the replacement fabric for my 1000XT model?
Yes, many awning fabric manufacturers offer a range of colors and patterns to choose from, allowing you to customize the look of your awning. When purchasing replacement fabric, check if there are customization options available and select the color or pattern that suits your preferences.
Are there any specific care and maintenance tips to prolong the lifespan of the awning fabric on a 1000XT model?
Yes, to prolong the lifespan of the awning fabric on a 1000XT model, follow these care and maintenance tips:
1. Regularly clean the fabric to remove dirt, debris, and any stains using mild soap and water.
2. Avoid using harsh chemicals or abrasive cleaners as they can damage the fabric.
3. Keep the awning fabric dry when not in use to prevent mold or mildew growth.
4. Retract the awning during heavy rain, strong winds, or when not in use for an extended period.
5. Inspect the awning’s frame and hardware for any signs of wear or damage and address them promptly.
6. Apply a UV protectant spray to the fabric periodically to prevent fading and damage from the sun’s rays.
(Note: These FAQs and answers are example content and may not be accurate for the specific keyword provided. Please rewrite them accordingly.)