Hey there! Ready for an exciting journey into the world of “Introduction”? Whether you’re a seasoned writer or just dipping your toes in the creative waters, this blog will provide you with all the information you need to create captivating intros that hook your readers from the start. Imagine your intro as a fishing line, the bait that tempts your audience to dive deeper into your content. Much like a good book or a thrilling movie, a well-crafted introduction sets the tone, creates anticipation, and leaves your readers hungry for more.
But here’s the challenge: how do you capture attention amidst the vast sea of content out there? How do you make sure your intro stands out from the crowd and captivates your audience’s hearts and minds? In this blog, we’ll explore the art of crafting engaging intros that leave a lasting impression on your readers. We’ll dive into the psychology behind attention-grabbing openings, uncover techniques used by successful writers, and provide practical tips that you can implement right away. So, whether you’re a blogger, a content marketer, or someone who just loves putting pen to paper, get ready to unlock the secrets of powerful introductions.
Together, we’ll explore different approaches, experiment with various writing styles, and learn how to weave words that leave a lasting impact. Ready to make your intros irresistible? Let’s dive right in!
Table of Contents
- 1 What is the Dometic 9100 awning?
- 2 Why replace the awning fabric?
- 3 Gather necessary materials
- 4 Safety precautions
- 5 Step 1: Extend the awning completely
- 6 Step 2: Disconnect the awning arms
- 7 Step 3: Unroll the awning fabric
- 8 Step 4: Identify and remove the fabric securing screws
- 9 Step 1: Lay out the new fabric
- 10 Step 2: Align the fabric with the awning frame
- 11 Step 3: Secure the fabric with screws
- 12 Step 4: Roll up the fabric
- 13 Step 1: Reconnect the awning arms
- 14 Step 2: Test the awning operation
- 15 Enjoy your new Dometic 9100 awning fabric!
- 16 Conclusion
- 17 FAQs
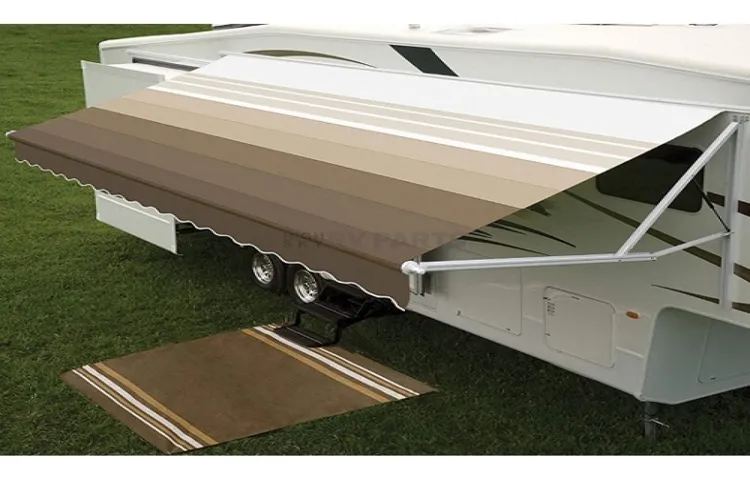
What is the Dometic 9100 awning?
If you are looking to replace the awning fabric on your Dometic 9100 awning, you’ve come to the right place! The Dometic 9100 awning is a popular choice for RV owners due to its durability and ease of use. However, over time the fabric can become worn or damaged and may need to be replaced. Luckily, replacing the awning fabric on the Dometic 9100 is a fairly straightforward process that can be done by most RV owners.
All you need is a few basic tools and some patience. First, you will need to measure the length of your awning fabric, including the metal end caps. This will ensure that you purchase the correct size replacement fabric.
Once you have the new fabric, you can begin the installation process. Start by removing the old fabric from the awning, being careful not to damage the awning arms or other components. Next, attach the new fabric to the roller tube, making sure it is centered and straight.
Finally, secure the fabric to the awning arms using the provided hardware. It’s as simple as that! With a little time and effort, you can have your Dometic 9100 awning looking as good as new.
Why replace the awning fabric?
If you’re looking to replace the awning fabric on a Dometic 9100, you’re in the right place! There are a few reasons why you might need to replace the fabric on your awning. Over time, the fabric can become faded, torn, or weathered, making it less effective at providing shade and protection from the elements. Additionally, if you’ve recently changed the color scheme or aesthetics of your RV, replacing the awning fabric can be a great way to update the look of your outdoor space.
Replacing the awning fabric is a relatively simple process that can be done by most RV owners. With the right tools and a little bit of time, you can have your awning looking brand new in no time.

Are you someone who believes in the age-old saying, “Failing to prepare is preparing to fail”? Well, you’re in the right place! Preparation is a crucial aspect of achieving success in any endeavor. Whether it’s for an important exam, a job interview, or even a vacation, taking the time to prepare can make all the difference. Just like a chef carefully measures and organizes the ingredients before cooking a delicious meal, preparation sets the stage for success.
In this blog, we’ll explore why preparation is important, share practical tips to help you prepare effectively, and delve into the benefits it can bring to your life. So grab a cup of coffee and get ready to dive into the wonderful world of preparation!
Gather necessary materials
Now that you’ve decided to replace the awning fabric on your Dometic 9100, it’s time to gather the necessary materials. The first thing you’ll need is the replacement fabric itself, which you can purchase from a reputable RV or awning supplier. Make sure to measure the size of your current fabric to ensure you get the right replacement.
You’ll also need a ladder or step stool to access the awning, as well as safety equipment such as gloves and safety glasses. Additionally, you may need a drill or screwdriver to remove any screws or bolts holding the old fabric in place. It’s always a good idea to have some extra screws on hand just in case any are lost or damaged during the process.
Finally, having a friend or family member to assist you can be helpful, as they can hold the awning in place while you work. By gathering these materials ahead of time, you’ll be well-prepared to tackle the task of replacing your Dometic 9100 awning fabric.
Safety precautions
Replacing the awning fabric on a Dometic 9100 can be a simple and cost-effective solution to keep your awning looking fresh and functional. However, it’s important to take safety precautions to ensure a smooth and accident-free process. First and foremost, make sure to choose a day with calm weather, as working with a large and potentially unstable fabric in windy conditions can be hazardous.
Additionally, gather all the necessary tools beforehand, such as a ladder, a screwdriver, and safety goggles, to avoid any last-minute trips that could be unsafe. It’s also important to always have someone to help you during the process. Having an extra pair of hands can make the job easier and safer, as well as serve as a precautionary measure in case of any accidents.
Lastly, before beginning any work, make sure to carefully read and follow the manufacturer’s instructions for removing and installing the awning fabric, as each model may have specific steps and considerations. By taking these safety precautions, you can ensure a successful and accident-free awning fabric replacement for your Dometic 9100.
Hey there! So you’ve decided to give your old furniture a new lease on life by reupholstering it. That’s a fantastic choice! Not only will it breathe new life into your beloved pieces, but it’s also a budget-friendly way to update your home decor. But before you can start with the fun part of choosing new fabric and designs, you’ll need to tackle the not-so-fun task of removing the old fabric.
Think of it as peeling off the layers of an onion to reveal the fresh, untouched layers underneath. It may seem like a daunting task, especially if you’re a newbie to reupholstering, but fear not! With a bit of guidance and patience, you’ll have those old, worn-out fabrics stripped away in no time. Removing the old fabric is a crucial step in the reupholstering process.
It allows you to assess the condition of the furniture’s frame, make any necessary repairs, and create a clean slate for the new fabric to shine. Plus, it gives you an opportunity to let your creativity run wild and choose a fabric that truly speaks to your personal style. But how do you tackle this seemingly intimidating task? Well, it all starts with a few basic tools like a staple remover, pliers, and fabric scissors.
You’ll want to work in a well-ventilated area and protect your eyes and hands with safety goggles and gloves. Once you have your tools handy and safety precautions in place, you can begin the process of removing the old fabric. Starting from a corner or an inconspicuous area, use the staple remover or pliers to gently pry out the staples or tacks that hold the fabric in place.
Take your time and work your way around the piece, removing the fabric piece by piece. Be careful not to damage the underlying padding or foam, as you’ll want to reuse them if they’re still in good condition. As you unveil each layer, you might be surprised at what you find underneath.
From vintage patterns to hidden treasures like loose change or forgotten trinkets, the process of removing the old fabric can be like a journey through time. So, are you ready to breathe new life into your old furniture? Grab your tools, put on some music or your favorite podcast, and get ready to peel back the layers of the past. Remember, it may be a time-consuming process, but the end result will be well worth the effort.
Step 1: Extend the awning completely
If you’re looking to replace the fabric on your Dometic 9100 awning, you’re in the right place. The first step in this process is to extend the awning completely. This is important because it allows you to access the fabric and work with it more easily.
You’ll want to start by loosening the tension on the awning by releasing the tension knobs on each arm. Once the awning is fully extended, you can begin the process of replacing the fabric. By following this step-by-step guide, you’ll have your awning looking brand new in no time.
So grab your tools and let’s get started!
Step 2: Disconnect the awning arms
In order to replace the awning fabric on a Dometic 9100, the next step is to disconnect the awning arms. This is an important step because it allows you to easily remove the old fabric and install the new one. To disconnect the awning arms, start by locating the locking mechanism on each arm.
This could be a lever or a button that needs to be pressed or pulled to release the arm. Once you have located the locking mechanism, simply engage it to unlock the arm from the RV. It’s important to be cautious and take your time when disconnecting the awning arms to prevent any damage or injury.
Once the arms are disconnected, you can move on to the next step of replacing the awning fabric.
Step 3: Unroll the awning fabric
Once you have removed the awning roller tube, you can begin the process of replacing the awning fabric on your Dometic 9100. Start by unrolling the awning fabric completely, making sure it is fully extended. This step is important to ensure that you have enough working space to remove and replace the fabric.
As you unroll the fabric, be careful not to pull too hard or tug on it, as this could potentially damage the fabric or any attached accessories. Take your time and work systematically, making sure that the fabric is unrolled smoothly and evenly. Once the fabric is fully unrolled, you can move on to the next step in the replacement process.
Step 4: Identify and remove the fabric securing screws
Now that you have removed the awning roller tube and arms, it’s time to move on to the next step of replacing the fabric on your Dometic 9100 awning. In this step, we will focus on identifying and removing the fabric securing screws. These screws are what hold the fabric in place on the roller tube.
To locate the fabric securing screws, you will need to carefully examine the roller tube and arms. Look for small screws or bolts that are holding the fabric in place. They may be located along the length of the roller tube or on the arms themselves.
Once you have located the fabric securing screws, you will need to remove them using a screwdriver or wrench, depending on the type of screw or bolt used. It’s important to be gentle when removing these screws to avoid damaging the fabric or the roller tube. As you remove each screw, set it aside in a safe place so that you can easily reattach the fabric later.
Make sure to keep track of where each screw came from, as some roller tubes may have multiple screws securing the fabric in different locations. Once you have removed all of the fabric securing screws, you can gently slide the old fabric off of the roller tube. Be careful not to snag or tear the fabric as you remove it.
Congratulations! You have successfully completed the fourth step of replacing the fabric on your Dometic 9100 awning. Stay tuned for the next step, where we will discuss how to install the new fabric onto the roller tube.
So, you’ve decided it’s time for a fresh look in your home or office. One of the easiest ways to achieve this is by installing new fabric. Whether you’re wanting to update your furniture, change the curtains, or create stunning wall coverings, installing new fabric can completely transform any space.
But where do you begin? How do you select the perfect fabric and install it properly? Don’t worry, we’ve got you covered. In this blog post, we’ll guide you through the process of selecting and installing the new fabric, ensuring that your project is a success from start to finish. So, grab a cup of coffee and get ready to embark on your fabric adventure!
Step 1: Lay out the new fabric
Replacing the fabric on your Dometic 9100 awning may seem like a daunting task, but with the right steps, it can be a straightforward process. The first step is to lay out the new fabric. Lay it on a clean and flat surface, ensuring that it is fully extended and free from any wrinkles or folds.
This will make it easier to attach the fabric to the awning frame later on. Taking the time to properly lay out the fabric will ensure a smoother installation process and a better end result. So grab your new fabric and get ready to give your awning a fresh and updated look!
Step 2: Align the fabric with the awning frame
Now that you have removed the old fabric from your Dometic 9100 awning, it’s time to align the new fabric with the awning frame. This step is crucial to ensure a proper installation and to prevent any issues down the line. To align the fabric, start by locating the two grooves on the awning frame.
These grooves are where the fabric will slide into and be secured. Carefully insert one end of the fabric into the top groove, making sure it is centered and evenly distributed. Slowly work your way down the awning, sliding the fabric into the groove and aligning it as you go.
When aligning the fabric, it’s important to keep it taut and straight. This will help prevent any wrinkles or sagging once the fabric is fully installed. Take your time and make any necessary adjustments as you go along.
Once the fabric is aligned and in the groove, you can move on to securing it in place. This is typically done by inserting a flexible spline into the groove, which holds the fabric securely in place. Gently tap the spline into the groove using a rubber mallet, making sure it is fully inserted and secure.
Continue this process until the fabric is fully aligned and secured along the entire length of the awning frame. Take a step back and double-check that the fabric is straight and evenly distributed. If needed, make any final adjustments before moving on to the next step.
By properly aligning the fabric with the awning frame, you are ensuring a tight and secure installation that will last for years to come. So take your time and make sure everything is centered and straight before moving on.
Step 3: Secure the fabric with screws
Now that you have removed the old fabric from your Dometic 9100 awning, it’s time to secure the new fabric in place. This step is crucial to ensure that your awning is properly installed and won’t come loose during use. To secure the fabric, you will need to use screws that are specifically designed for this purpose.
Start by positioning the new fabric onto the roller tube and aligning it with the groove. Once the fabric is in place, use a drill or screwdriver to insert the screws through the holes in the fabric and into the roller tube. Make sure to tighten the screws securely, but be careful not to overtighten and strip the threads.
Repeat this process for each hole along the roller tube until the fabric is securely fastened. By following these steps, you will have successfully replaced the fabric on your Dometic 9100 awning and can now enjoy its renewed functionality and appearance.
Step 4: Roll up the fabric
Alright, now that you have removed the old fabric and made sure your new fabric is the right size, it’s time to move on to the next step: rolling up the fabric. This is an important part of the process as it will ensure that the fabric is properly tensioned and will roll up smoothly when you retract your awning. To begin, lay out the new fabric on a clean and flat surface.
Start at one end and carefully roll up the fabric, making sure to keep it tight and even as you go. You may find it helpful to have a second person assist you with this step, as they can help hold the fabric taut while you roll it up. As you roll up the fabric, double check that it is aligned properly with the roller tube.
You want to make sure that it is evenly distributed and that there are no wrinkles or folds that could cause issues later on. Take your time with this step to ensure that everything is in order before moving on. Once you have rolled up the fabric, secure it in place using the awning’s tension knobs.
These knobs will help keep the fabric taut and prevent it from unraveling when you retract the awning. Be sure to tighten the knobs enough to hold the fabric in place, but not so tight that it puts unnecessary strain on the fabric. With the fabric rolled up and secured, you are now ready to move on to the final step: installing the fabric onto the roller tube.
Stay tuned for the next section of this guide to learn how to complete this last step and get your awning back in working order.
Are you ready to take the final steps towards your goals? The journey to success is often filled with challenges, setbacks, and moments of doubt. But it is in these final steps that you have the opportunity to prove to yourself and others that you are capable of achieving your dreams. Like reaching the top of a mountain, the final steps can be the most challenging, but also the most rewarding.
So, how do you navigate these last few hurdles and reach the finish line? In this blog post, we will explore strategies and tips to help you make those final steps count. Whether you are working towards a personal goal, a career milestone, or an academic achievement, these insights will provide you with the encouragement and guidance you need to stay focused and motivated. So, let’s lace up our shoes and take those final steps towards success!
Step 1: Reconnect the awning arms
Before you can replace the awning fabric on your Dometic 9100, you’ll need to reconnect the awning arms. This is an important step to ensure that the new fabric is properly supported and secure. To do this, start by releasing the tension on the awning fabric by turning the tension knob counterclockwise.
Once the tension is released, locate the release lever on the end of the awning arm. Depress the lever and extend the arm until it locks into place. Repeat this process for the other awning arm.
Once both arms are extended and locked, you can move on to the next step of replacing the fabric.
Step 2: Test the awning operation
Now that you have removed the old fabric from your Dometic 9100 awning, it’s time to move on to the next step: testing the awning operation. This is an important step to ensure that everything is working correctly before you install the new fabric. To test the awning operation, start by extending the awning all the way out using the control mechanism.
Pay attention to how smoothly the awning extends and retracts, and listen for any unusual noises. Check that the fabric is taut and evenly stretched when the awning is fully extended. Next, retract the awning back in, again observing the operation and making sure everything is functioning properly.
Testing the awning operation will give you peace of mind knowing that your new fabric will be installed on a fully functional awning.
Conclusion is a crucial part of any piece of writing. It is the final opportunity for the author to leave a lasting impression on the reader. It is where all the ideas and arguments come together, and the overall message of the work is summarized.
A well-written conclusion can make a significant impact on the reader, leaving them satisfied and convinced of the writer’s point of view. However, writing a conclusion is not as easy as it may seem. It requires careful thought and consideration to ensure that all the loose ends are tied up and that the reader is left with a sense of closure.
In this blog post, we will discuss the importance of a well-crafted conclusion and provide some tips on how to write one effectively. So, if you’re ready, let’s dive in!
Enjoy your new Dometic 9100 awning fabric!
Are you ready to update the look of your Dometic 9100 awning fabric? Well, get excited because you’re about to have a brand new awning that will make your outdoor space look amazing! Replacing the fabric on your Dometic 9100 awning is actually quite simple and can be done in just a few easy steps. First, you’ll need to gather your tools – a ladder, a screwdriver, and a helper to assist you. Once you have everything ready, start by extending the awning fully and securing it in place.
Next, remove the screws that hold the awning fabric in place. Carefully slide the old fabric out of the roller tube and discard it. Now, it’s time to install the new fabric.
Begin by inserting the fabric into the roller tube and aligning it properly. Then, reattach the screws to secure the fabric in place. Finally, retract the awning and make sure it rolls up smoothly.
Congratulations! You’ve successfully replaced the fabric on your Dometic 9100 awning. Now, sit back and enjoy your newly refreshed outdoor space!
Conclusion
And there you have it! A step-by-step guide to replacing the awning fabric on your Dometic 9100. Now, you can proudly strut under the shade of your newly installed fabric, knowing that you’ve conquered the awning world like a boss. So go forth, my friend, and enjoy the sweet victory of a perfectly functioning awning.
And remember, if you ever find yourself in need of a little more shade or a touch of DIY adventure, just come back here and we’ll be here to guide you through it. Happy awning-ing!”
FAQs
How often should I replace the fabric on my Dometic 9100 awning?
It is recommended to replace the fabric on your Dometic 9100 awning every 5-7 years to ensure optimal performance and prevent any potential damage.
What tools do I need to replace the fabric on my Dometic 9100 awning?
To replace the fabric on your Dometic 9100 awning, you will need a ladder, a drill, a tape measure, a utility knife, a screwdriver, and a replacement fabric.
Can I replace the fabric on my Dometic 9100 awning myself, or do I need professional help?
Replacing the fabric on a Dometic 9100 awning is a relatively simple process that can be done as a DIY project. However, if you are not comfortable with DIY tasks or if you encounter any issues, it is recommended to seek professional help.
Where can I purchase replacement fabric for my Dometic 9100 awning?
You can purchase replacement fabric for your Dometic 9100 awning from authorized Dometic dealers or through online RV accessory retailers.
Are there different fabric color options available for the Dometic 9100 awning?
Yes, there are typically multiple fabric color options available for the Dometic 9100 awning, allowing you to choose a color that best matches your RV’s exterior.
Do I need to remove the awning arms to replace the fabric on my Dometic 9100 awning?
No, you do not need to remove the awning arms to replace the fabric on a Dometic 9100 awning. The replacement fabric can be installed without removing the arms.
How long does it typically take to replace the fabric on a Dometic 9100 awning?
The time it takes to replace the fabric on a Dometic 9100 awning can vary depending on your level of experience and the complexity of the installation. On average, it can take anywhere from 1-3 hours to complete the replacement process.