Hey there! Are you ready to dive into the world of introductions? Introductions are like the opening act of a concert – they set the stage, grab your attention, and leave you eager for what’s to come. Whether it’s a blog post, a speech, or a conversation, a good introduction can make all the difference in capturing your audience’s interest and getting your message across. Think of introductions as the appetizers of the writing world.
They give you a taste of what’s to come, leaving you hungry for more. They’re like the first few notes of a song, pulling you in and making you want to dance. They’re the first impression you make when meeting someone new, setting the tone for the entire interaction.
But what makes a great introduction? Well, it’s all about grabbing attention and sparking curiosity. You want to make your reader think, “Wow, I need to keep reading.” You can use rhetorical questions to get them thinking or start with an intriguing fact that leaves them wanting to know more.
Analogies and metaphors can also be powerful tools in introductions. They help paint a vivid picture in the reader’s mind and make abstract concepts more relatable. Just like how a key unlocks a door, a good introduction unlocks the reader’s interest and opens the door to your main content.
So, whether you’re writing a blog post, giving a presentation, or striking up a conversation, don’t underestimate the power of a compelling introduction. It’s the gateway to capturing your audience’s attention and keeping them engaged throughout your piece. And with a little creativity and a dash of intrigue, you’ll have them hooked from the very beginning.
So let’s dive in and master the art of introductions together!
Table of Contents
- 1 What is an RV Awning?
- 2 Why Replace the Awning Fabric?
- 3 Gather the Necessary Tools and Materials
- 4 Safety Precautions
- 5 Unroll and Extend the Awning
- 6 Detach the Awning Fabric from the RV
- 7 Remove the Fabric from the Roller Tube
- 8 Inspect and Clean the Awning Frame
- 9 Measure the Awning Fabric
- 10 Select the Fabric Type
- 11 Consider Additional Features
- 12 Attach the Fabric to the Roller Tube
- 13 Secure the Fabric to the RV
- 14 Make Adjustments and Test the Awning
- 15 Regular Cleaning
- 16 Proper Storage
- 17 Inspecting for Damage or Wear
- 18 Enjoy Your New Awning Fabric
- 19 Conclusion
- 20 FAQs
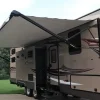
What is an RV Awning?
Replacing the awning fabric on your RV can be a simple and cost-effective way to give your vehicle a fresh look and protect yourself from the elements. An RV awning is a retractable cover made of durable fabric that provides shade and shelter for outdoor activities. Over time, the fabric can become worn, torn, or faded, and it may be necessary to replace it.
Fortunately, the process is relatively straightforward and can usually be done with a few basic tools. To replace the fabric, you will generally need to remove the old fabric from the awning roller, measure and cut the new fabric to size, and then attach it to the roller using the manufacturer’s instructions. It’s important to ensure that the fabric is properly tensioned to prevent sagging or flapping in the wind.
With a little time and effort, you can have a brand new awning that will provide years of enjoyment on your RV adventures.
Why Replace the Awning Fabric?
If you own an RV, you may occasionally need to replace the fabric on your awning. While awning fabric is designed to be durable and withstand the elements, over time it can become worn or damaged. It’s essential to replace the fabric because a damaged or worn awning can no longer provide adequate shade or protection from the sun and rain.
Additionally, a damaged awning can be an eyesore and detract from the overall appearance of your RV. By replacing the awning fabric, you can ensure that your RV looks its best and that you can continue to enjoy the benefits of having a shaded outdoor area.
Whether it’s preparing for a big exam, a job interview, or a major life event, we all know that preparation is key to success. But what does it really mean to be prepared? And how can we ensure that we’re fully prepared for whatever challenges lie ahead? In this blog, we’ll explore the art of preparation and uncover some helpful tips and strategies to help you become a master preparer. So grab a pen and paper, because we’re about to dive into the world of preparation!
Gather the Necessary Tools and Materials
Replacing the awning fabric on an RV may seem like a daunting task, but with the right tools and materials, it can be a straightforward process. To start, gather the necessary tools, such as a ladder, tape measure, screwdriver or drill, and a utility knife. Additionally, you will need the new awning fabric, which can be purchased from a specialty RV store or online.
It is crucial to take accurate measurements of your existing awning to ensure that the new fabric is the correct size. Once you have all the tools and materials, you are ready to begin the process of replacing the awning fabric on your RV.
Safety Precautions
Replacing the awning fabric on your RV is a great way to give your vehicle a fresh new look and ensure it’s functioning properly. However, it’s important to take the necessary safety precautions to avoid any accidents or injuries during the process. First and foremost, make sure to choose a safe and stable area to work in.
This could be a level surface such as a driveway or a flat patch of ground. Next, gather all the necessary tools and materials before starting the project. This includes a ladder or step stool, a wrench or socket set, and the new awning fabric itself.
It’s also a good idea to have a friend or family member nearby to assist you and lend a helping hand. Before climbing up the ladder, always ensure it is stable and secure. Double-check that all screws and bolts are tightened properly and the ladder is free from any defects.
While working on the awning, take your time and be cautious. Avoid any sudden movements or jerks that could lead to accidents or injuries. And finally, make sure to follow the manufacturer’s instructions carefully and ask for professional help if needed.
By following these safety precautions, you can successfully replace the awning fabric on your RV without any mishaps.
Are you tired of looking at your old, worn-out awning fabric? Perhaps it’s faded from the sun or has been damaged by harsh weather conditions. Whatever the case may be, it’s time to give your outdoor space a much-needed upgrade. In this blog post, we’ll walk you through the process of removing the old awning fabric, so you can start fresh with a new and improved look.
Think of it as a facelift for your patio or deck – a simple change that can make a world of difference. So, let’s get started and bring new life to your outdoor space!
Unroll and Extend the Awning
If you own an RV, it’s important to know how to replace the awning fabric when it becomes worn or damaged. Luckily, the process is relatively simple and can be done with just a few tools. Start by unrolling the awning completely and ensuring that it is securely in place.
Then, using a screwdriver or awning rail tool, remove any screws or fasteners that are holding the fabric in place. Carefully remove the old fabric from the awning rail, making sure not to damage it any further. Once the old fabric is off, lay the new fabric flat and line it up with the awning rail.
Gently slide it into place, ensuring that it is straight and centered. Finally, reattach the fabric to the awning rail using the screws or fasteners that were previously removed. Give the awning a test run to make sure everything is functioning properly.
With a little bit of time and effort, you can have your RV’s awning looking and working like new again. So don’t let a damaged or worn awning fabric keep you from enjoying the great outdoors – follow these simple steps and get back to camping in no time.
Detach the Awning Fabric from the RV
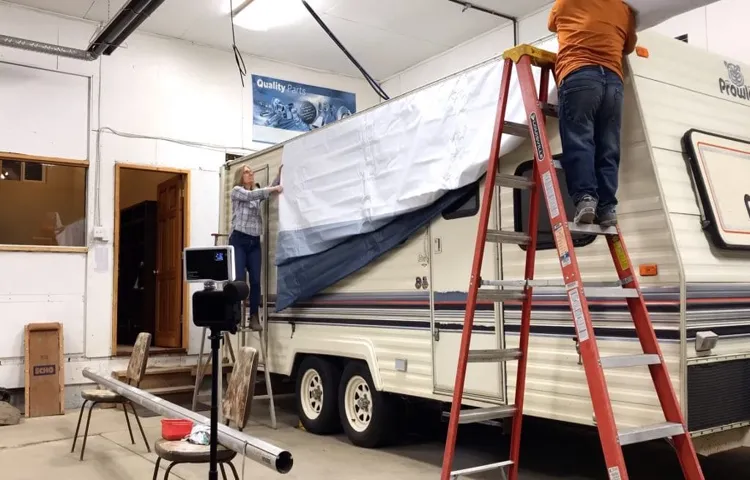
So, you’ve noticed some wear and tear on your RV’s awning fabric and it’s time for a replacement. Don’t worry, I’ve got you covered! In this blog post, I’ll walk you through the process of detaching the awning fabric from your RV. First things first, make sure you have all the necessary tools handy.
You’ll need a ladder to reach the awning, a screwdriver or drill with the appropriate bit, and a helper if possible. Safety first! To start, locate the screws or bolts that are holding the awning fabric in place. These are usually found on the arms of the awning.
Carefully remove these screws or bolts, making sure to keep track of them so you don’t lose them. Now that the fabric is no longer secured, it’s time to detach it from the roller tube. At this point, you may need your helper to hold the fabric while you detach it from the roller tube.
Slowly and carefully, roll the awning fabric off the roller tube. It’s important to take your time and not rush this step to avoid any accidents or damage to the fabric or your RV. Once the fabric is completely rolled off the roller tube, you can detach it from the RV’s sidewall.
This may involve removing a few more screws or bolts, so be sure to have your screwdriver or drill handy. And there you have it! You’ve successfully detached the awning fabric from your RV. Now, you can move on to the next step of replacing the fabric.
Stay tuned for the next blog post in this series to learn how to install the new awning fabric on your RV. Happy RVing!
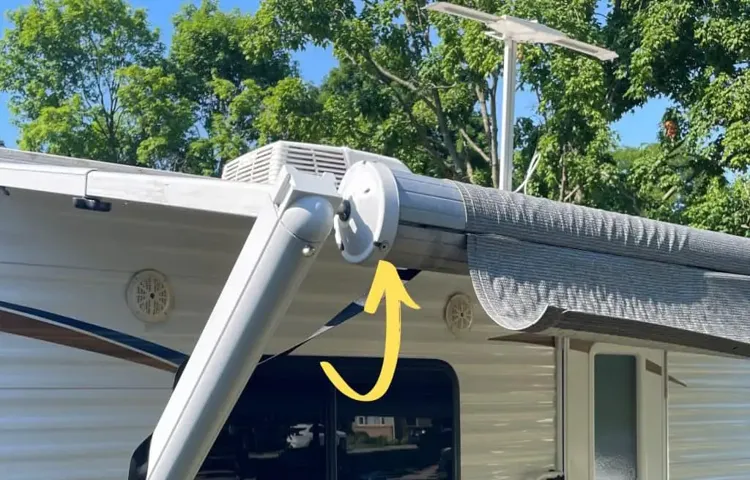
Remove the Fabric from the Roller Tube
So, you’re ready to replace the awning fabric on your RV. Good choice, as freshening up the look of your RV’s awning can give it a whole new lease on life. But before you can install the new fabric, you’ll need to remove the old fabric from the roller tube.
To start, make sure your awning is fully extended and secure to prevent any accidents. Then, locate the end of the fabric on the roller tube. You should see a small metal pin or rod that is holding the fabric in place.
This pin needs to be removed in order to release the fabric. Using a pair of pliers, carefully remove the pin by gripping it and pulling it out. Be sure to hold onto the fabric as you remove the pin to prevent it from unrolling too quickly.
Once the pin is removed, you can begin to roll up the fabric by hand, making sure to keep it straight and even as you go. As you roll up the fabric, you may encounter some resistance or tight spots. This is normal, as the fabric can become warped or uneven over time.
If you encounter any particularly tight spots, you can gently tug on the fabric or use a soft mallet to tap it into place. Once the fabric is completely rolled up, secure it in place by using a bungee cord or clamps to hold it tight against the roller tube. This will prevent it from unrolling unexpectedly and keep it out of the way while you install the new fabric.
Now that you’ve successfully removed the old fabric from the roller tube, you’re one step closer to installing the new fabric and giving your RV’s awning a fresh, updated look. Stay tuned for our next blog section on how to install the new fabric and complete the awning replacement process.
Inspect and Clean the Awning Frame
If you’re looking to replace the fabric on your RV awning, it’s important to start by inspecting and cleaning the awning frame. This will ensure that your new fabric will fit properly and last longer. First, inspect the frame for any signs of damage or wear.
Look for any bent or broken parts that may need to be replaced. Next, remove any dirt, debris, or mildew that may have accumulated on the frame. You can use a mild detergent and water to clean the frame, making sure to rinse it thoroughly afterwards.
Once the frame is clean and dry, you can move on to replacing the fabric. This step is best done with the help of another person, as it can be a bit tricky to handle the large fabric. By taking the time to inspect and clean the awning frame, you’ll ensure that your new fabric will fit properly and look great on your RV.
Choosing the perfect fabric for your new awning can seem like a daunting task. With so many options available, how do you know which one is right for you? Well, fret not! We’re here to help you make an informed decision and find the fabric that checks all your boxes. Think of it as picking out the right outfit for your home – you want something that not only looks great but also suits your needs and withstands the test of time.
So, imagine your awning as a fashion statement for your house and let’s dive right in!
Measure the Awning Fabric
Replacing the awning fabric on your RV is a relatively simple process that can be done with a little time and effort. The first step in replacing the fabric is to measure it properly. This will ensure that you purchase the correct replacement fabric and that it will fit properly on your RV.
To measure the fabric, first, extend the awning fully and make sure it is secure. Then, measure the length of the fabric from end to end, making sure to include any extra length that hangs off the roller. Next, measure the width of the fabric by measuring from one side of the roller to the other.
This will give you the dimensions you need to purchase the replacement fabric. It’s important to measure accurately to avoid any issues with the new fabric not fitting properly. So, take your time and measure twice if needed.
With the measurements in hand, you can now purchase the replacement fabric and move on to the next step of the replacement process.
Select the Fabric Type
Replacing the fabric on your RV’s awning can be a great way to refresh the look and functionality of your outdoor space. The first step in this process is selecting the right fabric type. There are a few different options to consider, each with its own benefits and drawbacks.
One popular choice is vinyl fabric, which is known for its durability and resistance to fading and mildew. Another option is acrylic fabric, which offers superior color retention and is often treated to be water repellent. Finally, there are also polyester fabrics available, which are lightweight and easy to clean.
Ultimately, the best fabric type for your RV’s awning will depend on your specific needs and preferences. Consider factors such as durability, weather resistance, and ease of maintenance when making your decision.
Consider Additional Features
When replacing the awning fabric on an RV, it is important to consider additional features that can enhance your camping experience. One popular feature to consider is an awning LED light strip. This can provide added visibility and ambiance during your outdoor gathering or evening relaxation.
Another feature to think about is an awning room attachment. This can create additional living space and privacy, allowing you to enjoy the great outdoors while still having a protected area. Additionally, some awning fabrics offer extra UV protection, which is especially important if you plan on spending a lot of time outside.
By considering these additional features, you can make the most out of your RV’s awning fabric replacement and create a more comfortable and enjoyable camping experience.
So, you’ve decided it’s time to spruce up your outdoor living space by installing a new awning fabric. That’s a fantastic idea! Not only will a fresh awning give your patio or deck a stylish facelift, but it will also provide much-needed shade and protection from the elements. But where do you begin? With so many fabric options out there, it can feel overwhelming.
Don’t worry, though! In this blog post, we’ll walk you through everything you need to know about installing the new awning fabric, from choosing the right material to the step-by-step installation process. So grab a cup of coffee, sit back, and let’s get started on transforming your outdoor oasis!
Attach the Fabric to the Roller Tube
Replacing the awning fabric on your RV can be a bit of a daunting task, but with the right steps and some patience, it can be accomplished easily. One of the first steps in the process is to attach the fabric to the roller tube. This is an important step as it ensures that the fabric is secure and properly aligned.
To do this, start by rolling out the new fabric on a clean surface. Make sure to position it so that the hemmed edge is facing up and the fabric is centered on the tube. Then, using a cordless drill, secure the fabric to the roller tube by attaching the awning rail brackets.
These brackets will hold the fabric in place and prevent it from coming loose during operation. Once the fabric is securely attached, roll it up onto the tube using the awning crank. Take your time with this step to ensure that the fabric rolls up evenly and smoothly.
With the fabric securely attached to the roller tube, you can now move on to the next step in the process of replacing your RV awning fabric.
Secure the Fabric to the RV
Now that you have successfully removed the old awning fabric from your RV, it’s time to secure the new fabric in place. This step is crucial to ensure that your awning is properly attached and will not come loose while you’re on the road. Start by aligning the fabric with the roller tube, making sure it is centered and straight.
Use a ladder or step stool to reach the awning rail and slide the fabric into the track, starting from one end and working your way to the other. Make sure the fabric is evenly distributed along the roller tube and adjust if necessary. Once the fabric is in place, carefully roll it up using the awning crank or motor, making sure it rolls smoothly and evenly.
Finally, secure the ends of the fabric using the included retaining screws or clips. These will prevent the fabric from sliding out of the track while you’re traveling. With the fabric securely attached, your RV is now ready to hit the road with a brand new awning!
Make Adjustments and Test the Awning
If your RV’s awning fabric is worn out or damaged, replacing it is a relatively simple process that you can do yourself. First, you’ll need to remove the old fabric by unrolling the awning and loosening the fabric from the rollers. Next, measure the length and width of the old fabric to ensure you purchase the correct size replacement.
After you have the new fabric, attach it to the rollers and carefully roll it up. Make any necessary adjustments to ensure the fabric is centered and rolls up evenly. Finally, test the awning to make sure it extends and retracts smoothly.
By following these steps, you can easily replace the awning fabric on your RV and have it looking and functioning like new.
Hey there! Are you a proud owner of a car or a homeowner looking to maintain and care for your property? If so, you’ve come to the right place. In this blog, we will discuss some essential maintenance and care tips that will help you keep your possessions in top-notch condition. Maintaining and caring for your belongings is not only important for their longevity, but it also ensures that they function properly and look their best.
Think of it like taking care of yourself – when you eat well, exercise regularly, and get enough rest, you feel energized and ready to take on the world. The same goes for your car or your home! Now, you might be wondering, what does maintenance and care entail? Well, it involves a combination of regular inspections, cleaning, and timely repairs. By following these simple tips, you can save yourself from costly replacements and repairs down the road.
For your car, it’s vital to keep up with routine maintenance tasks such as oil changes, tire rotations, and brake inspections. These services not only help your car run smoothly but also prevent potential issues from escalating into major problems. Additionally, don’t forget to wash and wax your vehicle regularly to protect its paint and keep it looking shiny and new.
When it comes to caring for your home, there are several areas to pay attention to. Regularly inspecting your roof for any signs of damage, cleaning out your gutters to prevent water damage, and maintaining your HVAC system are just a few examples. By staying on top of these tasks, you can ensure that your home remains safe, comfortable, and in good condition.
Remember, maintenance and care are ongoing processes. It’s not a one-time job but rather a commitment to regularly check and maintain your possessions. By incorporating these tips into your routine, you’ll be able to enjoy the benefits of a well-maintained car and a well-cared-for home for years to come.
So, whether you’re a car enthusiast or a homeowner looking to protect your investment, stick around. In the upcoming blog posts, we will dive deeper into each aspect of maintenance and care, providing you with useful tips and tricks to keep your possessions in tip-top shape.
Regular Cleaning
Replacing the awning fabric on your RV is a task that you may need to take on from time to time to keep your RV looking its best. Regular cleaning of your RV’s awning fabric can help prevent the need for replacement and extend its lifespan. To clean your awning fabric, start by removing any loose dirt or debris with a broom or leaf blower.
Next, use a mild soap and water solution to wash the fabric, gently scrubbing any stains or spots. Rinse the fabric thoroughly with clean water and allow it to air dry before retracting or rolling it back up. If there are any tears or damages to the fabric that cannot be repaired, it may be time to replace it.
Replacing the awning fabric on your RV can be a DIY project, but if you’re unsure, it’s always best to consult a professional to ensure it’s done correctly.
Proper Storage
When it comes to owning an RV, proper storage is key. You want to make sure your investment is protected and that includes taking care of the awning fabric. Over time, the fabric can wear out or become damaged, so knowing how to replace it is essential.
First, start by removing the old fabric from the awning frame. This can be done by loosening the screws and sliding the fabric out. Next, measure the awning frame to determine the size of the new fabric needed.
You can find replacement fabric at most RV supply stores or online. Once you have the new fabric, slide it into place on the awning frame and secure it with the screws. Make sure to tighten them securely to ensure the fabric stays in place.
Finally, test the awning to ensure it is working properly and adjust as needed. With a little bit of time and effort, you can have a brand new awning fabric for your RV.
Inspecting for Damage or Wear
If you’re an RV owner, you may eventually find yourself needing to replace the awning fabric on your vehicle. Over time, the fabric can become damaged or worn from exposure to the elements. Inspecting your awning fabric regularly is key to catching any potential issues early on.
To inspect your awning fabric, start by fully extending the awning and examining it for any signs of wear, such as tears, holes, or discoloration. Pay attention to the seams as well, as these areas are prone to wear and tear. Additionally, check the retractable arms and brackets for any signs of damage.
If you notice any problems during your inspection, it’s time to replace the awning fabric. Replacing the fabric can seem like a daunting task, but with a little patience and careful attention to detail, it can be done.
So, you’ve reached the end of the road. The conclusion. You’ve gathered all the information, analyzed all the data, and now it’s time to wrap it all up.
But before you do, have you ever wondered why the conclusion is such an important part of any piece of writing? Well, think of it like the cherry on top of a delicious sundae. The conclusion is where you tie everything together, summarize your main points, and leave your reader with a lasting impression. It’s your chance to make a final statement and leave a lasting impact.
So, let’s dive into the world of conclusions and explore why they matter.
Enjoy Your New Awning Fabric
Replacing the fabric on your RV awning can be a great way to give your outdoor space a fresh look and provide some much-needed shade. But if you’ve never done it before, you might be wondering how to go about it. Don’t worry – it’s actually a fairly straightforward process that you can do yourself with a little bit of time and effort.
First, you’ll need to measure your existing awning fabric so that you can purchase the correct size for replacement. Once you have the new fabric, you’ll need to remove the old fabric from the roller tube and the awning arms. This may involve removing screws or other fasteners, so be sure to keep track of them.
Once the old fabric is removed, you can simply slide the new fabric onto the roller tube and reattach it to the awning arms. Finally, make sure to secure the fabric with the proper tension and test it to ensure that it rolls out and retracts smoothly. With a little bit of patience and attention to detail, you can enjoy your new awning fabric in no time.
Conclusion
In conclusion, replacing the fabric on an RV awning may seem like a daunting task, but with a little patience and a few simple steps, you’ll be able to tackle it like a pro. Just think of it as giving your RV a stylish new outfit that will not only protect you from the elements but also make all the other RVs green with envy. So grab your tools, channel your inner DIY expert, and get ready to show your RV some love.
Trust me, you’ll be awning it in no time!”
FAQs
How often should I replace the awning fabric on my RV?
It is recommended to replace the awning fabric on your RV every 3-5 years, or sooner if you notice any signs of wear or damage.
What tools do I need to replace the awning fabric on my RV?
To replace the awning fabric on your RV, you will generally need a ladder, a drill, a socket wrench, a rubber mallet, a tape measure, and a helper.
Can I replace the awning fabric on my RV myself, or should I hire a professional?
While it is possible to replace the awning fabric on your RV yourself, it can be a complex and time-consuming task. If you are not confident in your abilities, it is recommended to hire a professional to ensure it is done correctly.
How long does it take to replace the awning fabric on an RV?
The time it takes to replace the awning fabric on an RV can vary depending on factors such as the size of the awning and the level of experience of the person performing the replacement. On average, it can take anywhere from 2-6 hours.
What is the cost of replacing the awning fabric on an RV?
The cost of replacing the awning fabric on an RV can vary depending on factors such as the size of the awning and the type of fabric chosen. On average, you can expect to spend anywhere from $200 to $500 for the replacement.
Can I choose a different color or pattern for my new awning fabric?
Yes, you can usually choose a different color or pattern for your new awning fabric. Many manufacturers offer a variety of options to customize the look of your RV awning.
How do I properly clean and maintain my RV awning fabric?
To clean and maintain your RV awning fabric, you should regularly remove any debris or leaves, gently brush off any dirt or stains, and use a mild soap and water mixture to clean the fabric. Avoid using harsh chemicals or abrasive materials as they can damage the fabric. Additionally, make sure to let the awning dry completely before retracting it to prevent mold or mildew from forming.