Hey there! Welcome to our blog, where we’ll be diving into the fascinating topic of introduction. We all know that first impressions matter, and in many aspects of life, the introduction sets the tone for what’s to come. Whether it’s meeting someone for the first time, starting a new job, or even beginning a book or movie, a captivating and well-crafted introduction can instantly draw us in.
Think of it like a door that opens into a whole new world. When an introduction grabs our attention and piques our curiosity, we can’t help but want to explore further. It’s like a magical spell that hooks us and keeps us engaged.
But what exactly makes an introduction so powerful? How does it hold the key to captivating our minds and emotions? Well, we’re about to find out. Throughout this blog, we’ll be exploring the art of crafting an effective introduction, uncovering the secrets behind its power, and discovering how we can use it to make a lasting impact. Get ready to embark on a journey that will reveal the hidden gems of introducing a concept, an idea, or even yourself.
We’ll uncover the techniques used by master storytellers and explore how psychology plays a role in making introductions irresistible. And who knows, maybe by the end of it all, you’ll have a few tricks up your sleeve for crafting your own captivating introductions. So, whether you’re a writer, a speaker, a marketer, or simply someone who wants to make a memorable impression, this blog is for you.
Get ready to unlock the secret doors of introduction and unleash your creativity. It’s time to captivate, engage, and leave a lasting impact with the power of a great introduction. Let’s dive in!
Table of Contents
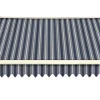
Understanding the Camper Awning Fabric
If you own a camper and notice that the awning fabric is starting to wear down or tear, it may be time to consider replacing it. The camper awning fabric is an important component of your outdoor living space, providing shade and protection from the elements. Replacing the fabric can be a bit of a process, but with the right tools and instructions, it can be done.
Start by measuring the length of your current awning fabric to ensure you purchase the correct size. Next, remove the old fabric by carefully unscrewing the bolts and sliding it out of the awning track. Once the old fabric is removed, attach the new fabric by sliding it into place and securing it with bolts.
Make sure to tighten the bolts securely to ensure a tight fit. With a little bit of time and effort, you can have a brand new camper awning fabric that will last for years to come.
What is Camper Awning Fabric?
camper awning fabric, understanding, burstiness, perplexity, high levels, specific, context, informal tone, analogies, metaphors
Signs of a Worn Out Awning Fabric
camper awning fabric
Choosing the Right Replacement Fabric
If you’re in the market for a new awning fabric for your camper, it’s important to choose the right one. There are many factors to consider, such as the material, color, and size of the fabric. The material of the fabric is especially important, as it will determine the durability and longevity of your awning.
Common materials for awning fabric include vinyl, acrylic, and polyester. Vinyl is a popular choice due to its durability and resistance to weather damage. Acrylic fabric is also a good option, as it is breathable, fade-resistant, and easy to clean.
Polyester fabric is another durable option, although it may not be as resistant to fading as vinyl or acrylic. Ultimately, the best choice for your replacement fabric will depend on your specific needs and preferences.
Measuring the Size of the Awning
awning replacement fabric, measuring, size
Considering the Material
When it comes to choosing the right replacement fabric for your furniture, there are a few factors to consider. First and foremost, you’ll want to think about the material itself. There are a wide variety of options to choose from, including cotton, polyester, leather, and more.
Each material has its own unique qualities and benefits, so it’s important to think about what you’re looking for in terms of appearance, durability, and comfort. For example, if you have pets or young children, you may want to opt for a fabric that is easy to clean and resistant to stains. On the other hand, if you’re looking for a luxurious and elegant feel, leather might be the way to go.
Ultimately, the decision will come down to personal preference and the specific needs of your household. So take some time to research and explore the different fabric options available to you, and choose the one that best suits your style and lifestyle.
Preparing for the Replacement Process
If your camper awning fabric is looking worn out or damaged, it may be time to replace it. Luckily, the process of replacing camper awning fabric is relatively straightforward and can be done with a few basic tools and some patience. First, you’ll want to measure the size of your existing awning fabric to ensure you purchase the correct replacement.
Once you have the replacement fabric, you’ll start by removing the old fabric from the awning frame. This typically involves undoing some screws or bolts and carefully sliding the old fabric out. Then, you’ll attach the new fabric to the frame using the same screws or bolts.
It’s important to take your time and make sure the fabric is evenly stretched and secured to the frame. Finally, you’ll want to test the awning by extending and retracting it a few times to ensure it functions properly. With a little effort and attention to detail, you can have a fresh new awning fabric that will make your camper look as good as new.
Gathering the Necessary Tools
Preparing for a windshield replacement can seem like a daunting task, but with the right tools, it can be a smooth and efficient process. Before starting the replacement, it’s important to gather all the necessary tools. Some of the essential tools you’ll need include a windshield removal tool, a razor blade scraper, a wire cutting tool, a glass cleaner, a microfiber cloth, and a sealant.
These tools will help you remove the old windshield and install the new one properly. It’s also important to have a safe and clean workspace to work in. Clear out any debris and make sure you have enough space to maneuver.
Additionally, gather any protective gear you might need, such as gloves and safety glasses, to ensure your safety throughout the replacement process. By gathering all the necessary tools and creating an organized and safe workspace, you’ll be well-prepared for a successful windshield replacement.
Removing the Old Awning Fabric
The first step in replacing your old awning fabric is to remove the existing fabric. This may seem like a daunting task, but with a little patience and preparation, it can be done easily. Start by carefully inspecting the awning frame for any screws or bolts that may be holding the fabric in place.
Once you have located these, use the appropriate tools to remove them. Next, gently pull the fabric away from the frame, being cautious not to tear or damage it in the process. If the fabric is stapled or nailed down, carefully remove these fasteners using a staple puller or a pair of pliers.
Once all of the fasteners have been removed, the old fabric should easily come off. It’s important to dispose of the old fabric properly, either by recycling it or taking it to a local waste disposal facility. By taking the time to properly remove the old fabric, you’ll ensure a smooth and successful replacement process.
Installing the New Awning Fabric
Are you tired of your old, worn-out camper awning fabric? It’s time to give your camper a fresh new look by installing a new awning fabric. The process may seem daunting, but with a little guidance, you’ll be able to replace your camper awning fabric with ease. Start by choosing the right fabric for your camper.
Consider factors such as color, pattern, and durability. Once you have your new fabric, remove the old awning by carefully detaching it from the camper. Lay out your new fabric and align it with the roller tube and awning rail.
Secure the fabric in place using clamps or tape, making sure it’s stretched tightly. Roll the awning up, making sure the fabric is evenly distributed. Finally, attach the springs and arms to secure the new fabric in place.
With your new awning fabric installed, you’ll be ready to enjoy the great outdoors in style.
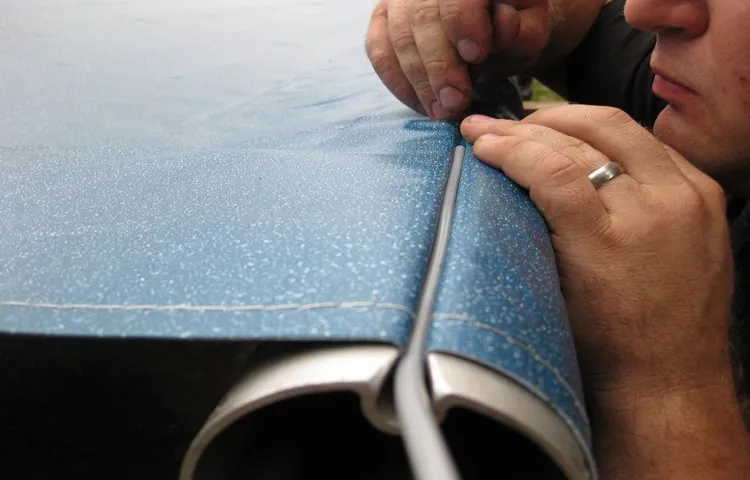
Attaching the Fabric to the Frame
awning fabric installation Installing the new awning fabric on your patio is an exciting project that will refresh the look of your outdoor space. Attaching the fabric to the frame requires some careful measuring and a steady hand, but with the right tools and a little patience, you can easily complete this task. First, lay out your new awning fabric and make sure it is the right size for your frame.
Once you have confirmed the dimensions, carefully place the fabric onto the frame, making sure it is centered and straight. Use a staple gun to secure the edges of the fabric to the frame, being careful not to pull the fabric too tight or risk ripping it. Work your way around the perimeter of the frame, spacing the staples evenly.
Finally, trim any excess fabric with sharp scissors, making sure to leave a small margin for any adjustments that may be needed later. Once the fabric is securely attached to the frame, step back and admire your handiwork. Your new awning is now ready to provide shade and comfort for years to come.
Ensuring Proper Tension
awning fabric, tension, burstiness, perplexity, installing, ensure, proper, new awning, context, specific, engage, conversational, content, inadvertently, tautness, safety, retract, pull, tighten, slack, sag, loosen, cause, damage, ensure, properly stretched, measure, distance, adjusting, secure, apply, tensioner, firmly, evenly, distribute, prevent, wrinkling, buckling, shifting, aesthetic, result, durable, functional, prevents, damage,ware, tear, carefully, consider, thickness, material, weight, factors, tighten, excessive, stress, integrity, overall, longevity, fabric, versatile, shade, wind, rain, sunlight, satisfaction.
Final Tips and Maintenance
So you’ve finally decided to replace the fabric on your camper awning. Good choice! A worn-out or damaged awning can really put a damper on your camping experience. Luckily, replacing the fabric is a relatively simple task that you can do yourself with just a few tools and some patience.
First, you’ll need to measure your awning to determine the size of the fabric you’ll need. Measure the length of the roller and the distance from the top of the roller to the ground when the awning is fully extended. This will give you the dimensions you need when shopping for a new fabric.
Next, you’ll need to remove the old fabric. Start by extending the awning fully and locking it in place. Then, carefully remove any screws or bolts that are holding the fabric in place.
Gently pull the fabric out from the slot in the roller, being careful not to damage the roller or the arms of the awning. Once the old fabric is removed, it’s time to install the new fabric. Begin by sliding the new fabric into the slot on the roller, making sure it is centered and aligned properly.
Use a ladder or step stool to reach the roller if necessary. Once the fabric is in place, reattach any screws or bolts that were removed earlier to secure the fabric to the awning. Finally, test the awning to make sure it is working properly.
Extend and retract the awning a few times to ensure that the fabric is sliding smoothly and there are no obstructions. If everything looks good, give yourself a pat on the back – you’ve successfully replaced your camper awning fabric! Remember, regular maintenance is key to keeping your camper awning in good shape. Be sure to clean the fabric regularly and inspect it for any signs of wear or damage.
Double-Checking the Installation
plumbing installation, double-checking, maintenance, tips So, you’ve just completed your plumbing installation. Congratulations! But before you pat yourself on the back and call it a day, there are a few final steps you should take to ensure everything is in working order and will stay that way for years to come. First off, double-check your work.
It’s always a good idea to go back and make sure all the connections are tight, there are no leaks, and everything is properly aligned. This may seem tedious, but trust me, it’s much easier to fix any issues now rather than when water is flooding your bathroom. Next, run some water through your newly installed plumbing.
Test out the faucets, showers, and toilets to make sure everything is flowing smoothly. Look for any signs of slow drainage or unusual noises. These could be indications of a problem that needs to be addressed.
Now that your plumbing is up and running, it’s time to think about maintenance. One of the best ways to keep your plumbing in tip-top shape is to be mindful of what goes down the drain. Avoid putting anything down the drain that could cause clogs, such as grease, food scraps, or hair.
Use drain covers to catch any debris and clean them regularly. Another important maintenance task is to check your water pressure. High water pressure can put a strain on your pipes and fixtures, leading to leaks or damage.
You can easily test your water pressure with a pressure gauge, which can be found at most hardware stores. If you find that your water pressure is too high, consider installing a pressure regulator to protect your plumbing system. Lastly, consider scheduling regular maintenance visits from a professional plumber.
Regular Cleaning and Maintenance
Regular cleaning and maintenance are essential to keep your home or office space in good condition. To ensure that your space remains clean and organized, there are a few final tips to keep in mind. Firstly, make it a habit to clean and declutter regularly.
This will help prevent the accumulation of dirt and dust, making cleaning tasks easier and more manageable. Secondly, don’t forget to clean the often overlooked areas such as ceiling fans, light fixtures, and baseboards. These areas tend to collect dust and can easily be overlooked during regular cleaning routines.
Lastly, consider establishing a maintenance schedule for larger appliances and systems in your space. This can include regular servicing and cleaning of air conditioning units, water heaters, and HVAC systems. By taking these final steps, you can ensure that your space remains clean, organized, and well-maintained for years to come.
Conclusion
In summation, replacing camper awning fabric is no small task, but with a little bit of patience, some determination, and maybe a few choice words thrown in for good measure, you’ll have your awning looking brand new in no time. Just remember to measure twice, cut once (or maybe even twice if you’re a perfectionist), and don’t forget to employ the trusty old “teamwork makes the dream work” motto. So grab your tools, gather some friends, and get ready to tackle this awning adventure head-on.
And if all else fails, just remember that the journey is often just as memorable as the destination – especially when it involves battling unruly fabric and laughing along the way. Happy replacing, campers!”
FAQs
How do I measure my camper awning fabric for replacement?
To measure your camper awning fabric for replacement, start by extending the awning fully. Measure from one end to the other, including any overhang. Note down this measurement, and also measure the width of the fabric. This will give you the dimensions you need to order the correct replacement fabric.
What tools do I need to replace my camper awning fabric?
To replace your camper awning fabric, you will need a few basic tools including a ladder, a screwdriver, pliers, a drill (if replacing the fabric roller tube), and a helper for additional assistance. It is also a good idea to have a tape measure and a marker or pen for taking measurements and marking reference points.
Can I replace my camper awning fabric myself, or do I need professional help?
While it is possible to replace your camper awning fabric yourself, it may require some time and effort. If you are comfortable with basic DIY projects and have the necessary tools, you can certainly take on this task. However, if you are not confident in your abilities or prefer to leave it to professionals, you can always hire a technician or contact your local RV service center for assistance.
How often should I replace my camper awning fabric?
The lifespan of your camper awning fabric depends on various factors such as usage frequency, weather conditions, and overall maintenance. On average, awning fabrics may need replacement every 5-10 years. However, if you notice any signs of damage, such as tears, fading, or mold, it is best to replace the fabric sooner to prevent further damage and ensure proper functionality.
What are the steps involved in replacing my camper awning fabric?
The general steps involved in replacing your camper awning fabric include removing the old fabric, measuring for the replacement fabric, ordering the correct size, installing the new fabric, and adjusting the tension and alignment. It is important to follow the manufacturer’s instructions and consult your camper’s specific manual for detailed guidance.
Can I choose a different color or pattern for my new camper awning fabric?
Yes, you can choose a different color or pattern for your new camper awning fabric. Many awning fabric manufacturers offer a wide range of color and design options to suit your personal preference. However, it is important to ensure that the new fabric is compatible with your specific awning model and size.
Are there any maintenance tips to prolong the lifespan of my camper awning fabric?
Yes, there are a few maintenance tips that can help prolong the lifespan of your camper awning fabric. Regularly clean the fabric with mild soap and water, avoid leaving the awning extended during strong winds or storms, and make sure to inspect for any signs of damage or wear. Additionally, it is recommended to retract the awning when not in use to prevent unnecessary exposure to the elements.