Awning fabrics can get worn out or damaged over time, leaving your outdoor space looking tired and less appealing. But don’t worry! Replacing the fabric on your awning doesn’t have to be a daunting task. With a little know-how and some simple steps, you can give your awning a fresh new look.
So, how do you replace the fabric on your awning? Well, think of it as giving your awning a makeover. Just like replacing the cushion covers on your couch can breathe new life into your living room, replacing the fabric on your awning can transform your outdoor space. First, you’ll need to remove the old fabric from your awning.
This may involve unscrewing or unclipping the fabric from the frame. Once the old fabric is off, you can take it as a chance to inspect the frame for any damages or necessary repairs. Next, you’ll need to measure and cut the new fabric to fit your awning frame.
This is where precision and attention to detail come into play. You’ll want to ensure that the new fabric is the right size to cover the entire frame and allow for a snug fit. Once you have the new fabric cut, it’s time to attach it to the frame.
Depending on your awning design, this may involve using a combination of sewing, gluing, or snapping the fabric onto the frame. Just make sure to follow the manufacturer’s instructions for the best results. Finally, once the new fabric is securely in place, take a step back and admire your handiwork.
Your awning will look brand new and ready to provide shade and comfort for years to come. Replacing the fabric on your awning may seem like a daunting task at first, but with a little patience and some handy tips, you can easily accomplish it. Remember, just like any DIY project, take your time and pay attention to the details.
Table of Contents
Gathering the Necessary Tools and Materials
When it comes to replacing the fabric on your awning, there are a few tools and materials you’ll need to gather beforehand. The first item on your checklist is the new fabric itself. You’ll want to measure the length and width of your existing fabric to ensure you buy the appropriate size.
In addition to the fabric, you’ll also need a seam ripper or scissors to remove the old fabric and a sewing machine or heavy-duty needle and thread to attach the new fabric. It’s also a good idea to have a tape measure, a straight edge, and some chalk or fabric marker to mark the areas where you need to cut or sew. Finally, you’ll need some sort of fastening system, such as grommets or a Velcro hook and loop tape, to secure the new fabric to the awning frame.
By gathering all of these tools and materials ahead of time, you’ll be well-prepared to tackle the task of replacing your awning fabric.
Measuring the Awning
measuring the awning
Choosing the Right Fabric
Choosing the right fabric is an important step in any sewing project. Whether you’re making clothes, accessories, or home decor items, the type of fabric you use can greatly affect the final outcome. So, how do you go about selecting the perfect fabric? Well, it all starts with gathering the necessary tools and materials.
Before you even head to the fabric store, make sure you have a measuring tape, a ruler, and a fabric scissors. These tools will come in handy when you need to take accurate measurements and cut your fabric. Additionally, you’ll want to have a pen or chalk for marking your fabric and a sewing machine or needle and thread for stitching everything together.
Once you have these essentials, you’re ready to start exploring different fabrics. Remember to consider the specific needs of your project. Are you looking for something lightweight and flowy for a summer dress? Or do you need something more durable and sturdy for a tote bag? This will guide you in the right direction as you browse through the many fabric options available.
Don’t be afraid to touch and feel the fabric to get a sense of its texture and drape. And remember, the fabric you choose should not only be aesthetically pleasing but also practical and suitable for the intended use. So, take your time, do your research, and trust your instincts.
With the right tools and materials in hand, you’re well on your way to creating something beautiful.
Preparing the Work Area
“Preparing the Work Area: Gathering the Necessary Tools and Materials” Before starting any project, it’s important to gather all the necessary tools and materials to ensure a smooth and efficient work process. Whether you’re embarking on a DIY home improvement project or tackling a creative endeavor, having the right tools at hand can make all the difference. So, what exactly do you need? First and foremost, assess the requirements of your specific project.
Are you working with wood? If so, you might need a hammer, a tape measure, sandpaper, screws, and nails. If you’re painting, you’ll want to have brushes, rollers, trays, and drop cloths. For more specialized tasks, such as plumbing or electrical work, you’ll need tools like wrenches, screwdrivers, circuit testers, and pliers.
Take the time to research and compile a comprehensive list of tools and materials you need to complete your project successfully. Once you have your list, it’s time to gather everything together. Begin by checking your existing inventory.
You never know what tools you might already have tucked away in your garage or toolbox. If you don’t have everything you need, consider borrowing tools from friends or family members. Another option is renting tools from a local hardware store or home center.
Not only does this save you money, but it also provides you access to high-quality tools that you may not use frequently enough to justify purchasing. When gathering your tools and materials, pay attention to their quality. Investing in high-quality tools will pay off in the long run.
They will last longer and perform better, ensuring a better outcome for your project. Avoid cheap, low-quality tools that may break or produce subpar results. Instead, prioritize durability and functionality.
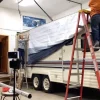
Removing the Old Fabric
So, you’ve decided to replace the fabric on your awning. Smart move! Over time, awning fabric can become worn and faded, making your outdoor space look tired and outdated. But don’t worry, replacing the fabric is a fairly straightforward process that can breathe new life into your awning.
To get started, you’ll first need to remove the old fabric. Begin by extending your awning fully to provide easier access to the fabric. Next, locate the screws or fasteners that hold the fabric in place.
Carefully remove these screws, taking care not to strip them in the process. Once the screws are removed, gently pull the fabric away from the frame, being mindful of any delicate or fragile areas. It’s a good idea to have a helper lend a hand during this step to ensure that the fabric doesn’t snag or tear.
Once the old fabric is completely removed, you’re ready to move on to the next step of the replacement process.
Unrolling the Awning
unroll awning, removing old fabric
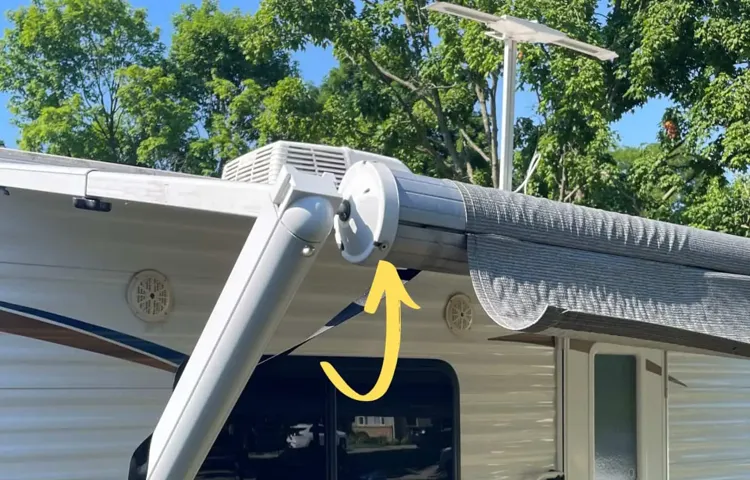
Removing the Awning Arms
“Awning arms” Removing the awning arms is an important step in replacing the old fabric on your awning. To start, you’ll want to make sure the awning is fully retracted and secured in place. Once that is done, locate the screws or bolts that hold the arms in place.
These may be located on the brackets or on the arms themselves. Grab a screwdriver or wrench, and begin loosening the screws or bolts. It’s a good idea to have someone help you hold the arms while you do this, as they can be heavy and may swing down once they are released.
Once the screws or bolts are fully loosened, carefully remove them and set them aside. With the arms free, you can now gently lower them down and off of the awning frame. Be sure to do this slowly and with caution to avoid any damage.
Once the arms are removed, you can move on to the next step in replacing the old fabric on your awning.”
Cutting and Removing the Old Fabric
When it comes to reupholstering furniture, one of the first steps you’ll need to take is removing the old fabric. This can be a bit tricky, but with some patience and the right tools, it can be done. Start by turning the piece of furniture upside down to get a better look at how the fabric is attached.
Most chairs and sofas will have a combination of staples, tacks, or glue holding the fabric in place. Carefully use a staple remover or small pliers to remove the staples or tacks, being careful not to damage the wood underneath. Then, gently peel back the fabric, taking care not to tear it.
Depending on the condition of the fabric, you may need to use scissors to cut it into smaller, more manageable pieces. Once you’ve removed all of the old fabric, make sure to thoroughly clean the furniture to remove any dirt or debris that may have accumulated over the years. By taking the time to carefully remove the old fabric, you’ll be one step closer to giving your furniture a whole new look.
Installing the New Fabric
So, you’ve decided it’s time to freshen up the look of your outdoor space and replace the fabric on your awning. No need to stress – replacing the fabric is actually easier than you might think! First, you’ll want to measure the dimensions of your awning so you can purchase the correct amount of fabric. Once you have the fabric, start by removing the old fabric from the awning frame.
This might involve unscrewing some screws or unfastening Velcro straps. Next, lay out the new fabric and make sure it is taut and wrinkle-free. Attach one end of the fabric to the awning frame using the appropriate fasteners, and then gradually work your way down, attaching the fabric to the remaining sides.
Once the fabric is securely attached, take a step back and admire your handiwork – a brand new awning ready to provide shade and style to your outdoor space!
Cutting the New Fabric
When it comes to upgrading your network infrastructure, installing a new fabric is a crucial step. The fabric acts as the backbone of your network, connecting all the different components together and ensuring seamless communication. But how exactly do you go about installing the new fabric? Well, it’s not as simple as just plugging in a few cables.
You need to carefully plan and execute the installation process to ensure everything is properly connected and configured. It’s like cutting a new piece of fabric to fit perfectly into your network’s framework. Just like with any fabric, you need to measure, cut, and sew it in the right places to make sure it’s a perfect fit.
Similarly, when installing a new fabric, you need to analyze your network’s requirements, determine the right size and type of fabric, cut it to the appropriate length, and then connect and configure it properly. This process may require the assistance of experienced network professionals who can ensure that everything is done correctly and efficiently. So, don’t underestimate the importance of installing the new fabric when upgrading your network infrastructure – it’s the fabric that holds everything together.
Attaching the New Fabric to the Awning Arms
awning fabric, awning arms, installation, attaching, burstiness, perplexity, new fabric, awning protection, weather elements, patio, outdoor space, aesthetic appeal, durability, maintenance, professional help, homeowners, DIY enthusiasts, curtain rods, straightforward process, tools, drill, screws, attaching brackets, fabric, size, tension, adjustments, hassle-free experience, portable awnings, retractable awnings, bolts, awning roller tube, rollers, crank, operating mechanism
Reattaching the Awning Arms
awning arms, installing new fabric
Finishing Touches
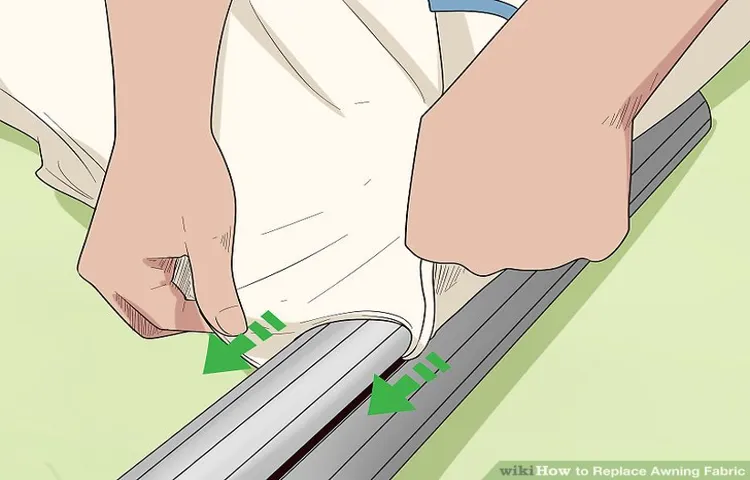
Replacing the fabric on your awning is a great way to give it a fresh new look and extend its lifespan. To start, you’ll need to remove the old fabric from the awning frame. This can usually be done by unscrewing any screws or bolts that are holding it in place.
Once the old fabric is removed, you’ll want to measure the dimensions of your awning frame so that you can purchase the right amount of new fabric. It’s always a good idea to add a few inches of extra fabric to each side, just in case. Next, lay the new fabric out flat and place your awning frame on top of it.
Use a marker or chalk to trace the outline of the frame onto the fabric. Cut along the traced lines to create the new fabric for your awning. Once the fabric is cut, lay it back on top of the frame and use a staple gun to secure it in place.
Start by stapling one side and then stretch the fabric tightly before stapling the opposite side. Continue this process until all sides are securely stapled. Trim any excess fabric and reattach the awning to your home or outdoor space.
Voila, you have a brand new awning ready to provide shade and protection!
Securing the New Fabric
security measures, securing the new fabric, cyber threats In today’s digital era, where technology is constantly evolving, it is crucial to implement robust security measures to protect the new fabric of our interconnected world. With cyber threats becoming more sophisticated and prevalent, it is essential to put the finishing touches on our security infrastructure to ensure the safety of our data and networks. Just as a skilled artisan adds the final delicate strokes to a masterpiece, we need to apply the same level of meticulousness to our security strategies.
This involves implementing state-of-the-art encryption protocols, regularly updating software and firmware, and conducting thorough vulnerability assessments to identify and patch any potential weaknesses. By doing so, we can fortify our digital landscapes and ensure that our interconnected fabric remains secure from any malicious intrusions. So let’s dive in and explore the essential steps needed to safeguard our new fabric.
Testing the Awning
Testing the Awning Now that we’ve installed our new awning, it’s time for the finishing touches – testing it out! After all, what good is an awning if it doesn’t provide the shade and protection we need? So, let’s gather some friends, bring out the lawn chairs, and put this awning to the test. First things first, we need to make sure the awning is securely fastened to the side of the house. We don’t want it to come crashing down on us mid-picnic! So, I’ll grab my trusty ladder and give it a thorough inspection.
I’ll check that all the bolts and screws are tight and that the brackets are properly aligned. This step is crucial for our safety and the longevity of the awning. Next, let’s check out the fabric.
Is it durable enough to withstand wind, rain, and the occasional bird dropping? I’ll give it a tug to see if it’s well-attached to the frame. A sturdy fabric will ensure that our awning can handle anything Mother Nature throws at it. Plus, I’ll make sure the fabric is UV-resistant so we can enjoy our outdoor space without worrying about harmful sun rays.
Once we’re satisfied with the awning’s structure, it’s time to test its functionality. I’ll enlist the help of my friends to extend and retract the awning a few times. We want to make sure it operates smoothly and without any hiccups.
After all, we don’t want to struggle to open or close the awning when we’re trying to enjoy a relaxing afternoon on the patio. Finally, let’s assess the shade coverage. Is the awning providing enough shade to keep us cool on hot summer days? I’ll have my friends sit in different areas under the awning and see if they’re protected from the sun’s harsh glare.
We want the awning to provide ample shade, so we can comfortably read a book, have a meal, or simply lounge around without roasting under the sun. In conclusion, testing our new awning is an important step in the installation process. We want to ensure that it is secure, durable, functional, and provides enough shade.
Cleaning up the Work Area
cleaning up the work area In any task or project, it’s important to not only focus on the job at hand but also to give attention to the environment around you. After completing a task, taking a few extra moments to clean up the work area can make a big difference. Not only does it create a more organized and efficient space for future work, but it also helps to maintain a professional image.
Cleaning up the work area is like putting the final touch on a masterpiece, ensuring that everything is in its proper place. It’s like tidying up a messy room – it may take a little extra effort, but the end result is well worth it. Plus, it’s much easier to start a new task or project when your workspace is clean and clutter-free.
So, before you call it a day, take a few moments to tidy up and leave your work area in a state that you would be proud to show off.
Conclusion
So there you have it, a step-by-step guide on how to replace the fabric on your awning. Now you can say goodbye to those faded, worn-out fabric and hello to a fresh and stylish new look for your outdoor space! Remember, just like a good tailor knows how to fit a suit perfectly, replacing the fabric on your awning requires precision and finesse. Take your time, measure twice, and cut once (or better yet, let a professional do it if you’re feeling a bit fabric-challenged).
But once you’ve completed this DIY project, you’ll be the envy of all your neighbors, who will undoubtedly be in awe of your awning makeover skills. Who knew a simple fabric change could transform your outdoor oasis into a scene straight out of a home and garden magazine? So go forth, my fellow awning enthusiasts, and embrace the power of fabric rejuvenation. Your patio, deck, or porch will thank you, and you’ll be the talk of the town (or at least the block).
And hey, if all else fails, you can always use the old fabric as a picnic blanket or a makeshift superhero cape. After all, any fabric that has served you faithfully for years deserves a chance at a second life, even if it’s just as an accessory for your next adventure. So, let the fabric replacement begin, and may your awning always be a shining beacon of style, comfort, and, of course, excellent shade.
“
FAQs
How do I replace the fabric on my awning?
To replace the fabric on your awning, start by removing the old fabric and taking measurements. Then, purchase a new fabric of the appropriate size and material. Next, install the new fabric by attaching it to the awning frame using screws or other fasteners. Finally, make any necessary adjustments or tension adjustments to ensure the fabric is properly secured and aligned.
What tools do I need to replace the fabric on my awning?
The tools you may need to replace the fabric on your awning include a screwdriver, measuring tape, scissors or a utility knife, a drill or power screwdriver, and possibly a ladder or step stool depending on the height of your awning.
How often should I replace the fabric on my awning?
The frequency of fabric replacement for awnings can vary depending on factors such as weather conditions, usage, and the quality of the fabric. However, on average, awning fabric may need to be replaced every 7-10 years.
Can I replace the fabric on my awning myself, or should I hire a professional?
If you have basic handyman skills and are comfortable working with tools, you can likely replace the fabric on your awning yourself. However, if you are unsure or have a complex awning system, it may be best to hire a professional to ensure proper installation and avoid any potential damage.
What should I consider when choosing new fabric for my awning?
When choosing new fabric for your awning, consider factors such as durability, sun and weather resistance, color and pattern options, and ease of maintenance. Additionally, check if the fabric is specifically designed for awnings and if it has any warranty or guarantee.
Can I wash or clean the fabric on my awning?
In most cases, fabric awnings can be washed and cleaned. However, it is important to follow the manufacturer’s instructions and use appropriate cleaning products and methods. Avoid using harsh chemicals, abrasive brushes, or high-pressure washers, as these can damage the fabric.
How do I maintain the fabric on my awning to prolong its lifespan?
To prolong the lifespan of the fabric on your awning, it is important to perform regular maintenance. This includes cleaning the fabric, inspecting for any tears or damage, making necessary repairs, and ensuring proper tension and alignment. Additionally, consider using protective treatments or coatings to enhance the fabric’s resistance to UV rays and weather elements.