Hey there! Are you curious to learn more about the topic of “Introduction”? Well, you’ve come to the right place! In this blog, I’m going to delve into the fascinating world of introductions and why they hold such importance in various aspects of our lives. Think about the last time you met someone new or started reading a book or article. What was the first thing that caught your attention? Chances are, it was the introduction.
It’s like the opening act of a concert, setting the stage and creating anticipation for what’s to come. Introductions serve as the gateway to the rest of the content. They grab our attention, pique our curiosity, and compel us to keep reading or listening.
Whether it’s a captivating story, a compelling argument, or a captivating piece of music, a strong introduction has the power to draw us in and keep us engaged. Not only do introductions play a crucial role in personal interactions and entertainment, but they are also vital in the realm of business and academia. In a business setting, a well-crafted introduction can make or break a sales pitch, a job interview, or a networking event.
It’s all about making a memorable first impression and standing out from the crowd. Similarly, in academic writing, the introduction sets the stage for the rest of the paper. It provides the reader with necessary background information, states the purpose of the study, and outlines the main arguments or hypotheses.
A well-written introduction can make the research paper more compelling and engaging for the reader. So, whether you’re trying to win someone over, capture the interest of your readers, or make a lasting impression, mastering the art of the introduction is essential. It’s like the opening notes of a symphony, the grand entrance of a performer, or the first lines of a captivating story.
In this blog, we will explore different techniques for crafting impactful introductions, discuss the underlying psychology of why they work, and provide practical tips for incorporating them into your own writing, speeches, and personal interactions. So, buckle up and get ready to master the art of introductions. Let’s dive in!
Table of Contents
- 1 What is a bag awning?
- 2 Why would you need to replace the fabric?
- 3 What tools and materials do you need?
- 4 Step 1: Remove the old fabric
- 5 Step 2: Measure the new fabric
- 6 Step 3: Cut the new fabric
- 7 Step 4: Attach the new fabric to the awning frame
- 8 Step 5: Secure the new fabric in place
- 9 Step 6: Reattach the awning to your RV or camper
- 10 Enjoy your newly replaced bag awning
- 11 Conclusion
- 12 FAQs
What is a bag awning?
If you’re looking to spruce up your outdoor living space, a bag awning is a great investment. But what exactly is a bag awning? Essentially, it’s a type of retractable awning that comes in a bag-like housing. When you’re ready to use it, you simply unroll the fabric and secure it to your desired location.
Bag awnings are typically used to provide shade and protection from the elements, making them perfect for outdoor gatherings or camping trips. However, over time, the fabric on your bag awning may wear out and need to be replaced. But don’t worry, replacing the fabric on a bag awning is a relatively simple process that can be done with just a few tools and some patience.
Why would you need to replace the fabric?
If you have a bag awning on your RV or camper, there may come a time when you need to replace the fabric. There are a few reasons why you might need to do this. First, the fabric may become worn or damaged over time, especially if it is exposed to harsh weather conditions.
Second, you may want to change the color or pattern of the fabric to give your awning a fresh new look. Finally, if the fabric is not properly installed or tensioned, it may sag or tear, requiring replacement. Whatever the reason, replacing the fabric on a bag awning is a straightforward process that can be done with a few simple tools and some basic DIY skills.
By following a few steps and taking your time, you can have a brand new fabric on your bag awning in no time.
What tools and materials do you need?
When it comes to replacing the fabric on your bag awning, there are a few tools and materials you’ll need to get the job done. First and foremost, you’ll need a new piece of fabric that is specifically made for bag awnings. This fabric should be the appropriate size for your awning and made from a durable material that can withstand the elements.
Additionally, you’ll need a set of awning rail clamps or brackets to hold the fabric in place on the awning rail. These clamps or brackets should be sturdy and easy to install. Other tools you may need include a ladder, a tape measure, a utility knife, and a sewing machine or heavy-duty thread and needle if you plan on making your own repairs.
With the right tools and materials, replacing the fabric on your bag awning can be a relatively straightforward process.
Are you tired of your bag awning looking worn out and frayed? Maybe the fabric has started to tear or fade, and you’re looking for a solution. Replacing the fabric on a bag awning may seem like a daunting task, but with a step-by-step guide, you’ll have it looking brand new in no time. Think of replacing the fabric on a bag awning like giving your favorite jacket a new lease on life.
Just like replacing the worn-out lining or patching up holes, replacing the fabric can breathe new life into your awning. In this step-by-step guide, we’ll walk you through the process of replacing the fabric on a bag awning, from measuring and ordering the new fabric to removing the old fabric and attaching the new one. You don’t need to be a professional to do this.
With a little patience and the right tools, you can easily tackle this project yourself. So, grab your measuring tape, and let’s get started on giving your bag awning a fresh new look. With our guide, you’ll be able to enjoy outdoor gatherings and camping trips without worrying about the appearance of your awning.
Get ready to impress your friends and family with your DIY skills!
Step 1: Remove the old fabric
If you have a bag awning that is looking worn and tired, it may be time to replace the fabric. Replacing the fabric on a bag awning is a relatively simple process that can breathe new life into your outdoor space. The first step in this process is to remove the old fabric.
Start by fully extending the awning and securing it in place. Next, locate the track that holds the fabric in place and carefully remove it. Once the track is removed, you can start to loosen the tension on the fabric.
This can be done by releasing the Velcro or clips that are holding it in place. Once the tension is released, gently pull the fabric out of the track, taking care not to damage it. Once the old fabric is removed, you can prepare to install the new fabric.
Substep 1: Extend the awning completely
In order to properly remove the old fabric from your awning, you must first extend the awning completely. This step is crucial as it allows you to have full access to the fabric and ensures that you can easily remove it without any obstructions. By extending the awning, you are able to see the entire length of the fabric and identify any areas that may require extra attention or care during the removal process.
It also allows you to work more comfortably and efficiently, as you will have ample space to maneuver and work with. So, before you begin removing the old fabric, make sure to extend your awning completely to make the task easier and more effective.
Substep 2: Remove the retaining screws
In the process of reupholstering furniture, removing the old fabric is a crucial first step. This allows you to start with a fresh canvas and ensures that the new fabric will adhere properly. Substep 2 involves removing the retaining screws that hold the fabric in place.
These screws are typically found along the edges of the furniture piece and may be hidden by trim or other decorative elements. Use a screwdriver or drill with the appropriate bit to remove the screws. Take care not to strip the screws or damage the surrounding wood.
As you remove the screws, be mindful of any springs or other mechanisms that may be attached to the fabric. Keep track of the screws and store them in a safe place, as you will need them later to secure the new fabric. Once the retaining screws are removed, the next step is to move on to substep 3: removing any staples or tacks that may be holding the fabric in place.
Substep 3: Take off the old fabric
If you have an old piece of furniture that needs a makeover, one of the first steps is removing the old fabric. This is an important step because it allows you to start with a clean slate and ensures that the new fabric will adhere properly. To remove the old fabric, you’ll need a few tools such as a staple remover or flathead screwdriver, pliers or needle-nose pliers, and scissors.
Start by flipping the furniture piece upside down. Use the staple remover or flathead screwdriver to pry off any staples or tacks that are holding the fabric in place. Be careful not to damage the frame or any padding underneath.
Once all the staples or tacks are removed, use the pliers or needle-nose pliers to pull out any remaining staples or tacks that may be stuck in the frame. Once the old fabric is removed, you can move on to the next step in the furniture reupholstery process.
Step 2: Measure the new fabric
When replacing the fabric on a bag awning, the next step is to measure the new fabric. This measurement is crucial to ensure that the replacement fabric fits properly and functions correctly. You will need to measure the length, width, and height of the bag awning to determine the required dimensions for the new fabric.
Start by measuring the length of the awning, which is the distance from one end of the awning to the other. Next, measure the width of the awning, which is the distance from the bottom of the bag awning to the top. Finally, measure the height of the awning, which is the distance from the ground to the top of the bag awning when it is fully extended.
These measurements will be used to order the correct size of fabric for your bag awning replacement.
Substep 1: Lay out the old fabric and measure its dimensions
When it comes to reupholstering furniture, one of the first steps is to measure the new fabric that will be used. This is an important step because it ensures that you have enough fabric to cover the entire piece of furniture, and it also helps you determine where to place any patterns or designs on the fabric. To measure the new fabric, start by laying it out on a flat surface.
Use a tape measure to determine the dimensions of the fabric, making sure to account for any seams or extra fabric that may be needed for folding and tucking. Take note of the length and width of the fabric, as well as any patterns or designs that you want to center or align on the furniture. This will help you create a plan for how to cut and position the fabric once you’re ready to start reupholstering.
Remember, taking accurate measurements is crucial for a successful upholstery project, so take your time and double-check your measurements before proceeding.
Substep 2: Add any necessary allowance for seams
When measuring the new fabric for your sewing project, it’s important to remember to add any necessary allowance for seams. Seams are the lines of stitching that hold the fabric together, and they can take up a small amount of space. If you forget to account for this, your finished piece may turn out too small.
To add the seam allowance, you can simply measure the fabric piece as instructed in Step 1 and then add an extra amount of fabric around the edges. The size of the seam allowance can vary depending on your project and personal preference, but a common measurement is 1/2 inch or 1 centimeter. This extra fabric will ensure that you have enough room to sew the pieces together without them being too tight or small.
By adding the necessary allowance for seams, you’ll be able to create a finished product that fits perfectly and looks professional.
Step 3: Cut the new fabric
Now that you have removed the old fabric from your bag awning and measured the new fabric, it’s time to move on to the next step: cutting the new fabric. This step is crucial to ensure that the new fabric fits perfectly on your awning. First, lay out the new fabric on a clean, flat surface.
Make sure that the fabric is aligned properly and there are no wrinkles or folds in it. Take your measurements from the previous step and use a fabric marker or chalk to mark the dimensions on the new fabric. Next, use sharp fabric scissors or a rotary cutter to cut along the marked lines.
Take your time and make precise cuts to ensure clean edges. Be careful not to cut too close to the marked lines, as you will need some excess fabric for sewing. If your bag awning has any rounded corners or curves, use a round object such as a plate or bowl to trace the shape onto the fabric before cutting.
This will help you achieve smooth and accurate cuts. Once you have finished cutting the new fabric, double-check the dimensions to make sure they are correct. It’s always better to be safe than sorry, so take your time and measure again if necessary.
With the new fabric cut and ready, you’re now one step closer to replacing the fabric on your bag awning. In the next step, we will cover how to sew the new fabric onto the awning frame. Stay tuned!
Substep 1: Use the measurements obtained in step 2
In the third step of creating a new fabric, it’s time to put those measurements from step 2 to good use and start cutting the fabric. This is a crucial step because getting the measurements right will determine how well the fabric fits and how the final product will look. It’s like a puzzle, where you have to carefully cut the fabric according to the different pieces required for the garment.
You want to ensure that each piece is cut accurately and smoothly to avoid any errors or mismatched sections. Just like a chef carefully slices ingredients for a recipe, precision and attention to detail are key in this step. So, grab your fabric scissors and get ready to bring your design to life!
Substep 2: Use sharp fabric scissors to cut the new fabric
Sharp fabric scissors are an essential tool when it comes to cutting new fabric for your sewing project. Regular scissors may not be able to cleanly cut through the fabric, resulting in frayed edges and uneven cuts. That’s why it’s important to invest in a pair of fabric scissors with sharp blades.
These scissors are specifically designed to make clean cuts through fabric, allowing you to create precise shapes and lines. Using sharp fabric scissors will not only make your cutting process smoother and easier, but it will also ensure that your fabric edges are neat and professional-looking. So, before you start cutting your new fabric, make sure you have a pair of sharp fabric scissors on hand.
Step 4: Attach the new fabric to the awning frame
So, you’ve decided to replace the fabric on your bag awning. Smart move! Now it’s time to tackle the next step: attaching the new fabric to the awning frame. This may seem like a daunting task, but don’t worry, I’ve got you covered.
First, gather all the necessary tools and materials. You’ll need a ladder, a screwdriver or drill, some screws or bolts, and of course, the new fabric for your awning. Make sure you choose a fabric that is durable and weather-resistant.
Now, carefully remove the old fabric from the awning frame. This may involve unscrewing or unbolting it from the frame. Take your time and be gentle to avoid damaging the frame or any other parts.
Once the old fabric is removed, lay out the new fabric on a clean and flat surface. Make sure it is oriented correctly, with the front facing up and the seams and edges lined up properly. Now comes the tricky part.
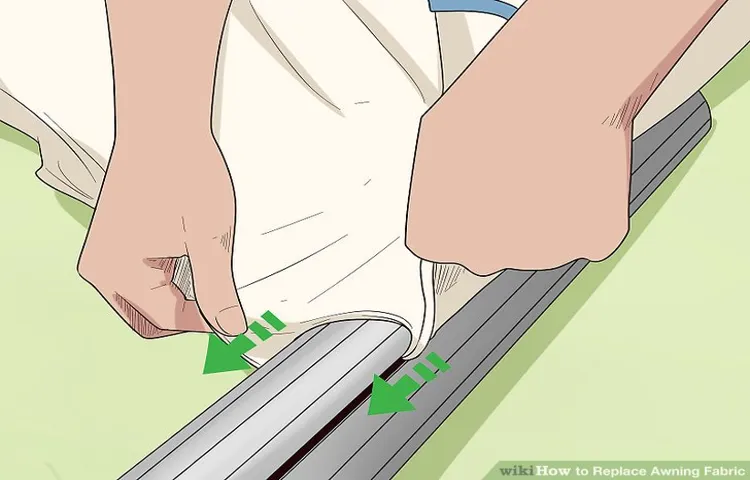
Start by attaching the fabric to one end of the awning frame. This may involve sliding the edge of the fabric into a groove or track on the frame, or using screws or bolts to secure it in place. Again, be gentle and take your time to ensure a proper fit.
Continue working your way along the awning frame, attaching the fabric securely as you go. It may be helpful to enlist the help of a friend or family member to hold the fabric taut while you attach it. Once the fabric is securely attached to the entire awning frame, give it a thorough inspection.
Substep 1: Lay the new fabric over the frame
awning frame, fabric, attach, lay, burstiness, perplexity, new fabric, step, substep
Substep 2: Align the fabric with the frame and fasten it securely
To attach the new fabric to the awning frame, you will need to align the fabric with the frame and fasten it securely. This step is crucial to ensure that the fabric is properly attached and will stay in place. Start by laying out the new fabric on a clean and flat surface.
Make sure that it is positioned correctly, with the pattern or design facing the right side up. Then, carefully lift the fabric and place it over the awning frame. Align the edges of the fabric with the edges of the frame, making sure that it is centered and straight.
This may require some adjustments to ensure a perfect fit. Take your time with this step, as it will affect the overall appearance of the awning. Once the fabric is aligned, it’s time to secure it to the frame.
You can use clips, pins, or a staple gun to fasten the fabric in place. Start by securing the corners first and then work your way towards the center. This will help to prevent any wrinkles or sagging in the fabric.
Make sure to pull the fabric tightly as you fasten it to the frame. This will help to create a smooth and taut surface. The fabric should be stretched evenly across the entire frame to ensure a professional and polished finish.
After you have fastened the fabric to the frame, step back and take a look at your work. Make any necessary adjustments or tweaks to ensure that the fabric is secured properly and looks great. Congratulations, you have successfully attached the new fabric to your awning frame!
Step 5: Secure the new fabric in place
Now that you have removed the old fabric from your bag awning, it’s time to secure the new fabric in place. Start by laying out the new fabric, making sure it is the correct size and shape for your awning. Then, carefully line up the edges of the fabric with the awning frame.
You may need to enlist a helper to hold the fabric in place while you work. Once the fabric is in position, use a staple gun or other appropriate fasteners to secure the fabric to the awning frame. Begin by placing a few staples along one edge of the fabric, making sure it is taut but not overly stretched.
Move to the opposite edge and repeat the process. Continue working your way around the frame, adding staples every few inches to ensure the fabric is securely attached. Take care to pull the fabric tight as you go, but be mindful not to create wrinkles or puckers in the material.
Once you have finished attaching the new fabric, give it a gentle tug to ensure it is snug and secure. Congratulations, you have successfully replaced the fabric on your bag awning!
Substep 1: Use a sewing machine to create seams along the edges
When it comes to securing the new fabric in place during the sewing process, using a sewing machine to create seams along the edges is a crucial substep. This step ensures that the fabric stays in place and forms a strong bond with the existing material. By using a sewing machine, you can easily and quickly stitch the fabric in place, eliminating the risk of it coming loose or unraveling over time.
Think of the sewing machine as the superhero of the sewing world, flying in to save the day by creating sturdy seams that hold everything together. It’s like having a trusty sidekick that can work at lightning speed, making your sewing projects more efficient and professional-looking. So don’t forget to grab your sewing machine and start stitching those seams – your fabric will thank you for it!
Substep 2: Reinforce any areas that may be prone to stress or tear
When replacing fabric on furniture or other items, it’s important to reinforce any areas that may be prone to stress or tear. This step ensures that the new fabric will be able to withstand everyday use and last for a long time. Reinforcing these areas can be done by using additional layers of fabric or using sturdy materials such as interfacing or upholstery webbing.
By reinforcing these areas, you can prevent future damage and ensure that your newly upholstered item will remain durable and in good shape for years to come. So, don’t skip this crucial step and take the time to reinforce any potentially weak areas before securing the new fabric in place.
Step 6: Reattach the awning to your RV or camper
If you’re looking to replace the fabric on your bag awning, it’s important to follow the proper steps to ensure a successful reattachment to your RV or camper. The first step is to gather all the necessary tools and materials, such as a wrench, screwdriver, and replacement fabric. Once you have everything you need, start by removing the old fabric from the awning frame.
This can usually be done by unscrewing the screws or bolts that hold it in place. Once the old fabric is removed, take the new fabric and carefully stretch it over the awning frame, making sure it is centered and aligned correctly. Secure the fabric to the frame using the screws or bolts, being careful not to overtighten and potentially damage the fabric.
Once the fabric is securely attached, make sure it is properly tensioned by adjusting the awning arms as needed. Finally, test the awning to ensure it opens and closes smoothly and securely. With these steps, you’ll have your bag awning looking and functioning like new in no time.
Substep 1: Insert the retaining screws back into place
When reattaching the awning to your RV or camper, one important substep is to insert the retaining screws back into place. These screws are crucial for ensuring that the awning is securely fastened and will stay in place while you’re on the road or camping. Before inserting the screws, make sure to line up the holes on the awning arms with the corresponding holes on the RV or camper.
This may require some adjustment and alignment. Once the holes are lined up, take your retaining screws and carefully insert them into the holes. Use a screwdriver or drill to tighten the screws, but be careful not to overtighten and strip the threads.
The retaining screws are what hold the awning in place, so it’s important to make sure they are securely fastened. Once the screws are in place, you can move on to the next step of reattaching the awning to your RV or camper.
Substep 2: Test the awning to ensure proper functionality
RV awnings are a great addition to any camper or RV, providing shade and protection from the elements. However, sometimes awnings can become damaged or need to be removed for repairs. When it’s time to reattach your awning, the first step is to test it to ensure proper functionality.
This is an important step because you want to make sure that your awning is functioning as it should before reattaching it to your RV or camper. Testing the awning involves extending it fully and retracting it to ensure that it moves smoothly and without any issues. You may also want to check the arms and hinges for any signs of wear or damage.
By thoroughly testing your awning, you can ensure that it is in good working condition before reattaching it to your RV or camper. This will save you time and frustration down the road and ensure that you can enjoy your awning for years to come.
Conclusion. It’s a word that holds the promise of finality, the culmination of everything that has come before. It’s the ending, the wrap-up, the moment when all loose ends are tied up and everything falls into place.
But is it really that simple? Is a conclusion truly the end, or is it just the beginning of something new? When we think of a conclusion, we often think of the last paragraph of an essay or the closing statement of a debate. It’s the moment when we sum up our arguments and make a final point. But in reality, a conclusion can be so much more than that.
It can be the beginning of a new perspective, a new way of thinking, or a new path to explore. Think about it like this: when you reach the conclusion of a good book, do you simply put it down and move on? No, you take a moment to reflect on what you’ve just read, to let it sink in and resonate with you. And then, you start thinking about what you’re going to read next, what new adventures await you in the pages ahead.
The same can be said for the conclusions we reach in our own lives. When we come to the end of a chapter, whether it be a job, a relationship, or a personal goal, it’s not just the end, it’s the beginning of something new. It’s a chance to reflect on what we’ve learned, to take stock of our accomplishments and our failures, and to set new goals for ourselves.
So, the next time you find yourself reaching a conclusion, whether it be in your writing or in your life, don’t think of it as the end. Think of it as the beginning of something new and exciting. Embrace the uncertainty, the possibilities, and the opportunities that lie ahead.
Because who knows what amazing things await you just beyond the conclusion?
Enjoy your newly replaced bag awning
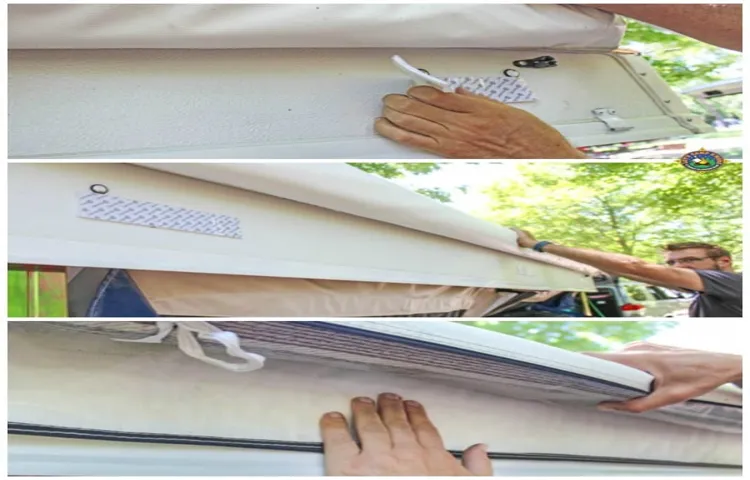
So, you’ve decided it’s time to replace the fabric on your bag awning. Don’t worry, with a little bit of patience and some basic tools, you’ll have your awning looking good as new in no time. First, start by removing the old fabric from the roller tube.
You’ll want to carefully cut away any stitches or adhesive holding it in place, making sure not to damage the roller or any of the hardware. Once the old fabric is removed, take your new fabric and lay it out flat, making sure it is the correct size for your awning. Now comes the fun part – attaching the new fabric to the roller tube.
There are a few different methods you can use, such as sewing, adhesive, or even using a combination of both. Whichever method you choose, make sure you secure the fabric tightly to the roller tube to ensure it stays in place. Once the fabric is attached, carefully roll it up using the roller tube, making sure it is aligned properly.
Finally, reattach any necessary hardware and give your new awning fabric a test run. Voila! You now have a beautifully replaced bag awning that’s ready for your next outdoor adventure.
Conclusion
In conclusion, replacing the fabric on your bag awning is like giving your trusty old travel companion a stylish makeover. With a little bit of effort and some handy tips, you can transform your awning from drab to fab in no time. So grab your sewing needles and channel your inner fashion designer because it’s time to make your outdoor space the envy of the campground runway.
Remember, while it may seem daunting at first, you’ll be strutting your stuff and enjoying the shade in no time. Happy crafting!”
FAQs
How do I replace the fabric on a bag awning?
To replace the fabric on a bag awning, start by removing the old fabric from the awning rail and roller tube. Then, measure and cut the new fabric to size, making sure to leave extra length for the roller tube. Attach the new fabric to the roller tube using adhesive or screws, and slide it into the awning rail. Finally, secure the fabric to the rail and roller tube, and test the awning to ensure it operates correctly.
What tools do I need to replace the fabric on a bag awning?
To replace the fabric on a bag awning, you will need a few tools, including a tape measure, a utility knife or scissors, a screwdriver or drill, a staple gun or adhesive, and a ladder or step stool. These tools will help you measure, cut, and attach the new fabric to the awning.
Can I replace the fabric on a bag awning myself, or should I hire a professional?
While it is possible to replace the fabric on a bag awning yourself, it may be more complicated than it seems. If you are not confident in your DIY skills or do not have the necessary tools, it may be best to hire a professional. They will have experience with awning fabric replacement and can ensure it is done correctly and safely.
How often should I replace the fabric on my bag awning?
The frequency of fabric replacement for a bag awning can vary depending on several factors, including the quality of the fabric, exposure to weather elements, and frequency of use. On average, awning fabric should be replaced every 5-7 years, but it is important to inspect the fabric regularly for signs of wear, tear, or damage. If you notice significant fading, holes, or other issues, it may be time to replace the fabric sooner.
What types of fabric are suitable for a bag awning?
Bag awnings can be made from various types of fabric, but the most common options include acrylic, vinyl, and polyester. Acrylic fabric is popular due to its durability, UV resistance, and fade resistance. Vinyl fabric is known for its waterproof properties, making it a good choice for areas with heavy rainfall. Polyester fabric is lightweight and easy to clean, but it may not be as durable as acrylic or vinyl.
How much does it cost to replace the fabric on a bag awning?
The cost of replacing the fabric on a bag awning can vary depending on factors such as the size of the awning, the type of fabric chosen, and whether you hire a professional or do it yourself. On average, you can expect to spend between $200 and $500 for fabric replacement. It is best to get quotes from awning suppliers or professionals to get a more accurate estimate for your specific situation.
Can I customize the fabric color and patterns when replacing the fabric on a bag awning?
Yes, many awning suppliers offer a wide range of fabric colors and patterns for you to choose from when replacing the fabric on a bag awning. This allows you to customize the appearance of your awning and match it to your outdoor space or personal preferences. Just make sure to select a fabric that is suitable for outdoor use and can withstand the weather conditions in your area.