Are you tired of seeing your camper awning in a sorry state, with faded and torn fabric that is barely holding on? Well, fear not, because I’m here to show you how to replace the fabric on your camper awning and breathe new life into your outdoor space! Your awning is like the cherry on top of your camper, providing shelter and shade from the sun while adding a touch of style to your outdoor living area. But over time, the fabric can become worn out, damaged, or simply outdated. Replacing the fabric on your camper awning may seem like a daunting task, but with the right tools and a little bit of know-how, it can actually be a fun and rewarding DIY project.
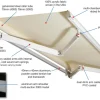
Plus, it can save you a significant amount of money compared to hiring a professional. So, how do you get started? First, you’ll need to measure the dimensions of your awning to ensure you order the correct size fabric. This can be done by simply measuring the length of the roller tube and the distance from the roller tube to the ground.
Once you have the measurements, it’s time to choose the new fabric. There are a wide variety of options available, ranging from durable vinyl to stylish and breathable acrylic materials. Consider factors such as weather resistance, ease of cleaning, and aesthetics when making your selection.
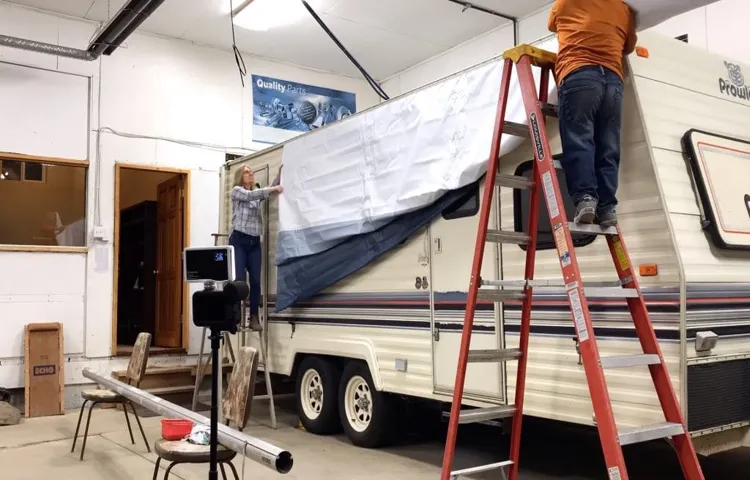
Next, you’ll need to remove the old fabric from your awning. This typically involves detaching it from the roller tube and carefully unthreading it from the awning arms. It can be a bit tricky, but with some patience and perhaps an extra set of hands, you’ll get the hang of it.
After removing the old fabric, it’s a good idea to give the awning frame a thorough cleaning and inspection. This is the perfect time to tighten any loose screws or replace any worn-out hardware. Now, it’s time to install the new fabric.
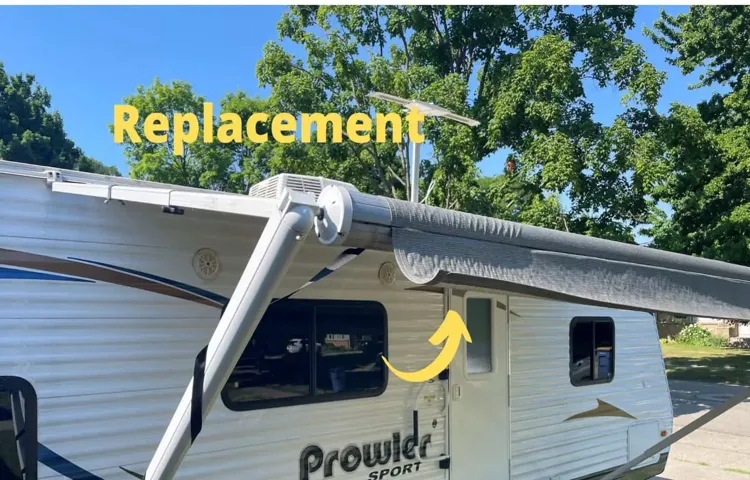
Start by attaching it to the roller tube, making sure it is properly aligned and centered. Then, carefully thread it through the awning arms, ensuring it is taut and free from wrinkles or folds. Lastly, secure the new fabric to the awning arms and roller tube using the appropriate screws or fasteners.
Table of Contents
Introduction
Are you tired of looking at your worn-out camper awning fabric? If so, you’re in the right place! In this blog post, we will guide you on how to replace the fabric on your camper awning. Camping is a great way to disconnect from the daily routine and reconnect with nature. However, over time, your camper’s awning fabric may start to deteriorate due to constant exposure to the elements.
This can make your camping experience less enjoyable and even cause damage to your RV. But don’t worry, replacing the fabric on your camper awning is easier than you might think. So let’s get started and give your camper a fresh new look!
Why Replace Your Camper Awning Fabric?
camper awning fabric, replace camper awning fabric Introduction: Picture this: you’re out on a camping trip, enjoying the great outdoors, and you decide to set up your camper awning for some much-needed shade. But, to your surprise, you find that the fabric is worn out, torn, or faded. What do you do? Well, it’s time to replace your camper awning fabric.
In this blog post, we’ll explore the reasons why it’s essential to replace your camper awning fabric and how it can enhance your camping experience. So, let’s dive in and discover why investing in a new camper awning fabric is well worth it.
Tools and Materials Needed
When it comes to replacing the fabric on your camper awning, there are a few tools and materials that you will need to get the job done. First and foremost, you will need the new fabric for your awning. Make sure to measure your current fabric to ensure you purchase the correct size.
In addition to the fabric, you will also need a ladder to reach your awning and a screwdriver to remove any screws that are holding the old fabric in place. Depending on your awning, you may also need a drill and some brackets to secure the new fabric properly. Finally, a helper or two can make the job much easier, as they can hold the awning steady while you work on replacing the fabric.
With these tools and materials on hand, you’ll be ready to tackle the project of replacing your camper awning fabric.
List of Required Tools
List of Required Tools When it comes to tackling a DIY project, having the right tools and materials is essential. Before you begin, it’s important to make sure you have everything you need on hand. Here’s a list of required tools and materials to get you started:
Power tools: Depending on the project, you may need a variety of power tools such as a drill, saw, or sander. These tools can help make your job easier and more efficient.
Hand tools: Alongside power tools, hand tools are also important for completing DIY tasks. Common hand tools include a hammer, screwdrivers, pliers, and wrenches. These tools are essential for tasks that require a more delicate touch or where power tools may not be suitable.
Measuring tools: Accuracy is key when it comes to DIY projects, so having measuring tools is crucial. This includes tools such as a tape measure, level, and square.
These tools will ensure that your project is properly aligned and sized. Safety equipment: Safety should always be a priority when working on any project.
Make sure you have personal protective equipment such as safety goggles, gloves, and a dust mask. Depending on the project, you may also need ear protection or a helmet.
Choosing the Right Fabric
When it comes to choosing the right fabric for your project, there are a few tools and materials that you’ll need to have on hand. One of the most important tools is a fabric sample chart. This chart will allow you to compare different types of fabric side by side, so you can see how they look and feel.
It’s important to remember that different fabrics have different properties, so it’s a good idea to do some research before you start shopping. For example, if you’re looking for a fabric that’s durable and easy to clean, you might want to consider a polyester blend. On the other hand, if you’re looking for a fabric that’s soft and cozy, a cotton or flannel might be a better choice.
Once you’ve decided on the type of fabric you want, you’ll need to gather some materials. Basic sewing supplies like needles, thread, and scissors are essential, as well as a sewing machine if you have one. It’s also a good idea to have some measuring tools on hand, like a tape measure and a ruler.
With these tools and materials, you’ll be well-prepared to select the perfect fabric for your project.
Step-by-Step Guide
If you’re looking to replace the fabric on your camper awning, don’t worry – it’s easier than you might think! Follow these simple steps, and you’ll have a brand new awning in no time. First, gather all the necessary tools and materials, including a replacement fabric, a ladder, a screwdriver, and a helper. Once you have everything you need, start by retracting your awning and removing any accessories or attachments.
Next, carefully remove the old fabric by unscrewing it from the roller tube and removing any screws or fasteners. Make sure to keep track of all the hardware you remove, as you’ll need it later. Once the old fabric is off, lay it out flat and use it as a template to cut the new fabric to size.
Align the new fabric with the roller tube, making sure it’s centered and straight, and then secure it using the screws and fasteners you removed earlier. Finally, test the awning to make sure it retracts and extends smoothly, and then reattach any accessories or attachments. With a little patience and some basic tools, you’ll have a beautiful new awning that will enhance your camping experience.
Step 1: Prepare Your Workspace
The first step in any project is to prepare your workspace. This is an important starting point because it sets the foundation for the work that is to come. So, how do you go about preparing your workspace? Well, first, you want to make sure you have all the necessary tools and materials readily available.
This could include things like a computer, notebooks, pens, and any other tools specific to your project. Next, you want to ensure that your workspace is clean and organized. Clear away any clutter and make sure everything is in its proper place.
This will not only help you stay focused but will also make it easier to find what you need when you need it. Lastly, make sure your workspace is comfortable. Find a chair that supports good posture and make sure you have adequate lighting.
Creating a workspace that is both functional and comfortable will set you up for success in your project. So, take the time to prepare your workspace before diving into your work, and you’ll be off to a great start.
Step 2: Remove the Old Fabric
When it comes to reupholstering a piece of furniture, the first step is to remove the old fabric. This can be a bit time-consuming and requires some patience, but it’s an important step in the process. To start, you’ll need to gather a few supplies, including a pair of sharp scissors, a staple remover, and a screwdriver.
Begin by removing any cushions or pillows from the furniture and set them aside. Then, use the screwdriver to loosen and remove any screws or staples holding the old fabric in place. Once the fasteners are removed, carefully peel back the old fabric, taking care not to tear or damage it.
In some cases, the fabric may be glued or stapled to the furniture, so you may need to use the staple remover or scissors to carefully detach it. Once the old fabric is removed, you’ll be left with a blank canvas ready for the next step in the reupholstering process.
Step 3: Measure and Cut the New Fabric
“Step 3: Measure and Cut the New Fabric” Once you have chosen the perfect fabric for your DIY project, it’s time to tackle the next step: measuring and cutting the fabric. This step is crucial to ensure that your fabric fits perfectly and looks professional. Start by measuring the dimensions of the area where you will be placing the fabric.
Use a measuring tape to get accurate measurements of both the height and width of the space. It’s important to measure twice to avoid any mistakes. Next, lay out your fabric on a flat surface.
Make sure there are no wrinkles or folds that could compromise your measurements. Use a straight edge, such as a ruler or a yardstick, to mark the dimensions of your fabric. Before you make any cuts, double-check your measurements to ensure accuracy.
Once you are confident in your measurements, use sharp fabric scissors to cut along the marked lines. It’s important to make clean, straight cuts to achieve a professional-looking finish. If you are working with a patterned fabric, make sure to align the pattern correctly before cutting.
This will ensure that the design remains consistent once the fabric is in place. Remember, measuring and cutting fabric requires precision and attention to detail. Take your time and make sure to double-check your measurements before making any cuts.
With the right tools and careful execution, you’ll be ready to move on to the next step in your DIY project.
Step 4: Preparations for Installation
Step 4 of the installation process involves making all the necessary preparations before actually installing the product. This step is crucial as it ensures that everything is in place and ready for the installation to go smoothly. One of the first things you’ll need to do is gather all the tools and materials you’ll need for the installation.
This may include things like screws, nails, a power drill, and any other specialized tools that may be required. Once you have everything you need, it’s important to organize them in a way that is easily accessible. This will save you time and prevent any frustration during the installation process.
Additionally, you should take the time to clear the area where the installation will take place. Remove any furniture or obstacles that may get in the way and create a clear, open space for the installation to take place. By taking these simple steps, you’ll be well-prepared for the installation and ensure that everything goes smoothly.
Step 5: Install the New Fabric
Installing new fabric is the final step in giving your home or space a fresh, updated look. But where do you start? Don’t worry, we’ve got you covered with this step-by-step guide. First, you’ll want to measure your windows to ensure you have the correct amount of fabric.
Remember to include a few extra inches for hemming and folding. Next, remove the old fabric and any hardware or brackets that may be in the way. This is also a good time to clean the windows and surrounding areas.
Once you have a clean slate, it’s time to cut your new fabric to size. Lay it out and carefully measure and cut using scissors or a rotary cutter. Now comes the fun part – attaching the new fabric.
Start by positioning the fabric on the window, making sure it’s centered and level. Use a staple gun or fabric glue to secure the fabric in place. If you’re using a staple gun, be sure to staple along the edges and at regular intervals to ensure a secure fit.
Finally, reattach any hardware or brackets that you removed earlier and admire your handiwork. Your new fabric will breathe new life into your space and give it a fresh, updated look. So go ahead, take the leap and install that new fabric – you won’t be disappointed!
Tips and Tricks
If your camper awning is starting to show signs of wear and tear, it may be time to replace the fabric. Thankfully, replacing the fabric on a camper awning is a relatively simple task that can be done on your own with a few tools and a bit of patience. First, you’ll need to remove the old fabric from the awning rails.
This can usually be done by removing the screws or bolts that hold it in place. Once the old fabric is removed, you can begin measuring and cutting your new fabric to size. Make sure to leave a few extra inches on each end for hemming.
After cutting the fabric, you’ll need to hem the edges to prevent fraying. This can be done using a sewing machine or by hand stitching. Once the fabric is hemmed, you can then reattach it to the awning rails using the same screws or bolts that you removed.
With a little bit of time and effort, you can have your camper awning looking as good as new again. So don’t let a worn-out fabric ruin your camping experience – replace it yourself and get back to enjoying the great outdoors!
Properly Maintaining Your Camper Awning
Properly maintaining your camper awning is essential for ensuring its longevity and functionality during your outdoor adventures. Here are some tips and tricks to help you keep your camper awning in top shape. First and foremost, it’s important to regularly clean your awning to prevent the buildup of dirt, grime, and mildew.
Start by hosing down the awning with water to remove any loose debris. Then, use a mild detergent or soap specifically designed for outdoor fabrics to gently scrub the awning. Rinse thoroughly and allow it to fully air dry before rolling it back up.
In addition to cleaning, it’s crucial to inspect your awning for any signs of damage or wear and tear. Look for tears, holes, or loose stitching that may need to be repaired. If you notice any issues, it’s best to address them promptly before they worsen and potentially lead to further damage.
Regularly lubricating the moving parts of your awning is another important maintenance step. This includes the roller tube, hinges, and arms. Use a silicone-based lubricant or spray to keep these parts running smoothly and prevent rust or corrosion.
When it comes to retracting and extending your awning, it’s important to do so with care. Avoid pulling or jerking on the awning, as this can strain the mechanism and potentially cause damage. Instead, use a slow and steady motion to roll or unroll the awning.
During periods of inclement weather or when you’re not using your camper, it’s wise to retract your awning to protect it from potential damage. Strong winds, heavy rain, and snow can all put unnecessary stress on your awning, so it’s best to err on the side of caution and keep it rolled up when not in use. By following these tips and tricks, you can ensure that your camper awning remains in the best possible condition, providing you with shade and shelter for many adventures to come.
Avoiding Common Mistakes
“avoiding common mistakes” Tips and Tricks for Avoiding Common Mistakes Making mistakes is a natural part of life, but when it comes to certain situations, we want to do our best to avoid them. Whether it’s in our personal or professional lives, avoiding common mistakes can save us time, money, and a whole lot of hassle. So, what can we do to minimize the chance of making mistakes? Here are some tips and tricks to help you steer clear of common pitfalls.
First and foremost, it’s essential to learn from the mistakes of others. By studying the experiences of those who have gone before us, we can gain valuable insights and avoid making the same blunders. This could involve reading books, attending seminars or workshops, or even just having conversations with people in similar situations.
When we have access to the wisdom and knowledge of others, it would be foolish not to take advantage of it. Secondly, it’s crucial to plan ahead and anticipate potential problems. By thinking through various scenarios and identifying potential pitfalls, we can be better prepared to handle any challenges that may arise.
It’s like planning for a long road trip – you want to make sure you have a spare tire, jumper cables, and a map, just in case something goes wrong. Similarly, by being proactive and considering all possible outcomes, we can avoid the headache of dealing with unexpected issues. Another important aspect of avoiding common mistakes is to seek feedback from others.
Oftentimes, we can become so engrossed in our own thoughts and ideas that we fail to see potential flaws in our plans. By bouncing ideas off of others and inviting feedback, we can gain valuable perspectives and identify blind spots that we may have missed. This could involve seeking input from colleagues, mentors, or even friends and family.
Remember, two heads are often better than one when it comes to problem-solving. Lastly, it’s crucial to approach challenges with a growth mindset. Mistakes are inevitable, but it’s how we respond to them that truly matters.
Conclusion
And there you have it – a step-by-step guide on how to replace the fabric on your camper awning. Not only will this save you time and money, but you’ll also feel a sense of accomplishment knowing you tackled this DIY project like a pro. Plus, now you’ll have a personalized and stylish awning that’s sure to make your camper the envy of the campground.
So go ahead, grab your tools and get to work – it’s time to take your awning from drab to fab!”
FAQs
How often should I replace the fabric on my camper awning?
It is recommended to replace the fabric on your camper awning every 5 to 7 years to ensure its durability and functionality.
Can I replace the fabric on my camper awning myself?
Yes, it is possible to replace the fabric on your camper awning yourself by following the manufacturer’s instructions and using the right tools.
What tools do I need to replace the fabric on my camper awning?
To replace the fabric on your camper awning, you will typically need a ladder, a screwdriver, pliers, a tape measure, and a staple gun.
Can the fabric on my camper awning be repaired instead of replaced?
In some cases, minor damages to the fabric of a camper awning can be repaired. However, if the damage is extensive or the fabric is old and worn, it is usually more practical to replace it.
How much does it cost to replace the fabric on a camper awning?
The cost of replacing the fabric on a camper awning can vary depending on factors such as the size of the awning, the type of fabric chosen, and whether you hire a professional or do it yourself. On average, you can expect to spend between $200 and $600.
Are there different types of fabric to choose from when replacing a camper awning?
Yes, there are different types of fabric available for camper awnings, including vinyl, acrylic, and polyester. Each type has its own pros and cons, so it’s important to choose one that suits your needs and preferences.
How long does it take to replace the fabric on a camper awning?
The time it takes to replace the fabric on a camper awning can vary depending on factors such as your level of experience, the size of the awning, and the complexity of the installation. On average, it can take anywhere from a few hours to a full day.