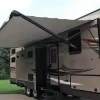
Looking to upgrade the lighting on your RV and enhance your outdoor experience? Replacing your RV awning LED light strip is a simple and effective way to achieve just that. Whether you’re looking to improve visibility at night or create a cozy ambiance while camping, a new LED light strip can make a world of difference. In this blog post, we will walk you through the step-by-step process of replacing your RV awning LED light strip, so you can get back to enjoying your outdoor adventures in no time.
So, grab your tools and let’s get started!
Table of Contents
Introduction
Replacing the LED light strip on your RV awning can give it a fresh and vibrant look. Whether you want to upgrade to a different color or need to replace a faulty strip, the process is relatively simple. Start by removing the old light strip from the awning.
This may involve unscrewing or unclipping it, depending on the type of awning you have. Once the old strip is removed, measure the length and purchase a new LED light strip of the same size. Make sure to choose one that is specifically designed for outdoor use and is compatible with your awning’s power source.
Installing the new light strip is as easy as attaching it to the awning using the provided adhesive or clips. Finally, connect the strip to the power source, making sure to follow the manufacturer’s instructions. With a little bit of time and effort, you can transform your RV awning and enjoy a vibrant outdoor space on your travels.
Overview of RV Awning LED Light Strip Replacement
RV awning LED light strip replacement is a necessary task for anyone who wants to keep their outdoor space bright and enjoyable. These light strips are a popular addition to RV awnings, as they provide functional and decorative lighting. Unfortunately, like any other type of lighting, LED light strips can wear out over time and need to be replaced.
In this blog post, we will discuss the reasons why you might need to replace your RV awning LED light strip, the steps involved in the replacement process, and some tips for choosing a new light strip. So, if you’re ready to brighten up your RV’s outdoor space, let’s dive in and learn more about this important maintenance task!
Tools and Materials Needed
When it comes to replacing the LED light strip on your RV awning, there are a few tools and materials you will need to get the job done. First and foremost, you will need a replacement LED light strip. Make sure to measure the length of your current strip so you can purchase one that is the right size.
In addition to the replacement strip, you will also need a ladder or step stool to reach your awning, as well as a wire cutter or scissors to remove the old strip. To install the new strip, you will need a power source, such as a battery pack or a power adapter, and some adhesive or clips to secure the strip in place. It is also a good idea to have a friend or family member to help you with this project, as an extra set of hands can make things much easier.
By gathering these tools and materials before you start, you will be well-prepared to replace your RV awning LED light strip.
List of Tools
List of Tools and Materials Needed When it comes to completing any DIY project, having the right tools and materials is essential. Not only does it make the task easier, but it also ensures that you achieve the best results. So, what tools and materials should you have on hand? Let’s take a look at some of the essential ones.
First and foremost, a good set of basic hand tools is a must-have. This includes items like a hammer, screwdrivers (both flathead and Phillips), pliers, an adjustable wrench, and a tape measure. These tools will come in handy for everyday tasks like hanging pictures, assembling furniture, or fixing minor repairs around the house.
For more advanced projects, you may need power tools. A cordless drill is an excellent investment, as it can be used for a wide range of tasks, including drilling holes and driving screws. A jigsaw is another versatile tool that allows you to make curved cuts in different materials, such as wood or plastic.
Various measuring and marking tools are also essential. A level ensures that everything is perfectly straight, while a combination square helps you achieve accurate 90-degree angles. A chalk line is handy for marking long lines, and a stud finder will help you locate wall studs for secure mounting.
When it comes to materials, it’s always a good idea to have a stock of nails, screws, and other fasteners in different sizes. Adhesives, such as wood glue or super glue, are also good to have on hand for bonding materials together. Additionally, a range of sandpaper grits and paintbrushes will be needed for finishing touches and applying paint or stain.
Lastly, don’t forget about safety equipment. Always wear safety goggles when using power tools or handling materials that may produce flying debris. Gloves and a dust mask will also protect your hands and lungs from harm.
List of Materials
Tools and Materials Needed for Your DIY Project Before starting any DIY project, it’s important to gather the necessary tools and materials. Having everything you need at hand not only saves you time and effort but also ensures that your project goes smoothly. Whether you’re tackling a small home improvement task or embarking on a major renovation, here’s a list of essential tools and materials you’ll need.
Measuring Tools: A good tape measure, ruler, and level are crucial for accurate measurements and straight lines.
Hand Tools: A basic toolkit should include a screwdriver set with different sizes and types, pliers, a hammer, utility knife, and a set of wrenches. Power Tools: Depending on your project, you may need power tools such as a drill, circular saw, jigsaw, or sander.
Make sure to have the appropriate bits and blades for each tool. Safety Gear: Always prioritize safety and wear gloves, safety glasses, and a dust mask when necessary.
If you’ll be working with loud tools, consider using ear protection as well. Fasteners and Adhesives: Stock up on various screws, nails, and bolts in different sizes.
Additionally, have a good quality adhesive such as wood glue or construction adhesive on hand. Paint and Painting Supplies: If your project involves painting, gather different brushes, rollers, paint trays, and painter’s tape.
Step-by-Step Instructions
If you’re looking to replace your RV awning LED light strip, don’t worry – it’s actually a relatively simple process. First, make sure you have the replacement LED light strip on hand. Next, locate the existing light strip on your RV awning.
It is usually attached to the underside of the awning fabric. Use a ladder or step stool to reach the light strip if necessary. Once you can access the light strip, carefully disconnect the power source.
This may involve unplugging a connector or removing screws that secure the strip in place. Take note of how the existing light strip is attached to the awning fabric, as you will use this as a guide when installing the new strip. Gently remove the old light strip from the awning, being careful not to damage the fabric.
Now it’s time to install the new LED light strip. Attach it to the awning fabric using the same method as the previous strip. Make sure it is securely fastened and straight.
Finally, reconnect the power source and test the new light strip to ensure it is working properly. With just a few simple steps, you can easily replace your RV awning LED light strip and enjoy a beautifully illuminated outdoor space.
Step 1: Prepare your RV
“prepare your RV” After the long wait, it’s finally time for that exciting road trip in your RV! But before you hit the open road, it’s important to properly prepare your RV to ensure a smooth and enjoyable journey. Follow these step-by-step instructions to get your RV ready for your adventure. First, start by cleaning both the interior and exterior of your RV.
Remove any dirt, dust, or debris and give it a thorough wipe down. This not only makes your RV look great, but it also helps you spot any potential issues that need to be addressed, such as loose screws or leaks. Next, check all the important systems in your RV.
Inspect the tires for any signs of wear or damage, and make sure they are properly inflated. Check all the fluid levels, including the oil, coolant, and brake fluid. Test the lights, windshield wipers, and horn to ensure they are all in working order.
Don’t forget about the mechanical components of your RV. Check the engine and generator, and make sure they are running smoothly. If you’re not confident in your mechanical abilities, it’s a good idea to have a professional inspect these components for you.
Once you’ve taken care of the basic maintenance, it’s time to pack your RV. Create a checklist of the essential items you’ll need for your trip, including food, water, bedding, and any necessary camping supplies. Don’t forget the tools and spare parts that may be needed for roadside repairs.
Finally, make sure your RV is properly stocked with safety equipment. This includes a fire extinguisher, first aid kit, and emergency road kit. It’s also a good idea to have a working carbon monoxide detector and smoke alarm onboard.
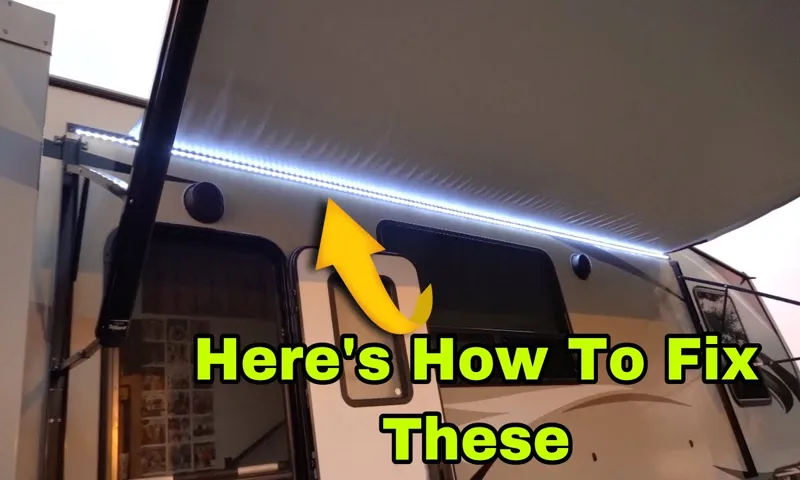
Step 2: Locate and access the awning LED light strip
Once you’ve gathered all the necessary materials, it’s time to locate and access the awning LED light strip. This step is crucial because it will determine where and how you install the lights. Start by examining your awning and looking for any existing wiring or electrical connections.
In some cases, the LED light strip may be pre-installed or hidden beneath a cover. If this is the case, carefully remove the cover by unscrewing any screws or clips holding it in place. Once you have access to the LED light strip, take a moment to familiarize yourself with the different components.
Look for the power source and any connectors or clips that will be used to secure the lights. By understanding how everything is laid out, you can proceed with the installation process confidently.
Step 3: Remove the old LED light strip
In this step, we will learn how to remove the old LED light strip. It’s an important step, as you need to carefully remove the existing strip before installing a new one. Here’s a step-by-step guide on how to do it.
Step 1: Switch off the power supply Before you start removing the old LED light strip, make sure to switch off the power supply to avoid any electrical mishaps. You don’t want to get electrocuted while working on it, so take this precautionary measure. Step 2: Remove the cover or casing Most LED light strips come with a cover or casing that needs to be removed before you can access the actual strip.
Gently remove the cover by loosening any screws or clips that may be holding it in place. Set the cover aside as you will need it later when installing the new strip. Step 3: Disconnect the wires Once the cover is removed, you will see the wires connecting the LED light strip to the power source.
Carefully disconnect the wires by loosening the screws or connectors that are holding them in place. Make sure to note down the arrangement of the wires so that you can connect them correctly when installing the new strip. Step 4: Remove the adhesive backing Most LED light strips come with an adhesive backing that allows you to stick them to the desired surface.
To remove the old strip, gently peel off the adhesive backing, starting from one end and working your way towards the other. Be careful not to damage the strip or the surface it is attached to. Step 5: Clean the surface After removing the old LED light strip, clean the surface thoroughly to remove any residue left behind by the adhesive.
You can use a mild detergent or rubbing alcohol to clean the surface and make it ready for the new strip. That’s it! You have successfully removed the old LED light strip. Now you can proceed to the next step, which is installing the new strip.
Step 4: Install the new LED light strip
“So you’ve chosen a new LED light strip to update your space and create a vibrant atmosphere. Now it’s time to install it and enjoy the benefits of energy-efficient and versatile lighting. Follow these step-by-step instructions to make the process smooth and hassle-free.
First, gather all the necessary tools, including a screwdriver, wire cutters, and electrical tape. Next, turn off the power to the area you’ll be working in by flipping the circuit breaker or unscrewing the fuse. Safety should always come first! Once the power is off, remove the existing light fixture by unscrewing the screws or clips holding it in place.
Carefully disconnect the wiring, taking note of which wires were connected where. Then, use the wire cutters to trim and strip the ends of the wires. Connect the corresponding wires of the new LED light strip to the existing wires, using wire nuts or electrical tape to secure the connections.
Double-check that all connections are tight and secure. Finally, test the new light strip by turning the power back on. If it illuminates, congratulations! You’ve successfully installed your new LED light strip.
“
Step 5: Test the new LED light strip
Once you’ve connected the LED light strip to the power supply and made sure everything is securely in place, it’s time to test the new lights! But how exactly do you do that? Don’t worry, I’ve got you covered with some step-by-step instructions. First, make sure the power supply is plugged in and turned on. You should see a small indicator light on the power supply itself, indicating that it’s receiving power.
If you don’t see this light, double-check your connections and make sure everything is properly connected. Next, take a look at the LED light strip itself. You should see a small controller attached to the strip, which allows you to control the settings and colors of the lights.
Make sure this controller is securely connected to the strip. Now, grab the remote control that came with your LED light strip. Point it at the controller and press the power button.
If everything is connected properly, you should see the lights turn on. At this point, you can start playing around with the different settings and colors. Use the buttons on the remote control to change the brightness, switch between different colors, or even set the lights to flash or fade.
Have fun experimenting with different settings to find the perfect ambiance for your space. If the lights don’t turn on or if they’re not working properly, double-check your connections and make sure everything is connected securely. It’s also worth checking the batteries in the remote control, as they may need to be replaced.
Once you’re satisfied with how the lights are working, you can step back and admire your handiwork. LED light strips are a great way to add some fun and ambiance to any space, and now you have the perfect setup to do just that. Enjoy your newly installed LED light strip!
Tips and Recommendations
If you need to replace the LED light strip on your RV awning, don’t worry, it’s a relatively straightforward process. First, you’ll want to gather the necessary tools: a ladder, a new LED light strip, and some adhesive or screws depending on how the original strip was attached. To begin, carefully remove the old LED light strip from the awning.
You may need to use a screwdriver or pry it off gently if it was screwed in place. Once the old strip is removed, clean the area thoroughly to ensure a good bond with the new strip. Next, measure the length of the awning to determine the correct length of the new LED light strip.
It’s important to choose a strip that is the appropriate size to avoid any gaps or overlap. You can usually find LED light strips at RV supply stores or online. Depending on the adhesive backing of the new strip, you can either peel off the protective layer and stick it directly onto the awning or use screws to secure it in place.
If using screws, make sure to pre-drill holes to prevent any damage to the awning. Once the new LED light strip is attached, test it to ensure it is working properly. If needed, you can use a 12-volt power source to check the lights before securing them permanently.
Finally, make sure to seal any exposed connections or wires with electrical tape or silicone to protect against water damage. This will help prolong the lifespan of your new LED light strip. Overall, replacing the LED light strip on your RV awning is a simple task that can easily be done with just a few tools and some careful measurements.
So go ahead and give your RV a fresh look with a new LED light strip!
Tip 1: Clean the awning before installation
awning installation, clean awning When it comes to installing an awning, one important tip is to make sure you clean it thoroughly before installation. This might seem like an obvious step, but it’s one that is often overlooked. Awnings can accumulate dirt, dust, and debris over time, especially if they have been stored or have been exposed to the elements.
Cleaning the awning before installation not only ensures a clean and polished look, but it also helps to prolong its lifespan. Use a mild detergent and a soft brush or cloth to gently scrub away any dirt or stains. Rinse it thoroughly and allow it to dry completely before proceeding with the installation process.
By starting with a clean awning, you can ensure a smooth and hassle-free installation experience, and enjoy the benefits of a fresh and well-maintained awning for years to come.
Tip 2: Use silicone or adhesive for a secure installation
When it comes to installing a silicone or adhesive, you want to make sure you have a secure installation that will hold up for the long haul. Using silicone or adhesive can help ensure that your installation stays in place, even in high-traffic areas or environments with moisture or humidity. Silicone provides a strong bond and is resistant to water and extreme temperatures, making it a great option for areas that are prone to moisture or temperature fluctuations.
Adhesive, on the other hand, is ideal for applications where a more permanent bond is needed. It provides a strong grip and can be used on a variety of surfaces, including wood, metal, and plastic. Whether you’re installing a new countertop, bathroom fixtures, or any other type of surface, using silicone or adhesive can help ensure a secure and long-lasting installation.
Tip 3: Check the voltage compatibility of the new LED light strip
In the world of LED lighting, one of the most important factors to consider is voltage compatibility. LED light strips come in various voltages, and it’s crucial to make sure that the new light strip you are purchasing is compatible with your existing setup. Different LED light strips require different voltage levels to operate efficiently, and using the wrong voltage can not only damage your new lights but also pose a safety hazard.
To avoid any potential issues, always check the voltage compatibility of the new LED light strip before making a purchase. This information can usually be found in the product specifications or on the packaging of the light strip. By ensuring that the voltage of the new LED light strip matches your existing setup, you can ensure optimal performance and longevity for your lighting system.
Conclusion
So, there you have it – the foolproof guide to replacing your RV awning LED light strip. Now you can bid farewell to those dim, flickering lights that have been plaguing your outdoor adventures and say hello to a vibrant, illuminating atmosphere. Just remember to follow these steps carefully, have the right tools on hand, and, of course, a dash of patience.
And if all else fails, don’t be afraid to call in the professionals. After all, there’s no shame in admitting defeat to a roll of LED lights. So go forth, my fellow RV enthusiasts, and light up the night sky with the brilliance of a thousand stars – or at least with the radiance of a well-functioning LED light strip.
Happy awning repairing!
Summary of RV Awning LED Light Strip Replacement Process
RV awning LED light strip replacement can be a simple and straightforward process if you follow a few tips and recommendations. First, it’s important to choose the right replacement LED light strip that is compatible with your RV awning. Look for a strip that is waterproof and has adhesive backing for easy installation.
Before installing the new strip, make sure to disconnect the power to avoid any electrical shocks. Remove the old light strip by carefully peeling it off and cleaning the area with a mild detergent. Next, measure and cut the new strip to fit the length of your awning.
Peel off the backing and carefully apply the strip to the desired location, making sure it is firmly pressed against the surface. Finally, reconnect the power and test the new LED light strip to ensure it is working properly. By following these tips and recommendations, you can easily replace your RV awning LED light strip and enjoy a bright and vibrant outdoor living space.
Final thoughts and recommendations
Tips and Recommendations for Final Thoughts In conclusion, planning a trip can be an exciting and overwhelming experience. To make the most out of your adventure, here are a few tips and recommendations to keep in mind. Firstly, be sure to research and choose your destination wisely.
Consider factors such as climate, attractions, and local customs to ensure a memorable experience. Next, create a detailed itinerary that includes a balance between must-see landmarks and off-the-beaten-path discoveries. This will help you make the most of your time and discover hidden gems along the way.
Additionally, don’t forget to pack wisely by considering the weather, activities, and cultural norms of your destination. It’s also a great idea to bring a reusable water bottle and eco-friendly toiletries to reduce waste and minimize your impact on the environment. Finally, make sure to book accommodations and transportation in advance to guarantee availability and secure potential discounts.
And most importantly, don’t forget to have fun and embrace the unexpected moments that often make for the most memorable experiences. Bon voyage!
FAQs
How do I replace an RV awning LED light strip?
To replace an RV awning LED light strip, first, locate the power source and turn off the electricity. Then, remove the old light strip by carefully pulling it off or unscrewing it. Next, connect the new LED light strip to the power source by either plugging it in or wiring it directly. Finally, test the new light strip to ensure it is working properly.
What tools do I need to replace an RV awning LED light strip?
To replace an RV awning LED light strip, you will typically need a screwdriver, wire cutters, electrical tape, and a power source (either a plug or wiring connections).
Can I replace an RV awning LED light strip myself, or should I hire a professional?
You can usually replace an RV awning LED light strip yourself, as long as you feel comfortable working with electricity and have some basic DIY skills. However, if you are unsure or uncomfortable with the process, it is always best to hire a professional to ensure safety and proper installation.
Where can I buy a replacement RV awning LED light strip?
You can buy a replacement RV awning LED light strip from various places, such as RV supply stores, online retailers, or even directly from the manufacturer of your RV.
How long do RV awning LED light strips typically last?
The lifespan of an RV awning LED light strip can vary depending on the quality of the product and how often it is used. However, on average, LED light strips can last anywhere from 30,000 to 50,000 hours. This can translate to several years of use under normal conditions.
Are RV awning LED light strips waterproof?
Many RV awning LED light strips are designed to be waterproof or at least water-resistant. However, it is always important to check the product specifications to ensure that the LED light strip you are purchasing is suitable for outdoor use and can withstand exposure to rain or other weather conditions.
Can I customize the color of my RV awning LED light strip?
Yes, many RV awning LED light strips come with color-changing options or the ability to choose from a variety of colors. This can be done through a remote control or a built-in control panel, allowing you to easily customize the color of your LED light strip to suit your preferences or create different lighting effects.