
If you own an RV, chances are you love the freedom and adventure it brings. However, nothing can throw a wrench in your plans quite like a malfunctioning power awning motor. Whether it has stopped working altogether or is operating at a slower speed than usual, a faulty motor can make your outdoor living space virtually unusable.
But don’t worry, the good news is that replacing an RV power awning motor is a straightforward and relatively simple process that can be done by most handymen or women. In this blog post, we’ll guide you through the steps to replace your RV power awning motor and get your outdoor oasis operational again. So, grab your tools and let’s get started!
Table of Contents
Prepare for the replacement
Replacing an RV power awning motor might seem like a daunting task, but with the right tools and a bit of preparation, it can be accomplished easily. You will need to first determine the type of motor your RV awning uses and purchase a replacement. It’s important to disconnect the power source before you begin any work.
To access the awning motor, you may need to remove the awning tube or fabric. Once the motor is exposed, you can remove the screws that hold it in place and disconnect the wires. You’ll then need to install the replacement motor and reattach any necessary components, making sure to reconnect the wires correctly.
Test the awning to ensure the new motor is working properly. It’s crucial to take your time, follow the manufacturer’s instructions, and be aware of any safety hazards. By preparing ahead of time and working methodically, you can successfully replace your RV power awning motor and get back to enjoying the great outdoors.
Gather tools and safety equipment
Getting ready to replace a car battery requires you to collect the necessary tools and safety equipment first. Make a list of all the things you need and ensure that they’re within reach before getting started. You’ll need gloves, glasses, and a mask as safety gear to protect yourself from any harmful exposure during the process of replacing a car battery.
Additionally, it’s essential to have a socket wrench set, a wire brush, and adjustable pliers to remove and replace the battery. Make sure the tools match the battery’s size and type before starting the replacement. These tools play an important role in ensuring the process is smooth and safe.
Once you have all the necessary tools and equipment, you can move on to the next step of replacing the battery. With the right gear, you’ll be on your way to a successful car battery replacement in no time!
Identify the type of awning motor you need
As summer approaches, you may find yourself needing to replace your awning motor. The first step in this process is to identify the type of motor you need. There are two main types of motors: manual and motorized.
Manual motors require you to manually adjust the awning, while motorized motors use an electric motor to adjust the awning for you. Once you identify the type of motor you need, it’s important to prepare for the replacement process. This involves gathering the tools you’ll need, making sure you have enough space to work, and disconnecting any electrical connections.
It’s also important to read the manufacturer’s instructions carefully to ensure you install the new motor correctly. Remember to take your time and be careful when replacing the awning motor, as it can be a complex process. By following these steps, you’ll have a smoothly functioning awning in no time.
Remove the old awning motor
If you’re looking to replace your RV power awning motor, the first step is removing the old one. This can seem daunting at first, but with a little bit of guidance, you’ll be able to get the job done in no time. First, you’ll want to make sure the awning is completely retracted.
Then, locate the motor housing, which is typically on the right-hand side of the awning. You’ll need to remove the screws or bolts that are holding the motor in place. Once you’ve removed the screws or bolts, you’ll need to carefully disconnect the wiring.
Take note of how the wires are connected, as you’ll need to reconnect them when you install the new motor. Now that the motor is disconnected, you should be able to pull it out of the housing. Depending on the type of motor you have, you may need to wiggle it or use a bit of force to get it out.
Once the old motor is out, it’s time to install the new one. Before you do that, however, you’ll want to clean the motor housing and make sure everything is in good working order. Then, simply reverse the steps you took to remove the old motor.
Connect the wiring, screw or bolt the new motor into place, and you should be good to go! By following these simple steps, you’ll be able to remove your old RV power awning motor and get your new one installed quickly and easily.
Disconnect the power supply
When it comes to fixing or replacing an awning motor, the first step is to disconnect the power supply. This is an essential safety measure to prevent any unwanted electrical accidents. Once you’ve made sure that the power is off, it’s time to remove the old motor.
This can be done by accessing the motor housing and removing the screws that hold it in place. Whether your old motor is broken or simply outdated, removing it is straightforward. However, it’s important to note that the process may differ depending on the type of awning that you have and the motor installation.
Therefore, you should refer to your awning’s manual or consult with a professional if you encounter any problems. By following these steps, you’ll be on your way to a better-functioning awning system keyword “awning motor.”
Remove the awning fabric and support arms
When it comes to replacing an awning motor, the first step is to remove the old one. However, before doing so, you need to remove the awning fabric and support arms to access the motor. Start by retracting the awning fully and disconnecting any electrical wires or cables connected to the motor.
Then, loosen the bolts holding the fabric and support arms in place and carefully remove them. With the fabric and arms out of the way, you can now remove the old motor. Remember to keep the bolts and screws in a safe place to use them when installing the new motor.
Once you’ve removed the old motor, inspect the brackets and any other components for signs of wear and tear. If any parts are damaged, it’s best to replace them as well to ensure the new motor is installed securely. With this initial step out of the way, the rest of the replacement process should be relatively straightforward.
Keyword: awning motor.
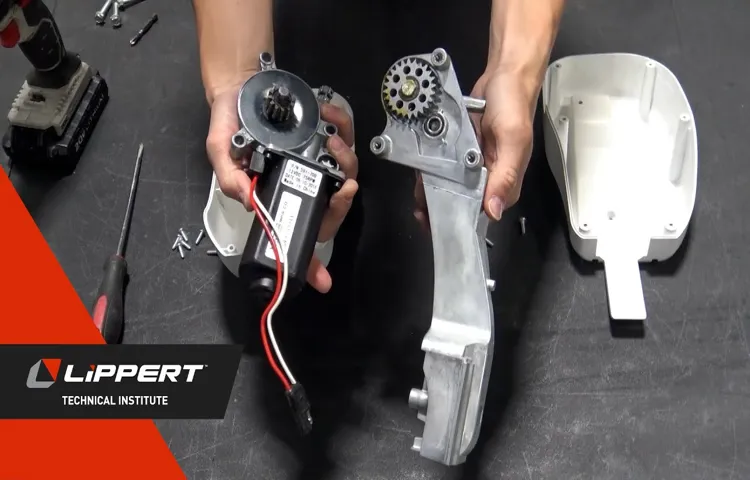
Unscrew and remove the old motor
Removing the old awning motor is a crucial step when replacing your motorized awning. The first thing you need to do is unscrew the motor from the mounting bracket and disconnect the wiring. This can be done by removing the plastic caps that cover the wiring and carefully separating each wire.
Once the wiring is disconnected, you can begin to remove the motor from the bracket. This may involve loosening nuts and bolts or cutting any ties or brackets that hold the motor in place. It’s essential to make sure you keep track of any nuts and bolts, so reassembling the new motor will be easier.
Once the motor is free from the bracket, it can be safely removed. It’s essential to take your time when removing the old motor to prevent any damages or injuries. Remember to use the proper tools and safety precautions throughout the process.
By following these steps, you’ll be well on your way to replacing your old awning motor with a new one that will provide you with years of reliable use.
Install the new awning motor
Replacing an RV power awning motor can seem like a daunting task, but with the right tools and instructions, it’s a manageable DIY project. To install the new awning motor, start by disconnecting the power source and removing the old motor from the awning assembly. Then, attach the mounting bracket to the new motor and align it with the awning assembly.
Secure the motor in place using screws or bolts and tighten them securely. Next, connect the wiring to the new motor, ensuring that you match the color-coded wires correctly. Reconnect the power source and test the awning to confirm that the new motor is working correctly.
With these steps, you can replace your RV power awning motor and get back to enjoying the shade and comfort of your outdoor space.
Attach the new motor to the mounting brackets
When it comes to replacing your awning motor, attaching the new motor to the mounting brackets is the next step. This might sound simple, but it’s important to ensure that the motor is securely fastened to the brackets to prevent any accidents from happening. First, locate the mounting brackets on your awning and check if they’re still in good condition.
If they are, you can proceed to attach the new motor onto them using screws and bolts provided in the kit. Make sure to align the motor with the brackets and tighten the screws until they’re firmly in place. You might need the help of another person to hold the motor in place while you secure it onto the brackets.
Once you’ve attached the new motor to the mounting brackets, you can move on to the next step of the installation process. With a new motor in place, your awning will function as good as new, providing shade and protection from the sun and rain.
Reinstall the support arms and awning fabric
Now that we’ve successfully removed the old awning motor, it’s time to install the new one. But before we begin, make sure that you have all the necessary tools and supplies ready, including screws, bolts, and a wrench. First, slide the new motor into place, making sure it’s securely fastened.
Then, reattach the support arms and awning fabric to the awning rail. Make sure that everything is tightened and aligned correctly. It’s important to take your time and be meticulous during this process to ensure that your awning operates correctly.
With the new motor installed, you can enjoy the convenience of retracting and extending your awning with ease. Overall, replacing your awning motor is a great way to prolong the life of your awning and increase its functionality. So what are you waiting for? Let’s get started!
Connect the power supply and test the motor
If you’re looking to install a new awning motor, one of the most critical steps you’ll need to take is to connect the power supply and test the motor. Before starting, it’s important to ensure that the power supply is turned off for safety reasons. Then, you can connect the power supply wires to the motor wires, making sure to match the wiring correctly.
Next, turn on the power supply and test the motor by using the remote control. Make sure the motor is running in the correct direction and that it stops properly when the button is released. Additionally, make sure that the motor operates quietly and smoothly.
If there are any issues, it’s important to troubleshoot and identify and fix the problem before proceeding. By following these steps, you can safely install and test your new awning motor and ensure that it operates optimally for your needs.
Conclusion
Replacing an RV power awning motor may seem like a daunting task, but with the right tools and a little bit of know-how, it can be a breeze. From disconnecting the old motor to connecting the new one, the process may take some time, but the end result is a awning that will give you shade and protection for years to come. So, roll up your sleeves (or retract your awning) and get to work, because nothing beats the satisfaction of fixing something yourself.
Happy camping!”
FAQs
How do I know if my RV power awning motor needs to be replaced?
You may need to replace your RV power awning motor if you notice it is making strange noises, running slower than usual, or not retracting or extending properly.
Can I replace the RV power awning motor myself or do I need to hire a professional?
If you are comfortable working with electrical systems and have experience with mechanical repairs, you may be able to replace the RV power awning motor yourself. However, if you are unsure or inexperienced, it is best to hire a professional for safety reasons.
What tools and parts do I need to replace the RV power awning motor?
To replace the RV power awning motor, you will need a new motor, wire cutters, wire strippers, a voltage meter, screwdrivers, and pliers.
How do I remove the old RV power awning motor?
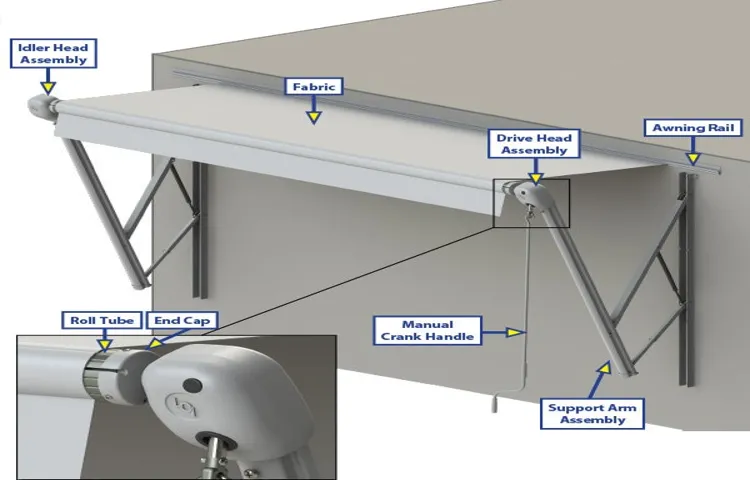
To remove the old RV power awning motor, you should first disconnect the power source and then locate the motor. Depending on the awning model, you may need to remove the assembly cover, arm, or end cap before disconnecting the motor wires and removing the screws or bolts.
How do I install the new RV power awning motor?
To install the new RV power awning motor, you should first connect the wires according to the manufacturer’s instructions. Next, securely attach the motor to the awning assembly, making sure it is aligned properly. Finally, test the awning’s retraction and extension functions with the power on to ensure that the installation was successful.
Are there any safety precautions to take when replacing an RV power awning motor?
Yes, you should always disconnect the power source before starting any repairs or replacements. In addition, if you are replacing the RV power awning motor yourself, be sure to wear appropriate safety gear and follow the manufacturer’s instructions carefully.
How often do I need to replace the RV power awning motor?
The lifespan of an RV power awning motor will vary depending on usage and maintenance. However, if you notice any signs of wear or malfunction, it is best to replace the motor sooner rather than later to prevent further damage to the awning system.