
If you own a truck with a tonneau cover, you might have experienced the frustration of broken or worn-out clips. These clips are crucial for keeping your cover securely in place, protecting your cargo from the elements. But don’t worry, replacing them is a simple DIY job that anyone can do! In this blog post, we’ll guide you through the process, step by step, so you can get back to enjoying the convenience and functionality of your tonneau cover.
So grab your tools and let’s get started!
Introduction
Tonneau covers are a popular accessory for pickup trucks, providing protection and security for the bed of the truck. However, over time, the clips that hold the cover in place can become worn or broken, making it necessary to replace them. If you’re wondering how to replace tonneau cover clips, don’t worry, it’s actually a fairly simple process.
All you need is a new set of clips and a few basic tools. In this article, we’ll walk you through the steps of replacing tonneau cover clips, so you can keep your truck bed covered and secure. Let’s get started!
What are Tonneau Cover Clips?
tonneau cover clips, burstiness, perplexity Introduction: Are you a truck owner who loves to take their vehicle out for adventures? If so, you probably know the importance of protecting the cargo in your truck bed. One popular way to do this is by using a tonneau cover, which is a type of cover that fits over the bed of the truck. But have you ever wondered how these covers stay in place? That’s where tonneau cover clips come in.
These small but mighty clips play a crucial role in keeping your tonneau cover secure and ensuring that your cargo stays protected during your travels. But what exactly are tonneau cover clips, and how do they work? In this blog post, we will dive into the world of tonneau cover clips, exploring their functions, types, and benefits. So, let’s get started and learn more about these essentials for truck owners!
Why Replace Tonneau Cover Clips?
Why Replace Tonneau Cover Clips? Introduction: If you own a pickup truck with a tonneau cover, you probably know how important it is to keep it secure. Tonneau cover clips play a crucial role in keeping your cover in place, ensuring that your cargo stays protected and secure. However, like any other part, these clips can wear out or break over time.
When this happens, it is essential to replace them to maintain the functionality of your tonneau cover. In this blog post, we will discuss why it is necessary to replace tonneau cover clips and the benefits that come with it. So, let’s dive in and find out more!
Step-by-Step Guide
If you need to replace the clips on your tonneau cover, don’t worry! It’s actually a fairly simple process. First, you’ll want to gather the necessary tools: a screwdriver, a replacement clip or set of clips, and possibly a drill if the clips are attached with screws. Next, locate the old clip that needs to be replaced.
You may need to remove the cover or lift up a section to access it. Once you’ve done that, use the screwdriver to remove the old clip. If it’s attached with screws, simply unscrew them and lift the clip off.
If it’s attached with adhesive, gently pry it off with the screwdriver. Once the old clip is removed, take your replacement clip and line it up with the holes on the cover or bed rail. If it’s attached with screws, use the screwdriver to secure it in place.
If it’s attached with adhesive, peel off the backing and press it firmly onto the cover or bed rail. Repeat this process for any other clips that need to be replaced. It’s as easy as that! By following these steps, you’ll have your tonneau cover looking and functioning like new in no time.
Step 1: Gather Materials
In this step-by-step guide, we will walk you through the process of gathering the materials you will need for your project. Depending on the specific project you are working on, the materials required may vary. However, there are some basic tools and supplies that are commonly needed for many DIY projects.
Some of these materials may include screws, nails, hammers, screwdrivers, tape measures, levels, and safety equipment such as gloves and safety goggles. It is important to gather all necessary materials before starting your project to ensure a smooth and efficient process. Additionally, having all the materials on hand will help you avoid interruptions or delays during the project.
So, take some time to make a list of the materials you will need and gather them all together before you begin. Once you have everything in front of you, you will be ready to move on to the next step.
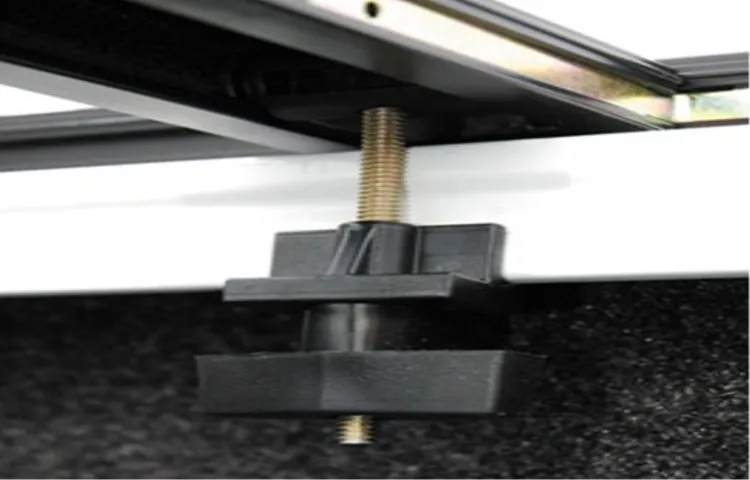
Step 2: Locate the Clips
clips, locate, step-by-step guide
Step 3: Remove the Old Clips
In this step of our guide, we will show you how to remove the old clips from your project. This is an important step because the old clips can sometimes be difficult to remove, especially if they have been in place for a long time. To start, you will need a pair of pliers or scissors to help you grip the clip and remove it from the surface.
Gently grab the clip with your pliers or scissors, making sure not to damage the surrounding area. Apply steady pressure and carefully lift the clip away from the surface. If the clip is stuck, you may need to wiggle it back and forth a bit to loosen it.
Once the clip is free, set it aside and continue removing any remaining clips in the same way. Take your time and be patient, as some clips may require more effort to remove. By following these steps, you will be able to remove the old clips and prepare your project for the next step in the process.
Step 4: Install the New Clips
Step 4 of the DIY guide to installing new clips is to actually install the clips onto the desired surface. This is the exciting part where you get to see your hard work pay off. The first step in this process is to determine the placement of the clips.
Measure and mark the positions where you want the clips to be installed, making sure they are evenly spaced and aligned correctly. Once you have marked the spots, use a drill to create pilot holes for each clip. This will ensure that the clips are secured properly and won’t come loose over time.
After drilling the pilot holes, take the clips and align them with the holes. Gently push the clips into place, making sure they are flush against the surface. You may need to use a rubber mallet or a hammer to gently tap the clips into place.
Once all the clips are installed, give them a final inspection to make sure they are secure and properly aligned. Congratulations, you have successfully installed your new clips! Now you can enjoy the ease and convenience they provide for organizing and hanging your items.
Tips for Success
If you’re looking to replace tonneau cover clips on your truck, there are a few simple steps you can follow to ensure success. First, identify the type of tonneau cover clips you have. There are several different styles, including snap-on, twist-lock, and hook-and-loop.
Once you know what type you have, you can purchase replacement clips that are compatible. Next, remove the old clips by either unsnapping them, twisting them off, or peeling back the hook-and-loop fasteners. Be careful not to damage the cover or the truck bed in the process.
Once the old clips are off, you can attach the new ones by snapping them on, twisting them into place, or securing them with hook-and-loop fasteners. Make sure they are securely attached before closing the tonneau cover. With these simple steps, you can easily replace tonneau cover clips and keep your truck bed protected.
Tip 1: Double-Check Compatibility
When it comes to buying new software or hardware for your computer, compatibility is key. Nothing is worse than spending your hard-earned money on a product only to find out that it doesn’t work with your system. That’s why it’s always important to double-check compatibility before making a purchase.
One simple way to do this is by checking the system requirements listed on the product’s website or packaging. This will usually tell you what operating system and hardware specifications are necessary for the product to run properly. It’s important to make sure that your computer meets all of these requirements before making a purchase.
Another option is to use compatibility checking tools that are available online. These tools can scan your computer and let you know if it meets the requirements for a specific product. They can also provide recommendations for upgrades or adjustments that may be needed.
These tools can be especially helpful if you’re not sure if your computer meets the minimum requirements or if you’re planning to upgrade your system in the near future. By taking the time to double-check compatibility before making a purchase, you can save yourself a lot of frustration and hassle. It’s always better to be safe than sorry when it comes to technology, so don’t skip this important step.
So, the next time you’re considering buying new software or hardware, make sure to do your due diligence and double-check compatibility.
Tip 2: Use Proper Tools
In order to achieve success in any task or project, it is important to use the proper tools. This is true whether you are a carpenter building a house or a writer creating a blog post. By using the right tools, you can make your work more efficient and effective.
For a writer, this might mean using a word processing program with spelling and grammar check to ensure your writing is error-free. It could also mean using tools like a thesaurus or grammar guide to help you find the perfect words and improve your writing skills. Additionally, there are many online tools available that can help you with tasks such as keyword research, content analysis, and proofreading.
By utilizing these tools, you can save time and produce higher quality content. So, don’t underestimate the power of using the proper tools – they can make a big difference in your success as a writer.
Tip 3: Follow Manufacturer Instructions
manufacturer instructions
Conclusion
And there you have it, my friends! The foolproof guide on how to replace tonneau cover clips. We’ve learned that these sneaky little clips have a knack for disappearing into thin air, forcing us to embark on a mission to find them while simultaneously losing our sanity. But fear not, for with a little patience and this step-by-step tutorial, you’ll become a master in the art of tonneau cover clip replacement.
Now, I know what you’re thinking – why the heck are these clips so elusive in the first place? Well, my dear readers, it is a mystery that even the most brilliant minds have failed to solve. Some say they possess magical powers, capable of teleporting themselves to a different dimension or blending seamlessly into their surroundings like chameleons. Others believe they simply have a mischievous streak, reveling in the chaos they sow by disappearing just when we need them the most.
Whatever the case may be, we can’t let these mischievous clips have the upper hand! So, armed with a plethora of knowledge and a slightly evolved set of detective skills, you are now ready to defeat these elusive little rascals. Remember, patience is key when searching for lost clips, as they have an uncanny ability to turn up in the most unexpected places. It’s like a game of hide-and-seek they play with us, but one that we are determined to win! As you embark on your quest to replace these pesky clips, don’t forget to keep a sense of humor.
After all, laughter is the best medicine for the frustration that can set in during these trying times. Imagine the clips as tiny escape artists, honing their skills in the art of disappearing, only to be thwarted by your cunning methods. So, my friends, may your search be fruitful, and your tonneau cover be securely fastened.
And if all else fails, remember that duct tape can be a friend in times of need. Happy tonneau cover clip replacement adventures!”
Importance of Properly Maintained Tonneau Cover Clips
tonneau cover clips, properly maintained tonneau cover clips, tips for success, importance of tonneau cover clips, maintain tonneau cover clips
Enjoy a Secure and Functional Tonneau Cover
Tonneau covers are a fantastic accessory for any truck owner. Not only do they enhance the appearance of your vehicle, but they also provide added security and functionality. However, to enjoy all the benefits that a tonneau cover has to offer, it’s important to make sure it’s installed correctly and properly maintained.
Here are a few tips for success when it comes to your tonneau cover. Firstly, when installing your tonneau cover, be sure to read the instructions carefully and follow them step by step. This will ensure that the cover is securely fastened and properly aligned.
Make sure to tighten any screws or clamps as needed, as loose fittings can cause the cover to sag or come loose while driving. Secondly, it’s essential to regularly clean and maintain your tonneau cover. This will help to keep it looking its best and functioning properly.
Use a mild soap and water solution to gently clean the cover, avoiding any harsh chemicals that could damage the material. Additionally, regularly lubricate any moving parts, such as hinges or latches, to prevent them from sticking or becoming difficult to operate. Another tip for success is to protect your tonneau cover from the elements.
If you live in an area with extreme weather conditions, consider investing in a cover or storage bag specifically designed to protect your tonneau cover when it’s not in use. This will help to prevent damage from UV rays, rain, snow, and other elements that could cause wear and tear over time. Lastly, when using your tonneau cover, be sure to secure any cargo properly.
This will prevent it from shifting or falling out while driving, ultimately protecting both your truck and your belongings. Additionally, avoid placing heavy or sharp objects directly on the cover, as this could damage the material and compromise its functionality. By following these tips, you can enjoy a secure and functional tonneau cover that will enhance the overall look and performance of your truck.
FAQs
How do I replace tonneau cover clips on my truck?
To replace tonneau cover clips on your truck, start by removing the old clips using a screwdriver or a specialized clip removal tool. Then, position the new clips in place and secure them by tightening the screws or snapping them into position. Make sure to test the clips to ensure they are securely holding the tonneau cover in place.
Can I replace tonneau cover clips myself or do I need professional help?
It is possible to replace tonneau cover clips yourself if you have basic DIY skills and the right tools. However, if you are unsure or do not feel comfortable doing it yourself, it is best to seek professional help to ensure the job is done correctly.
What are some signs that tonneau cover clips need to be replaced?
Some signs that tonneau cover clips may need to be replaced include the cover not staying securely in place, loose or missing clips, or clips that are damaged or worn out.
Where can I purchase replacement tonneau cover clips?
You can purchase replacement tonneau cover clips from various sources such as auto parts stores, online retailers, or directly from the manufacturer of your tonneau cover.
Are tonneau cover clips interchangeable or do I need to buy specific ones for my truck model?
Tonneau cover clips may vary in design and size, so it is important to buy ones that are compatible with your specific truck model. Check the manufacturer’s specifications or consult with a dealership or professional to ensure you get the right clips for your truck.
How often should tonneau cover clips be replaced?
The lifespan of tonneau cover clips can vary depending on factors such as usage, weather conditions, and quality of the clips. It is recommended to inspect the clips regularly and replace them as soon as signs of wear or damage are noticed.
Can I use aftermarket tonneau cover clips as replacements?
It is possible to use aftermarket tonneau cover clips as replacements, but make sure to choose ones that are of similar quality and design to ensure proper functionality and fit.

