Are you tired of struggling with a broken tonneau cover handle bracket? We’ve all been there – trying to open or close our truck bed cover, only to find that the handle is hanging by a thread or completely detached. It can be frustrating and inconvenient, especially when you need access to your truck bed on a regular basis. But fear not, because replacing a tonneau cover handle bracket is easier than you might think.
Imagine having a toolbox full of tools, but one of them is broken. No matter how many times you try to use it, it just won’t do the job. That’s exactly how it feels when your tonneau cover handle bracket is broken – it’s the missing piece that prevents you from easily opening and closing your truck bed cover.
But just as you would replace a broken tool, you can replace a broken tonneau cover handle bracket. Think of your tonneau cover handle bracket as the gatekeeper to your truck bed. It’s the part that allows you to effortlessly open and close your tonneau cover, keeping your belongings safe and secure.
Without a functioning handle bracket, your tonneau cover becomes virtually useless. But don’t worry – replacing the bracket is a simple process that anyone can do with a few basic tools and a little bit of time. Now, picture yourself effortlessly opening your truck bed cover with a brand-new tonneau cover handle bracket.
No more struggling or frustration – just smooth, easy operation. By replacing the broken handle bracket, you can regain full control of your truck bed cover and enjoy the convenience and protection it provides. So, how exactly do you replace a tonneau cover handle bracket? Stay tuned for our step-by-step guide, where we’ll walk you through the process from start to finish.
We’ll provide you with all the information and tips you need to successfully replace your broken bracket and get back to enjoying the functionality of your tonneau cover. Get ready to say goodbye to the struggle and hello to effortless operation – let’s get started!
Table of Contents
Introduction
Are you tired of struggling with a broken tonneau cover handle bracket? Well, you’re in luck because I’m here to show you how to replace it and have your truck bed cover functioning like new again. The tonneau cover handle bracket is an essential component that helps secure the cover in place and allows you to open and close it with ease. Over time, it may become damaged or worn out, causing difficulties in operating the cover.
But fear not, replacing the tonneau cover handle bracket is a relatively simple process that you can do yourself with just a few tools and some basic knowledge. So let’s get started and get your truck bed cover back in action!
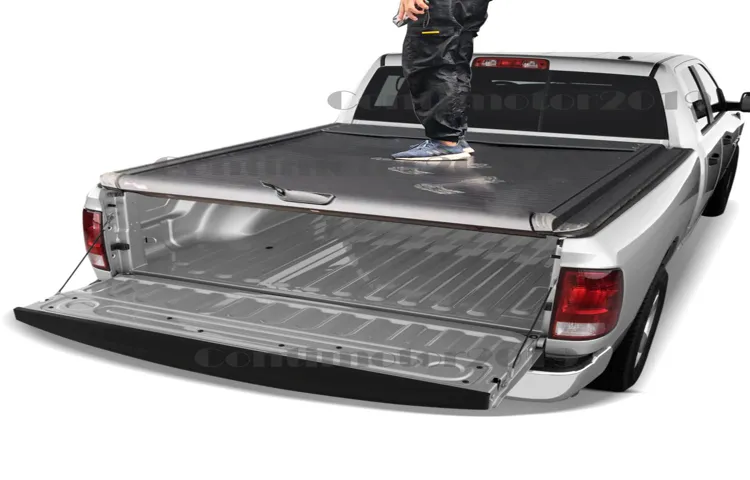
What is a Tonneau Cover Handle Bracket
tonneau cover handle bracket
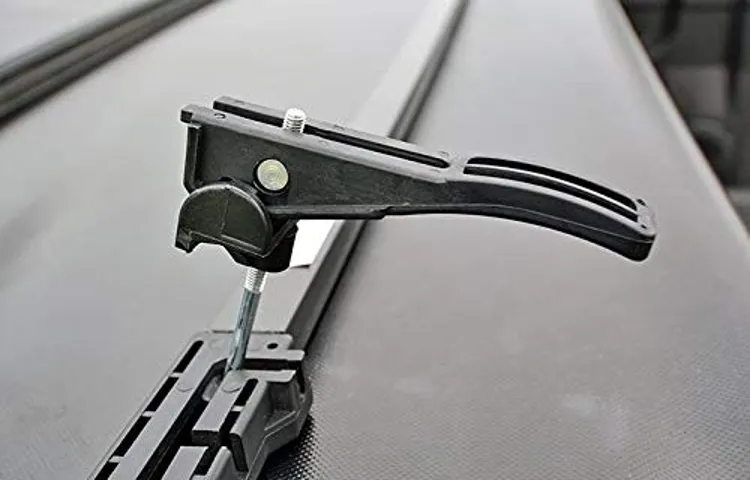
Signs that the Tonneau Cover Handle Bracket Needs Replacement
tonneau cover handle bracket replacement Tonneau covers are a great way to protect your truck bed from the elements and keep your cargo safe. However, over time, the handle bracket on your tonneau cover may wear out or break. If you’re unsure if your tonneau cover handle bracket needs replacement, there are a few signs you can look out for.
In this blog post, we’ll discuss some of these signs and offer some tips on how to replace the handle bracket if needed. So, let’s dive in and discover how to keep your tonneau cover in top shape!
Preparation
Preparation is key when it comes to accomplishing any task or goal, and this holds true for almost anything in life. Whether you’re planning a trip, starting a new project, or studying for an exam, taking the time to prepare will greatly enhance your chances of success. The same goes for blogging.
Before diving into the world of blogging, it’s important to take some time to prepare and set yourself up for success. This includes determining your niche, researching your target audience, and creating a content plan. By doing this, you’ll be able to provide valuable, engaging content that will keep your readers coming back for more.
So, let’s dive in and explore the first steps of preparation for creating a successful blog.
Step-by-Step Guide
If you’re looking for a step-by-step guide on how to replace a tonneau cover handle bracket, you’ve come to the right place. The tonneau cover handle bracket is an essential component of your truck’s bed cover, as it is responsible for securing the cover in place and providing easy access to your cargo. Over time, the handle bracket may become damaged or worn out, making it necessary to replace it.
Luckily, replacing the tonneau cover handle bracket is a relatively simple process that can be done with just a few basic tools. In this guide, I will walk you through the steps involved in replacing the tonneau cover handle bracket, so you can get your truck’s bed cover back in working order in no time.
Step 1: Remove the Old Handle Bracket
In this step-by-step guide, we’ll walk you through the process of removing the old handle bracket from your door. This is the first step in replacing a door handle, and it’s important to do it correctly to ensure a seamless installation of the new handle. To begin, you’ll need a few tools: a screwdriver, pliers, and possibly an Allen wrench, depending on the type of handle you have.
Start by locating the screws that secure the handle bracket to the door. These screws are typically found on the interior side of the door and may be hidden beneath a cover plate or decorative trim. Once you’ve located the screws, use the appropriate tool to loosen and remove them.
As you remove the screws, be sure to keep them in a safe place so that you can easily find them later. Once the screws are removed, you can gently pull the handle away from the door. Depending on the type of handle you have, there may be a small retaining clip or nut that needs to be removed before the handle can be fully detached.
Use the pliers or Allen wrench to remove any additional hardware as necessary. With the handle fully removed, you can now remove the old handle bracket. This is typically held in place by additional screws or bolts.
Use the appropriate tool to remove these fasteners and carefully remove the bracket from the door. Once the old handle bracket is removed, you can move on to the next step in the installation process. But for now, take a moment to appreciate your progress – you’ve successfully removed the old handle bracket! Next, we’ll cover how to install the new handle bracket and complete the door handle replacement.
Stay tuned!
Step 2: Clean and Inspect the Area
“clean and inspect the area” So, you’ve identified a problem in your home or workspace and now it’s time to tackle it head-on. The next step is to clean and inspect the area thoroughly. This is an essential step because it allows you to get a clear understanding of the extent of the issue and ensures that you have a clean slate to work with.
Start by removing any clutter or debris from the area. This will give you a better view of the space and make it easier to identify any potential dangers or hazards. Once the area is cleared, take a closer look at the surfaces and surroundings.
Are there any visible signs of damage or wear? Are there any leaks or cracks in the walls or floors? It’s important to pay attention to even the smallest details as they can provide valuable information about the issue at hand. If you notice any signs of water damage, mold, or structural issues, it may be necessary to call in a professional for further inspection. However, if the problem is minor and manageable, you can proceed with the necessary cleaning and repairs on your own.
Remember, the key here is to be thorough and meticulous in your inspection to ensure that you address the problem effectively.
Step 3: Install the New Handle Bracket
“Step 3: Install the New Handle Bracket” Now that you have successfully removed the old handle bracket, it’s time to install the new one. This step is crucial in ensuring your handle is securely attached and functions properly. First, take a close look at the new handle bracket and familiarize yourself with its different parts.
It may look similar to the old one, but there could be slight variations, so it’s important to pay attention. Start by lining up the screw holes on the bracket with the corresponding holes on the door. Once the holes are aligned, insert the screws and tighten them securely using a screwdriver.
It’s important to use the correct size and type of screws for this part to ensure a tight fit. Once the screws are in place, give the handle a gentle tug to make sure it feels sturdy. If there is any wobbling or movement, you may need to tighten the screws further or adjust the bracket position.
Next, check the latch mechanism on the door to ensure it aligns properly with the handle. The latch should be able to extend and retract smoothly when the handle is turned. If there are any issues with the alignment, you may need to adjust the bracket position slightly.
Finally, test the handle to make sure it opens and closes smoothly. Give it a few tries to ensure everything is functioning as it should. If there are any problems, double-check the installation and make any necessary adjustments.
Congratulations, you have successfully installed the new handle bracket! Now you can enjoy a fully functional door handle that adds style and convenience to your space.
Additional Tips and Considerations
When replacing a tonneau cover handle bracket, there are a few additional tips and considerations to keep in mind. First, be sure to consult the manufacturer’s instructions or guidelines for your specific tonneau cover model. This will provide you with the necessary steps and tools needed for the replacement process.
Additionally, it’s essential to choose a high-quality replacement bracket to ensure durability and proper functionality. Consider the material of the bracket, such as metal or plastic, and choose one that matches your desired level of strength and aesthetic. It’s also crucial to properly align and secure the bracket to ensure a secure fit.
Lastly, regularly inspect and maintain your tonneau cover handle and bracket to prevent any future issues from occurring. By following these tips and considerations, you can successfully replace your tonneau cover handle bracket and ensure the longevity and functionality of your tonneau cover.
Check the Compatibility of the New Handle Bracket
One important step to consider when installing a new handle bracket on your device is to check its compatibility. This ensures that the bracket will properly fit and securely hold the handle in place. The last thing you want is for the handle to come loose or fall off, potentially damaging your device or causing injury.
To check compatibility, you should carefully examine the specifications of the handle bracket and compare them to the requirements of your device. This may involve measuring the dimensions of the bracket and ensuring they match the dimensions of your device’s mounting points. Additionally, you should consider any specific requirements or recommendations from the manufacturer of your device.
They may provide guidance on compatible handle brackets or offer suggestions for where to purchase them. Taking the time to check compatibility will help ensure a successful installation and reliable performance of your new handle bracket.
Use Proper Tools and Safety Measures
“proper tools and safety measures”
Test the New Handle Bracket
door handle, handle bracket, installation, tips and considerations, test, secure, alignment, functionality, durability, safety Additional Tips and Considerations: When testing the new handle bracket on your door, there are a few additional tips and considerations to keep in mind to ensure a secure and reliable installation. First, check the alignment of the handle bracket with the door itself. It should be properly centered and level, as this will ensure that the handle operates smoothly and doesn’t put unnecessary strain on the bracket.
Next, test the functionality of the handle by opening and closing the door multiple times. Pay attention to any sticking or resistance, as this could be a sign of an improperly installed bracket. If you notice any issues, it’s best to address them before continuing with the installation.
Durability is also an important consideration when testing a new handle bracket. Give the handle a firm pull to ensure that it is securely attached to the door and will not come loose over time. You want to be confident that your new handle will stand up to regular use without any problems.
Finally, safety is always a top concern when it comes to any door hardware. Make sure that the handle feels sturdy and solid when in use. It should not wobble or feel loose, as this could be a sign of a poorly installed bracket.
A secure handle is not only more comfortable to use but also ensures the safety of those using the door. By following these tips and considerations, you can confidently test the new handle bracket on your door, ensuring that it is properly installed and functions as intended.
Conclusion
And there you have it, a step-by-step guide on how to replace a tonneau cover handle bracket. Now, you may be wondering, why would anyone go through the trouble of replacing this seemingly insignificant piece? Well, let me tell you, my friend, the tonneau cover handle bracket may be small, but it plays a big role in ensuring that your tonneau cover stays securely in place. Think of it as the unsung hero of your truck bed.
Its purpose is to hold the handle in place, allowing you to effortlessly open and close your tonneau cover whenever you please. But, like any hero, it too can become worn out or damaged over time. That’s where our guide comes in handy.
By following these simple steps, you can easily replace the handle bracket and restore your tonneau cover to its former glory. No more struggling to open or close it, no more worrying about items in your truck bed getting exposed to the elements. With a new handle bracket in place, you’ll be back to conquering the open road in no time.
So, whether you’re a seasoned DIY enthusiast or a newcomer to the world of truck maintenance, don’t let the task of replacing a tonneau cover handle bracket intimidate you. With our guide and a little bit of determination, you’ll have it fixed in a jiffy. And remember, sometimes it’s the little things that make all the difference.
So next time you’re out on the road, cruising with your tonneau cover securely in place, take a moment to appreciate the small but mighty handle bracket that made it all possible. Cheers to the unsung hero of the truck bed!”
FAQs
Replacing a tonneau cover handle bracket may seem daunting at first, but with the right tools and a little bit of know-how, it can be a relatively simple process. First, you’ll need to locate the bracket that needs to be replaced. This is usually located on the underside of the tonneau cover, near the handle.
Once you’ve identified the bracket, you’ll need to remove it from the cover. This can usually be done by unscrewing a few bolts or screws. Once the old bracket is removed, you can then attach the new bracket using the same screws or bolts.
Make sure to tighten them securely to ensure the bracket stays in place. Once the new bracket is attached, you can then reattach the tonneau cover handle. Give it a test to make sure it’s working properly, and you’re done! Replacing a tonneau cover handle bracket may take a little bit of time and effort, but it’s a relatively simple process that can save you money compared to buying a whole new cover.
References
If you find yourself needing to replace the handle bracket on your tonneau cover, don’t worry – it’s a relatively simple process that you can do yourself. The handle bracket is the part of the tonneau cover that holds the handle in place, allowing you to easily open and close the cover. Over time, this bracket may become worn or damaged, making it necessary to replace it.
To do so, first, you’ll need to locate the screws that hold the bracket in place. Use a screwdriver to remove these screws, taking care not to strip them. Once the old bracket is removed, you can simply attach the new handle bracket in its place, securing it with the same screws.
Make sure to tighten the screws securely, but be careful not to over-tighten and strip them. Once the new bracket is securely in place, you can reattach the handle and test it to ensure it is functioning properly. Overall, replacing the tonneau cover handle bracket is a fairly straightforward task that can be completed in just a few minutes.
FAQs
How do I replace a tonneau cover handle bracket?
To replace a tonneau cover handle bracket, follow these steps:
1. First, locate the damaged bracket on the tonneau cover.
2. Use a screwdriver or a wrench to remove the screws or bolts securing the old bracket.
3. Take out the old bracket and keep it aside.
4. Place the new bracket in the same position and align it properly.
5. Secure the new bracket in place by tightening the screws or bolts.
6. Test the tonneau cover to ensure that the new bracket is properly installed and working.
What tools do I need to replace a tonneau cover handle bracket?
To replace a tonneau cover handle bracket, you will need the following tools:
1. Screwdriver or wrench (depending on the type of screws or bolts used)
2. New tonneau cover handle bracket (to replace the old one)
3. Possibly, a socket set or adjustable wrench (if large bolts are used)
Can I replace a tonneau cover handle bracket myself, or do I need professional help?
It is possible to replace a tonneau cover handle bracket yourself, as long as you have the necessary tools and a basic understanding of how to use them. However, if you are unsure or uncomfortable with DIY tasks, it is recommended to seek professional help to ensure proper installation.
Where can I purchase a tonneau cover handle bracket?
Tonneau cover handle brackets can often be purchased from automotive parts stores, online retailers, or directly from the manufacturer. It is important to ensure that you select the correct bracket that is compatible with your specific tonneau cover model.
Are tonneau cover handle brackets universal or do they vary by manufacturer?
Tonneau cover handle brackets can vary by manufacturer, as each brand may have different designs and specifications for their covers. It is essential to check the compatibility of the bracket with your tonneau cover before making a purchase.
How long does it take to replace a tonneau cover handle bracket?
The time required to replace a tonneau cover handle bracket can vary depending on the complexity of the installation and the individual’s DIY skills. On average, it may take between 30 minutes to an hour to complete the replacement process.
Is there a warranty for tonneau cover handle brackets?
Warranty policies for tonneau cover handle brackets may vary by manufacturer. Some brands offer warranties that cover defects or damages under certain conditions. It is recommended to check the warranty information provided by the manufacturer or retailer before making a purchase.