
Is your tire losing air or showing signs of wear and tear? A common culprit for air loss is a leak where the tire meets the rim. Luckily, sealing a tire to the rim isn’t rocket science; in fact, it’s a simple process that can be done with a few basic tools. In this guide, we’ll take you through the steps of how to seal a tire to the rim with ease, helping to keep your vehicle safe and running smoothly on the road.
From identifying the source of air loss to selecting the right sealant, we’ve got you covered. So, buckle up and let’s dive in!
Table of Contents
Understanding the Importance of Proper Tire Sealing
When it comes to tires, proper sealing is crucial for optimal performance and safety on the road. If a tire isn’t properly sealed to the rim, it can lead to a host of problems like low tire pressure, punctures, and even blowouts. To seal a tire to the rim, there are a few key steps to follow.
First, ensure that the tire and rim are clean and free of debris. Then, apply a sealant to the rim and tire bead to create an airtight seal. Tighten the bolts in a star pattern to evenly distribute pressure and ensure a secure fit.
Finally, check the tire pressure to ensure that it’s at the manufacturer’s recommended level. Properly sealing your tires to the rim not only keeps you safe, but it also improves tire lifespan and performance on the road.
Preventing Air Leaks and Blowouts
Proper tire sealing is essential when it comes to preventing air leaks and blowouts. An air leak might seem like a minor inconvenience, but it reduces the performance of your tires and increases the risk of a blowout, which can be dangerous and potentially life-threatening. The most common cause of air leaks is a damaged valve stem, which can be caused by overinflation, underinflation, or simply wear and tear.
Another factor that can cause air leaks is a puncture in the tire, which can occur from sharp objects on the road or through normal wear and tear. Fortunately, there are steps you can take to prevent air leaks and blowouts. Regularly checking your tire pressure and ensuring that your tires are properly inflated is key.
Additionally, investing in high-quality tires and ensuring that they are properly sealed can also help prevent air leaks and blowouts. By taking these simple steps, you can help ensure the safety and performance of your vehicle on the road.

Tools and Materials You Will Need
If you’re looking to learn how to seal a tire to the rim, you’ll need a few tools and materials before you can get started. First of all, you’ll need a tire sealant, which is a liquid substance that can help patch up any small leaks or punctures in your tire. You can find these sealants at most auto parts stores or online.
You’ll also need a tire iron and a tire pressure gauge to remove the tire from the rim and check the pressure inside the tire. Additionally, you may need an air compressor to inflate the tire once it’s been sealed. It’s important to ensure that you have all of these tools and materials on hand before you begin, as trying to seal a tire without the proper tools can be frustrating and time-consuming.
By starting with the right equipment, you can save yourself time and effort in the long run.
Tire Sealant
If you want to save yourself from a flat tire, tire sealant can be an excellent solution. Tire sealant is a liquid that you put inside your tire, which helps seal any punctures or leaks. Before pouring the sealant inside your tire, you need to ensure that you have the necessary tools and materials.
Firstly, you will need a tire gauge to check the tire pressure. Secondly, you need a valve core remover to remove the valve. Thirdly, you will need a funnel to pour the sealant into the tire.
Fourthly, you require a sealant bottle that is adequate enough to hold the sealant. Lastly, make sure you are wearing gloves because the sealant can make your hands messy. When selecting a tire sealant, choose one with high-quality ingredients, and it should be compatible with your tire.
Ensure that you make the necessary preparations before using the tire sealant to make sure that you can handle the matter correctly. By having these tools and materials, you can achieve the best results and avoid any mishaps.
Valve Core Removal Tool
If you’re looking to change your bike tire, you’ll need a few basic tools and materials to get started. One essential tool that you’ll need is a valve core removal tool. This small and simple tool allows you to remove the valve core from the valve stem of your tire, which is necessary when inflating or deflating your tire.
Without a valve core removal tool, you won’t be able to access the valve stem and inflate your tire properly. Along with the valve core removal tool, you’ll also need a tire pump, new tire tube, and a tire lever. These tools combined will enable you to remove your old tire, replace it with a new one, and inflate it to the proper pressure level.
With these tools in hand, you’ll be able to handle most basic tire changes on your own, without the need for professional help.
Compressed Air Source
When it comes to setting up a compressed air source for your tools, there are a few essential tools and materials that you’ll need to get started. Firstly, you’ll need an air compressor, which will generate the compressed air that powers your tools. You’ll also need an air hose, which connects your compressor to your tools.
Make sure to choose a durable hose that can handle the pressure of the compressed air. Additionally, you’ll need a regulator, which controls the pressure of the air coming out of your compressor. This is important because each tool requires a different pressure to operate effectively.
Lastly, you’ll need some plumbing fittings, including connectors and adapters, to join everything together. With these tools and materials on hand, you’ll be able to set up a compressed air source that will power your tools with ease.
Tire Irons or Bead Breaker
When it comes to changing a tire, you will need a few essential tools and materials. One of these is a tire iron or bead breaker. A tire iron is a curved metal bar used to remove the nuts on your car’s wheel.
On the other hand, a bead breaker is a tool that separates the tire from the rim, making it easier to change the tire. To use a bead breaker, place it between the tire and the rim and use leverage to break the bead loose. A tire iron, on the other hand, is used to remove the lug nuts on your wheel by either turning them clockwise or counterclockwise, depending on whether you’re removing or tightening them.
It’s important to use the correct tool for the job to avoid damaging the tire or wheel. So if you’re changing a tire, make sure you have a tire iron or bead breaker on hand to make the process quicker and easier.
Tape Measure
When it comes to home improvement and DIY projects, having the right tools and materials can make a big difference. One tool that is essential to have in your toolkit is a tape measure. The most important aspect of a tape measure is its accuracy.
You want to make sure you are getting precise measurements for your projects. Look for a tape measure with a locking mechanism to keep the tape in place while you measure. Additionally, having a tape measure with a sturdy and comfortable grip will make it easier to use.
Don’t forget to consider the length of the tape as well, as different projects may require different lengths. Remember, investing in a high-quality tape measure can save you time and frustration in the long run.
Step-by-Step Guide to Sealing Your Tire to the Rim
If you’re experiencing a leak in your tire, one possible solution is to seal it to the rim. Sealing your tire to the rim involves the use of a sealant to fill in any gaps between the two surfaces. To start, you’ll need to remove your tire from the rim and clean both surfaces to remove any debris.
Applying a sealant such as rubber cement or silicone to the rim and around the inside of the tire, you’ll then need to carefully place the tire back onto the rim, making sure that it is properly aligned. Once the tire is in place, inflate it to the recommended pressure level and roll the tire to evenly distribute the sealant. Finally, let the sealant fully dry before driving on the tire.
This process can be a bit tricky and time-consuming, but it can help salvage a tire and prevent the need for a costly replacement. Remember to always follow safety precautions and seek professional help if you’re unsure about the process or if your tire needs repairing.
Step 1: Deflate the tire
Step 1: Deflate the tire Before sealing your tire to the rim, the first step is to deflate the tire entirely. This step is necessary to ensure that the sealant can penetrate all areas of the tire, including any leaks or punctures. Deflating the tire also makes it easier to remove any remaining debris or foreign objects that may be causing the puncture.
You can use a tire pressure gauge to check the current tire pressure before deflating it. Once you have confirmed the tire’s pressure, use a valve stem tool or the tip of a screwdriver to depress the valve stem’s center pin and release all the air. Be sure to deflate the tire slowly, so you do not damage the valve stem or cause the tire’s sidewall to deform.
Once the tire is entirely deflated, proceed with the next steps to seal the tire to the rim and get back on the road.
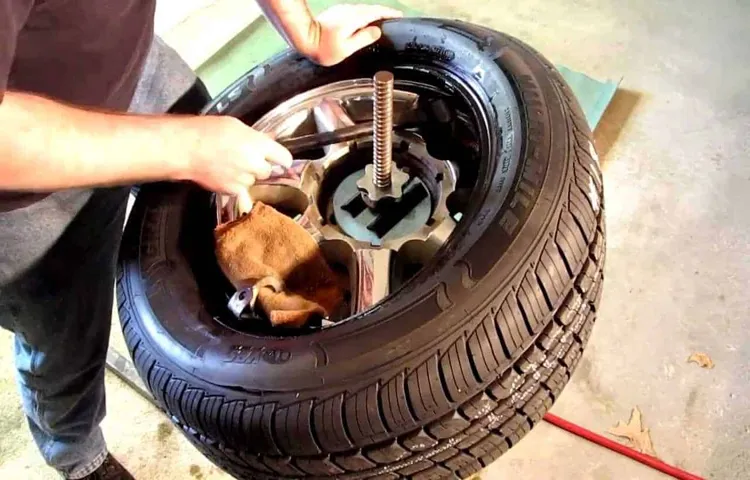
Step 2: Remove the valve core
Removing the valve core is an essential step to seal your tire to the rim effectively. You can’t seal the bead without taking out the valve core. Here is how to do it.
With a valve core remover tool, unscrew the valve cap from the valve stem. Place the tool over the valve stem and turn it counterclockwise to loosen the valve core. Once you can move the valve core with your fingers, remove it completely.
You should hear a hissing sound as you do so. You’ve now removed the valve core and are one step closer to sealing your tire to the rim. It’s worth noting that you should consider replacing the valve core, especially if it’s old.
A faulty valve core can cause air leaks and affect your tire’s performance. With that in mind, it’s best to replace it with a new one before resealing the tire.
Step 3: Break the bead of the tire
Breaking the bead of the tire is a crucial step in sealing your tire to the rim. First, you need to remove the valve core using a valve core remover tool. Once the valve core is out, you can deflate the tire completely by pressing on the valve stem.
After that, push the tire away from the rim using a tire iron to break the bead. This will allow you to separate the tire from the rim and access the inside of the tire where you will apply the sealant. You must be careful while breaking the bead to avoid damaging the rim or the tire.
It may take some effort to pry the tire away from the rim, so be patient and work slowly. Breaking the bead is an important step that ensures a proper seal between the tire and the rim. By following these steps, you can successfully seal your tire to the rim and prevent air leaks.
Step 4: Apply tire sealant to the rim and tire
Applying tire sealant Now that you’ve removed any debris and seated your tire on the rim, it’s time to apply the tire sealant. First, shake the bottle of sealant thoroughly to ensure that it’s well-mixed. Then, remove the valve core from your tire using a valve core removal tool.
This will help the sealant flow into your tire more easily. Next, use a valve stem insertion tool to attach the sealant bottle to the valve stem. Squeeze the sealant into the tire slowly, making sure to distribute it evenly inside.
After you’ve finished, wipe any excess sealant off the valve stem and screw your valve core back in. Finally, inflate your tire to the recommended pressure and give it a spin to distribute the sealant evenly throughout the tire. Remember to check your tire pressure regularly to ensure that your sealant is still doing its job.
By following these steps, you’ll be able to seal your tire to the rim effectively and ensure a smooth and safe ride.
Step 5: Reinflate the tire and reinstall the valve core
After successfully applying the tire sealant to the rim, it’s time to reinflate the tire and reinstall the valve core. First, remove the air compressor from the valve stem and place the valve core back into the stem. Use the valve core tool to tighten it securely.
Then, reconnect the air compressor and begin inflating the tire to the recommended PSI level. Make sure to check the tire pressure as you inflate, using a tire pressure gauge to ensure you don’t overinflate or underinflate. Once you’ve reached the recommended PSI level, disconnect the air compressor and replace the valve cap onto the valve stem.
Congratulations! You’ve successfully sealed your tire to the rim and it should now be fully functional. Remember to regularly check your tire pressure and inspect for any signs of damage or leaks to ensure your tire stays in top condition.
Step 6: Monitor the tire for leaks and adjust pressure as needed
Sealing your tire to the rim is a crucial step in ensuring that your vehicle’s tires perform optimally. Once you have applied the sealant, you will want to ensure that the tire is airtight. This is why monitoring the tire for leaks and adjusting pressure as needed is important.
The first thing you will want to do is inflate the tire to the recommended level and then spray soapy water around the bead area. This will help you identify any leaks. If you see bubbles forming, you can be sure that air is escaping through the leak.
Once you have identified the location of the leak, deflate the tire, apply more sealant (if needed), and reseat the tire. Repeat the process until the tire is completely airtight. Remember, it may take some time for the sealant to set, so it is important to keep monitoring the tire for leaks over the next few days.
By following these steps, you can ensure that your tire stays sealed to the rim and performs optimally for a long time.
Safety Precautions to Keep in Mind When Sealing a Tire
When it comes to sealing a tire to the rim, safety should always be the top priority. Before beginning the process, make sure the tire is completely deflated and removed from the vehicle. It’s also important to use the appropriate sealant and follow the instructions carefully.
Wear protective gloves and eye goggles to avoid contact with the sealant, which can be caustic. When it’s time to inflate the tire, use a pressure gauge to ensure it’s inflated to the proper level. Overinflating the tire can lead to a dangerous explosion, while underinflation can put unnecessary strain on the tire.
Before hitting the road, take the vehicle for a test drive to ensure the seal is holding and there are no leaks. By following these safety precautions, you can successfully seal your tire to the rim and achieve a safer, smoother ride.
Wear Gloves and Eye Protection
When it comes to sealing a tire, safety is key. One of the most important precautions you can take is to wear gloves and eye protection. Gloves will help protect your hands from any chemicals or sharp objects that may be present during the sealing process.
Eye protection is just as important, as it can prevent any debris or chemicals from getting into your eyes. It’s also a good idea to wear long sleeved clothing and closed-toe shoes when sealing a tire. These precautions may seem small, but they can make a big difference in preventing accidents and injuries.
When in doubt, always prioritize your safety and take the necessary precautions before starting any tire sealing project to avoid any unforeseen damages to your vehicle!
Use Caution When Dealing with Compressed Air
When it comes to dealing with compressed air, it’s always better to err on the side of caution. This is especially true when it comes to sealing a tire. While a quick fix may seem like an easy solution, there are some serious safety precautions that you should keep in mind.
The most important thing to remember is to never over-inflate a tire. Doing so can cause it to burst, which can be extremely dangerous, not to mention expensive. Additionally, be sure to wear protective eyewear and gloves when working with compressed air.
It’s also a good idea to keep a safe distance from the tire and to always work in a well-ventilated area. By following these precautions, you’ll stay safe while getting your tire back on the road in no time.
Choose a Well-Ventilated Work Area
When it comes to sealing a tire, safety should always be top of mind. One important precaution to keep in mind is choosing a well-ventilated work area. This ensures that any fumes from the sealing compound or adhesives are quickly dispersed, reducing the chances of inhaling harmful chemicals.
A well-ventilated area will also help to prevent the build-up of flammable gases in case of a mishap. Adequate ventilation ensures that you have a safe and comfortable work environment. Therefore, before beginning any tire sealing operation, set up in a well-ventilated space with good airflow to keep yourself safe and healthy.
By doing this, you are protecting yourself from potential hazards that could cause harm.
Conclusion
Sealing a tire to the rim can be a real pain in the asphalt, but with the right tools and know-how, it’s a breeze. Just be sure to take your time, follow the instructions carefully, and if all else fails, don’t hesitate to call in the pros. Happy sealing, and safe travels!”
FAQs
What is the process of sealing a tire to the rim?
Sealing a tire to the rim involves cleaning the rim, applying a bead sealant, mounting the tire, and inflating it to the recommended pressure.
Can I seal a tire to the rim without the help of a professional mechanic?
Yes, sealing a tire to the rim can be done at home with the right tools and a little bit of knowledge.
What are the common problems associated with tire rim sealing?
Common problems include leaks, uneven tire wear, and tire blowouts due to improper sealing.
How often should I check my tire rim seal for leaks?
It is recommended to check the seal every time you change the tire or at least once a year.
What are the tools required to seal a tire to the rim?
Tire levers, bead sealant, valve stem, and an air compressor are some of the tools required to seal a tire to the rim.
Is it possible to reseal a tire to the rim multiple times?
Yes, if done correctly, a tire can be resealed to the rim multiple times.
What are the safety precautions required while sealing a tire to the rim?
Wearing safety goggles, ensuring the tire is correctly mounted, and avoiding over-inflating the tire are some of the safety precautions required while sealing a tire to the rim.