
Welcome to our blog where we dive deep into the fascinating world of introductions! Whether you’re introducing yourself to a new group of people, presenting a new product, or writing the opening lines of a blog post, introductions are an essential part of communication. But have you ever stopped to think about the power of a great introduction? The way it can captivate an audience, spark curiosity, and set the stage for what’s to come? In this blog, we’ll explore the art of introductions, uncovering the secrets to crafting compelling openings that leave a lasting impression. So, if you’re ready to learn how to make a memorable first impression, let’s get started!
Table of Contents
Understanding RV Awning Tension
Setting the tension on your RV awning is an important step in ensuring it functions properly and stays securely in place. To start, locate the tension knob or screw on the awning roller, usually found at one end. Turn the knob or screw clockwise to increase tension and counterclockwise to decrease tension.
The goal is to have the awning fabric taut and straight without any sagging or wrinkles. Keep in mind that the appropriate tension may vary depending on the specific awning model and manufacturer. It’s always a good idea to consult your RV owner’s manual or contact the manufacturer for specific instructions on setting the tension for your particular awning model.
By properly setting the tension on your RV awning, you can enjoy a secure and functional outdoor living space while on your travels.
What is RV Awning Tension?
RV awning tension refers to the tightness of the fabric on an RV awning. It is important to have the correct tension on your RV awning to ensure it functions properly and stays in place during windy conditions. When the tension is too loose, the fabric can sag and flap in the wind, causing damage to the awning and potentially the RV itself.
On the other hand, if the tension is too tight, it can put excessive strain on the awning arms and cause them to bend or break. Finding the right balance of tension is crucial for the longevity and functionality of your RV awning.
Importance of Proper RV Awning Tension
RV awnings are an essential part of any recreational vehicle. They provide shade and protection from the elements, making your outdoor living space more comfortable. However, many people overlook the importance of proper RV awning tension.
Having the right tension on your awning is crucial for its functionality and longevity. When the tension on your RV awning is too loose, it can flap in the wind, which not only creates a noisy and annoying distraction but also puts unnecessary stress on the fabric and support arms. This constant flapping can cause the fabric to tear or the arms to bend, leading to costly repairs or replacements.
On the other hand, if the tension is too tight, it can strain the fabric and hardware, causing them to wear out prematurely. Proper RV awning tension ensures that the fabric is taut and secure, preventing it from flapping or sagging under gusty winds or heavy rain. It also helps to maintain the structural integrity of the awning, preventing unnecessary wear and tear on the arms, support brackets, and hardware.
To achieve the correct tension, start by extending the awning fully and ensure that it is centered and level. Use the tension arms to adjust the fabric’s tightness, making sure it is taut but not overly stretched. Be mindful of the weather conditions and adjust the tension accordingly, tighter during windy days and looser during calm weather.
Regularly inspect and adjust the tension as needed to keep your RV awning in optimal condition. Taking the time to understand and maintain proper RV awning tension is essential for maximizing the lifespan and functionality of your awning. By doing so, you can enjoy a comfortable and protected outdoor living space for years to come.
Checking the Current Tension of Your RV Awning
One important aspect of maintaining your RV awning is ensuring that it has the correct tension. If the tension is too loose, the awning may sag and not provide adequate shade or protection from the elements. On the other hand, if the tension is too tight, it could put undue stress on the awning and potentially cause damage.
To check the current tension of your RV awning, start by extending the awning fully. Next, locate the tension knobs or mechanisms on the arms of the awning. These may be located near the top or bottom of the arms, depending on the type of awning you have.
Use a wrench or other appropriate tool to loosen the tension knobs or mechanisms. Once they are loosened, gently pull down on the awning fabric to assess the tension. It should have some give to it, but not be so loose that it sags.
If the tension needs adjustment, tighten or loosen the tension knobs or mechanisms accordingly. By regularly checking and adjusting the tension of your RV awning, you can ensure that it provides optimal shade and protection for your outdoor adventures.
Visual Inspection
RV awnings provide shade and protection from the elements while you’re enjoying the great outdoors. However, over time, the tension in your RV awning can loosen, causing it to sag or not function properly. That’s why it’s important to regularly check the tension of your RV awning to ensure it is in good condition.
One way to check the tension is by visually inspecting the awning fabric. Look for any signs of sagging or drooping, as this can indicate that the tension needs to be adjusted. Additionally, check the roller tube and arms for any signs of wear or damage.
If you notice any issues, it may be time to re-tension your RV awning to keep it working properly and prolong its lifespan.
Manual Testing
RV awnings are a great addition to any recreational vehicle, providing shade and protection from the sun and rain. However, just like any other part of your RV, it’s important to regularly check the tension of your awning to ensure it is properly secured and functioning as it should. When manually testing the tension of your RV awning, start by fully extending it and making sure it is locked into place.
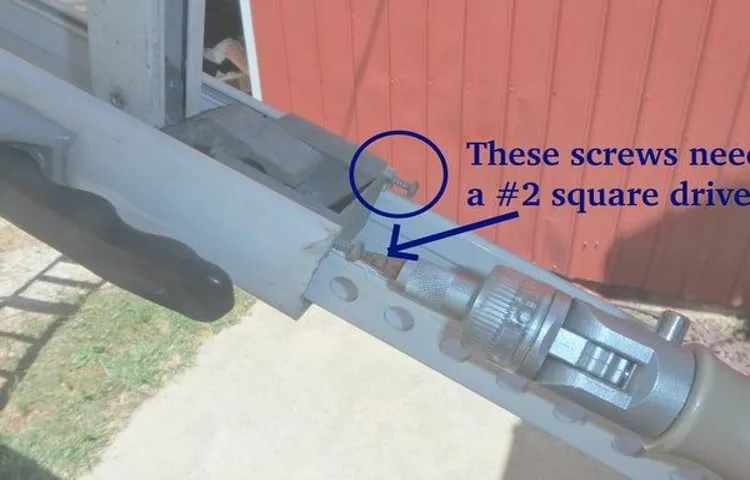
Then, gently push up on the fabric, checking for any sagging or movement. If the awning feels loose or unstable, you may need to adjust the tension. This can usually be done by tightening or loosening the nuts or screws on the arms of the awning.
It’s also a good idea to inspect the fabric for any tears or damage, as this can affect the tension as well. By regularly checking the tension of your RV awning, you can ensure that it stays securely in place and provides you with the shade and protection you need on your camping adventures.
Consulting the Awning Manufacturer’s Manual
RV awnings are a great feature to have on your recreational vehicle, providing shade and protection from the elements while you enjoy your outdoor adventures. However, it’s important to properly maintain and adjust the tension of your awning to ensure it functions correctly. One way to do this is by consulting the manufacturer’s manual.
The manual will provide specific instructions on how to check and adjust the tension of your RV awning. This is important because if the tension is too loose, the awning may sag and not provide adequate shade. On the other hand, if the tension is too tight, it can put unnecessary strain on the awning’s components, potentially causing damage.
By following the manufacturer’s guidelines, you can ensure that your RV awning is properly tensioned and ready for your next adventure.
Adjusting the Tension on Your RV Awning
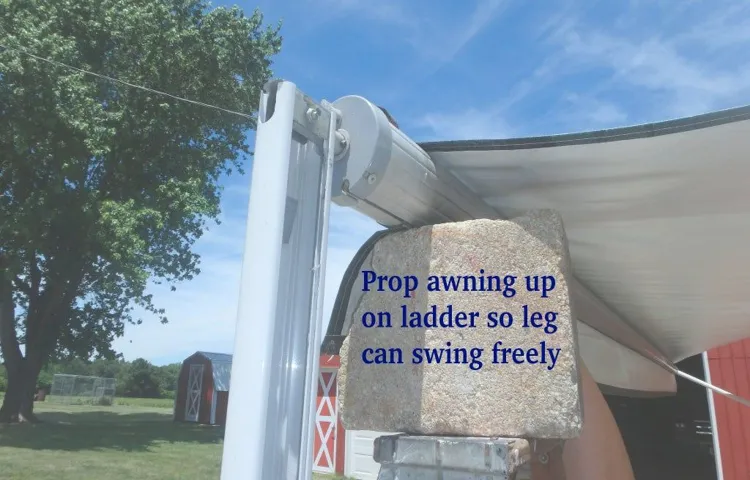
Are you having trouble with the tension on your RV awning? Don’t worry, you’re not alone! Adjusting the tension on your RV awning can be a bit tricky, but with a few simple steps, you can have it working perfectly in no time. First, make sure you have the proper tools on hand, such as a ladder and a wrench. Next, locate the tension knobs on either side of your awning.
These knobs are usually located near the front of the awning and can be adjusted by turning them clockwise or counterclockwise. If your awning is sagging, you’ll want to tighten the tension by turning the knobs clockwise. On the other hand, if your awning is too tight, you’ll need to loosen the tension by turning the knobs counterclockwise.
Be sure to make small adjustments and test the tension after each turn to avoid over-tightening or loosening the awning. Once you have the tension just right, your RV awning will be ready to provide shade and protection for all your outdoor adventures.
Gathering the Necessary Tools
When it comes to adjusting the tension on your RV awning, you’re going to need a few tools to get the job done right. First, you’ll need a ladder or step stool to safely reach the awning. You’ll also need a wrench or screwdriver, depending on the type of awning system you have.
If your awning is operated by a manual crank, you’ll need a ratchet or crank handle. If it’s operated by a motor, you’ll need a control box or remote. It’s important to have these tools on hand before you start the adjustment process, as it can be frustrating and time-consuming to have to stop mid-way and go searching for what you need.
So gather your tools, and let’s get started!
Safety Precautions
RV awnings are a great addition to any outdoor adventure, providing shade and protection from the elements. However, it’s important to ensure that your awning is properly tensioned to prevent any accidents or damage. Adjusting the tension on your RV awning is a relatively simple process that can be done in just a few steps.
First, locate the tension knobs on either side of the awning. These knobs allow you to loosen or tighten the tension on the awning. Begin by loosening the tension knobs on both sides of the awning.
Next, extend the awning fully and check for any sagging or drooping. If the awning is sagging, tighten the tension knobs until the fabric is taut. It’s important not to overtighten the awning as this can damage the fabric or arms.
Once the tension is adjusted to your liking, secure the tension knobs to prevent them from loosening while you’re on the road. And that’s it! With just a few simple steps, you can ensure that your RV awning is properly tensioned and ready for your next adventure.
Step-by-Step Process of Adjusting the Tension
RV awnings are a great addition to your outdoor set up, providing shade and protection from the elements. However, over time, the tension on your awning may loosen, causing it to sag or not retract properly. Adjusting the tension on your RV awning is a relatively simple process that can be done with just a few tools and a little bit of patience.
First, locate the tension knob or lever on your awning. This is typically located on the roller tube at the end of the awning. Use a tool, such as a screwdriver or wrench, to turn the tension knob or lever in the direction indicated by the manufacturer.
This will tighten the tension on the awning and should help to eliminate any sagging. It’s important to make small adjustments and test the awning after each adjustment to ensure the tension is correct. If necessary, continue to make small adjustments until the tension is just right.
Once you have adjusted the tension to your liking, make sure to secure the tension knob or lever in place to prevent it from loosening over time. With a little bit of effort, you can easily adjust the tension on your RV awning and enjoy a perfectly functioning awning that provides shade and protection whenever you need it.
Testing the New Tension
Setting the tension on your RV awning is crucial in ensuring that it functions properly and doesn’t get damaged in windy conditions. So, how do you go about setting the tension? Well, the first step is to locate the tension adjustment knobs. These are usually located on either end of the awning roller.
Once you’ve found them, you can begin adjusting the tension. Start by loosening the knobs slightly, then use your hand to pull the awning fabric outwards. This will create some tension.
Next, tighten the knobs to secure the tension in place. It’s important to strike a balance between too tight and too loose. If the tension is too tight, it can put unnecessary strain on the awning and the mechanism.
On the other hand, if the tension is too loose, the awning can sag and may not provide adequate protection from the sun or rain. It may take a few tries to find the perfect tension, but with practice, you’ll get the hang of it. So, go ahead and give it a try!
Visual Inspection
visual inspection, testing the new tension, manufacturing process
Manual Testing
Manual Testing When it comes to testing the new tension, manual testing is key. Manual testing involves a human tester going through the software or application to identify any bugs, errors, or issues that may affect its functionality or performance. This type of testing allows testers to simulate real-life scenarios and interactions to ensure that the software or application performs as expected.
Manual testing allows for a hands-on approach, where testers can explore different features, functionalities, and user flows to uncover any potential issues. This type of testing is especially important when it comes to testing new tense situations, as it allows for a deeper understanding of how the software or application will perform in real-life scenarios. By manually testing the new tension, testers can ensure that the software or application can handle high-stress situations and user interactions without crashing or malfunctioning.
This type of testing also allows testers to identify any usability issues, such as confusing user interfaces or cumbersome workflows, that may hinder the user experience. In addition to testing for functionality and performance, manual testing also allows testers to identify any potential security vulnerabilities in the software or application. By manually going through the software or application, testers can identify any weak points or loopholes that hackers may exploit.
Overall, manual testing is an essential part of the testing process when it comes to testing the new tension. It allows for a more thorough and comprehensive evaluation of the software or application, ensuring that it meets the desired standards and performs optimally in real-life scenarios.
Noticing Signs of Proper Tension
testing new tension, proper tension, signs of proper tension, guitar strings So you’ve just put on a new set of guitar strings and you’re eager to start playing. But how do you know if the tension is right? One way to test the new tension is by plucking the strings and paying attention to the sound they produce. Proper tension will result in a clear and balanced tone, with each string resonating at its full potential.
If a string sounds dull or muted, it could be a sign that the tension needs adjustment. Another way to test the tension is by bending notes. When you bend a note, the string should respond smoothly and effortlessly.
If you feel resistance or hear any buzzing or choking sounds, it’s an indication that the tension is either too tight or too loose. It’s important to find the sweet spot where the tension allows for easy bending without compromising the overall tone. By paying attention to these signs, you can ensure that your guitar strings are properly tensioned and ready for some rocking.
Conclusion
In conclusion, setting tension on an RV awning is like finding the perfect balance between a tightrope walker and a zen master. It involves a delicate dance, a symphony of strength and calmness, all to create the ideal shelter from the elements. Just like a tightrope walker, you want the tension to be just right – not too loose that it flaps in the wind like a flag on a blustery day, and not too tight that it resembles a guitar string ready to snap at any moment.
But, it’s not just about brute force. No, setting tension on an RV awning requires the finesse of a zen master. You must find your inner peace and connect with the natural rhythms of the universe.
By adjusting the tension just perfectly, you harmonize with the elements, creating a sanctuary of shade that beckons you to relax, unwind, and enjoy the great outdoors. So, my fellow awning enthusiasts, embrace your inner tightrope walker and zen master, and set that tension on your RV awning with precision and finesse. May your outdoor adventures be filled with just the right amount of tension and serenity, creating a haven of shade for all who seek refuge under your perfectly-tensioned awning.
“
FAQs
How do I set tension on my RV awning?
To set tension on your RV awning, start by extending the awning fully. Then, locate the tension knobs or adjustment arms on the awning’s roller tube. Use a tool or your hand to turn these knobs or adjust the arms, tightening them to increase tension or loosening them to decrease tension. Gradually adjust the tension until the awning fabric is taut and there is no sagging or wrinkles.
What tools do I need to set tension on my RV awning?
Setting tension on your RV awning typically requires a tool such as a wrench or a screwdriver. The specific tool needed may depend on the type and model of your awning. Consult the owner’s manual for your awning or contact the manufacturer for precise tool requirements.
Can I adjust the tension on my RV awning by myself?
Yes, adjusting the tension on your RV awning is a task that can usually be done by a single person. However, it is always a good idea to have someone assist you to ensure safety and proper adjustment. Plus, an extra set of hands can be helpful when you need to hold the awning in place while making adjustments.
How often should I check and adjust the tension on my RV awning?
It is recommended to check the tension on your RV awning at least once every camping season. However, you may need to adjust the tension more frequently if you notice the awning fabric sagging, wrinkling, or flapping in the wind. Regularly inspecting and maintaining the tension will help prolong the life of your awning.
What should I do if my RV awning doesn’t have tension adjustment knobs or arms?
Some older or simpler models of RV awnings may not have tension adjustment knobs or arms. In such cases, you may need to manually tighten the awning fabric by rolling it tightly using a Velcro strap or bungee cord. Alternatively, consider upgrading to a newer awning model that has built-in tension adjustment features for easier and more precise tension control.
Can setting too much tension on my RV awning cause damage?
Yes, setting too much tension on your RV awning can potentially cause damage. Overly tightening the awning fabric can strain the components and eventually lead to premature wear or tears. It is important to find the right balance between proper tension and excessive tension to ensure the longevity and functionality of your awning.
Are there specific instructions or guidelines provided by the awning manufacturer for setting tension?
Yes, each awning manufacturer may have specific instructions or guidelines for setting tension on their particular models. It is recommended to consult the owner’s manual for your RV awning or reach out to the manufacturer directly for precise instructions. Following the manufacturer’s recommendations will help you set the correct tension and avoid any potential damage or warranty issues.