
Ever wondered how to convert the electrical power in your van from 12 volts DC to 110 volts AC? Well, look no further, because in this blog post, we’re going to guide you through the process of setting up a complete 12 volt DC to 110 volt AC power inverter system in your van, complete with charging capabilities. Whether you’re a van dweller, a road trip enthusiast, or simply in need of a mobile power solution, this step-by-step guide is here to help. So, let’s dive right in and make sure you’re equipped with all the knowledge and tools to bring electrical power to your van wherever you go!
Table of Contents
Introduction
If you’re looking to create a fully functional power system in your van, then you’ve come to the right place. In this blog section, we’re going to show you exactly how to set up a complete 12 volt DC to 110 volt AC power inverter system in your van, complete with charging capabilities. This system will allow you to power all of your electronics and appliances while on the road, without having to rely on external power sources.
Whether you’re planning on going on a long road trip or you’re considering living in your van full-time, having a reliable power system is essential. So let’s dive right in and learn how to set it up!
Explanation of a power inverter system
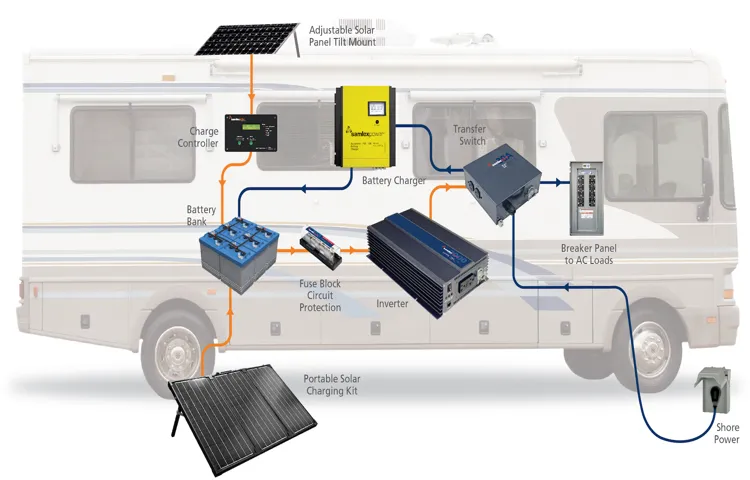
Power inverter system
Choosing the Right Inverter
So you’re converting your van into a mobile home, and you need to set up a power inverter system to provide 110 volt AC power from your van’s 12 volt DC battery. Choosing the right inverter is crucial to ensure that you have enough power to run all your appliances and devices. There are a few factors to consider when selecting an inverter for your van.
First, you need to determine how much power you will need. Make a list of all the appliances and devices you plan to use and their power requirements. This will help you determine the wattage capacity your inverter needs to have.
Additionally, you’ll want to consider the type of inverter – modified sine wave or pure sine wave. Modified sine wave inverters are more affordable, but they may not be suitable for certain sensitive electronics. Pure sine wave inverters provide a smoother, cleaner power output that is safe for all types of devices.
Ultimately, choosing the right inverter for your van conversion project will ensure that you have a reliable source of 110 volt AC power for your everyday needs, no matter where your adventures take you.
Determining power needs
Choosing the Right Inverter for Your Power Needs When determining your power needs for your home or business, one important factor to consider is choosing the right inverter. An inverter is a device that converts direct current (DC) power from battery banks or solar panels into alternating current (AC) power that is compatible with most household appliances and electronic devices. There are various types of inverters available, each with its own features and capabilities.
The two main types are modified sine wave inverters and pure sine wave inverters. Modified sine wave inverters are more affordable but may not be suitable for all appliances, especially those with sensitive or motor-driven electronics. On the other hand, pure sine wave inverters produce a clean and stable power output that is similar to the grid power, making them ideal for powering all types of appliances and electronics.
When choosing the right inverter for your power needs, it’s essential to consider factors such as the wattage and surge capacity. The wattage rating determines how much power the inverter can handle continuously, while the surge capacity indicates the temporary power surge that an inverter can handle when an appliance or electronic device starts up. To determine your power needs, you should make a list of all the appliances and electronics you plan to power with the inverter.
Take note of the wattage ratings of each item and factor in their surge capacity, if applicable. Add up the total wattage to determine the minimum power rating you should look for in an inverter. It’s also important to consider the future growth of your power needs.
If you anticipate adding more appliances or expanding your system in the future, it’s wise to choose an inverter with a higher power rating to accommodate these additional power requirements. Additionally, if you plan to use your inverter for extended periods or run power-hungry appliances like air conditioners or refrigerators, it’s advisable to choose an inverter with a higher wattage rating and surge capacity. In conclusion, choosing the right inverter for your power needs is crucial for ensuring efficient and reliable power supply.
Take into account factors such as the type of inverter, wattage rating, surge capacity, and future growth. By doing so, you can select an inverter that meets your power requirements and allows you to power all your appliances and electronics seamlessly. So, before investing in an inverter, take the time to do your research and consult with professionals to ensure you make the right choice.
Considering surge wattage
surge wattage, inverter, choosing the right inverter When it comes to choosing the right inverter for your needs, one important factor to consider is surge wattage. Surge wattage refers to the amount of power that an inverter can handle for a short period of time, typically a few seconds, when starting up appliances or electronics that require a higher initial power draw. This burst of power is necessary to get devices like refrigerators, air conditioners, or power tools up and running smoothly.
If the surge wattage of an inverter is not sufficient, it can lead to equipment damage or even failure. So, it’s crucial to select an inverter that can handle the surge wattage of your specific devices. This can be done by checking the documentation or specifications of your appliances or electronics to determine their surge wattage requirements.
It’s also a good idea to choose an inverter that offers a higher surge wattage capacity than what your devices need, to allow for any fluctuations or unexpected power surges. By considering surge wattage when choosing an inverter, you can ensure that your appliances and electronics start up safely and efficiently.
Researching different inverter types
inverter types, choosing the right inverter
Preparation
Setting up a complete 12-volt DC to 110-volt AC power inverter system in a van with charging can be a game-changer when it comes to creating a comfortable and convenient living space on the go. So, how do you go about getting started? Well, first things first, you’ll need to gather all the necessary equipment. This includes a power inverter, deep cycle batteries, a battery charger, fuses, and wiring.
Once you have all the components, it’s time to plan out the installation process. Find a suitable location in your van to mount the inverter and batteries, ensuring they are secure and easily accessible. Next, connect the batteries in parallel and install the fuses to protect your system from any electrical faults.
Now, it’s time to hook up the inverter and battery charger. Connect the positive and negative terminals of the inverter to the corresponding terminals on the batteries, and do the same for the battery charger. Lastly, make sure to install a transfer switch to seamlessly switch between shore power and the inverter.
With this setup, you’ll be able to charge your batteries while driving or when parked at a campsite with access to shore power. So, hit the road and enjoy the freedom of having a complete power inverter system in your van!
Assessing van’s electrical system
One of the crucial steps in converting a van into a livable space is assessing its electrical system. This will ensure that you have a reliable power source to run your appliances and charge your devices while on the road. Before you dive into installing solar panels or hooking up a battery system, it’s essential to thoroughly prepare.
Start by conducting a detailed inspection of the van’s existing electrical setup. Check for any visible damage, loose connections, or outdated wiring. It’s also wise to consult a professional electrician who can help you determine the voltage capacity and whether any upgrades or repairs are necessary.
By taking these necessary precautions, you can ensure a safe and efficient electrical system for your van conversion.
Calculating battery capacity
“battery capacity” Preparation is key when it comes to calculating battery capacity. Whether you’re designing a new device or trying to understand how long your current battery will last, it’s important to gather the necessary information and do some calculations. First, you’ll need to know the voltage and current ratings of your battery.
Voltage is like the force of electricity, while current is the flow of electricity. Next, you’ll need to determine how long you want your device to run on battery power. This could be expressed in hours, minutes, or even days.
Finally, you’ll need to consider the efficiency of your device. How well does it convert electrical energy into useful work? By taking all of these factors into account, you can calculate the battery capacity needed to power your device for the desired amount of time. So, grab a pen and paper, and let’s crunch some numbers!
Determining optimal wiring layout
“optimal wiring layout” When it comes to determining the optimal wiring layout for your home or office, preparation is key. Before you start installing wires and outlets, it’s important to assess your needs and create a plan. Consider how many electrical devices you will have, where they will be located, and the overall layout of the space.
This will help you determine the best locations for outlets and switches, as well as the most efficient paths for running your wires. By taking the time to plan and prepare, you can ensure that your wiring layout is optimized for your specific needs, making future installations and repairs much easier.
Installing the Inverter
If you’re looking to set up a complete 12-volt DC to 110-volt AC power inverter system in your van, one of the essential steps is installing the inverter itself. The inverter is what converts the 12-volt DC power from your van’s battery into the 110-volt AC power that can be used to charge your devices. To install the inverter, you’ll first need to locate a suitable mounting location in your van.
This can be a cabinet, a wall, or even the floor of the van. Once you have a suitable location, you’ll need to secure the inverter using screws or brackets. Make sure to choose a location that is easily accessible for maintenance and troubleshooting.
Once the inverter is securely mounted, you’ll then need to connect the wires. This involves connecting the positive wire from the inverter to the positive terminal on your van’s battery and the negative wire to the negative terminal. It’s important to make sure the connections are tight and secure to avoid any electrical issues.
Finally, you’ll need to connect the AC outlets of the inverter to any devices or appliances you want to power. This can be done using a standard AC power cord. Once everything is connected and properly secured, you’ll be ready to start enjoying the convenience of a fully functional power inverter system in your van.
Mounting the inverter
“Installing the Inverter: Powering Up Your Solar System” Once you have all the solar panels securely mounted on your roof, it’s time to install the heart of your solar system – the inverter. The inverter is responsible for converting the direct current (DC) electricity produced by the solar panels into the alternating current (AC) electricity that powers your home. To begin, you’ll need to find a suitable location for the inverter.
This is typically an area close to your electrical service panel, as the inverter needs to be connected to your home’s electrical grid. Ensure that the chosen location is well-ventilated and offers enough space for the inverter to be mounted securely. Once you’ve found the perfect spot, it’s time to mount the inverter.
Start by attaching the mounting bracket to the wall or surface using screws. Make sure the bracket is level to ensure a proper installation. Next, carefully slide the inverter into the bracket, securing it with screws or clips provided by the manufacturer.
When mounting the inverter, it’s crucial to consider its weight and size. Inverters can vary in size and weight, so be sure to check the manufacturer’s specifications to ensure the bracket and mounting surface can handle the load. Now that the inverter is securely mounted, you can begin connecting it to your solar panel system.
Follow the manufacturer’s instructions carefully and connect the DC input from the solar panels to the appropriate terminals on the inverter. Double-check all connections to make sure they are secure and tight. Once all the connections are made, it’s time to connect the inverter to your home’s electrical panel.
This step requires working with the electrical wiring in your home, so it’s important to hire a licensed electrician if you’re not comfortable doing it yourself. The electrician will ensure that the inverter is safely and correctly connected to your home’s electrical grid. With the inverter properly installed and connected, you are now ready to enjoy the benefits of solar energy.
Connecting the inverter to the battery
Installing the Inverter Now that you have your solar panels set up and your batteries ready to go, it’s time to connect the inverter to the battery. The inverter is an essential component of your solar power system as it converts the DC (direct current) electricity produced by your panels into AC (alternating current) electricity that can be used to power your home appliances. To begin, locate a suitable spot for your inverter.
It should be close to your batteries and in a well-ventilated area. It’s important to keep the inverter away from any moisture or extreme temperatures. Once you have found the right spot, mount the inverter securely using the provided hardware.
Next, carefully connect the positive and negative terminals of the battery to the corresponding terminals on the inverter. Make sure to follow the manufacturer’s instructions for proper connection. It’s important to double-check that the connections are secure and tight to prevent any loose connections that could lead to electrical faults or failures.
Once the connections are in place, turn on the inverter and check the display or indicators to ensure that it is functioning properly. Some inverters have built-in safety features that will automatically shut off if there is a problem with the connection or if the voltage is too high or too low. It’s a good idea to periodically check the connections and monitor the performance of your inverter to ensure that it is working efficiently.
If you have any concerns or notice any issues, consult the manufacturer’s manual or seek professional assistance. By installing the inverter correctly and taking the necessary precautions, you can enjoy the benefits of your solar power system and power your home appliances with clean, renewable energy. So, go ahead and take that step towards a greener and more sustainable future!
Test running the inverter
installing the inverter
Charging the Inverter System
So, you’ve decided to transform your van into a mobile home and you want to set up a complete 12 volt DC to 110 volt AC power inverter system. One of the most important things to consider is how you’re going to charge this system. After all, you’ll need a reliable source of power to keep your batteries topped up and your appliances running.
One option is to have a dedicated charging system installed in your van. This typically involves installing a solar panel on the roof of your van, along with a charge controller and a battery bank. The solar panel harnesses the power of the sun and converts it into electricity, which is then stored in the battery bank.
The charge controller regulates the amount of power going into the batteries to prevent overcharging. Another option is to use a portable generator to charge your power inverter system. Generators can be a convenient and reliable source of power, especially if you’re going on longer trips or camping in areas with limited sunlight.
Make sure to choose a generator that is compatible with your power inverter system and has enough capacity to keep your batteries charged. Lastly, if you’re traveling in areas with access to electricity, you can use a standard AC outlet to charge your power inverter system. Simply plug your inverter into the outlet and it will convert the AC power into DC power to charge your batteries.
This option is great if you’re staying in campsites or RV parks that offer electrical hookups. No matter which charging option you choose, it’s important to keep an eye on your battery levels and make sure they’re properly maintained. Regularly check the charge level and use a multimeter to ensure that your batteries are getting the power they need.
With a reliable charging system in place, you can enjoy all the comforts of home while on the road.
Exploring charging options
In order to keep your inverter system running smoothly, it’s important to understand the different charging options available. One common method of charging the inverter system is through a direct connection to the power grid. This means that the inverter is connected to your home’s electrical system, allowing it to draw power from the grid when needed.
This is a convenient option because it means that you don’t have to worry about constantly monitoring and maintaining the system’s battery levels. However, if there is a power outage, this method of charging will not be available and your inverter system will not be able to function. That’s why it’s recommended to have a secondary charging option, such as solar panels or a generator.
These options allow you to charge the inverter system using renewable energy sources, ensuring that you have power even during an outage. Solar panels harness the energy of the sun to generate electricity, while a generator uses fuel to power the inverter. Both options are reliable and can provide a consistent source of power for your inverter system.
So, whether you choose to connect your inverter system directly to the power grid or use renewable energy sources, it’s important to have a backup plan in case of emergencies.
Installing a solar charging system
Solar charging systems are a great way to harness the power of the sun and reduce your reliance on traditional electricity sources. One important aspect of installing a solar charging system is properly charging the inverter system. The inverter is a key component of the system that converts the DC power generated by the solar panels into AC power that can be used to power your home.
To ensure that the inverter is charged correctly, you will need to connect it to the solar panels and the battery bank. This can be done by following the manufacturer’s instructions and using the appropriate cables and connectors. Once the inverter is connected, you can then monitor its charging status and adjust the settings as needed.
It’s important to note that the charging process may take some time, so be patient and allow the system to fully charge before using it. By properly charging the inverter system, you can ensure that your solar charging system is working efficiently and effectively. So, why not take advantage of the power of the sun and start saving money on your electricity bills today?
Connecting to the van’s alternator
charging the inverter system, connecting to the van’s alternator Now that you’ve set up your inverter system in your van, you need to make sure it stays charged and ready to power your electronic devices. One way to do this is by connecting your inverter system to your van’s alternator. This connection allows the alternator, which is a device that converts mechanical energy into electrical energy, to charge the batteries in your inverter system while you are driving.
It’s like having a little power plant in your van! To make this connection, you will need to identify the positive and negative terminals of your van’s alternator. These terminals are usually labeled, but if they are not, you can consult your van’s manual or do a quick search online for the specific make and model of your van. Once you have located the terminals, you will need to connect the positive terminal to the positive terminal of the inverter system and the negative terminal to the negative terminal.
It’s important to use the right size wire for this connection. A wire that is too thin may not be able to handle the current, while a wire that is too thick may be difficult to work with. It’s also a good idea to use fuses or circuit breakers to protect your system from any electrical damage.
Now that your inverter system is connected to your van’s alternator, it will automatically start charging whenever the van is running. This means that as long as you are driving, your inverter system will be getting a steady supply of power. This is especially useful if you plan on using your van’s electrical system for extended periods of time, such as camping trips or long road trips.
In conclusion, connecting your inverter system to your van’s alternator is a great way to ensure that your system stays charged and ready to use. It’s a simple and effective solution that will keep your electronic devices powered up while you are on the road. Plus, it’s like having your own little power plant in your van! So why not take advantage of your van’s alternator and keep your inverter system charged and ready to go?
Safety Precautions
Are you ready to power up your van with a complete 12-volt DC to 110-volt AC power inverter system? Safety should be your top priority when setting up this system. Here are some important precautions to keep in mind. First, make sure to choose a high-quality power inverter that is specifically designed for the wattage and voltage requirements of your devices.
This will prevent overload and potential damage to both your electronics and the inverter itself. Additionally, be sure to properly ground the inverter to minimize the risk of electric shock. Connect the inverter to a dedicated battery bank with the appropriate cables, and install a fuse or circuit breaker between the battery and inverter to protect against short circuits and overcurrent events.
Lastly, always follow the manufacturer’s instructions and consult with a professional if you are unsure about any aspect of the installation process. Safety first, and happy adventuring with your new power inverter system!
Understanding potential dangers
Safety precautions are vital when it comes to avoiding potential dangers. Whether you’re at home, work, or out in public, it’s essential to be aware of your surroundings and take steps to keep yourself and others safe. One important precaution is to make sure that your environment is secure.
This includes locking doors and windows, as well as having a security system in place. It’s also important to be mindful of your personal information, such as not sharing credit card numbers or passwords with anyone. Taking simple steps like these can go a long way in preventing potential dangers and keeping yourself safe.
Properly grounding the inverter system
Properly grounding the inverter system is essential for ensuring safety and preventing potential hazards. When it comes to electrical systems, safety should always be a top priority. Grounding helps to provide a safe path for electrical current to flow in the event of a fault or surge.
It also helps to prevent electrical shock and protects equipment from damage. So, how do you properly ground an inverter system? Here are a few safety precautions to keep in mind.
Conclusion
And there you have it, folks! The ultimate guide on how to transform your humble van into a powerhouse on wheels. By setting up a complete 12-volt DC to 110-volt AC power inverter system, you can charge your devices, power your appliances, and keep the party going no matter where you roam. But let me break it down for you with a clever analogy.
Picture your van as a superhero, going on adventures and saving the day. But even superheroes need to recharge their powers, right? That’s where the power inverter system comes in. Think of the power inverter as the van’s trusty sidekick, constantly converting the DC power from the van’s battery into AC power that your devices can use.
It’s like having a personal assistant who anticipates your needs and ensures you never run out of juice. But wait, there’s more! Like any good superhero team, you need a reliable charging system to keep your battery in top shape. Enter the charger.
This gadget acts as a superhero’s secret hideout, providing a safe space for your battery to rejuvenate and replenish its energy. With the power inverter system and charger working together harmoniously, you can conquer any situation that comes your way. Whether it’s powering a mini-fridge to keep your drinks cool or charging your phone to stay connected with the outside world, this setup has got you covered.
So, my fellow adventurers, it’s time to unleash the power of your van and transform it into a mobile oasis. Set up your complete 12-volt DC to 110-volt AC power inverter system, charge your battery like a superhero, and let the road become your playground. Happy travels!”
FAQs
What is a power inverter?
A power inverter is a device that converts DC (direct current) power from a battery to AC (alternating current) power that can be used to run household appliances or electronic devices.
How does a power inverter system work?
A power inverter system works by taking the DC power from a battery and converting it into AC power. This AC power can then be used to run various appliances or devices that require AC power.
How do I choose the right power inverter for my van?
When choosing a power inverter for your van, you need to consider the wattage requirements of the appliances or devices you wish to power. It is recommended to select an inverter with a higher wattage rating than the combined wattage of all the devices you plan to use simultaneously.
Can I use a power inverter while my van is charging?
Yes, you can use a power inverter while your van is charging. In fact, it is a common practice to charge the van’s battery while simultaneously running appliances or devices using the power inverter.
How do I connect the power inverter to my van’s battery?
To connect a power inverter to your van’s battery, you need to first locate the positive and negative terminals of the battery. Then, connect the positive terminal of the inverter to the positive terminal of the battery and the negative terminal of the inverter to the negative terminal of the battery.
Can a power inverter drain my van’s battery?
Yes, a power inverter can drain your van’s battery if used for an extended period without the van’s engine running. It is advisable to keep the engine running or periodically start it to recharge the battery when using a power inverter.
What type of appliances or devices can I power with a 12-volt DC to 110-volt AC power inverter system?
A 12-volt DC to 110-volt AC power inverter system can power a wide range of appliances or devices, such as laptops, smartphones, TVs, refrigerators, and power tools. However, it is essential to check the wattage requirements of each device to ensure it is within the limits of the inverter’s capacity.