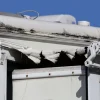
Having a bent RV awning arm can be a frustrating predicament, and it’s essential to address the issue as soon as possible. Whether it’s due to accidental damage or wear and tear over time, a bent RV awning arm can hinder the functionality and aesthetics of your recreational vehicle. But don’t worry! In this blog post, we’ll walk you through the simple steps of straightening a bent RV awning arm.
By the end of this guide, you’ll have all the information you need to fix the problem and get your awning back in tip-top shape. So let’s dive in and get your RV ready for your next adventure!
Table of Contents
Introduction
If you’re an RV owner, you know the importance of having a functional awning to provide shade and protection from the elements. However, sometimes accidents happen, and your awning arm may become bent or damaged. While it may seem like a daunting task to straighten a bent RV awning arm, with a little guidance, you can get your awning back in working order in no time.
In this article, we will explore a step-by-step guide on how to straighten a bent RV awning arm, so you can continue to enjoy the great outdoors with peace of mind. So, let’s get started!
Overview of RV Awning Arms
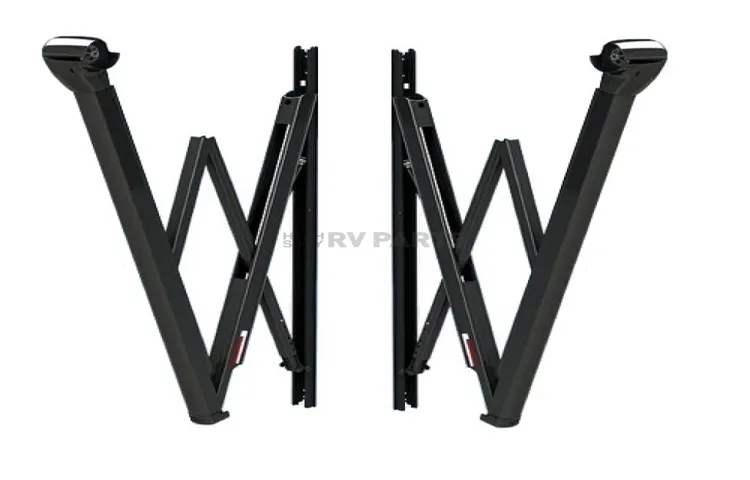
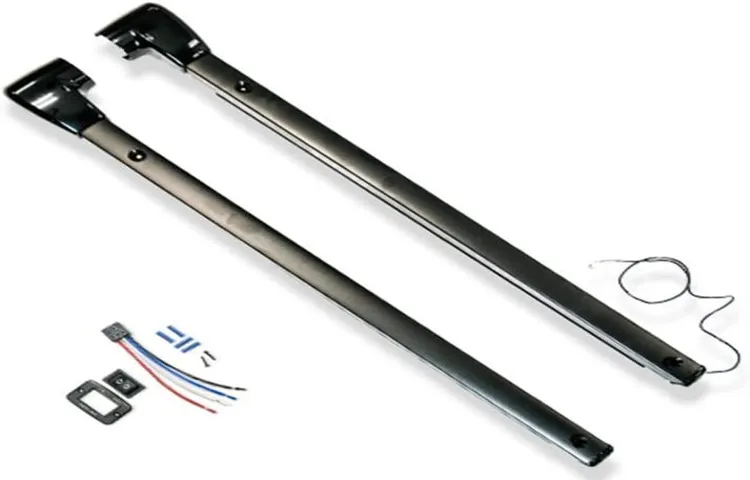
RV awning arms are an essential component of an RV’s retractable awning system. These arms are responsible for supporting and extending the awning fabric, allowing RVers to enjoy shade and cover from the sun and elements. They help create a comfortable outdoor living space and can be extended or retracted as needed.
RV awning arms come in different styles, including manual and automatic options, each offering its own benefits and features. Whether you’re looking to upgrade your current awning system or considering adding one to your RV, understanding the different types of awning arms available can help you make an informed decision that best suits your needs and preferences.
Importance of Straightening Bent RV Awning Arms
bent RV awning arms, straightening bent RV awning arms
Tools and Materials You’ll Need
If you’ve noticed that your RV awning arm has become bent, don’t worry! It’s a common issue that can be addressed with a few tools and materials. To straighten a bent RV awning arm, you’ll need a ladder, a pair of pliers or vice grips, a heat gun or hairdryer, and a little bit of elbow grease. First, set up your ladder so that you can easily access the bent awning arm.
Then, using your pliers or vice grips, carefully grip the bent portion of the arm and apply gentle pressure to straighten it. Be sure to avoid using too much force, as this can cause further damage. If the awning arm is severely bent and difficult to fix manually, you can use a heat gun or hairdryer to warm up the aluminum.
This will make it more pliable and easier to straighten. Just be sure to use caution when working with heat tools to avoid any burns or damage to your RV’s exterior. With a little bit of patience and the right tools, you’ll have your RV awning arm looking straight and sturdy in no time.
List of Required Tools
List of Required Tools When it comes to taking on a new project, having the right tools and materials is essential. Whether you’re a seasoned DIY enthusiast or just starting out, having a well-stocked toolbox will make your life a whole lot easier. So, what tools do you need? Let’s take a look at some of the essentials.
First and foremost, you’ll need a good set of basic hand tools. This includes a hammer, screwdrivers (both flathead and Phillips), pliers, a tape measure, and an adjustable wrench. These tools will come in handy for a wide range of tasks, from hanging pictures to tightening loose screws.
Additionally, you’ll want to invest in some power tools. A cordless drill is a must-have, as it will make drilling holes and driving screws a breeze. A circular saw is also a useful tool to have, as it can cut through wood and other materials quickly and accurately.
And of course, don’t forget safety equipment, such as safety glasses, gloves, and a dust mask. With these tools in your arsenal, you’ll be ready to tackle any project that comes your way. So go ahead, get started, and let your creativity shine!
Materials Needed
Before you start any DIY project, it’s important to gather all the tools and materials you’ll need to get the job done right. For this particular task, you’ll want to make sure you have a few basic tools on hand. A good set of screwdrivers, both flathead and Phillips, will come in handy when assembling the various components.
You’ll also want to have a pair of pliers within reach for tightening any nuts or bolts. Additionally, a measuring tape or ruler will be essential for ensuring precise measurements. As for the materials, you’ll need a sturdy base or frame to build upon.
This could be anything from a wooden platform to a metal frame, depending on your design preference. You’ll also need various connectors or brackets to secure the components together. This could include screws, nails, or even zip ties.
Finally, don’t forget about the main material itself. Whether you’re building a shelf, a table, or a piece of furniture, you’ll need the appropriate wood, metal, or other material to bring your vision to life. By having all the tools and materials ready before you start, you’ll save yourself time and frustration down the line.
Step-by-Step Instructions
So, your RV awning arm got bent, huh? Don’t worry, it happens to the best of us. Luckily, fixing a bent RV awning arm is a relatively simple process that you can do yourself. Here’s a step-by-step guide on how to straighten a bent RV awning arm.
First, you’ll need a few tools to get the job done. Grab a rubber mallet, a pair of pliers, and a wrench or socket set. You might also need some lubricant, such as WD-40, to help loosen any stuck parts.
Start by extending the awning fully and securing it in place so that it doesn’t move while you’re working on it. Then, take a closer look at the bent awning arm. Identify the source of the bend and determine if any other parts are damaged.
Next, use your pliers to straighten out any smaller kinks or bends in the awning arm. Gently grasp the bent section and apply steady pressure in the opposite direction of the bend. Be careful not to exert too much force, as you don’t want to cause further damage.
If the bent section is severely damaged or still won’t straighten out, it’s time to bring out the rubber mallet. Lay a towel or blanket over the bent area to protect the awning fabric, and then use the rubber mallet to tap the bent section back into shape. Start with light taps and gradually increase the force until the awning arm is straight again.
Once you’ve straightened out the bent awning arm, check the other parts of the awning for any signs of damage. You may need to replace or repair any broken or worn components. Finally, give the awning arm a thorough inspection to make sure it’s properly aligned and functioning correctly.
Step 1: Safety Precautions
When it comes to any DIY project, safety should always be the first priority. This is especially true when working with electrical wiring. Before you dive into any electrical project, make sure you follow these safety precautions to protect yourself and your home.
First, always make sure the power is turned off at the circuit breaker before you start working on any electrical wiring. It’s also a good idea to wear protective gear such as safety glasses and gloves to prevent any accidents. Never overload an electrical circuit and use the correct wattage light bulbs for your fixtures.
Additionally, if you’re unsure about anything, it’s best to consult a professional electrician. Remember, taking the necessary safety precautions can ensure that your DIY electrical project goes smoothly and without any mishaps.
Step 2: Assess the Damage
When dealing with damage in your home, it is important to assess the situation step-by-step. The first step is to assess the damage and determine the extent of it. This may involve inspecting the affected area, taking pictures, and documenting any visible damage.
You should also check for any potential safety hazards and make note of them. Next, you will want to contact your insurance company to report the damage and initiate the claims process. They will guide you through the necessary steps and provide you with the information you need to proceed.
Assessing the damage is crucial in order to determine the best course of action and ensure that it is properly addressed.
Step 3: Prepare the Work Area
When it comes to painting a room, preparation is key. Taking the time to prepare the work area will make the painting process much smoother and help you achieve professional-looking results. In this step-by-step guide, we will walk you through how to properly prepare your work area before starting to paint.
First, start by clearing the room of any furniture, decorations, or other items that could get in the way. This will give you ample space to move around and ensure that nothing gets accidentally damaged or stained during the painting process. Next, protect the floors and any remaining furniture by covering them with drop cloths or plastic sheets.
Paint can easily splatter or spill, and having a protective barrier in place will prevent any unwanted accidents or messes. Now, it’s time to address any holes, cracks, or imperfections on the walls. Use a putty knife to fill in any holes or cracks with spackle or joint compound, and then sand it down until it’s smooth.
This will create a clean and smooth surface for the paint to adhere to, resulting in a more professional finish. Once the walls are repaired, it’s important to give them a good cleaning. Use a mild detergent mixed with water to remove any dirt, grease, or stains.
This will ensure that the paint adheres properly and will help the color to go on evenly. Finally, before you start painting, take the time to tape off any trim, windows, or other areas that you don’t want to get paint on. Use painter’s tape to create clean lines and protect these areas from accidental drips or brush strokes.
By taking the time to properly prepare your work area, you will set yourself up for success when it comes to painting the room. These simple steps will save you time and frustration in the long run and help you achieve professional-looking results. So grab your paintbrush and get ready to transform your space with a fresh coat of paint!
Step 4: Loosen the Rivets
While the previous steps have focused on preparing your project for rivet removal, step 4 is where the action really starts. Loosening the rivets is a crucial part of disassembling and fixing any structure held together by these fasteners. To begin, you’ll need a drill with a bit roughly the same size as the rivet head.
The idea here is to create a small hole in the rivet head without damaging the surrounding material. Once you have the hole, use a punch or small hammer to tap away at the rivet until it starts to loosen. Remember not to force it too much at once, as this can cause damage.
It’s also a good idea to give the rivet a few taps from the backside, pushing it out in the opposite direction of how it was installed. With patience and precision, you’ll soon have the rivets loosened and ready for the next step in your project.
Step 5: Straightening the Arm
“straightening the arm” In this step-by-step guide, we will cover how to properly straighten your arm during exercises or activities that require arm extension. Straightening the arm is an essential movement that is used in various exercises, such as push-ups, bicep curls, and overhead presses. It is important to maintain the correct form while performing these exercises in order to prevent injury and maximize the effectiveness of the workout.
To straighten your arm, start by standing up with your feet shoulder-width apart and your arms by your sides. Then, engage your core and slowly extend your arm, keeping it straight and parallel to the ground. Avoid locking your elbow or overextending your arm, as this can put unnecessary strain on your joints.
Instead, focus on maintaining a controlled movement and a slight bend in your elbow. As you straighten your arm, be mindful of any pain or discomfort and adjust your technique accordingly. Practice this movement with lighter weights or resistance bands before progressing to heavier loads.
By following these steps, you will be well on your way to mastering the proper technique for straightening your arm during exercises.
Step 6: Realigning the Awning Arm
awning arm realignment, step-by-step instructions Now that you’ve successfully removed the awning arm from the bracket in the previous steps, it’s time to realign it and get it ready for installation. Realignment is an important step because it ensures that the arm is positioned correctly and will function properly once it’s back in place. To begin the realignment process, you’ll need to closely examine the arm and bracket to determine if any adjustments are needed.
Look for any signs of wear or damage that may have caused the misalignment in the first place. If you notice any issues, such as bent or broken parts, it may be necessary to replace them before proceeding. This will ensure that your awning operates smoothly and safely.
Once you’ve determined that the arm and bracket are in good condition, you can proceed with realigning the arm. Start by lining up the holes in the arm with the holes in the bracket. Take your time to ensure that they are properly aligned before moving on to the next step.
Next, insert the bolts into the holes and tighten them securely. Use a wrench or socket set to ensure that the bolts are tightened to the correct torque. This will prevent the arm from shifting or becoming loose once it’s back in place.
After you’ve tightened the bolts, give the arm a gentle tug to make sure it’s securely attached to the bracket. If it feels loose or wobbly, tighten the bolts further until it feels stable. Now that the awning arm is properly realigned and securely attached to the bracket, you can move on to the final step of the installation process.
This typically involves reattaching the awning fabric to the arm and adjusting the tension for optimal performance. But for now, take a moment to appreciate your accomplishment. You’ve successfully realigned the awning arm and are one step closer to enjoying your outdoor space in comfort and style.
Step 7: Tighten the Rivets
Tighten the Rivets, Step-by-Step Instructions, How to Tighten Rivets Alright, now that we have our rivets in place and secured, it’s time to tighten them up and make sure they’re nice and snug. This step is important because it ensures the stability of whatever it is you’re working on. If the rivets are loose, it can lead to structural issues down the road.
So, let’s get started! Firstly, you’ll need a rivet tool. This is a specialized tool that is designed specifically for riveting. It has a handle and a head with a built-in mechanism that tightens the rivets.
If you don’t have one, you can find them at your local hardware store or online. Next, find the appropriate size tip for your rivets. The tip should fit snugly into the rivet head to ensure a proper grip.
Once you have the right size tip, insert it into the rivet tool head. Now, place the rivet tool over the rivet head and apply pressure. You’ll want to make sure you have a good grip on the tool and that it’s positioned directly over the rivet.
Press down firmly to tighten the rivet. As you tighten the rivet, you may notice that it starts to pull the two pieces of material closer together. This is a good sign! It means the rivet is doing its job and creating a strong bond.
Continue to tighten the rivet until you feel resistance. Be careful not to over-tighten, as this can cause the rivet to snap or strip. Once you’ve reached the point of resistance, stop tightening and move on to the next rivet.
Tips and Tricks
If you find that your RV awning arm has become bent, don’t panic! There are a few simple steps you can take to straighten it out and get your awning back in working order. First, make sure that you have the necessary tools on hand. You’ll need a pair of pliers and a heat source such as a blowtorch or heat gun.
Start by heating up the bent section of the awning arm using the blowtorch or heat gun. This will soften the metal and make it easier to manipulate. Once the metal is hot, use the pliers to slowly and gently straighten out the bend.
Be careful not to apply too much pressure, as this could cause further damage. Take your time and work slowly, making small adjustments until the arm is straight. Once you’re satisfied with the result, allow the metal to cool before retracting the awning.
By following these simple tips, you can easily straighten out a bent RV awning arm and have your awning functioning properly in no time.
Tip 1: Use Heat for Tough Bends
In the world of DIY projects, sometimes you encounter bends in materials that seem impossible to achieve. But fear not! I have a tip that will help you conquer those tough bends with ease: use heat. Applying heat to certain materials can make them more pliable and easier to bend.
The heat helps to soften the material, making it more flexible and less prone to breaking or cracking. You can use a heat gun or a hairdryer to warm up the material before attempting to bend it. Just be sure to heat the material evenly and gradually to avoid any damage or warping.
So, next time you’re faced with a stubborn bend, remember to bring the heat!
Tip 2: Ask for Assistance if Needed
ask for assistance if needed
Tip 3: Regular Maintenance to Prevent Bends
Regular maintenance is essential to prevent bends in your equipment. Bends can occur for a variety of reasons, such as improper use, wear and tear, or accidental damage. By conducting regular maintenance, you can identify and address any issues before they become severe.
Here are some tips for maintaining your equipment and preventing bends: Inspect your equipment regularly: Take the time to visually inspect your equipment for any signs of damage or wear. Look for dents, cracks, or any other abnormalities that could potentially lead to bends.
Clean and lubricate regularly: Keeping your equipment clean and properly lubricated is key to preventing bends. Dust, dirt, and debris can build up and cause friction, which can stress the equipment and lead to bends.
Regular cleaning and lubrication will help keep everything running smoothly. Handle with care: Always handle your equipment with care, both during use and when storing it.
Avoid dropping or banging the equipment, as even a small impact can cause bends. Use proper lifting techniques and store the equipment in a designated area where it won’t be bumped or knocked over.
Use appropriate tools and accessories: Using the right tools and accessories for your equipment can also help prevent bends. Make sure you are using the correct size and type of tools for the job, and use any necessary accessories or supports to ensure the equipment is properly aligned and supported.
Conclusion
In the realm of RV life, accidents happen. One moment you’re cruising down the highway, enjoying the open road, and the next, you find yourself in a battle with a bent awning arm. But fear not, fellow adventurers! With a little patience and some handy tools, you can straighten out that awning arm and have your RV looking sleek and stylish once again.
First things first, you’ll need to gather your tools. Think of yourself as the MacGyver of RV repair, armed with an adjustable wrench, some pliers, a hammer (because who doesn’t feel powerful with a tool that goes ‘bang’), and a can-do attitude. Grab your awning arm and let’s get started.
Step one: Locate a sturdy surface to work on, preferably somewhere with good lighting and a scenic view. After all, you deserve a little entertainment as you tackle this repair. Step two: Examine the bent arm closely, like a detective at a crime scene.
Assess the damage and mentally prepare yourself for the task ahead. Remember, no mystery is too great for a determined RVer! Step three: Using your adjustable wrench, loosen the bolts or screws holding the arm in place. This will give you the freedom to work your magic without any pesky restrictions.
If needed, channel your inner Houdini and perform some advanced maneuvering to gain access to those hard-to-reach areas. Step four: Now comes the fun part – bending that arm back into shape. Take your trusty pliers and gently maneuver them around the bend, applying steady pressure until you feel the arm begin to straighten.
Consider it a yoga session for your awning arm – find that perfect balance between firmness and finesse. Step five: Once you’ve successfully restored your awning arm to its former glory, you’re ready to reattach it to your RV. Secure those bolts or screws once again, tighter than a curling champion’s grip on the stone.
Summary of Key Points
In this blog section, we will summarize the key points and provide some tips and tricks for optimizing SEO. SEO, or search engine optimization, is essential for driving traffic to your website and improving its visibility in search engine rankings. One key tip is to conduct keyword research to determine the most relevant and popular words and phrases that your target audience is searching for.
Incorporating these keywords naturally into your website’s content, meta tags, and URLs can help search engines recognize your site as relevant to those searches. Another trick is to optimize your site’s loading speed, as faster-loading websites tend to rank higher in search results. Additionally, creating high-quality, original content that is regularly updated can help improve your organic search rankings.
Lastly, it’s essential to ensure that your website is mobile-friendly, as mobile devices are becoming increasingly popular for internet browsing. By following these tips and tricks, you can enhance your website’s SEO and increase its visibility online.
Final Thoughts
“Tips and Tricks for Writing Engaging Blog Content” When it comes to writing a blog post that captivates your readers, a few tips and tricks can go a long way. Firstly, it’s important to know your audience and understand what they want to read. Research popular topics and trends in your niche to ensure that your content is relevant and up-to-date.
Secondly, make your blog post scannable by using headings, bullet points, and shorter paragraphs. This helps break up the text and makes it easier for readers to digest. Additionally, use images and videos to enhance your blog post and make it visually appealing.
Visual content not only captures attention but also helps to reinforce your message. Furthermore, be authentic and inject your personality into your writing. Readers are more likely to engage with content that feels genuine and relatable.
Lastly, don’t forget to proofread and edit your work before publishing it. Typos and grammatical errors can detract from your message, so take the time to ensure that your blog post is error-free. By following these tips and tricks, you’ll be able to create engaging blog content that keeps your readers coming back for more.
FAQs
How do I straighten a bent RV awning arm?
To straighten a bent RV awning arm, you will need to carefully assess the damage and use a combination of elbow grease and tools to gently bend it back into shape. Here is a step-by-step guide to help you:
1. Inspect the damage: Take a close look at the bent awning arm and assess the extent of the damage. Determine if it can be safely straightened or if it needs to be replaced.
2. Gather the necessary tools: You will need a rubber mallet or a hammer with a rubber tip, a pair of pliers or a crescent wrench, and a pry bar or a sturdy piece of wood.
3. Loosen the awning arm: Use the pliers or crescent wrench to loosen any screws or bolts holding the awning arm in place. Be sure to keep track of all the hardware removed.
4. Support the awning: Before attempting to straighten the arm, make sure to support the weight of the awning to prevent it from causing further damage.
5. Apply gentle force: Use the rubber mallet or hammer to lightly tap on the bent section in the opposite direction of the bend. Do this incrementally, applying gentle pressure until the arm starts to straighten.
6. Check for progress: After each adjustment, remove the support holding up the awning and check if the arm is straightening. If it’s not, continue tapping and adjusting until you see improvement.
7. Final adjustments: Once the arm is close to being straight, you can use the pry bar or sturdy piece of wood to provide extra leverage and make any final adjustments.
8. Reattach the awning arm: Once you are satisfied with the straightness of the arm, securely reattach it using the screws or bolts you loosened earlier. Make sure everything is tightened properly.
9. Test the functionality: Extend and retract the awning a few times to ensure it is fully functional and that the repaired arm can handle the movement.
Remember, if you are unsure about your ability to straighten the bent RV awning arm or if the damage is extensive, it is always best to consult a professional for assistance.