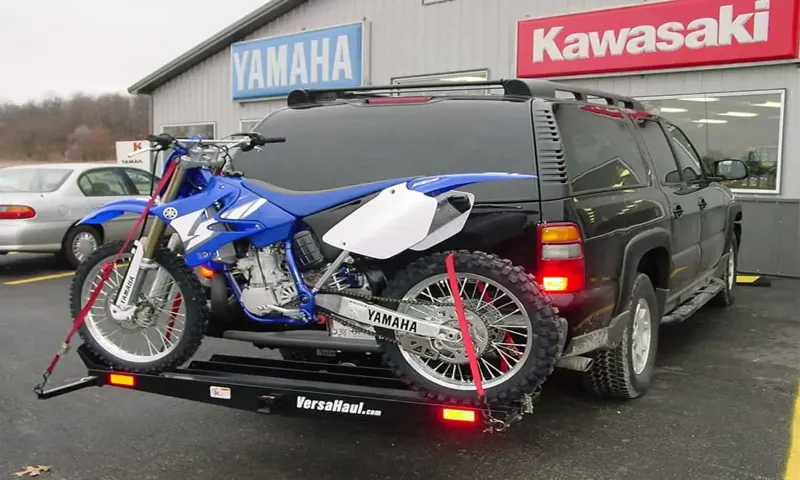
If you’re an adrenaline junkie who loves hitting the trails on your dirt bike, then you know how important it is to have a reliable way to transport your bike from one location to another. And when it comes to hitch carriers, they can be a real game changer. A hitch carrier is a device that attaches to the back of your vehicle and is designed to safely and securely transport your dirt bike.
With their sturdy construction and easy-to-use design, they offer a convenient and efficient way to get your bike to the track, the trail, or wherever your off-road adventures take you. But how do you strap a dirt bike to a hitch carrier? It may seem intimidating at first, but with a few simple steps, you’ll be able to load and secure your bike in no time. In this blog post, we’ll walk you through the process, sharing tips and tricks along the way to ensure a smooth and stress-free experience.
So if you’re ready to hit the road with your dirt bike in tow, keep reading to learn how to strap it to a hitch carrier like a pro. We’ll cover everything from choosing the right straps to securing your bike in place, so you can focus on the thrill of the ride, not the worry of getting your bike there safely. Let’s get started!
Table of Contents
Introduction
If you’re an avid dirt bike rider, you’ll know how important it is to have a reliable and secure way to transport your bike. One popular method is using a hitch carrier, which attaches to the back of your vehicle and allows you to easily transport your dirt bike. But how do you ensure that your bike stays securely strapped to the hitch carrier during transport? In this blog post, we’ll discuss some tips on how to strap your dirt bike to a hitch carrier effectively.
When it comes to strapping your dirt bike to a hitch carrier, the key is to use high-quality tie-down straps. These straps should be made of durable materials such as nylon or polyester and feature strong metal hooks. It’s important to choose straps that have a high break strength and are specifically designed for securing motorcycles.
To begin the strapping process, start by positioning your dirt bike on the hitch carrier with the front tire facing forward. This will help to distribute the weight evenly and prevent any unnecessary movement during transport. Once your bike is in place, use the tie-down straps to secure it to the carrier.
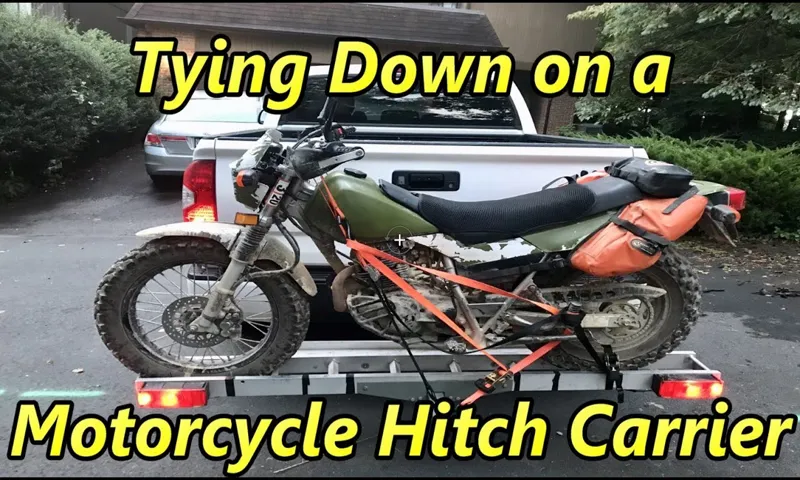
Attach the straps to the handlebars and the footpegs of your dirt bike, making sure they are snug and secure. Be sure to check that the straps are not too tight, as this can damage your bike or restrict suspension movement. One important thing to remember is to crisscross the straps to create an “X” pattern over the bike.
This will provide added stability and prevent any side-to-side movement. Before hitting the road, do a final check to ensure that your dirt bike is securely strapped to the hitch carrier. Give the straps a gentle tug to make sure they are tight, and check for any signs of slack or movement.
In conclusion, strapping your dirt bike to a hitch carrier is a straightforward process when done correctly. By using high-quality tie-down straps and following the proper strapping techniques, you can ensure that your dirt bike stays securely in place during transport. Happy riding!
Why using a hitch carrier is beneficial
hitch carrier, car hitch carrier, benefits of using a hitch carrier, using a hitch carrier for transportation, hitch cargo carrier Introduction: Are you tired of cramming your car full of luggage and gear every time you take a trip? Well, there’s a solution that can make your life much easier – the hitch carrier! A hitch carrier is a device that attaches to the back of your car’s hitch receiver and provides additional space for transporting all your belongings. Whether you’re going on a camping adventure or simply need to transport some bulky items, using a hitch carrier can be incredibly beneficial. In this blog post, we’ll dive into the advantages of using a hitch carrier and how it can make your life a whole lot easier.
So buckle up and let’s explore the world of hitch carriers!

Importance of properly strapping a dirt bike
strapping a dirt bike
Step 1: Prepare the hitch carrier
So, you’ve got your trusty dirt bike and you’re ready to hit the trails. But how do you transport it safely and securely? One option is to use a hitch carrier, which attaches to your vehicle’s hitch and allows you to transport your dirt bike without the need for a trailer. But before you can strap your dirt bike to the hitch carrier, you’ll need to prepare it.
Start by making sure the carrier is clean and free of any debris. This will prevent anything from getting trapped under the bike or causing damage during transportation. Next, check the carrier’s straps and ensure they are in good condition.
If they’re worn or frayed, it’s best to replace them for added security. Finally, make sure the carrier is securely attached to the hitch. Tighten any bolts or screws and double-check that it’s properly aligned.
Once you’ve completed these steps, your hitch carrier is ready to go and you can move on to strapping down your dirt bike securely for transport.
Check the hitch carrier for stability
hitch carrier, stability
Ensure the carrier is properly secured to the vehicle
When it comes to transporting items using a hitch carrier, it’s crucial to ensure that the carrier is properly secured to the vehicle. This will not only prevent any damage or accidents but also ensure that your items stay safe and secure during transit. To start the process, you need to prepare the hitch carrier.
Start by checking if the carrier is in good condition and free from any damages or defects. Next, make sure that the carrier is the right size and weight capacity for your needs. You don’t want to overload it and risk damaging both the carrier and your vehicle.
Finally, double-check that all the necessary components, such as straps or bolts, are included and in good working condition. By taking these steps to prepare the hitch carrier, you’ll be well on your way to securely transporting your items.
Step 2: Secure the dirt bike to the carrier
Now that you have your hitch carrier securely attached to your vehicle, it’s time to strap down your dirt bike. This step is crucial to ensure the safety of your bike during transportation. Start by placing the bike on the carrier, making sure it is evenly balanced and centered.
Next, use tie-down straps to secure the bike to the carrier. These straps should be tight enough to hold the bike in place, but not overly tight as to cause damage. It’s important to secure the bike at multiple points to prevent any shifting or movement during transit.
You can also use additional straps or bungee cords to further secure any loose parts or accessories. Take a moment to double-check that everything is properly strapped down before hitting the road. By securely fastening your dirt bike to the hitch carrier, you can have peace of mind knowing that it will arrive safely at your destination.
Use straps with ratchet mechanisms for added security
When it comes to securing your dirt bike to the carrier, using straps with ratchet mechanisms is a smart move. These straps offer an extra level of security, ensuring that your bike stays in place during transport. The ratchet mechanisms allow you to easily tighten the straps to the desired tension, keeping your bike secure and preventing any movement or shifting during travel.
This added security is especially important if you’re traveling long distances or on rough terrain. So, before you hit the road, make sure you’ve got your straps with ratchet mechanisms ready to go to keep your dirt bike safe and secure during transport.
Position the dirt bike centrally on the carrier
securing the dirt bike to the carrier, dirt bike carrier, position the dirt bike centrally on the carrier. Now that you’ve successfully mounted the dirt bike carrier on your vehicle, it’s time to secure your precious dirt bike to the carrier. This step is crucial to ensure the safety of your bike during transport.
To start, make sure to position the dirt bike centrally on the carrier. This means placing it in the middle, so it is balanced and evenly distributed. This will prevent any wobbling or shifting during transportation, keeping your dirt bike stable and secure.
Imagine balancing a scale – you want to distribute the weight evenly on both sides. By positioning the bike centrally, you’re ensuring that no excess weight is put on one side, minimizing the risk of accidents or damage to your bike and carrier. So take a moment to adjust the placement of your dirt bike on the carrier, making sure it is perfectly centered before moving on to the next step.
Wrap the straps around the bike’s handlebars and foot pegs
To securely transport your dirt bike, it’s important to properly secure it to the carrier. This will ensure that your bike stays in place and doesn’t shift during transit. One way to do this is by wrapping the straps around the bike’s handlebars and foot pegs.
This will hold the bike firmly in place and prevent it from sliding or tipping over. Make sure the straps are tight enough to secure the bike, but not too tight that they damage the bike or restrict its movement. By properly securing your dirt bike to the carrier, you can have peace of mind knowing that your bike will arrive at its destination safely and securely.
Step 3: Tighten and secure the straps
Once you have positioned your dirt bike on the hitch carrier, it’s time to tighten and secure the straps. This step is crucial to ensure that your bike stays in place and doesn’t wobble during transportation. Start by taking one end of the strap and attaching it to a secure point on the carrier.
This could be a metal loop or a strong anchor point. Next, bring the strap over the handlebars of the dirt bike and connect the other end to the opposite side of the carrier. Make sure the strap is tight and secure, but not too tight that it puts excessive pressure on the bike.
Repeat this process with another strap, attaching it to a different secure point on the carrier and looping it around the bike. Finally, give each strap a firm tug to ensure they are tight and double-check that the bike is stable. If necessary, use additional straps to provide extra security.
With the straps tightened and secured, you can now rest assured that your dirt bike will stay in place and arrive safely at your destination.
Use the ratchet mechanisms to tighten the straps
In order to keep your belongings safe and secure during transportation, it is crucial to properly tighten and secure the straps of your ratchet system. The ratchet mechanism is designed to provide maximum tension and hold the straps in place, so you want to take advantage of this feature to ensure a tight and secure fit. Start by placing the straps over your items and making sure they are positioned correctly.
Then, using the ratchet handle, begin to crank it forward to tighten the straps. You will feel the tension increasing as you turn the handle, and this is a sign that the straps are being properly tightened. Keep cranking until the straps are taut and there is no slack left.
Once you have tightened the straps, engage the ratchet mechanism to lock them in place. This will prevent any movement and ensure that your items stay put during transit. Remember to check the straps periodically throughout your journey to make sure they haven’t loosened and re-tighten if necessary.
With the ratchet mechanism, you can have peace of mind knowing that your belongings are securely strapped down and ready for the road ahead.
Double-check the tightness of the straps
In order to ensure your safety and comfort while wearing a backpack, it is crucial to double-check the tightness of the straps. This step is all about making sure that the backpack is secured to your body properly and won’t cause any discomfort or strain. To do this, start by adjusting the shoulder straps so that they are snug against your shoulders.
You don’t want them to be too loose or too tight, as this can cause discomfort or affect your balance. Next, tighten the chest strap if your backpack has one. This strap helps distribute the weight evenly and prevents the shoulder straps from slipping off your shoulders.
Lastly, adjust the hip belt if your backpack has one. This belt should sit comfortably on your hips, providing additional support and taking some of the weight off your shoulders. By taking the time to ensure that the straps of your backpack are properly tightened and secured, you’ll be able to enjoy your adventure without any discomfort or worries.
Secure any loose ends or excess strap length
When it comes to tightening and securing the straps on your load, it’s important to make sure there are no loose ends or excess lengths that could potentially cause problems while you’re on the road. This step is crucial for maintaining the stability and safety of your load. Before you hit the road, take the time to carefully tighten each strap and make sure there are no areas where it’s too loose or too tight.
Check for any slack or excess strap length that could potentially get caught on something while you’re driving. Use the proper tools and techniques to tighten the straps securely, making sure they are snug without being too tight. By securing any loose ends or excess strap length, you’ll have peace of mind knowing that your load is secure and won’t shift or move during transit.
Step 4: Test the stability and security
So you’ve got your hitch carrier all set up and you’re ready to hit the road with your dirt bike. But before you take off, it’s important to make sure that your bike is securely strapped down for a safe and worry-free journey. To start, position your bike on the carrier with the front wheel facing forward.
Use ratchet straps or bungee cords to secure the bike to the carrier. Make sure to strap the bike tightly and evenly to prevent any movement during transit. It’s also a good idea to use additional straps or tie-downs to anchor the bike to the carrier and prevent it from shifting.
Next, check the stability of your setup. Give your bike a gentle shake to make sure it is securely fastened to the carrier. If it feels loose or wobbly, make the necessary adjustments to tighten the straps and ensure a stable ride.
Finally, don’t forget about security. Locking devices, such as a hitch lock or cable lock, can provide an extra level of protection against theft. This will give you peace of mind knowing that your bike is safe and secure while you’re away from your vehicle.
In conclusion, taking the time to properly secure your dirt bike to a hitch carrier is essential for a safe and worry-free journey. By following these steps and checking the stability and security of your setup, you can enjoy your ride knowing that your bike is safely strapped down and ready for adventure.
Gently rock the dirt bike and carrier to check for any movement
When it comes to transporting your dirt bike, ensuring stability and security is paramount. Step 4 of the process involves testing the stability and security of your bike on the carrier. To do this, gently rock the dirt bike and carrier to check for any movement.
This step is crucial as it helps you identify any potential issues and make adjustments before hitting the road. By testing the stability and security, you can ensure that your dirt bike is securely fastened to the carrier and won’t wobble or shift during transit. So, give it a good shake and make sure everything feels tight and secure before you embark on your adventure.
After all, the last thing you want is for your bike to come loose while you’re driving down the highway. Take the time to test the stability and security, and you’ll have peace of mind knowing that your dirt bike is in safe hands.
Ensure the bike is securely attached from all angles
When it comes to ensuring the stability and security of your bike, it’s important to pay attention to every angle. A crucial step in this process is to test the bike to ensure that it is securely attached from all angles. This means checking that the bike is firmly held in place and does not wobble or move when pressure is applied.
One way to test this is by giving the bike a gentle shake or push from different directions. If the bike remains stable and does not shift or come loose, then it is securely attached. However, if you notice any movement or instability, it is vital to address the issue before riding the bike.
This could include tightening bolts or adjusting the attachments to ensure a secure fit. By taking the time to test the stability and security of your bike, you can ensure a safe and worry-free ride.
Conclusion
Now that you have all the tools and know-how, strapping your dirt bike to a hitch carrier is as easy as riding on two wheels. With the right technique, you’ll have your bike secured and ready to hit the trails in no time. So, strap it up, rev that engine, and let the adventure begin.
Just remember, as you embark on your off-roading escapades, the only wheelie you should be doing is on your bike, not on the highway. Happy riding, and may your dirt bike journey be as smooth as freshly paved trails.”
Properly strapping a dirt bike to a hitch carrier ensures safe transportation
After securely attaching the dirt bike to the hitch carrier and tightening the straps, it’s time to test the stability and security of the setup. This step is crucial to ensure a safe and worry-free transportation experience. Start by giving the dirt bike a gentle shake to see if there is any movement or wobbling.
If everything feels solid and secure, you’re off to a great start. However, don’t stop there. It’s important to take your testing to the next level.
Give the dirt bike a few more vigorous shakes and jolts, simulating the bumps and vibrations it might encounter during transportation. This will help you evaluate whether the straps are holding up and if any adjustments need to be made. A stable and secure dirt bike on the hitch carrier will ensure a smooth and trouble-free journey, allowing you to focus on the road ahead with peace of mind.
With these steps, you can confidently strap your dirt bike to a hitch carrier and transport it safely to your next thrilling adventure.
Follow these steps for a secure and worry-free journey
stability and security, secure and worry-free journey
FAQs
How do I secure a dirt bike to a hitch carrier?
To secure a dirt bike to a hitch carrier, first, ensure that the carrier is properly attached to your vehicle’s hitch. Then, position the dirt bike on the carrier, making sure it is centered and balanced. Next, use ratchet straps or tie-down straps to secure the bike to the carrier. Attach the straps to the handlebars, footpegs, or frame of the dirt bike, ensuring they are tight and secure. Finally, check that the bike is stable and immobilized before driving.
Can I use bungee cords to secure a dirt bike to a hitch carrier?
While bungee cords can be helpful in securing small items temporarily, they are not suitable for securing a dirt bike to a hitch carrier. Bungee cords may not provide enough tension or support to safely hold the bike in place during transportation. It is recommended to use ratchet straps or tie-down straps specifically designed for securing heavy loads like dirt bikes.
What is the maximum weight a hitch carrier can handle for a dirt bike?
The maximum weight capacity of a hitch carrier for a dirt bike can vary depending on the specific model. It is important to check the manufacturer’s guidelines or specifications for the hitch carrier you are using. Typically, the maximum weight capacity can range from 300 to 600 pounds. Exceeding the weight limit can compromise the safety and stability of the carrier and may result in damage to your vehicle or the dirt bike.
Are there any additional accessories I need to secure a dirt bike to a hitch carrier?
While ratchet straps or tie-down straps are the primary accessories needed to secure a dirt bike to a hitch carrier, there are a few additional accessories that can enhance safety and stability. Wheel chocks can be used to stabilize the front wheel of the dirt bike, preventing side-to-side movement during transportation. Additionally, soft loops can be attached to the straps and used to protect the handlebars or other sensitive parts of the bike from scratches or damage caused by direct contact with the straps.
Can I transport more than one dirt bike on a hitch carrier?
Some hitch carriers are designed to accommodate multiple dirt bikes, while others are meant for a single bike only. If you wish to transport more than one dirt bike, make sure to select a hitch carrier with a higher weight capacity and sufficient space to safely secure multiple bikes. It is also essential to ensure that the combined weight of the bikes does not exceed the maximum weight capacity of the hitch carrier.
Can I use a hitch carrier for other types of motorcycles or vehicles?
In most cases, hitch carriers designed for dirt bikes can also be used to transport other types of motorcycles, such as street bikes or scooters, as long as they fall within the weight limit of the carrier. However, it is essential to review the manufacturer’s guidelines to ensure compatibility and safety. Different types of vehicles, such as ATVs or UTVs, require specially designed carriers, so it is crucial to use the appropriate carrier for the specific vehicle.
Are hitch carriers suitable for off-road use?
Hitch carriers can be used for off-road transportation of dirt bikes, but it is important to consider the terrain and conditions you will be encountering. Off-road trails can be rough, bumpy, and uneven, which can affect the stability of the hitch carrier and the securing straps. It is recommended to regularly check the straps and re-tighten them if necessary during off-road trips to ensure the dirt bike remains securely attached to the carrier.


