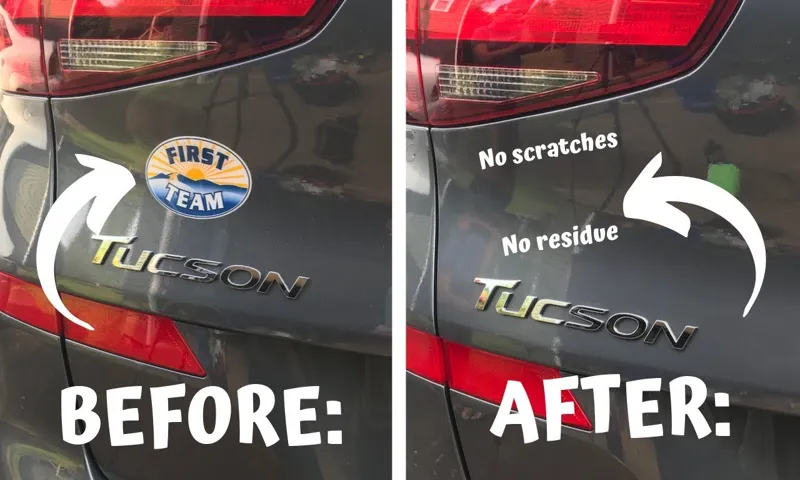
Have you recently purchased a new car from a dealership but can’t stand the obnoxious stickers and decals that litter the exterior? Don’t worry, you’re not alone. Many people feel the same way and want to remove these unwanted embellishments. However, it can be intimidating to tackle this task without damaging your brand new ride.
That’s where we come in. In this simple guide, we’ll take you through the step-by-step process of removing dealership stickers safely and effectively, so you can enjoy your car with a clean and sticker-free appearance. From the materials you’ll need to the techniques you should use, we’ve got you covered.
So, buckle up and let’s get started on this sticker-removal journey.
Table of Contents
Materials Needed
If you’ve recently purchased a new car, chances are there are dealership stickers plastered all over it. While some people might not mind leaving them on, others prefer to remove them for a cleaner look. The good news is that taking them off is relatively easy, and all you need are a few basic materials.
First, grab a bottle of rubbing alcohol, a microfiber towel, and some plastic cards like credit cards or gift cards. Begin by warming up the sticker with a hairdryer or by parking in the sun for a bit. Once it’s warm, use the plastic cards to gently scrape away any edges or corners of the sticker.
Spray some rubbing alcohol onto a section of the sticker and soak it for a few minutes. Afterward, use the plastic card to scrape off the sticker gently. Repeat this process until the dealership sticker is fully removed.
Finally, use the microfiber towel to wipe away any excess adhesive residue and enjoy your newly clean car. With these simple steps and materials, anyone can take off those pesky dealership stickers in no time!
Goo gone
If you’re struggling to remove tough stains or sticky residue, Goo Gone may be just what you need. This powerful cleaning solution can tackle a variety of messes, from gum and adhesive to oil and grease. To use Goo Gone effectively, you’ll need a few key materials.
First, make sure you have a bottle of Goo Gone on hand, which you can find at most hardware or home improvement stores. You’ll also want to have some paper towels or a soft cloth to apply the solution and wipe away any residue. If you’re dealing with a particularly stubborn stain, you may need a scraper or a stiff-bristled brush to help loosen it.
And of course, be sure to wear gloves and work in a well-ventilated area, as the solution can be strong and may irritate your skin or eyes. By using these materials and following the instructions on the bottle, you can make quick work of even the toughest messes with Goo Gone.
Boiling water
Boiling water may seem like a simple task, but having the right materials can make all the difference in achieving the perfect boil. First and foremost, you will need a pot or kettle to hold the water. The size of your pot will depend on the amount of water you need to boil.
It’s important to choose a pot with a lid, as this will help the water boil faster and more efficiently. Next, you’ll need water. The type of water you use can affect the taste of your boiled water, so it’s important to choose a high-quality source.
Finally, you will need a heat source to bring the water to a boil. This can be a stovetop range, a hot plate, or even a camping stove if you’re boiling water outdoors. With these materials in hand, you’re ready to start boiling water like a pro.
Rubbing alcohol
Rubbing alcohol, also known as isopropyl alcohol, is a versatile and affordable household item that has a variety of uses. If you want to make your own cleaning solutions, you’ll need rubbing alcohol! It is a powerful disinfectant agent, making it ideal for wiping down surfaces and sanitizing hands. You’ll also need rubbing alcohol for DIY beauty projects, such as making homemade hand sanitizer or removing stubborn adhesive residue.
Additionally, rubbing alcohol can be used to clean electronics, such as computer screens and keyboards, as it evaporates quickly and doesn’t leave any residue. One thing to keep in mind is that rubbing alcohol should only be used on non-porous surfaces and should not be ingested or used on open wounds. With just a bottle of rubbing alcohol, you can tackle a variety of cleaning and DIY projects around the house!
Step-by-Step Process
If you’ve just bought a new car from a dealership, you’re probably eager to show it off to your friends and family. But one thing that can detract from the beauty of your new vehicle is those annoying dealership stickers that seem to plague the rear window or trunk. Luckily, removing them is a fairly straightforward process, and you can do it at home with just a few tools.
Firstly, start by softening the adhesive holding the sticker onto the vehicle. You can do this by using a heat gun or a hairdryer and gently apply heat to the sticker. Once the adhesive is sufficiently soft, start peeling back the sticker from the corner, making sure to pull it slowly and evenly.
If there is any leftover residue, you can use rubbing alcohol or a specialized adhesive remover to clean it up. Remember to take your time and be patient throughout the process to avoid any damage to the car’s paintwork. With these simple steps, you’ll be able to remove those pesky dealership stickers in no time and enjoy the full beauty of your new ride!
Preparation
Preparation is key for any successful project, and the same goes for preparing for a blog post. To ensure your blog post is informative and engaging, there are several steps you can take to properly prepare. First, determine the topic you want to write about and conduct thorough research to gain a deeper understanding of the subject matter.
Next, create an outline to organize your ideas and ensure your post flows smoothly. This will also help you avoid getting off-topic or repeating yourself. Once you have your outline, start writing and keep your audience in mind.
Remember to use an informal tone, engage the reader with questions and analogies, and keep it brief. Finally, edit and proofread your work to ensure it is error-free and easy to comprehend. By following these steps, you can create a blog post that stands out and effectively communicates your message to your audience.
Application
When it comes to applying for a job, it can be overwhelming and time-consuming. However, following a step-by-step process can make the application process less stressful. Firstly, research the company and the job role to gain a clear understanding of the company’s culture and the responsibilities associated with the job.
Next, tailor your resume and cover letter to the specific job. Highlighting your relevant experiences and skills can increase your chances of getting an interview. It’s essential to proofread both your resume and cover letter to ensure there are no spelling or grammar errors.
Thirdly, follow the application instructions carefully. Some companies may require additional documents, such as references or a portfolio. Double-check that you have included all the necessary information before clicking ‘submit.
‘ Finally, follow up with the employer after a week or two to express your continued interest in the position. By following a step-by-step process, you can present yourself as a well-organized and detail-oriented candidate, increasing your chances of being selected for the job.
Removing the Sticker
Removing a sticker can be a daunting task, especially when you’re dealing with stubborn adhesives. Fortunately, you don’t need to spend hours scratching off your sticker anymore. In this step-by-step process, we’ll show you how to remove a sticker in a breeze.
Firstly, grab a hairdryer and set it on high. Hold it close to the sticker until the adhesive melts and bubbles appear. Gently lift one of the sticker’s corners with your fingernail or a plastic scraper.
Slowly peel the sticker away from the surface. If the sticker is still stubborn, try using adhesive remover or rubbing alcohol. Apply the substance to the sticker and let it sit for a while.
Afterward, attempt to remove the sticker. Repeat the process as necessary until the sticker is entirely gone. If any residue remains on the surface, clean it off with a cloth and some soap and water.
And there you have it, removing a sticker has never been easier!
Final Touches
Now that you have put all the pieces together for your project, it’s time for the final touches! The step-by-step process involves going through every detail and ensuring that everything is just right. Start by checking for typos and grammatical errors in your work. Then, take a closer look at the layout and formatting to make sure everything is consistent and visually appealing.
Check that all images and videos are aligned correctly, and the colors and fonts are consistent throughout. Next, double-check that all hyperlinks work and lead to the correct pages. Lastly, have a final read-through to ensure the tone and message of your content is accurately conveyed to your audience.
By taking the time to do all these final checks, you can be confident that your project is polished and ready to be presented.
Alternative Methods
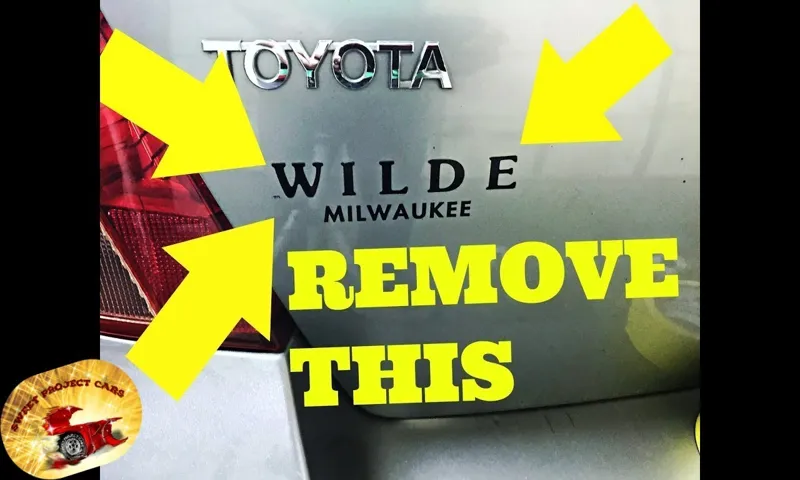
Removing dealership stickers from a car can be a bit of a hassle, but fortunately, there are alternative methods that you can try. One option that many people find effective is using a heat gun or hair dryer to warm up the adhesive on the sticker, making it easier to peel off. Just be careful not to overheat the sticker or the paint on your car! Another method is to use a solution of vinegar and hot water to soak the sticker, which can help break down the adhesive.
You can also try using a razor blade or plastic scraper to gently lift up the edges of the sticker and then peel it off slowly. Whatever method you choose, just be sure to use caution and take your time to avoid damaging your car’s paint or leaving behind any residue. By following these alternative methods, you can safely and effectively remove dealership stickers from your car.
Hairdryer and Plastic Scraper
When it comes to removing stickers or glue residue from surfaces, there are many alternative methods that you can try besides using chemical solvents. One effective method is by using a hairdryer and a plastic scraper. Start by heating the area with the sticker or residue using the hairdryer for a few minutes until it becomes warm to the touch.
Then, use the plastic scraper to gently pry away the sticker or residue. Repeat the process as needed until the surface is completely clean. This method works well on glass, plastic, and metal surfaces but may not be as effective on porous or delicate surfaces.
Overall, the hairdryer and plastic scraper method is an affordable and environmentally friendly way to remove stubborn stickers or residue without the use of harsh chemicals. Give it a try the next time you need to clean off a sticky surface!
Vinegar Solution
If you’re looking for an alternative, chemical-free way to clean your home, vinegar solution might be the answer. Vinegar is a natural disinfectant and can be used for a variety of cleaning tasks. To make a vinegar solution, mix equal parts water and white vinegar in a spray bottle.
This solution can be used to clean kitchen counters and appliances, bathroom surfaces, and even windows. Vinegar is also great for removing stubborn stains and odors. However, be careful not to use vinegar on certain surfaces such as marble or granite as it can etch the surface.
Another advantage of using vinegar is that it is an eco-friendly and cost-effective solution. Give vinegar solution a try next time you’re cleaning your home!
Conclusion
In conclusion, removing dealership stickers may seem like a daunting task, but with a little patience and the right tools, it’s a breeze. Think of it as peeling off the remnants of a bad relationship and making way for a fresh start with your new car. So, grab that hairdryer, start heating things up, and let those stickers know it’s time to hit the road.
Happy driving!”
FAQs
What are dealership stickers?
Dealership stickers are usually labels or decals used by car dealerships to promote their brand or to provide important information about a vehicle’s features.
Can I remove dealership stickers from my car?
Yes, you can remove dealership stickers from your car without causing damage to the paintwork. There are several methods that you can use, such as using a heat gun, using adhesive remover, or using a mixture of warm water and dish soap.
Are there any risks associated with removing dealership stickers?
There is no risk associated with removing dealership stickers as long as you use the right technique and tools. However, if you are not careful, you may end up scratching the paintwork or damaging the clear coat.
Will removing dealership stickers affect the resale value of my car?
Generally, removing dealership stickers will not affect the resale value of your car. However, if you remove a particular sticker that contains important information about the vehicle’s features, such as the fuel type or manual transmission, it may affect the resale value.
How often should I remove dealership stickers from my car?
It is recommended to remove the dealership stickers from your car as soon as possible after purchasing it. However, if you have not done so, you can remove them at any time you like.
Can I remove dealership stickers from leased cars?
Yes, you can remove dealership stickers from leased cars. However, you should check with your lease agreement first to make sure that you are not violating any terms.
Can I reuse dealership stickers on another vehicle?
No, you cannot reuse dealership stickers on another vehicle. Dealership stickers are usually designed to adhere to a specific make and model of the vehicle and may not fit or adhere properly on another vehicle.