
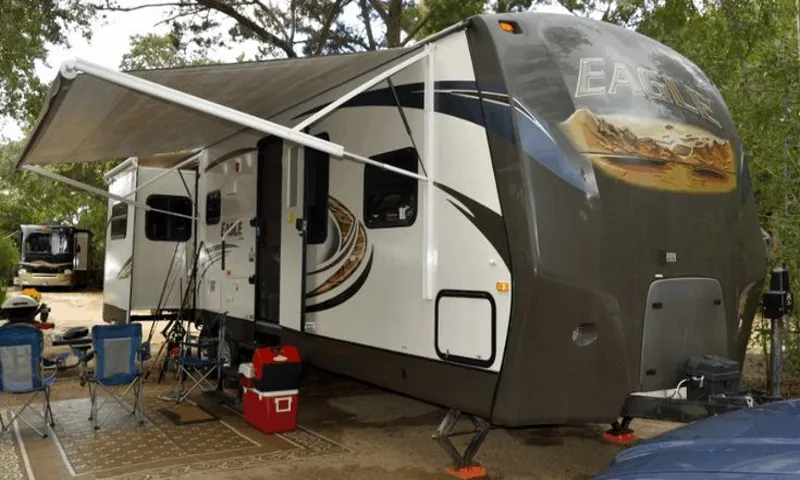
So, you’ve got your RV all set up, ready for a relaxing getaway. You’ve got the grill fired up, the chairs out, and the awning extended to provide some much-needed shade. But there’s just one problem – the angle of the awning isn’t quite right.
The sun is beating down at just the wrong angle, and you’re starting to bake. Don’t worry – we’ve got you covered! In this blog post, we’ll show you exactly how to tilt the awning on your RV to get the perfect amount of shade, no matter what the sun is doing. It’s a simple process that will make a world of difference in your camping experience.
Think of it like adjusting the blinds in your living room. Sometimes you want them fully open to let in as much light as possible, while other times you need to tilt them just right to block out the direct sunlight. Tilting the awning on your RV works in a similar way, allowing you to maintain the perfect balance between shade and sunlight.
So, how do you tilt the awning? It’s actually quite easy. Most RV awnings come with adjustable arms that allow you to change the angle. Simply locate the adjustment knobs or levers on the arms, usually near the top, and loosen them.
This will allow you to move the arms up or down, changing the pitch of the awning. Once you’ve loosened the adjustment knobs, carefully lift the awning arm on the side where you want more shade. This will tilt the awning and block out more sunlight in that area.
You can also adjust the other side to level out the awning if needed. But be sure to use caution when tilting the awning. Start with small adjustments and test the shade before making any big changes.
Introduction
If you’re looking to tilt the awning on your RV, you’ve come to the right place. Tipping the awning can provide additional shade, especially during the hot summer months. Luckily, adjusting the tilt of an RV awning is a relatively simple process.
Typically, a manual awning will have two adjustable arms that connect the awning to the RV. Start by locating the handles on these arms, which should be near the connection points. By rotating these handles, you can adjust the tilt of the awning.
It’s important to note that not all RV awnings have adjustable tilt functionality. If your awning doesn’t have this capability, you may want to consider investing in an aftermarket product that allows for tilting. Regardless of the type of awning you have, it’s always recommended to consult the manufacturer’s instructions for specific guidance on how to tilt your particular awning model.
Explanation of an RV awning
RV awnings are a great addition to any recreational vehicle, providing shade and protection from the elements. They are typically attached to the side of the RV and can be extended and retracted as needed. In this blog post, we will explore the different types of RV awnings, the benefits they offer, and how to properly care for and maintain them.
So, if you are an RV owner or are considering purchasing an RV, keep reading to learn all about RV awnings and how they can enhance your camping experience.
Importance of tilting the awning
importance of tilting the awning
Step-by-step Guide
So you’re wanting to tilt the awning on your RV? Well, lucky for you, it’s not as complicated as it may seem. In fact, it can be done in just a few simple steps. First, locate the awning’s control arm, which is typically found on the side of the RV near the awning itself.
Once you’ve found the control arm, look for the tilt adjustment knob or lever. This is what you’ll use to tilt the awning. Make sure the awning is fully extended before attempting to tilt it.
Once the awning is extended, use the knob or lever to adjust the angle of the awning. This will allow you to tilt it to your desired position, whether it be for shade or to protect against rain. Just be sure to keep an eye on the tension of the awning fabric as you adjust the angle, as too much tension can cause damage.
And there you have it – a quick and easy way to tilt the awning on your RV. Happy camping!
Step 1: Gather necessary tools
For any task or project, it’s important to gather the necessary tools before getting started. The same goes for creating a blog section. To ensure a smooth and efficient process, it’s essential to have all the tools you need at your disposal.
The first tool you’ll need is a computer or laptop. This is where you’ll be doing all your writing, editing, and formatting. Choose a device that you’re comfortable with and that has the necessary software installed, such as a word processing program.
Next, you’ll need a reliable internet connection. This will allow you to research topics, gather information, and upload your blog section to your website or blogging platform. Make sure you have a stable connection that won’t drop out in the middle of your work.
Another important tool is a text editor. While you can use a word processing program for this, using a dedicated text editor can help simplify the writing process. Text editors are often minimalist and distraction-free, allowing you to focus solely on your writing.
Additionally, you’ll want to have a note-taking tool handy. This can be as simple as a pen and paper or a digital note-taking app. This tool will come in handy for jotting down ideas, outlining your blog section, and keeping track of any important information you come across during your research.
Lastly, you’ll want to have a reliable source of inspiration. This can come in the form of books, articles, podcasts, or even other blogs. Surrounding yourself with inspiration will help fuel your creativity and ensure that your blog section is engaging and interesting to read.
Step 2: Extend the awning
Extend the awning, it’s time to create a little shade! This step is where your outdoor oasis really starts to take shape. Extending the awning gives you the opportunity to add a comfortable and shaded space to your patio or deck. So, grab a friend and let’s get started! First, locate the awning controls.
Typically, these are located near the base of the awning, either on the side or underneath. Depending on the type of awning you have, there may be a hand crank or an automated system. If you have a hand crank, insert it into the designated spot and begin turning it clockwise to extend the awning.
As you begin to turn the crank, you’ll feel the tension increase. This is a good thing! It means that the awning fabric is being pulled taut and the frame is extending. Keep cranking until the awning is fully extended to your desired length.
If you have an automated system, locate the control panel and press the button designated for extending the awning. Sit back and watch as the awning smoothly extends on its own. Once the awning is extended, take a moment to inspect it.
Look for any tears or damage in the fabric or any loose screws or bolts in the frame. If you notice any issues, it’s important to address them before proceeding. Now that your awning is fully extended and in good condition, it’s time to secure it in place.
Most awnings have latches or clips that you can use to lock the awning in its extended position. Make sure these are securely fastened to prevent any accidents or damage from strong winds or storms. With the awning securely in place, take a step back and admire your handiwork.
Step 3: Locate the awning arms
The next step in installing an awning is to locate the awning arms. These arms are an essential part of the awning, as they support and extend the fabric cover. To find the awning arms, start by examining the frame of the awning.
Look for metal or plastic brackets attached to the frame, as these are likely where the arms will connect. The arms themselves may be folded up and secured in place with clips or straps. Carefully undo any fasteners or straps and gently lower the arms into position.
Be sure to follow the manufacturer’s instructions and take any necessary safety precautions when handling the awning arms. Once the arms are in place, you can continue with the installation process, moving on to the next step.
Step 4: Identify the tilt mechanism
In the fourth step of our guide on how to repair a broken window blind, we will discuss the importance of identifying the tilt mechanism. The tilt mechanism is responsible for controlling the angle of the slats in your blinds, allowing you to adjust the amount of light and privacy in a room. It is essential to identify the tilt mechanism correctly, as this will determine the type of repair or replacement parts you will need.
Start by examining your blinds and looking for a rod or lever that is connected to the slats. This rod or lever is typically located either on the side of the blinds or in the middle, depending on the style of blinds you have. Once you have located the tilt mechanism, you can proceed with the necessary repairs or replacements to get your blinds functioning properly again.
Step 5: Use a ladder or step stool for safety
step stool, ladder safety tips, prevent accidents, household tasks When it comes to reaching higher places in your home, using a ladder or step stool can be a great help. However, it’s important to prioritize safety while using these tools to prevent accidents or injuries. One of the first steps in ladder or step stool safety is to make sure that the tool you are using is in good condition and free of any defects.
Check for any cracks or loose parts before using it. Additionally, always make sure that the ladder or step stool is on a stable and level surface before climbing onto it. This will help prevent any wobbling or tipping over while you are working.
In addition, be mindful of the weight capacity of the ladder or step stool and never exceed it. Overloading these tools can lead to instability and potential accidents. It’s also important to maintain three points of contact while using a ladder or step stool.
This means keeping two hands and one foot, or two feet and one hand on the tool at all times. This will help provide balance and stability as you work. Lastly, take your time and avoid rushing through tasks when using a ladder or step stool.
It’s better to take things slow and steady to ensure your safety. So, the next time you need the extra height to reach something in your home, remember to follow these ladder and step stool safety tips to prevent any accidents or injuries.
Step 6: Loosen the tilt knobs
In step 6 of our step-by-step guide on how to properly set up your camera tripod, we come to loosening the tilt knobs. This is an essential step in ensuring the stability and adjustability of your tripod. The tilt knobs are located on the head of the tripod and are used to control the vertical movement of your camera.
By loosening these knobs, you allow for smooth and precise tilting of your camera, whether it’s for capturing landscapes, portraits, or any other type of photography. By loosening the tilt knobs, you can easily adjust the angle of your camera to capture the perfect shot. Just remember to tighten the knobs once you have set your desired angle to ensure stability and prevent any accidental movement while you’re shooting.
So, go ahead and give those tilt knobs a gentle loosen, and get ready to capture some stunning photographs with your perfectly set up tripod.
Step 7: Adjust the angle
Now that you have adjusted the height of your camera, it’s time to focus on the angle. The angle at which you position your camera can greatly impact the composition of your shot and ultimately the overall visual aesthetic. So how do you go about adjusting the angle? Well, the key is to experiment.
Start by positioning your camera at eye level and take a test shot. Take a look at the image and see if it captures the subject in a visually pleasing way. If not, try adjusting the angle slightly higher or lower and take another shot.
Keep experimenting until you find the perfect angle that highlights your subject and creates a visually interesting composition. Remember, photography is all about trial and error, so don’t be afraid to play around with different angles until you find the one that works best for you.
Step 8: Secure the awning in place
patio awning installation, secure awning, awning hardware, awning anchor points, awning wall brackets, awning strap, awning ratchet, awning poles, awning stakes. Once you have properly installed your patio awning and adjusted it to the desired position, it’s time to secure it in place to ensure it stays put, even in windy conditions. The last thing you want is for your awning to come loose and potentially cause damage or injury.
To secure the awning, you will need a few essential awning hardware items. Start by attaching awning anchor points, also known as awning wall brackets, to your house’s exterior wall. These brackets are designed to hold the awning securely in place.
Next, take an awning strap and thread it through the anchor points, making sure it is tight and secure. You can then use an awning ratchet to tighten the strap further, adding extra stability. Finally, if your awning has the option, you can use awning poles or awning stakes to further secure the awning to the ground.
These items can be inserted into the ground on either side of the awning, providing additional support. By following these steps and using the appropriate awning hardware, you can ensure that your patio awning stays securely in place, even on windy days.
Tips and Precautions
One important feature of an RV awning is its ability to tilt, providing shade and protection from the sun at different angles. Tipping the awning can help to maximize shade throughout the day and depending on the position of the sun. To tilt the awning on an RV, follow these simple steps.
First, locate the awning arms and support legs. Then, loosen the knobs or levers on both arms to allow for adjustment. Next, manually raise or lower one side of the awning to tilt it to the desired angle.
Finally, secure the awning in place by tightening the knobs or levers. It’s important to exercise caution when adjusting the awning on an RV. Be sure to have someone assist you and use proper safety measures to avoid injury.
Additionally, be mindful of the weather conditions before tilting the awning. Strong winds or heavy rain can put strain on the awning and may cause damage if it is not properly secured. In conclusion, by following these tips and precautions, you can tilt the awning on your RV to enjoy maximum shade and protection from the sun while on your camping adventures.
Check the manufacturer’s instructions
“manufacturer’s instructions”
Inspect the awning and hardware regularly
awning, hardware, inspect, regularly, tips, precautions
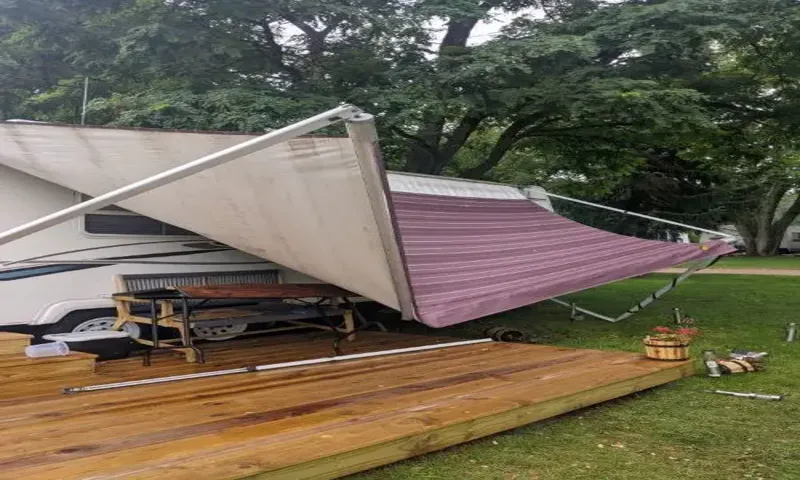
Avoid tilting the awning in strong winds
One important tip when it comes to awnings and strong winds is to avoid tilting the awning. While it might be tempting to try and adjust the angle of the awning to block the wind, doing so can actually be dangerous. Tilting the awning increases the surface area exposed to the wind, making it more susceptible to getting caught by a strong gust.
This could potentially lead to the awning being ripped off or damaged. It is much safer to leave the awning in its normal position during high winds and make sure it is properly secured. This way, you can avoid any potential damage or accidents.
So, if you find yourself in a windy situation, remember to resist the urge to tilt your awning and keep it securely in place.
Consider installing an awning tie-down kit
One important precaution to consider when installing an awning is to use an awning tie-down kit. This kit can help secure your awning in place and prevent it from being damaged or blown away during strong winds or storms. An awning tie-down kit typically includes straps and stakes that can be attached to your awning and securely anchored to the ground.
By using a tie-down kit, you can ensure that your awning stays in place, even in inclement weather conditions. This can give you peace of mind knowing that your awning is protected and won’t cause any damage to your property or surrounding areas. So, before you install your awning, make sure to invest in an awning tie-down kit to ensure its stability and longevity.
Conclusion
In conclusion, tilting an awning on an RV is like finding the perfect angle for a sunbathing session – it requires a bit of finesse and a dash of creativity. Just like a master chef, you’ll need to adjust the heat (or in this case, the tilt) to create the perfect balance of shade and sunlight. So grab your mixing bowl (or instead, your RV manual) and get ready to whip up some perfectly tilted awning goodness.
With a little bit of patience and a sprinkle of ingenuity, you’ll have the most envy-inducing setup at the campground in no time. Happy “tilting” and happy adventures!”
Summary of the steps to tilt an awning
awning tilting, tilt an awning, how to tilt an awning Awnings are a great addition to any outdoor space, providing shade and protection from the elements. However, sometimes you may need to adjust the angle of your awning to get the optimal amount of shade or to redirect rainwater. Tilted awnings can also help keep the inside of your home cooler by blocking out direct sunlight.
The process of tilting an awning is relatively simple and can be done in just a few steps. First, locate the crank or lever that controls the tilt mechanism. This is usually located on one side of the awning frame.
Next, use the crank or lever to tilt the awning to the desired angle. Be sure to do this slowly and carefully to avoid any damage to the awning or its mechanisms. Once the awning is tilted to the desired angle, secure it in place by either locking the tilt mechanism or using any provided hardware.
It’s important to follow the manufacturer’s instructions for tilting your awning to ensure proper operation and to avoid voiding any warranties. When tilting an awning, there are a few tips and precautions to keep in mind. First, never attempt to tilt an awning in strong winds or severe weather conditions.
This can put undue stress on the awning and may cause damage. It’s also important to regularly check the condition of your awning, including its frame, fabric, and tilt mechanism. If you notice any signs of wear or damage, it’s best to address them before attempting to tilt the awning.
Additionally, be mindful of any obstructions or objects in the path of the awning when tilting it. This includes tree branches, light fixtures, and windows. Finally, always exercise caution and take your time when tilting the awning.
Importance of proper awning maintenance
proper awning maintenance, importance of awning maintenance, awning maintenance tips, awning maintenance precautions, maintaining your awning, keeping your awning in good condition, caring for your awning. As a homeowner, you may have invested in an awning to enhance the beauty and functionality of your outdoor space. However, like any other part of your home, awnings require regular maintenance to ensure they stay in good condition and continue to serve their purpose effectively.
Maintaining your awning not only improves its longevity but also helps you avoid costly repairs or replacements down the line. Here are a few tips and precautions to help you keep your awning in the best possible shape. Firstly, it’s essential to clean your awning regularly to prevent dirt, debris, and pollutants from accumulating.
Use a soft brush or broom to remove any loose dirt, and then gently rinse the fabric with a mild detergent and water. Avoid using harsh chemicals or abrasive cleaners, as they can damage the fabric. Additionally, it’s crucial to inspect your awning for any signs of wear and tear, such as rips, tears, or loose stitching.
Addressing these issues promptly can prevent further damage and extend the lifespan of your awning. Finally, take precautions to protect your awning from extreme weather conditions. Retract your awning during strong winds, heavy rain, or snowfall to prevent it from getting damaged.
Investing in a weather sensor or wind sensor can automate this process and provide added protection. By following these simple tips and precautions, you can ensure your awning remains in optimal condition and continues to enhance your outdoor living space for years to come.
FAQs
How do I tilt the awning on my RV for better shade?
To tilt the awning on your RV, first, locate the awning arms on both sides. Then, release the locking mechanism on each arm by pushing the lever or button. Once unlocked, you can manually adjust the angle of the awning by pushing up or pulling down on one side while keeping the other side stationary. Experiment with different angles until you achieve the desired tilt for optimal shade.
Can I adjust the awning tilt to block out the sun?
Yes, you can adjust the tilt of your RV awning to block out the sun at different times of the day. By tilting the awning downwards on the side where the sun is coming from, you can create a shaded area underneath the awning. This is especially useful during hot summer days or when you want to enjoy a meal outside without the sun directly in your eyes.
How do I prevent water pooling on my RV awning?
To prevent water from pooling on your RV awning, it is important to make sure it is properly pitched or tilted. If your awning has an adjustable pitch, ensure that it is angled slightly downwards so that rainwater can easily run off. Additionally, make sure the fabric of the awning is taut and not sagging, as this can also contribute to water pooling. Regularly inspect and clean your awning to ensure proper drainage and longevity.
What should I do if my RV awning gets stuck in a tilted position?
If your RV awning gets stuck in a tilted position and won’t budge, there are a few troubleshooting steps you can try. First, check if any debris or objects are obstructing the movement of the awning arms or locking mechanism. Clearing any obstructions may allow the awning to tilt properly again. If that doesn’t work, try applying a silicone lubricant to the moving parts of the awning. This can help loosen any stuck components and allow for easier operation. If all else fails, it may be necessary to consult a professional for repairs.
Is it possible to adjust the tilt of my RV awning while it’s already extended?
Adjusting the tilt of your RV awning while it’s fully extended can be tricky but not impossible. It’s generally easier to adjust the tilt before fully extending the awning. However, if you need to make changes while the awning is already out, proceed with caution. Ensure that the awning arms and locking mechanism are stable and secure. Use one hand to support the awning while releasing and adjusting the tilt with the other hand. Take your time and make small adjustments to avoid any sudden movements or damage to the awning.
Can I tilt my RV awning to protect it from strong winds?
While tilting your RV awning can provide some protection against strong winds, it’s important to note that awnings are not designed to withstand severe weather conditions. In general, it’s recommended to retract or fully secure your awning when anticipating high winds, heavy rain, or storms. However, if you need temporary wind protection, you can adjust the tilt of the awning slightly downward on the side where the wind is coming from. This can help minimize wind resistance and reduce the risk of the awning getting damaged.
What is the proper angle to tilt an RV awning for rainwater runoff?
The proper angle to tilt an RV awning for rainwater runoff is usually between 5 to 15 degrees. This slight downward pitch allows rainwater to flow off the awning instead of pooling. Too much tilt can result in inadequate shade or coverage, while too little tilt can cause water to accumulate. It’s essential to find the right balance and adjust the tilt according to your specific awning model and weather conditions. Regular maintenance, such as cleaning debris from the awning fabric, can also help ensure proper rainwater runoff.