
Are you looking for a way to update your GM Tech 2 scan tool? If so, you’ve come to the right place. In this blog post, we will discuss how to update your GM Tech 2 scan tool and why it’s important to keep your tool up to date. Updating your scan tool is essential to ensure that it can accurately diagnose and troubleshoot issues with your GM vehicle.
Just like how your phone or computer needs regular software updates to perform at its best, your scan tool also requires updates to stay current with the latest vehicle information and diagnostic capabilities. Without regular updates, your scan tool may not be able to identify newer vehicle models or diagnose certain issues accurately. So, let’s dive right in and learn how to update your GM Tech 2 scan tool!
Table of Contents
Introduction
If you own a GM Tech 2 scan tool and want to keep it up to date with the latest software and features, you’re in luck! Updating your GM Tech 2 scan tool is a relatively simple process that can be done at home. By regularly updating your scan tool, you ensure that it remains compatible with the latest vehicle models and is able to diagnose any potential issues accurately. To update your GM Tech 2 scan tool, you will need a subscription to the GM Service Information (GMSi) website, as well as a PC with internet access.
Once you have these requirements, you can download the latest software updates onto your PC and then transfer them to your scan tool using a USB cable. With just a few simple steps, you can keep your GM Tech 2 scan tool up to date and functioning at its best. So, why wait? Start updating your scan tool today and stay ahead of the game when it comes to diagnosing and servicing GM vehicles.
What is the GM Tech 2 Scan Tool?
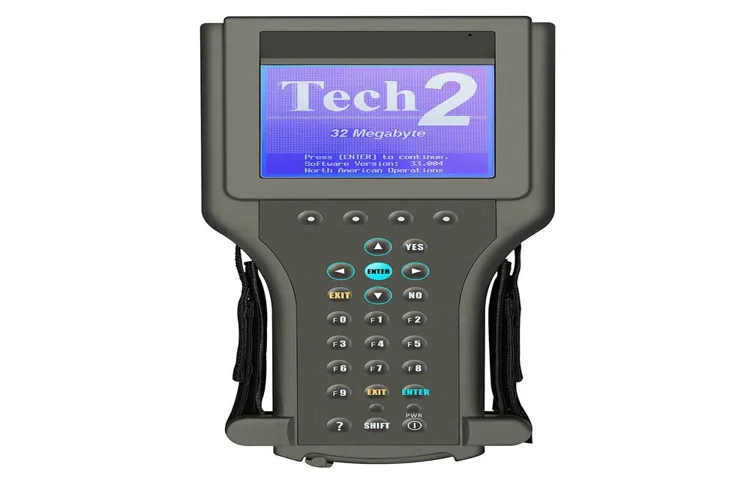
GM Tech 2 Scan Tool The GM Tech 2 Scan Tool is a diagnostic tool designed specifically for General Motors vehicles. It is a portable device that allows technicians to quickly and accurately diagnose and troubleshoot issues with GM vehicles. The Tech 2 scan tool connects to the vehicle’s computer system and provides real-time data on the vehicle’s performance, including engine speed, coolant temperature, fuel pressure, and more.
It also has the ability to read and clear diagnostic trouble codes, perform system tests, and program key fobs. In addition to its diagnostic capabilities, the Tech 2 scan tool can also be used to reprogram certain vehicle systems and modules. Overall, the GM Tech 2 Scan Tool is a versatile and powerful tool that helps technicians efficiently diagnose and repair General Motors vehicles.
Why is it important to update the GM Tech 2 Scan Tool?
GM Tech 2 Scan Tool
Step 1: Gathering the necessary materials
So, you’ve decided that it’s time to update your GM Tech 2 scan tool. Congratulations! Keeping your scan tool up to date is essential for ensuring that you have the latest software and can diagnose and repair vehicles accurately. The first step in the update process is gathering all the necessary materials.
You will need a computer with an internet connection, a USB cable, and of course, your GM Tech 2 scan tool. Make sure that your computer meets the system requirements for the update software, and ensure that you have enough storage space to download and install the update. Additionally, it’s always a good idea to have a backup of your scan tool’s current software, just in case anything goes wrong during the update process.
Once you have all these materials gathered, you’re ready to move on to the next step in updating your GM Tech 2 scan tool.
List of materials needed for the update
In order to successfully update your home, it is important to gather all the necessary materials beforehand. This will save you time and prevent any delays in the process. The first step is to make a list of the materials you will need for the update.
This can include items such as paint, brushes, rollers, drop cloths, sandpaper, and primers, depending on the specific project. You may also need tools such as a screwdriver, hammer, or level, depending on the type of update you are doing. It is a good idea to visit a hardware store or home improvement center to ensure you have all the materials you need before you begin the update.
By gathering all the necessary materials in advance, you can ensure a smooth and efficient update process.
Where can you obtain the necessary materials?
When it comes to starting your own DIY project, the first step is always gathering the necessary materials. But where can you obtain these materials? Well, there are a few different options available to you. One option is visiting your local home improvement store.
These stores typically have a wide selection of materials, such as lumber, paint, and hardware. Another option is searching online. There are numerous websites that specialize in selling DIY materials, and you can often find a wider range of options and better deals.
Additionally, you can also consider asking friends and family if they have any materials they no longer need. This could be a great way to save money and repurpose materials that would otherwise go to waste. So, before you dive into your DIY project, take the time to gather all the necessary materials.
Whether you choose to visit a store, shop online, or seek materials from others, make sure you have everything you need to bring your project to life.
Step 2: Downloading the update software
Updating the GM Tech 2 Scan Tool is a crucial step to ensure that you have the latest diagnostic software and data for your vehicle. To begin the update process, you will need to download the update software onto your computer. Start by visiting the official GM Tech 2 website and create an account if you haven’t already.
Once you have logged in, navigate to the “Downloads” or “Support” section of the website and look for the update software specific to your Tech 2 model. Click on the download link and save the software to a location on your computer that you can easily access. Make sure to double-check that you are downloading the correct software for your Tech 2 model to avoid any compatibility issues.
Once the download is complete, you can proceed to the next step of the update process.
Finding the official GM website for software updates
Once you have found the official GM website for software updates, the next step is to download the update software. This is an essential part of the process as it will allow you to update your vehicle’s software and ensure that it is functioning optimally. To download the software, you will need to navigate to the software update section of the website.
Here, you will typically find a list of available updates for your specific vehicle model. You can usually search for updates by entering your vehicle identification number (VIN) or selecting your vehicle from a drop-down menu. Once you have identified the correct update for your vehicle, you can click on the download button.
The update file will then be downloaded to your computer or device. It is important to note that the download process may differ slightly depending on the website and the specific software update you are downloading. Make sure to follow the instructions provided on the website to ensure a successful download.
Locating the specific software update for the GM Tech 2 Scan Tool
software update for GM Tech 2 Scan Tool, update software, downloading update software
Step 3: Connecting the GM Tech 2 Scan Tool to a computer
So, you’ve got your GM Tech 2 scan tool and you’re ready to update it. The first step is to connect it to your computer. This can be done using a USB cable.
Once you’ve connected the scan tool to your computer, you’ll need to turn on the scan tool and launch the software that came with it. This software will allow you to connect to the GM server and download any available updates. Once connected, you’ll be prompted to enter your user information and password.
After entering this information, the software will automatically search for any available updates for your scan tool. If updates are available, you’ll be able to download them directly to your scan tool. This process may take some time, depending on the size of the update and the speed of your internet connection.
Once the update is complete, you’ll be ready to use your GM Tech 2 scan tool with the latest software and diagnostic capabilities. So, why wait? Take the next step and update your scan tool today!
Using the USB cable to connect the scan tool to a computer
gm tech 2 scan tool, USB cable, computer, connecting, step 3 Once you have your GM Tech 2 Scan Tool and you’re ready to start diagnosing your vehicle, you’ll need to connect it to your computer using a USB cable. This step is crucial because it allows the scan tool to communicate with the computer and transfer data between the two devices. To begin, locate the USB port on your scan tool.
It’s usually located on the bottom or side of the device. Next, find the USB port on your computer. It’s typically located on the back or side of the computer tower.
Once you’ve located both USB ports, take your USB cable and plug one end into the USB port on the scan tool, and the other end into the USB port on your computer. Make sure the cable is securely connected on both ends. After connecting the USB cable, turn on your scan tool and wait for the computer to recognize it.
You may see a message on your computer screen indicating that a new device has been detected. Once the scan tool is connected and recognized by your computer, you can proceed with using diagnostic software or accessing vehicle-specific information. This connection allows you to perform various functions, such as reading and clearing diagnostic trouble codes, viewing live data, and running system tests.
In conclusion, connecting the GM Tech 2 Scan Tool to your computer using a USB cable is an essential step in utilizing the full capabilities of the scan tool. It allows for seamless communication between the two devices and enables you to diagnose and troubleshoot any issues with your vehicle. By following the steps outlined above, you’ll be well on your way to successfully connecting your scan tool to your computer and getting started with diagnosing your vehicle.
Ensuring the scan tool is properly powered on
GM Tech 2 Scan Tool Step 3: Connecting the GM Tech 2 Scan Tool to a computer Once you have properly powered on the scan tool, the next step is to connect it to a computer. This is an important step because it allows you to access and analyze the data collected by the scan tool. To connect the GM Tech 2 Scan Tool to a computer, you will need a USB cable.
This cable should be included with your scan tool kit. Locate the USB port on the scan tool and plug one end of the cable into the port. Next, find a free USB port on your computer and plug the other end of the cable into it.
Make sure the connection is secure. Once the scan tool is connected to the computer, you may need to install the necessary software or drivers. This will depend on the specific scan tool model and the computer operating system you are using.
Follow the instructions provided with your scan tool to install the software or drivers. This may involve downloading files from the manufacturer’s website or using a CD that was included with the scan tool. Once the software or drivers are installed, you should be able to access the data collected by the scan tool on your computer.
This will allow you to view diagnostic trouble codes, perform system tests, and make adjustments as needed. In conclusion, connecting the GM Tech 2 Scan Tool to a computer is an essential step in accessing and analyzing the data collected by the scan tool. By following the instructions provided by the manufacturer, you can ensure a secure and successful connection.
Step 4: Installing the update
Are you ready to update your GM Tech 2 scan tool? Great! It’s time to move on to step 4: installing the update. This is an important step to ensure that your scan tool is equipped with the latest software and features. To begin, you’ll need to connect your GM Tech 2 scan tool to your computer using the provided USB cable.
Once connected, open the update software on your computer and follow the on-screen instructions to install the update. It’s important to note that the installation process may take some time, so be patient and allow the update to fully install. Once the installation is complete, disconnect your scan tool from the computer and power it on.
You’re now ready to take advantage of the latest updates and enhancements on your GM Tech 2 scan tool. Happy scanning!
Running the software update program
Running the software update program can be a breeze, especially when you reach the step of installing the update. After going through the initial stages of checking for updates and downloading them, it’s time to let the update work its magic on your system. Installing the update is crucial to ensure that your software is up to date and running smoothly.
Just like how we update our appliances or furniture in our homes, updating software is like giving your computer a fresh coat of paint or a new set of wheels. It brings in new features, bug fixes, and security patches to keep your system optimized and protected. So, get ready to click that “Install” button and let your computer embrace the new update, so you can experience all the benefits it has to offer.
Following the on-screen instructions to install the update
updating software, install update, on-screen instructions, download, computer, device, system, technology, user-friendly. Following the on-screen instructions to install the update is an essential step in keeping your computer or device up to date with the latest software. Once you have downloaded the update, you will usually be prompted with a set of instructions that guide you through the installation process.
These instructions are designed to be user-friendly and straightforward, ensuring that even those with limited technical knowledge can easily update their systems. By following these instructions, you can ensure that the update is installed correctly and that any new features or security enhancements are properly integrated into your system. So, don’t rush through this step – take the time to carefully read and follow the on-screen instructions, and you’ll have your software updated in no time!
Step 5: Verifying the update
Updating the GM Tech 2 scan tool is a crucial step to ensure that you have the latest software and vehicle coverage. Once you have downloaded the update files from the manufacturer’s website, you can proceed with the verification process. To do this, connect the Tech 2 scan tool to your computer using the included USB cable.
Open the update software on your computer and follow the prompts to select the desired update files. Double-check that you have chosen the correct files for your specific scan tool model and vehicle make. Once you have confirmed the files, click on the “Verify” button to initiate the verification process.
This will compare the update files with the current software on your scan tool to ensure that they are compatible. The verification process may take a few minutes, so be patient and do not disconnect the scan tool during this time. Once the verification is complete, you will receive a confirmation message on your computer screen.
Congratulations, you have successfully verified the update for your GM Tech 2 scan tool! Now you can proceed with the installation process to complete the update and start using the latest software and vehicle coverage.
Disconnecting the GM Tech 2 Scan Tool from the computer
After completing the update process on the GM Tech 2 Scan Tool, the final step is to disconnect it from the computer and verify that the update was successful. Disconnecting the scan tool is a straightforward process. First, safely remove the USB cable from the scan tool and the computer.
Next, disconnect any adapters or connectors that were used during the update process. Once everything is disconnected, take a moment to visually inspect the scan tool for any signs of damage or loose connections. Now it’s time to verify the update.
To do this, turn on the scan tool and navigate to the menu where the software version is displayed. Compare this version number to the one you wrote down earlier. If they match, it means that the update was successful and the scan tool is now running the latest software version.
In addition to verifying the software version, you can also test the scan tool by performing a diagnostic scan on a vehicle. Connect the scan tool to a vehicle and run a scan to check for any error codes or issues. If the scan tool is able to successfully communicate with the vehicle and retrieve accurate diagnostic information, it further confirms that the update was successful.
By following these steps, you can ensure that the GM Tech 2 Scan Tool has been properly updated and is ready to use for diagnosing and troubleshooting vehicle issues. Disconnecting the scan tool and verifying the update are important final steps in the update process and can give you peace of mind that your equipment is up to date and functioning correctly.
Performing a self-test on the scan tool to ensure the update was successful
During the update process, it is important to perform a self-test on the scan tool to ensure that the update was successful. This self-test will help verify that all the functions and features of the tool are working properly after the update. To perform the self-test, you will need to follow the instructions provided by the manufacturer.
Typically, this involves selecting the self-test option from the menu on the scan tool and following the prompts. The self-test will then run diagnostic checks on the tool to ensure that everything is functioning correctly. If any issues are detected during the self-test, it may indicate that the update was not successful and further troubleshooting may be required.
However, if the self-test completes successfully without any errors, it is a good indication that the update was successful and the scan tool is ready to use. Verifying the update through a self-test is an important step to ensure that you can rely on the scan tool for accurate and reliable diagnostic information.
Conclusion
In conclusion, updating the GM Tech 2 scan tool is as important as giving your car’s brain a much-needed boost. Just like we need our morning coffee to wake up, our car’s diagnostic tool needs regular updates to stay sharp and ready to diagnose any potential issues. But fear not, dear automotive enthusiasts, for updating the GM Tech 2 scan tool is a breeze! With just a few simple steps, you can unleash the full potential of this mighty brainiac and ensure that your car receives the best care possible.
So, don’t let your scan tool become outdated and clueless like a fish out of water; give it the update it deserves and watch it transform into the Sherlock Holmes of automotive diagnostics. Happy updating, my fellow car aficionados!”
The importance of keeping your GM Tech 2 Scan Tool up to date
GM Tech 2 Scan Tool update
Enjoying the benefits of an updated scan tool
Having an updated scan tool can greatly enhance your automotive diagnostics capabilities, but it’s important to verify the update to ensure its effectiveness. Step 5 in the process of enjoying the benefits of an updated scan tool is verifying the update. This step ensures that the scan tool has been successfully updated and is ready to use.
Verifying the update involves checking for any error messages or prompt notifications that may indicate a problem with the update process. It’s also a good idea to run a diagnostic scan on a vehicle to verify that the scan tool is functioning properly and able to retrieve accurate data. By taking the time to verify the update, you can have confidence in the performance of your scan tool and make the most of its advanced features.
FAQs
How do I update my GM Tech 2 scan tool?
To update your GM Tech 2 scan tool, you will need a subscription to the GM Service Programming System (SPS) and a Tech 2 scan tool with the necessary software. Follow the instructions provided by GM to connect your scan tool to a computer and download any available updates.
Can I update my GM Tech 2 scan tool without a subscription?
No, you will need a subscription to the GM Service Programming System (SPS) in order to update your GM Tech 2 scan tool. The subscription provides access to the latest software and programming updates for GM vehicles.
How often should I update my GM Tech 2 scan tool?
It is recommended to update your GM Tech 2 scan tool regularly to ensure compatibility with the latest GM vehicle models and software updates. General guidelines suggest updating every 6 months to a year, or whenever significant updates are released by GM.
What is the cost of a GM Tech 2 scan tool update?
The cost of a GM Tech 2 scan tool update will vary depending on the specific subscription plan you choose and the length of the subscription. Contact GM or an authorized dealer for current pricing information.
Can I update the software on my GM Tech 2 scan tool myself?
Yes, you can update the software on your GM Tech 2 scan tool yourself by following the instructions provided by GM. However, it is important to ensure that you have a stable internet connection and carefully follow the update process to avoid any potential issues.
Are there any prerequisites or system requirements for updating my GM Tech 2 scan tool?
Yes, in order to update your GM Tech 2 scan tool, you will need a stable internet connection, a computer running Windows operating system, and the necessary software provided by GM. Make sure to review the system requirements and follow any prerequisites specified by GM.
Can I use a third-party software or tool to update my GM Tech 2 scan tool?
No, it is recommended to use the official GM Service Programming System (SPS) and software provided by GM to update your GM Tech 2 scan tool. Third-party software or tools may not be compatible or provide the necessary updates for full functionality.