
Have you ever experienced the frustration of a small crack or chip in your car’s windshield? It can be a real headache, not to mention a potential safety hazard. But before you rush to the auto shop and spend a small fortune on replacing the entire windshield, there’s a much simpler and cost-effective solution – the 3M Windshield Repair Kit. Imagine having the power to fix those annoying windshield imperfections right at home, without any professional expertise or expensive tools.
With the 3M Windshield Repair Kit, you can turn what would have been a major inconvenience into a quick and easy DIY project. Think of it like a first aid kit for your windshield – it contains everything you need to repair small cracks, chips, and bullseye damage in no time. This innovative kit uses advanced technology to fill in the damaged area, making it virtually invisible and restoring the strength and integrity of your windshield.
It’s like magic, but even better! Whether it’s a result of a loose pebble on the highway or a stray baseball flying through the air, the 3M Windshield Repair Kit can fix it all. It’s designed to work on various types of glass, including laminated windshields commonly found in most modern vehicles. So, no matter what kind of car you have, this kit has got you covered.
The best part? Not only is the 3M Windshield Repair Kit incredibly effective, but it’s also incredibly easy to use. With clear, step-by-step instructions and all the necessary tools included, even those with minimal DIY experience can achieve professional-quality results. Save time, save money, and save yourself the headache of dealing with a damaged windshield.
So, why put up with that annoying crack or chip any longer? Take matters into your own hands with the 3M Windshield Repair Kit and give your windshield the TLC it deserves. In just a few simple steps, you’ll have a clear and strong windshield once again, ready to protect you on the roads. Don’t let a small imperfection become a big problem – take action today with the 3M Windshield Repair Kit.
Table of Contents
What is the 3M Windshield Repair Kit?
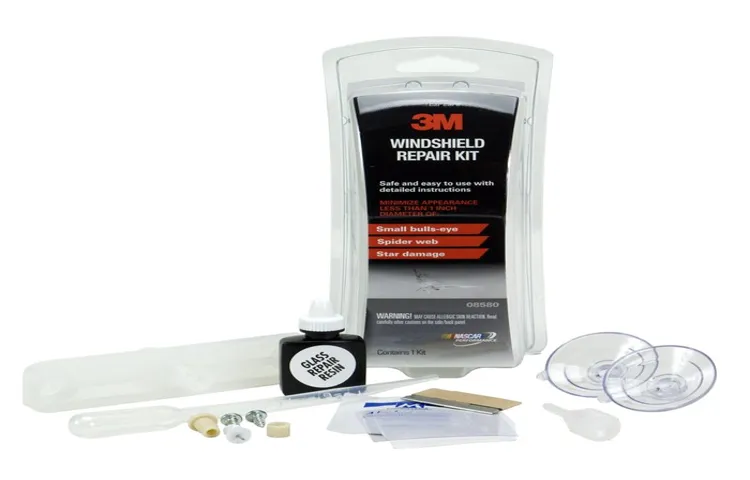
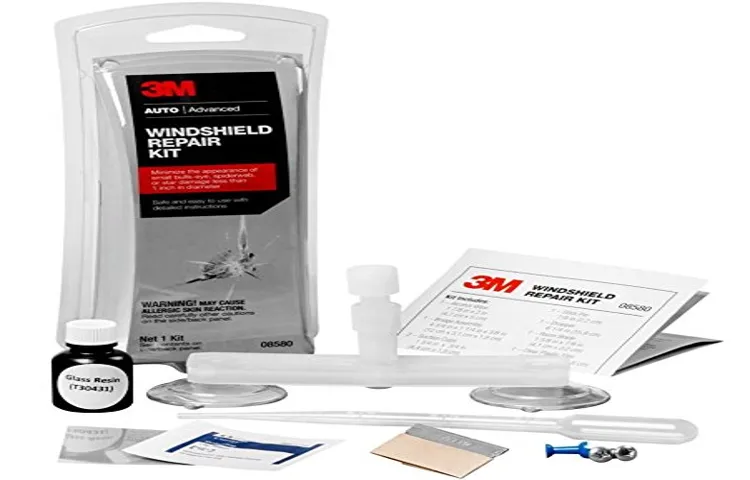
The 3M Windshield Repair Kit is a handy tool that allows you to fix minor chips and cracks in your car’s windshield. It’s a simple and effective solution that can save you time and money. The kit comes with everything you need to perform the repair, including a syringe, resin, and adhesive strips.
The process is straightforward and can be done in just a few easy steps. First, you’ll clean the damaged area and apply the adhesive strip to create a seal. Then, you’ll fill the syringe with the resin and inject it into the chip or crack.
The resin will then fill the damaged area and bond with the glass, restoring its strength and clarity. After a few minutes, you’ll remove the syringe and apply another adhesive strip to the repaired area. Finally, you’ll let it cure in the sunlight for about 5-10 minutes.
Once the resin is fully cured, you can remove the adhesive strip and the repair will be complete. With the 3M Windshield Repair Kit, you can fix minor windshield damage quickly and easily, ensuring clear visibility and safety on the road. So, if you have a small chip or crack in your windshield, don’t wait for it to get worse.
Grab the 3M Windshield Repair Kit and take care of it yourself.
Why should you use the 3M Windshield Repair Kit?
If you have a windshield that has been damaged by a small chip or crack, the 3M Windshield Repair Kit is a great solution to fix it quickly and easily. This kit is designed to be used by anyone, even those with no previous experience in windshield repair. With its clear instructions and easy-to-use tools, you can repair your windshield in just a few simple steps.
The kit includes all the necessary materials, such as resin, curing strips, and a repair bridge, to ensure a high-quality and durable repair. By using this kit, you can save time and money by avoiding the need to replace your entire windshield. So why wait? Get your 3M Windshield Repair Kit today and restore your windshield to its original condition.
How to use the 3M Windshield Repair Kit
If you have a chip in your windshield, the 3M Windshield Repair Kit is a great solution for fixing it. This kit includes everything you need to repair small chips and cracks in your windshield, including a special resin and applicator tools. Using the 3M Windshield Repair Kit is easy and can be done at home with minimal effort.
First, clean the damaged area thoroughly to ensure the resin adheres properly. Next, apply the resin to the crack or chip using the provided applicator tool. After applying the resin, cover it with the included curing strip and park your car in direct sunlight.
The sunlight will help the resin cure and strengthen the repair. After a few hours, remove the curing strip and use the included scraper to remove any excess resin. Finally, wipe the windshield clean and your repair is complete.
The 3M Windshield Repair Kit is a cost-effective and convenient way to fix minor windshield damage, saving you time and money compared to a professional repair.
Step 1: Preparation
3M Windshield Repair Kit, windshield repair, glass repair, DIY windshield repair, cracked windshield, chip repair
Step 2: Clean the damaged area
3M Windshield Repair Kit After assessing the damage to your windshield, it’s time to move on to step 2: cleaning the damaged area. This is an important step because it allows for better adhesion of the repair resin to the glass, ensuring a strong and lasting repair. To clean the damaged area, start by using the included alcohol wipe to thoroughly clean the surface.
This will remove any dirt, debris, or oils that may be present. Once the area is clean, take the special 3M safety razor and gently scrape away any loose glass fragments. Be careful not to apply too much pressure or you may further damage the windshield.
After the area is clean and free of any loose glass, take the 3M windshield repair resin and carefully apply it to the damage. Use the provided applicator to evenly distribute the resin, making sure to fill in any cracks or chips completely. Once the resin is applied, cover it with the included curing strip.
This strip will help to create a vacuum seal and ensure that the resin cures completely. Press the strip firmly onto the windshield, making sure it covers the entire damaged area. Now that the resin is in place and covered, it’s time to move on to the next step in the 3M Windshield Repair Kit: curing the resin.
Stay tuned to find out how to complete this final step and restore your windshield to its original condition.
Step 3: Apply the resin
3M Windshield Repair Kit, apply the resin
Step 4: Cure the resin
“3M Windshield Repair Kit” Now that you’ve successfully injected the resin into the crack or chip in your windshield using the 3M Windshield Repair Kit, it’s time to cure the resin and complete the repair process. Curing the resin is an essential step that ensures the resin hardens and bonds effectively with the glass, restoring strength and clarity to your windshield. To cure the resin, start by exposing it to natural sunlight or an ultraviolet (UV) lamp.
The UV rays will activate the curing process and help the resin harden faster. Make sure to position your vehicle in a spot where it can receive direct sunlight, or use a UV lamp according to the manufacturer’s instructions. Leave the resin to cure for at least 15 minutes, but if the weather is colder or the resin is thicker, you may need to allow for a longer curing time.
After the resin has hardened, you can use a razor blade to remove any excess resin that may be protruding from the surface of the windshield. Gently scrape off the excess resin, making sure not to scratch the glass. Once you’ve removed the excess resin, use a windshield cleaner to clean the repaired area and remove any remaining residue.
Congratulations, your windshield is now repaired and ready to withstand the road ahead. The 3M Windshield Repair Kit has helped you save time and money by fixing the crack or chip on your own, giving you peace of mind knowing that you have a reliable and clear view while driving.
Step 5: Polish the repaired area
3M Windshield Repair Kit, polish the repaired area, auto glass repair, DIY windshield repair, windshield chip repair, windshield crack repair, repairing windshield, repairing auto glass. After successfully filling the chip or crack with resin, the final step in using the 3M Windshield Repair Kit is to polish the repaired area. This step is crucial for achieving a smooth, clear finish that will blend in seamlessly with the rest of the windshield.
To begin, make sure the resin has completely cured according to the instructions provided with the kit. Once the resin is fully set, use a clean, lint-free cloth to apply a small amount of the 3M Glass Polishing Compound to the repaired area. Gently buff the compound into the resin, using circular motions, for about 30 seconds to a minute.
This will help to remove any remaining imperfections and restore the clarity of the glass. After polishing, wipe away any excess compound with a clean cloth. Finally, inspect the repaired area to ensure that it is smooth and free of any blemishes.
If necessary, repeat the polishing process until the repair is completely seamless. By following these steps, you can achieve professional-quality results and extend the longevity of your windshield repair.
Tips for using the 3M Windshield Repair Kit
Using the 3M Windshield Repair Kit can be a great way to fix minor cracks and chips in your car’s windshield. This kit comes with everything you need to do the repair yourself, including a resin formula that is specifically designed to bond with the glass and restore its strength. First, you’ll want to clean the damaged area with the provided alcohol wipe to remove any dirt or debris.
Then, apply the resin to the crack or chip using the included syringe. Make sure to follow the instructions carefully to ensure that you apply the right amount of resin and that it is evenly spread across the damaged area. After applying the resin, use the provided film to cover the repair site and expose it to sunlight or a UV light for a few minutes.
This will help the resin to harden and fully bond with the glass. Finally, remove the film and use the included razor blade to carefully scrape away any excess resin. With a little patience and care, your windshield will be restored to its former glory in no time.
Tip 1: Do not use in direct sunlight
3M Windshield Repair Kit, direct sunlight, tips When it comes to using the 3M Windshield Repair Kit, there are a few tips you’ll want to keep in mind to ensure the best results. One important tip is to avoid using the kit in direct sunlight. The heat from the sun can cause the resin to cure too quickly, which can lead to less effective repairs.
Instead, try to work in a shaded area or during cooler parts of the day. But why is it so important to avoid direct sunlight? Well, think of it like baking a cake. If you were to put a cake in the oven and turn the heat up really high, it would likely burn on the outside while remaining undercooked on the inside.
The same concept applies to the 3M Windshield Repair Kit. The resin needs time to cure and harden properly in order to create a strong bond. By working in direct sunlight, you risk the resin curing too quickly on the surface while remaining soft underneath.
So, to ensure the best results when using the 3M Windshield Repair Kit, be sure to find a shaded area or wait for a cooler time of day. This will give the resin the proper amount of time to cure and harden, resulting in a durable and long-lasting repair. Happy repairing!
Tip 2: Avoid getting resin on your skin or clothing
One important tip for using the 3M Windshield Repair Kit is to avoid getting the resin on your skin or clothing. The resin used in windshield repair kits can be sticky and difficult to remove, so it’s best to take precautions to prevent any accidental spills or smears. Before starting the repair process, it’s a good idea to put on gloves and wear clothing that you don’t mind getting dirty.
This will help protect your skin and clothing from coming into contact with the resin. If you do happen to get resin on your skin, wash it off immediately with soap and water. And if you get resin on your clothing, try to remove it as soon as possible by carefully scraping off any excess resin and then washing the garment according to the care instructions.
Taking these simple steps can help prevent any unwanted mess or damage while using the 3M Windshield Repair Kit. So remember, always be mindful of where the resin is going and take the necessary precautions to protect your skin and clothing.
Tip 3: Use the kit promptly after purchasing
3M Windshield Repair Kit
Tip 4: Follow the instructions carefully
3M Windshield Repair Kit
Conclusion
So, you find yourself with a pesky chip or crack in your windshield. Fear not, for the 3M Windshield Repair Kit is here to save the day! With its easy-to-use and convenient design, even the most clueless car owners can become windshield repair experts. First off, let’s talk about the “akut” part.
No, it’s not a magical potion from a wizard’s toolbelt. It simply means “acute” in German, which is fitting because this kit is designed for those acute moments when you need a quick and reliable solution. Using the 3M Windshield Repair Akut is as simple as pie.
First, assess the damage and clean the area around the chip or crack. Then, apply the specially formulated windshield repair resin using the handy syringe provided. This high-quality resin will fill the damaged area, preventing further cracks from spreading and restoring both the strength and clarity of your windshield.
But how does it work, you ask? Well, let’s break it down. The resin is not your average run-of-the-mill goop. It’s a special blend of advanced technology and brilliant science that forms a strong bond with your windshield, ensuring a lasting repair.
In fact, it’s so effective that it can withstand the rigors of everyday driving, including those pesky potholes and furious flocks of seagulls. And here’s the icing on the cake – the 3M Windshield Repair Akut is not just a temporary fix. It’s a permanent solution that will leave your windshield looking as good as new.
No more unsightly blemishes tarnishing your view of the road. With this kit in your hands, you’ll be cruising down the highway with crystal-clear confidence. So, whether you’re a seasoned DIY-er or a first-time fixer-upper, the 3M Windshield Repair Akut is the ultimate tool to have in your automotive arsenal.
FAQs
How does the 3M windshield repair kit work?
The 3M windshield repair kit works by injecting a special adhesive into the crack or chip in the windshield. This adhesive helps to bond the glass back together, preventing further damage and restoring the strength and clarity of the windshield.
Can I use the 3M windshield repair kit on my own?
Yes, the 3M windshield repair kit is designed for DIY use. The kit comes with all the necessary tools and instructions for repairing small cracks and chips in your windshield. However, it is important to note that larger or more severe damage may require professional repair.
How long does it take to repair a windshield using the 3M kit?
The time it takes to repair a windshield using the 3M kit depends on the size and severity of the damage. On average, repairs using the 3M kit can take around 30 minutes to an hour. It is best to follow the instructions provided with the kit for a more accurate time frame.
Can the 3M windshield repair kit fix all types of cracks and chips?
The 3M windshield repair kit is designed to fix small cracks and chips that are less than 6 inches in length. It may not be suitable for larger or more severe damage. If you are unsure whether the kit is appropriate for your specific situation, it is best to consult a professional.
Will the repair be invisible after using the 3M windshield repair kit?
While the 3M windshield repair kit can significantly improve the appearance of cracks and chips, it may not always be completely invisible. Factors such as the size and location of the damage can affect the final result. However, the repair should be much less noticeable compared to leaving the damage unattended.
How long will the repair done with the 3M windshield repair kit last?
When done correctly, the repair made with the 3M windshield repair kit can last for a long time. It can help to prevent further spreading of the crack and restore the strength of the windshield. However, it is important to note that the repair may not be as durable as a professional repair or windshield replacement.
Can I use the 3M windshield repair kit on multiple windshields?
Yes, the 3M windshield repair kit typically contains enough materials to repair multiple windshields. However, it is important to follow the instructions and use the supplies wisely to ensure proper repairs. If you have a large number of windshields to repair, it may be more cost-effective to consult a professional.