
When it comes to diagnosing issues with your vehicle’s cooling system, a coolant pressure tester is a tool you’ll want to have in your arsenal. This handy device allows you to detect leaks, test for pressure buildup, and ensure your coolant system is functioning properly. Whether you’re a seasoned mechanic or a DIY enthusiast, a coolant pressure tester can save you time and money by pinpointing problems before they become major repairs.
But what exactly is a coolant pressure tester and how does it work? In this blog post, we’ll give you an introduction to coolant pressure testers and explain why they are an essential tool for any car owner.
Table of Contents
What is a Coolant Pressure Tester?
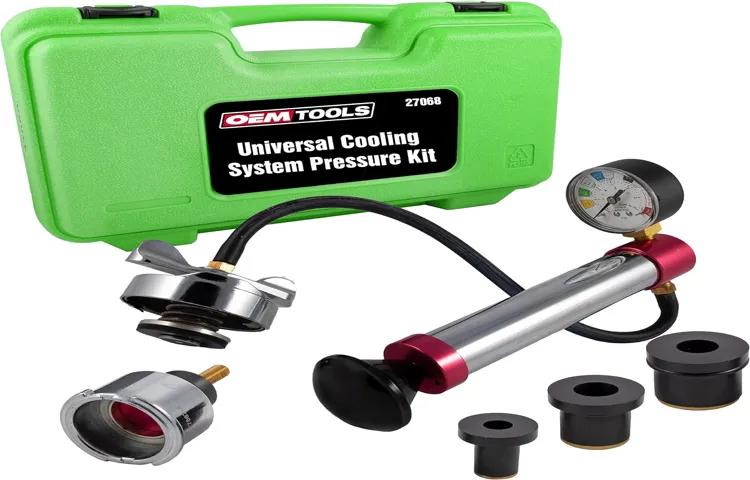
A coolant pressure tester is a handy tool used to diagnose problems with your vehicle’s cooling system. It is a simple device that connects to the radiator or coolant reservoir and allows you to check for any leaks or issues with the pressure in the system. Using a coolant pressure tester is fairly straightforward.
First, you need to make sure that your engine is cool before attempting to use the tool. Then, locate the radiator cap or the coolant reservoir cap, depending on your vehicle. Remove the cap and attach the pressure tester to the opening.
Pump the tester until you reach the desired pressure, which is usually indicated in the vehicle’s manual. Once you have achieved the desired pressure, you can then inspect the cooling system for any leaks or issues. The pressure tester will allow you to easily identify any leaks by causing them to become more apparent.
If you notice any leaks, you will need to fix them before continuing to use the vehicle. Overall, a coolant pressure tester is a useful tool for diagnosing and resolving issues with your vehicle’s cooling system.
Why Do You Need a Coolant Pressure Tester?
If you’re a car owner, you’ve probably heard about a coolant pressure tester but might wonder why you need one. Well, let me tell you why. A coolant pressure tester is a simple tool that helps you detect leaks and pressure issues in your car’s cooling system.
It works by pressurizing the system, simulating the conditions it would experience while the engine is running. This allows you to find any leaks or weaknesses in the system that might be causing problems like overheating. By using a coolant pressure tester, you can easily identify and fix any issues before they become major problems.
So, next time you’re facing cooling system issues, don’t forget to use a coolant pressure tester to diagnose the problem quickly and accurately.
How to Use a Coolant Pressure Tester
Do you suspect that your car’s coolant system is leaking or experiencing other issues? A coolant pressure tester can help you identify the problem. This tool is designed to measure the pressure in your coolant system, allowing you to pinpoint any leaks or other issues. To use a coolant pressure tester, start by first ensuring that your engine is cold.
Then, locate the radiator cap and remove it. Attach the pressure tester to the radiator neck and pump it up to the recommended pressure level. Keep an eye on the gauge, and if the pressure drops, it could indicate a leak.
You can also use the tester to identify a blown head gasket by checking for bubbles in the coolant. By using a coolant pressure tester, you can quickly and accurately diagnose any issues with your coolant system and take appropriate action to resolve them.
Step 1: Prepare the Vehicle
coolant pressure tester
Step 2: Locate the Coolant Pressure Cap
coolant pressure tester, locate the coolant pressure cap
Step 3: Connect the Coolant Pressure Tester
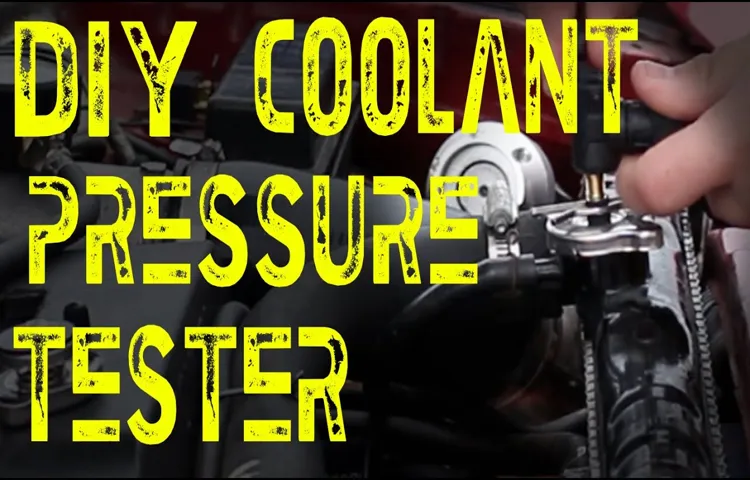
If you suspect a coolant leak in your vehicle, using a coolant pressure tester can help you pinpoint the issue quickly and easily. Step 3 in the process involves connecting the coolant pressure tester to the cooling system. To do this, you’ll need to locate the radiator cap and remove it carefully.
Then, attach the appropriate adapter from the pressure tester kit to the radiator neck. Make sure to secure the adapter tightly to avoid any leakage during the testing process. Once the adapter is in place, you can attach the pressure gauge to the tester by screwing it on.
It’s important to ensure a tight seal so that accurate readings can be obtained. With the pressure tester connected, you’re ready to move on to the next step and begin testing for coolant leaks.
Step 4: Pump Up the Pressure
coolant pressure tester The coolant pressure tester is an essential tool for diagnosing cooling system issues in vehicles. Once you have connected the tester to the radiator or reservoir, it’s time to pump up the pressure. This can be done by either manually pumping the tester or using an air compressor.
As you increase the pressure, it’s important to keep an eye on the gauge to ensure you don’t exceed the recommended maximum pressure for your vehicle. Too much pressure can potentially cause damage to the cooling system. By pumping up the pressure, you are simulating the conditions when the engine is running and coolant is circulating.
This allows you to identify any leaks or weak points in the system that may be causing cooling problems. It’s important to take your time and carefully inspect all the components, such as hoses, connections, and the radiator itself. If you notice any leaks or drops in pressure, these areas will need further inspection and potentially repair or replacement.
By using a coolant pressure tester, you can save time and money by quickly identifying cooling system issues and addressing them before they become bigger problems. So, the next time you suspect a cooling issue in your vehicle, consider investing in a coolant pressure tester and follow these steps to diagnose and solve the problem.
Step 5: Observe the Pressure Gauge
coolant pressure tester, pressure gauge One important step in using a coolant pressure tester is to observe the pressure gauge. This gauge provides valuable information about the condition of your coolant system and can help you identify any potential issues. When you attach the pressure tester to the radiator or coolant reservoir, it will start to pressurize the system.
As the pressure increases, the needle on the gauge will move accordingly. By observing the pressure gauge, you can determine if the pressure remains steady or if it drops over time. A steady pressure indicates a healthy coolant system, while a drop in pressure could indicate a leak or other problem.
Additionally, the pressure gauge can help you identify the appropriate pressure range for your specific vehicle. This is important because the pressure requirements can vary depending on the make and model of your car. By observing the pressure gauge and noting any abnormalities, you can take the necessary steps to address any issues with your coolant system and ensure your vehicle is running smoothly.
So take a close look at that pressure gauge and let it guide you to the optimal performance of your coolant system.
Step 6: Inspect for Leaks
coolant pressure tester So, after you have filled your cooling system with coolant and replaced the radiator cap, the next step is to inspect for leaks. This is where a coolant pressure tester comes in handy. A coolant pressure tester is a tool that allows you to apply pressure to the cooling system and check for any leaks.
It works by connecting the tester to the radiator or coolant reservoir and pumping it up to the recommended pressure level. Once the pressure is reached, you can then visually inspect the cooling system for any signs of leakage, such as dripping coolant or wet spots. It’s important to check all the components of the cooling system, including hoses, clamps, fittings, and the radiator itself.
By using a coolant pressure tester, you can identify and fix any leaks before they turn into bigger problems down the road.
Tips and Tricks
If you are facing issues with your vehicle’s cooling system, using a coolant pressure tester can help you diagnose and fix the problem. To use a coolant pressure tester, start by removing the radiator cap when the engine is cool. Then, attach the pressure tester to the radiator neck and pump it up to the recommended pressure level.
This will allow you to check for any leaks in the system. If there are no visible leaks, the pressure should hold steady on the gauge. On the other hand, if the pressure drops, it could indicate a leak or a faulty radiator cap.
Additionally, you can also use the coolant pressure tester to check for any combustion gases in the cooling system, which could be a sign of a blown head gasket or a cracked cylinder head. Overall, using a coolant pressure tester is a simple and effective way to diagnose cooling system issues in your vehicle and ensure its proper functioning.
Tip 1: Use the Correct Adapter
When it comes to charging our devices, using the correct adapter is crucial. We’ve all been there – struggling to charge our phone or tablet because we don’t have the right adapter. It’s frustrating and time-consuming, not to mention it can damage our devices.
That’s why tip number one is to always use the correct adapter. If you’re unsure which adapter to use, consult the user manual or do a quick online search. Using the wrong adapter can not only slow down the charging process but also potentially damage the battery or even cause a fire.
So, take the time to find the right adapter for your device. It may seem like a small thing, but it can make a big difference in the long run.
Tip 2: Check the Manufacturer’s Guidelines
When it comes to using any type of machine, it’s always a good idea to read the manual and follow the manufacturer’s guidelines. This is especially important when it comes to maintaining and cleaning your device. Each manufacturer may have specific recommendations on how to clean and care for their product to ensure optimal performance and longevity.
While it may be tempting to skip this step and go straight to using your new gadget, taking the time to read the guidelines can save you time, money, and frustration in the long run. The manufacturer’s guidelines will provide you with step-by-step instructions on how to clean the device, what cleaning solutions to use (if any), and any precautions you should take to avoid damaging the machine. Following these guidelines will not only keep your device in pristine condition but also ensure that it continues to operate at its best.
So, before you start using your new gadget, take a few minutes to read the manual and familiarize yourself with the manufacturer’s recommendations. It’ll be worth it in the end!
Tip 3: Allow the Engine to Cool Down
One of the most important tips for taking care of your car’s engine is to allow it to cool down properly. After a long drive or a particularly intense bout of city traffic, your engine can get extremely hot. Allowing it to cool down before turning off the car is crucial to avoid any damage.
Think of it like giving yourself a cool-down period after a workout – you need time to let your body temperature regulate and return to normal. Your car’s engine works in a similar way. When you turn off the car, the coolant stops circulating, and the engine heat has nowhere to escape.
This can lead to overheating and potential damage to various engine components. So, before you shut off the ignition, take a few minutes to let your engine cool down. This will not only help prolong its lifespan but also ensure that it runs smoothly and efficiently for years to come.
Tip 4: Repeat the Test if Necessary
One of the important tips when conducting a test is to be open to the possibility of repeating it if necessary. Sometimes, the results obtained may not be accurate or conclusive, or there may be variables that were not taken into account during the initial testing. By repeating the test, you have the opportunity to validate or negate the findings and ensure that accurate conclusions are made.
Additionally, repeating the test can help identify any inconsistencies or errors in the methodology, allowing for adjustments to be made and improving the overall quality of the results. So, if you find yourself unsure or unsatisfied with the initial test results, don’t be afraid to give it another try. It’s better to repeat the test and be confident in the accuracy of the findings rather than relying on potentially flawed data.
Troubleshooting
If you suspect that your car is leaking coolant or if you are experiencing overheating issues, using a coolant pressure tester can help you diagnose the problem. This tool allows you to check for any coolant leaks in your car’s cooling system by pressurizing it and observing if there are any drops in pressure. To use a coolant pressure tester, first, you will need to remove the radiator cap and attach the pressure tester to the radiator neck.
Pump the tester’s handle until it reaches the recommended pressure for your vehicle. Next, observe the pressure gauge and look for any drops in pressure. If the pressure drops, it indicates that there is a coolant leak in your system that needs to be fixed.
Additionally, you can also use a coolant pressure tester to check for faulty radiator caps or a blown head gasket. By following these steps, you can effectively troubleshoot and identify any coolant leaks in your car. Remember to always consult your car’s manual for specific instructions and recommendations.
Problem 1: No Pressure Buildup
When it comes to troubleshooting pressure buildup issues in your equipment, it’s important to identify the root cause of the problem. One common issue that can occur is a lack of pressure buildup altogether. This can be frustrating, as it means your equipment is not able to function properly.
There are a few potential causes for this problem. One possibility is that there is a blockage in the system, preventing the flow of fluid or gas that would create pressure. Another possibility is that there is an issue with the pump or compressor, such as a malfunctioning valve or worn-out seals.
In some cases, the problem may be related to a faulty pressure gauge or sensor, which is not accurately measuring the pressure. It’s important to carefully inspect and test each component of your system to determine the exact cause of the problem. Once the cause is identified, you can take the necessary steps to fix the issue and get your equipment back up and running smoothly.
Problem 2: Leaking Coolant
Leaking coolant can be a frustrating problem, but with a little troubleshooting, you can identify the issue and find a solution. The first step is to determine where the coolant is leaking from. Check all the hoses, connections, and the radiator for any signs of leakage.
It’s possible that a hose may have a small crack or a connection might be loose. Tightening or replacing these parts can often solve the problem. If the hoses and connections are all intact, the issue might be with the radiator itself.
A leaky radiator can be more complicated to fix, but it is still possible. Consider using a radiator sealant or taking it to a professional for repair. Another potential cause of coolant leakage is a faulty water pump.
The water pump circulates the coolant through the engine, and if it is leaking, it will need to be replaced. In some cases, a simple gasket replacement might be all that is needed. Remember to always check your coolant levels regularly.
If you are constantly having to refill the coolant, there is likely an underlying issue that needs to be addressed. By troubleshooting and identifying the source of the coolant leak, you can take the necessary steps to fix the problem and ensure that your engine stays cool and running smoothly.
Problem 3: Inaccurate Pressure Reading
pressure reading, inaccurate, troubleshooting
Conclusion
And there you have it, my friends! You are now equipped with the knowledge and skills to conquer the world of coolant pressure testing. Remember, this tool is not just for the pros, but for anyone who dares to venture into the automotive realm. So next time you find yourself with a mysteriously overheating engine, don’t sweat it! Grab your trusty coolant pressure tester and get to work.
Just remember to wear your detective hat and follow the clues. Is it a leaking radiator? Or perhaps a faulty water pump? With the pressure tester, you can play Sherlock Holmes and solve the case of the sizzling engine. But beware, my friends, for with great power comes great responsibility.
Like the mighty Thor’s hammer, the coolant pressure tester must be wielded with care. Follow the instructions diligently, lest you unleash a torrent of coolant and regret. And if you ever feel overwhelmed or confused, fear not! The wise internet gods have bestowed upon us a wealth of knowledge in the form of tutorials and forums.
Seek out these digital gurus, and they shall guide you towards coolant pressure testing enlightenment. In the end, my friends, mastering the coolant pressure tester is not just about diagnosing a problem, but also about unleashing your inner automotive superhero. So go forth, young padawans of the engine bay, and show those coolant leaks who’s boss.
And may the coolant pressure be with you!”
FAQs
What is a coolant pressure tester?
A coolant pressure tester is a tool used to check the pressure of the coolant system in a vehicle. It helps detect any leaks, radiator cap issues, or other problems with the cooling system.
How does a coolant pressure tester work?
A coolant pressure tester works by connecting it to the radiator or coolant reservoir and pumping it up to a specific pressure. This pressure simulates the conditions when the engine is running and allows you to check for any leaks or weak spots in the cooling system.
Why is it important to use a coolant pressure tester?
Using a coolant pressure tester is important because it helps identify any leaks or issues with the cooling system before they become major problems. It allows you to catch issues early and prevent overheating or engine damage.
Can I use a coolant pressure tester on any vehicle?
Yes, a coolant pressure tester can be used on most vehicles, including cars, trucks, and SUVs. However, it’s important to consult the vehicle’s manual or a professional to ensure you are using the correct pressure and procedure for your specific vehicle.
How often should I use a coolant pressure tester?
It is recommended to use a coolant pressure tester as part of regular vehicle maintenance, such as during coolant system inspections or before long trips. It’s also a good idea to use it if you suspect any issues with the cooling system, such as overheating or coolant loss.
Can I perform a coolant pressure test myself?
Yes, a coolant pressure test can be performed by yourself if you have the proper tools and knowledge. However, if you are unsure or not confident in your abilities, it’s best to consult a professional mechanic who can perform the test for you.
Are there any safety precautions I should take when using a coolant pressure tester?
Yes, it’s important to follow safety precautions when using a coolant pressure tester. First, ensure that the engine is completely cool before performing the test to avoid any risk of burns. Second, wear protective goggles and gloves to protect yourself from any potential leaks or spills. Finally, always follow the instructions provided with the coolant pressure tester to ensure proper usage.