Picture this – you’re driving down the road, enjoying the breeze through your car window when you hear a loud thumping sound. You pull over, only to realize that your tire has come off the rim. Don’t worry; this is a common issue, and it doesn’t necessarily mean that you need to tow your car to the nearest repair shop or replace your tires right away.
In this post, we’ll share practical tips on how to fix a tire that came off the rim. Whether you’re a seasoned driver or a new one, this guide can help you solve this problem and ensure you’re back on the road in no time. So let’s dive into it!
Table of Contents
Assess the Damage
If you’re driving and suddenly notice that your tire came off the rim, it can be a scary situation. Before attempting to fix it, assess the damage to the tire and rim. Check for any signs of puncture or damage to the tire, and examine the rim for any bends or cracks.
If either the tire or rim is severely damaged, it may be time to replace them. However, if the damage is minor, you may be able to fix it yourself. Try lubricating the tire bead with a soapy solution and using a tire iron to pry the bead over the rim.
Once the tire is back in place, inflate it slowly and check for any leaks. If you’re unsure about how to fix a tire that came off the rim, it’s best to seek professional help. Remember to always prioritize safety on the road.
Check the Tire and Rim for Damage
When it comes to ensuring your safety on the road, checking your tires and rims for damage is a crucial step. Before assessing the damage, it’s essential to understand what you should be looking for. The most common types of damage to tires and rims include punctures, cracks, bulges, and dents.
Punctures, small holes in the tire caused by a sharp object, can be patched up, but if the puncture is too large or located in the sidewall, the tire will need to be replaced. Cracks in the tire’s rubber can weaken the tire, making it prone to blowouts, while bulges, caused by weak spots in the tire’s structure, can also lead to blowouts. Dents in the rim can cause vibrations while driving, leading to uneven wear on the tire and potentially causing a blowout.
Make sure to inspect your tires and rims regularly for any signs of damage and have them repaired or replaced as necessary. This can help prevent accidents and keep you and your passengers safe on the road.
Look for Leaks or Bent Rims
Assessing the damage to your car after hitting a big pothole or curb can be a stressful experience. The first thing to do is to check for any leaks or bent rims. Leaks can be a sign of a punctured tire or damaged suspension system, while a bent rim can cause vibrations and affect the car’s steering.
It’s important to address these issues right away as they can lead to more significant problems down the road. One way to check for leaks is to look for any puddles of fluid underneath the car or to inspect the tire for any visible signs of damage. Bent rims can be trickier to spot since they may not always be visible to the naked eye.
A good way to check for them is to drive the car and pay attention to any vibrations or shaking that you may feel. If any issues arise, it’s best to take your car to a professional mechanic who can properly assess and fix the problem. Remember, the longer you delay fixing any damage, the more costly repairs can become in the future.
Remove the Tire from the Rim
If you’re dealing with a tire that came off the rim, don’t worry – you can easily fix the problem by removing the tire from the rim. First, you’ll need to release all the air pressure from the tire, which can be done by removing the valve cap and pressing down on the valve stem. Next, you should carefully insert tire levers between the tire and rim, starting at the bead opposite the valve stem.
Use leverage to pry the tire away from the rim, working your way around the circumference until the entire tire is removed. If you find yourself struggling to remove the tire, try using a bead-buster tool to break the seal between the tire and rim. Once you’ve removed the tire, you’ll be able to inspect the rim for any damage or issues that may have caused the tire to come off in the first place.
Overall, removing a tire from a rim is a simple process that anyone can do with the right tools and a bit of patience.
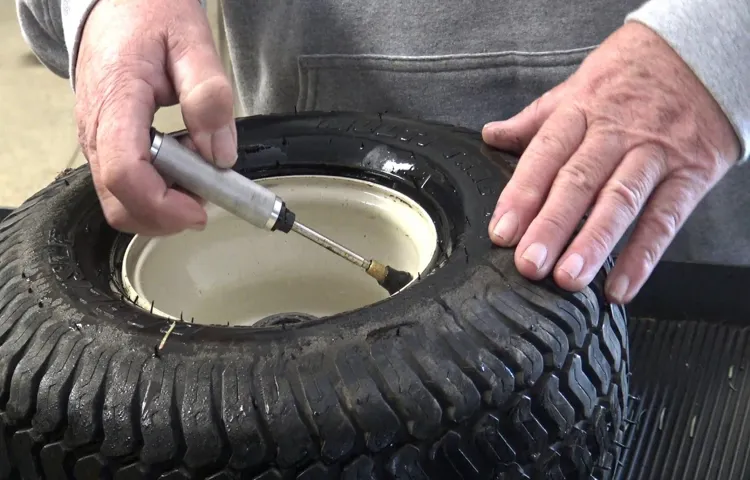
Deflate the Tire Completely
Before removing a tire from the rim, it’s crucial to deflate it completely. This may seem like an obvious step, but it’s essential for safety reasons and to prevent damaging the tire or rim during removal. If you’re uncertain how to deflate a tire, you can use a tire pressure gauge or simply press the valve stem using a small screwdriver or similar tool until all the air is released.
Once the tire is fully deflated, you can proceed with removing it from the rim. To avoid damaging the tire or rim during removal, it’s important to use the proper tools and techniques. Using a tire lever or spoon can help loosen the tire’s grip on the rim, and pushing the tire down and away from the rim can help create more clearance during removal.
By taking these necessary steps, you can safely and effectively remove a tire from the rim without causing any damage or harm.
Loosen the Bead from the Rim
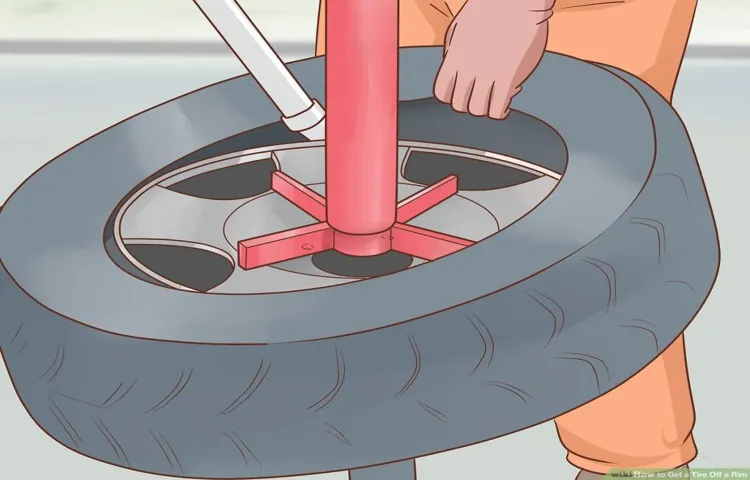
Removing a tire from a rim can be a tricky task, especially if you don’t have the right tools or experience. Loosening the bead from the rim is the first step in this process. To do this, you will need to insert a tire iron in between the rim and the tire.
Push the iron down towards the rim and pry it back until the bead is loose. This part of the process may require a repeated action and a bit of elbow grease to fully loosen both sides of the tire bead, but it’s crucial to make sure the tire is completely disconnected from the rim. At this stage, it’s important to be cautious and patient.
Don’t be in a hurry to remove the tire from the rim as this can cause more damage than good. Before proceeding to remove the tire from the rim, you should first inspect the tire tread and sidewalls for any signs of wear or damage. Be sure to take note of any punctures or cuts in the tire that may make it unsafe for further use.
In summary, loosening the bead from the rim is the first step in removing a tire from a rim. This is a relatively simple process that requires a tire iron and a bit of effort to pry it back until the bead loses grip from the rim. However, before removing the tire entirely, inspect it continuously to ensure that you’re not making things worse, and take note of any damage that necessitates replacement.
Removing the tire in an emergency situation is one thing, but taking care when doing it yourself is always the best course of action to preserve your rim and stay safe on the road.
Remove the Tire from the Rim
Removing the tire from the rim can be a daunting task, but it will become second nature with practice. First, ensure that the valve stem is not damaged. Then, insert a tire lever between the tire and the rim and pry it up, being careful not to snag the inner tube.
Once the first section is detached, work your way around the tire in a clockwise or counterclockwise direction until the whole tire is loose. Once the tire is fully detached, remove the inner tube, inspect it for damage, and repair or replace if necessary. When taking the tire off, make sure to use the right tools and follow the instructions carefully to prevent damaging the rim or injuring yourself.
By removing the tire from the rim, you will be able to replace worn tires, fix punctures, or simply give your bicycle a thorough cleaning.
Reattach the Tire to the Rim
If your tire has come off the rim, don’t panic! There are steps you can take to fix it yourself. The first thing you’ll need to do is reattach the tire to the rim. To do this, you’ll need to apply pressure to the sidewall of the tire with your hands.
This will allow the tire to fit snugly back onto the rim. Once you’ve done this, use a tire lever to work the tire bead back onto the rim. Be sure to work slowly and methodically around the tire to ensure it is securely attached to the rim.
When you’re finished, inflate the tire to the recommended pressure and give it a quick spin to make sure everything is working properly. With a bit of patience and a steady hand, you’ll be able to fix that tire in no time!
Clean and Inspect the Rim
To reattach the tire back to the rim, it’s important to first clean and inspect the rim. This step is crucial, as it provides a smooth and secure surface for the tire to grip onto. Start by wiping down the rim with a clean, damp cloth to remove any debris or dirt.
Next, inspect the rim for any cracks or damage that may cause issues with the tire’s fit. It’s better to identify these issues now, rather than having to deal with them later on. Once you’re sure the rim is clean and free of damage, it’s time to reattach the tire.
This can be a bit tricky, so take your time and be patient. Make sure the tire is aligned correctly with the valve stem and use your tire lever to work the tire back onto the rim. With a little bit of practice, you’ll have the tire attached in no time!
Insert the Tire Back onto the Rim
Inserting a tire back onto the rim can be a tricky task, but with some patience and persistence, it can easily be done at home. Begin by aligning the tire with the rim, then use your hands to work the tire back over the rim. If the tire is particularly stubborn, a tire lever or pliers can help you maneuver it.
Once the tire is back on the rim, use a tire pump to inflate it to the recommended pressure level. Be sure to check for any leaks around the tire bead, and if necessary, use a tire sealant or reposition the tire to ensure a secure fit. Taking the time to reattach the tire to the rim properly can prevent future accidents on the road and keep your vehicle running smoothly.
So, don’t rush through it and take care in ensuring the tire is securely fastened before hitting the road.
Reinflate the Tire and Check for Leaks
Once you’ve finished repairing the puncture and have removed the tire from the rim, it’s time to move onto the next step: reattaching the tire to the rim. This part of the process requires a bit of elbow grease, but it’s well worth the effort in the end. Begin by lining up the valve stem with the hole in the rim and then tucking the tire back into place on the rim.
Next, use your hands or a tire lever to stretch the tire back over the rim. This may take some force, particularly if you have a tight-fitting tire, but be patient and work your way around the tire slowly. Once the tire is back in place, take a quick break and stretch out your arms before moving on to reinflating the tire.
Remember to double-check that the tire is properly seated on the rim and that the bead is even all around the circumference of the tire. If everything looks good, it’s time to inflate the tire, after which you’ll want to spray the tire with soapy water and check for any leaks. With a bit of persistence and attention to detail, you’ll have your tire reattached and ready to ride in no time!
Preventing Future Issues
If you’ve experienced the frustration and potential danger of a tire coming off its rim while driving, you’re likely wondering what you can do to prevent it from happening again. Firstly, routine tire maintenance can go a long way in avoiding this issue. Check the air pressure on a regular basis to ensure it is at the recommended level, and inspect the tires for any signs of wear or damage.
Additionally, make sure that the tire and rim sizes are compatible and that the tire is properly mounted. If you find yourself in a situation where a tire has come off the rim, it’s best to pull over to a safe spot as quickly as possible and call for assistance. Attempting to fix the issue yourself can be dangerous and may cause further damage to your vehicle.
In the long run, investing in quality tires and having regular maintenance performed can save you both time and money while also ensuring your safety on the road.
Regularly Check Your Tires and Rims
Regularly checking your tires and rims is crucial in preventing future issues on the road. Neglecting to do so can lead to problems such as blowouts, uneven wear, and even accidents. It’s essential to keep an eye on the tire pressure, tread depth, and overall condition of your tires.
A tire gauge is a handy tool that should be used at least once a month to ensure your tires are properly inflated. Additionally, checking your rims for damage or cracks can also help prevent issues down the road. Think of your tires and rims as the foundation of your car, and taking care of them is like building a strong and sturdy house.
Stay proactive and stay safe on the road!
Avoid Overloading Your Vehicle
Overloading your vehicle can lead to various issues in the future. It may seem like you are saving time and money by fitting everything in one trip, but it is not worth the risk. Carrying excessive weight can damage the vehicle’s suspension, brakes, and tires which may cause accidents, and failure of critical components over time.
To prevent future issues, it is essential to understand your vehicle’s limitations, including its maximum payload capacity. Avoid stuffing your car with heavy cargo that can exceed the manufacturer’s recommended weight capacity. Doing so will not only help prolong your vehicle’s life expectancy but also ensure your safety on the road.
Remember, “better safe than sorry”.
Drive Slowly over Potholes and Bumps
Driving slowly over potholes and bumps is not just a matter of convenience, it’s also a way to prevent future issues with your vehicle. Potholes and bumps can cause serious damage to your car, resulting in costly repairs and potential safety hazards. By taking the time to drive carefully over these obstacles, you can reduce the amount of wear and tear on your tires, alignment, and suspension.
Not only will this save you money in the long run, but it will also ensure that your vehicle is safe and stable on the road. So next time you encounter a rough patch of road, remember to take it slow and steady. Your car (and wallet) will thank you!
Conclusion
While it may be tempting to panic when you discover that your tire has come off the rim, fear not! Fixing this issue is actually quite simple. Just follow these easy steps: first, remove the damaged tire from the rim. Next, find a replacement tire that is of the same size and style.
Finally, take a deep breath, put your tire-changing skills to the test, and voila! Your tire is fixed and ready to hit the road once again. Remember, with a little bit of know-how and a lot of determination, any tire problem can be conquered.”
FAQs
1. What are the common reasons for a tire coming off a rim? A: The most common reasons are worn-out tire or rim, improper installation, and overinflated or underinflated tire. 2. Can a tire be fixed if it comes off the rim? A: Yes, the tire can be fixed if it is not damaged or punctured. The tire and rim need to be inspected and properly reinstalled. 3. Is it safe to drive if a tire comes off the rim? A: No, it is not safe to drive if a tire comes off the rim. This can cause severe damage to the vehicle and can even lead to accidents. 4. What tools are required to fix a tire that comes off the rim? A: You may need a tire wrench, lug nut wrench, tire iron, and a mallet to fix a tire that comes off the rim. 5. Can a professional mechanic help fix a tire that comes off the rim? A: Yes, a professional mechanic can inspect and fix the tire and rim if necessary. It is recommended to take the vehicle to a mechanic if the tire comes off the rim. 6. How often should tires be checked to prevent them from coming off the rim? A: Tires should be checked every time before driving, especially if there is a noticeable vibration or noise while driving. 7. What is the correct way to install a tire to prevent it from coming off the rim? A: The tire should be properly inflated, the rim should be clean and free of rust, and the tire should be carefully and evenly mounted onto the rim, with the lug nuts tightened to the recommended torque.