
Have you ever found yourself with a small crack or chip in your windshield? It can be frustrating and inconvenient, not to mention potentially dangerous. But fear not – there is a solution! With a windshield repair kit, you can fix those pesky cracks and chips yourself, saving time and money. In this blog post, we will show you step-by-step how to use a windshield repair kit to fix those small cracks and chips.
So, let’s dive in and get your windshield looking as good as new!
Table of Contents
Understanding the Windshield Repair Kit
If you’ve ever had a crack or chip in your windshield, you know how frustrating it can be. Not only is it unsightly, but it can also pose a safety hazard if not repaired promptly. That’s where a windshield repair kit comes in handy.
This handy tool allows you to fix small cracks and chips in your windshield without having to take it to a professional. With a windshield repair kit, you can save both time and money by doing the repair yourself. So how does it work? The kit typically comes with a resin and a special applicator.
First, you clean the damaged area and apply the resin using the applicator. Then, you use a curing strip or a special UV light to harden the resin, which helps to seal the crack or chip. Once the resin is cured, you can smooth it out and polish the area, making it almost invisible.
With the right windshield repair kit and a little patience, you can easily fix small cracks and chips in your windshield, keeping it looking great and preventing further damage.
What is a windshield repair kit?
windshield repair kit, repairing cracked windshields, DIY repair kits, damaged windshield, fix chips and cracks, automotive maintenance, budget-friendly option, professional repair, long-lasting solution, safety concerns, clear vision, car’s structural integrity, comprehensive instructions
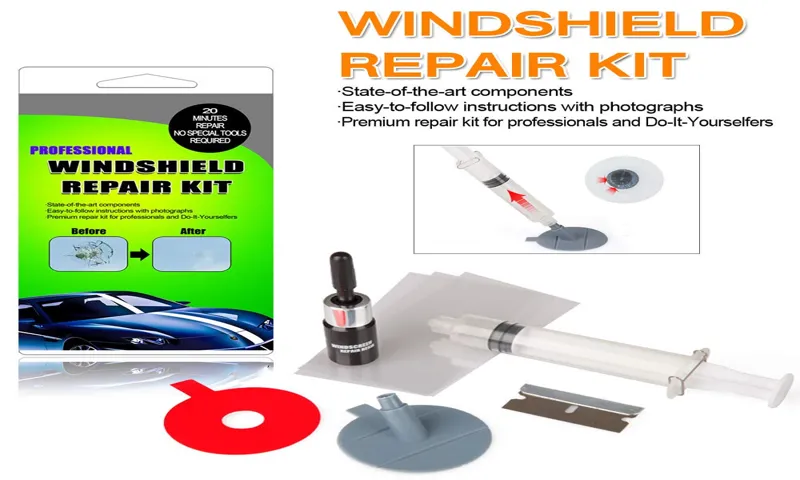
Components of a windshield repair kit
windshield repair kit, components of a windshield repair kit, understanding the windshield repair kit
Common types of windshield repair kits
Windshield repair kits are essential tools for fixing small cracks and chips on your windshield. They come in various types and understanding them can help you choose the right one for your needs. One common type is the resin-based repair kit, which uses a clear liquid resin to fill in the cracks and bonds the glass together.
These kits often come with a syringe or suction cup applicator that allows you to apply the resin accurately and evenly. Another type is the adhesive patch repair kit, which uses a strong adhesive patch to cover the damaged area and prevent further damage. These kits are easy to use and provide a temporary solution until you can get the windshield repaired or replaced.
Additionally, there are DIY repair kits that combine the features of both resin-based and adhesive patch kits. These kits usually include a resin injection system and adhesive patches for different types of damage. They are suitable for small cracks and chips and provide a cost-effective solution for minor windshield repairs.
Understanding the different types of windshield repair kits can help you choose the right one for your specific situation and ensure a successful repair.
Preparing Your Windshield for Repair
When it comes to fixing a cracked or chipped windshield, using a windshield repair kit can save you time and money. But before you dive into the repair process, it’s important to prepare your windshield properly. First, make sure the windshield is clean and dry.
Use a glass cleaner and a lint-free cloth to remove any dirt, debris, or water spots from the surface. This will ensure a better bond between the repair resin and the glass. Next, inspect the damaged area closely to determine if it’s suitable for repair.
If the crack or chip is larger than a quarter or if it’s located in the driver’s line of sight, it’s best to have the windshield replaced instead. Finally, protect the surrounding area of the windshield with a tape or plastic sheet to prevent any accidental damage. This will also help to contain the repair resin when you apply it.
By following these simple steps, you can ensure that your windshield is properly prepared for repair with a windshield repair kit.
Identifying the type and size of the chip or crack
“chip or crack on the windshield” When it comes to preparing your windshield for repair, the first step is to identify the type and size of the chip or crack. This is important because different types of damage require different repair methods. If you have a small chip or crack, it might be possible to repair it without replacing the entire windshield.
This can save you both time and money. However, if the damage is too severe or the crack is spreading, it may be necessary to replace the entire windshield. To determine the type and size of the damage, you can examine the windshield closely.
A chip is a small piece of glass that has been chipped away, while a crack is a line that runs through the glass. The size of the damage can vary from a small pinhole to a large crack running across the entire windshield. If the damage is relatively small and confined to one area, it is more likely that it can be repaired.
On the other hand, if the crack is longer than a few inches or the chip is larger than a quarter, it may be necessary to replace the windshield. It’s important to note that even small chips and cracks can worsen over time, especially if they are exposed to extreme temperatures or vibrations. That’s why it’s essential to address the issue as soon as possible.
In conclusion, preparing your windshield for repair starts with identifying the type and size of the chip or crack. By carefully examining the damage, you can determine whether it can be repaired or if the windshield needs to be replaced. Remember that addressing the issue early on can help prevent further damage and ensure the safety of your vehicle.
Cleaning the damaged area
Preparing Your Windshield for Repair: Cleaning the damaged area Before repairing a damaged windshield, it is important to properly clean the area to ensure the best possible repair. Dust, dirt, and debris can hinder the effectiveness of the repair and make it more difficult for the adhesive to bond properly. To clean the damaged area, start by removing any loose debris with a soft brush or cloth.
Be careful not to apply too much pressure, as this could cause further damage to the glass. Once the loose debris has been removed, use a glass cleaner to thoroughly clean the area. Spray the cleaner onto a clean cloth and gently wipe the damaged area, making sure to remove any residue or grime.
In addition to cleaning the damaged area, it is also important to clean the surrounding area. Dust and debris can easily get trapped in the adhesive and affect the bond, so it is best to clean the whole windshield. Use the same glass cleaner and cloth to clean the entire windshield, paying careful attention to the edges around the damaged area.
After cleaning, allow the windshield to dry completely before proceeding with the repair. This will ensure that the adhesive has a clean surface to bond to, increasing the chances of a successful repair. Taking the time to properly clean the damaged area before repairing your windshield can make a big difference in the outcome of the repair.
By removing any debris and cleaning the surrounding area, you can help ensure a strong and long-lasting bond between the glass and the adhesive. So don’t skip this important step – your windshield will thank you!
Applying protective tape to the surrounding glass
Preparing Your Windshield for Repair Before performing any repairs on your windshield, it is crucial to prepare it properly to ensure a successful outcome. One important step in this process is applying protective tape to the surrounding glass. This tape acts as a barrier, protecting the rest of the windshield from any potential damage caused by the repair process.
It also helps to keep the repair area clean and free from any debris or contaminants. Applying protective tape is a simple and straightforward process that can be done by anyone. Start by thoroughly cleaning the area around the damage with a mild detergent and water.
Once the area is clean and dry, carefully apply the tape around the damaged area, making sure to cover the edges completely. By taking this extra precaution, you can help prevent any further damage to the windshield and ensure a successful repair.
Using the Windshield Repair Kit
So you’ve found yourself with a pesky crack or chip in your windshield. It’s frustrating and can be expensive to replace the entire windshield. But fear not, because there is a solution – a windshield repair kit! These kits are designed to fix minor damages to your windshield, such as small chips or cracks.
They come with all the necessary tools and materials you need to do the repair yourself. Now, you might be wondering, “How do I use a windshield repair kit?” Well, let me break it down for you. First, you’ll want to clean the damaged area of the windshield.
Use a glass cleaner and a lint-free cloth to ensure that the area is free from dirt and debris. This will help the repair resin adhere properly to the glass. Once the area is clean, you can proceed to the next step.
Next, you’ll need to apply a clear adhesive disc over the damaged area. This disc is provided in the repair kit and serves as a platform for the repair resin. Make sure the disc is centered over the chip or crack and press it firmly onto the glass.
This will create a vacuum seal and prevent any air bubbles from forming during the repair process. Once the disc is in place, it’s time to inject the repair resin. Take the syringe provided in the kit and fill it with the resin.
Insert the syringe into the hole in the adhesive disc and slowly inject the resin into the damaged area. Be careful not to overfill the area, as this can cause excess resin to spill out. After the resin has been injected, you’ll want to let it cure.
Using the resin and adhesive components of the kit
Using the windshield repair kit is a simple and effective way to fix small cracks and chips in your windshield. The kit contains resin and adhesive components that work together to seal and strengthen the damaged area. To begin, clean the damaged area of your windshield with a mild detergent and water.
Make sure it is completely dry before proceeding. Then, apply the adhesive component to the damaged area. This adhesive helps to hold the resin in place and prevent it from leaking out.
Next, mix the resin according to the instructions provided in the kit. This typically involves combining the resin with a hardening agent to create a strong and durable solution. Once the resin is mixed, carefully apply it to the damaged area using a syringe or applicator tool.
Make sure to completely fill the crack or chip with resin. After applying the resin, cover the damaged area with a clear curing film. This film helps to protect the resin from dust and debris while it hardens.
Leave the film in place for the specified amount of time, usually several minutes or hours depending on the kit. Once the resin has hardened, remove the curing film and use a razor blade or scraper to remove any excess resin. Be careful not to scratch the windshield during this process.
Finally, use a glass cleaner to clean the repaired area and remove any residue. Using a windshield repair kit is a cost-effective and time-saving solution for minor windshield damage. It provides a quick fix that can help prevent further cracking and improve the overall appearance of your windshield.
Applying the resin to the damaged area
Applying the resin to the damaged area is a crucial step in using a windshield repair kit. This resin is specifically designed to fill in the cracks and chips on your windshield, restoring its strength and preventing further damage. To begin, ensure that the damaged area is clean and dry.
Then, carefully apply a small amount of resin onto the chip or crack, making sure to fill it completely. Once the resin is applied, cover it with a curing strip or a clear piece of plastic. This will help to create a smooth surface and protect the resin from dirt or debris.
Now, it’s time to let the resin cure. Leave it to dry for the recommended amount of time, which can vary depending on the product you are using. After the curing process is complete, remove the curing strip or plastic and check the repaired area.
If necessary, apply more resin and repeat the curing process until the damage is fully repaired. Remember to follow the instructions provided with your windshield repair kit for the best results. With a little patience and attention to detail, you can easily apply the resin and restore your windshield to its former glory.
Using the pressure device to inject the resin into the chip or crack
Using the Windshield Repair Kit to inject the resin into the chip or crack is a simple and effective way to fix minor damage to your windshield. The pressure device included in the kit helps ensure that the resin is spread evenly and thoroughly throughout the damaged area. It’s like giving your windshield a little injection of healing power! This method not only seals the chip or crack, but also helps to prevent the damage from spreading further.
The kit typically comes with detailed instructions, making it easy for anyone to use. So, if you notice a small chip or crack in your windshield, don’t ignore it! Grab a Windshield Repair Kit and give your windshield the attention it needs to stay strong and clear.
Allowing the resin to cure
The final step in using a windshield repair kit is allowing the resin to cure. This is a crucial step because it ensures that the repair is permanent and strong. Once you have applied the resin to the chip or crack in your windshield and covered it with a curing film, you will need to let it sit for the specified amount of time.
This time can vary depending on the brand of repair kit you are using, but it is usually around 15 to 30 minutes. During this time, the resin will harden and bond with the glass, creating a strong and durable seal. It’s important not to rush this step, as premature removal of the curing film can result in the repair failing to properly set.
So make sure to set aside enough time for the resin to cure completely.
Finishing Touches
If you find yourself dealing with a chip or crack in your windshield, don’t fret! With a windshield repair kit, you can fix the issue yourself and save some money. But how exactly do you use a windshield repair kit? Well, it’s actually quite simple! First, clean the damaged area of your windshield with a glass cleaner and let it dry completely. This will help ensure that the repair resin adheres properly.
Next, place the suction cup device included in the kit over the damaged area and press it firmly against the glass. This will create a seal and allow you to inject the repair resin. Now comes the fun part! Take the repair resin and carefully insert it into the suction cup device.
Make sure to follow the instructions provided in the kit, as different kits may have slightly different methods. Once the resin is in place, use the provided plunger to push it into the damaged area, filling the cracks or chips completely. After injecting the resin, wait for it to cure.
This usually takes around 30 minutes to an hour, but again, follow the instructions provided with your specific kit. Once the resin is fully cured, remove the suction cup device and use a razor blade or other sharp object to remove any excess resin from the surface of your windshield. And voila! Your windshield should now be repaired and ready to go.
Of course, it’s important to note that while a windshield repair kit can fix minor chips and cracks, it may not be suitable for more severe damage. In these cases, it’s best to consult a professional and possibly consider windshield replacement. But for those small annoyances, a windshield repair kit can be a lifesaver.
So don’t let a chip or crack ruin your day, grab a repair kit and get your windshield looking as good as new!
Removing the excess resin
Removing the excess resin is an important step in the resin art process when creating a smooth, polished finish. Once the resin has cured completely, you may notice that there are some imperfections, such as bubbles or uneven surfaces. To remove these imperfections, you will need to sand down the resin.
Start by using a coarse sandpaper to smooth out any high spots or irregularities. Once the resin is smooth, switch to a finer grit sandpaper to further refine the surface. Keep in mind that sanding resin can create a lot of dust, so it’s important to wear protective gear such as a mask and goggles.
After sanding, wipe the resin down with a damp cloth to remove any dust and debris. Finally, apply a clear coat or varnish to enhance the shine and protect the resin artwork. With these finishing touches, your resin art will truly stand out and make a statement.
Polishing the repaired area
Polishing the repaired area is all about those final touches that bring everything together and make it look seamless. It’s like putting the cherry on top of a sundae or adding the final stroke to a masterpiece painting. After all the hard work of fixing and repairing, it’s important to take the time to make sure everything is just right.
This could involve sanding down any rough edges, filling in any missed spots, or applying a final coat of paint or varnish. The goal is to leave the repaired area looking as good as new, if not better. It’s all about attention to detail and taking pride in your work.
So don’t rush through this step – take your time and make sure everything is perfect. In the end, the finished result will be well worth it.
Cleaning the excess resin from the windshield
windshield cleaning, excess resin, finishing touches, car maintenance
Precautions and Tips for Successful Repair
When it comes to repairing a windshield with a DIY windshield repair kit, there are a few precautions and tips to keep in mind for a successful repair. First and foremost, make sure to read and follow the instructions provided with the kit carefully. Each kit may have specific steps and guidelines that you need to follow for effective results.
Additionally, make sure to clean the damaged area thoroughly before starting the repair process. Any debris or dirt on the surface can hinder the repair and affect the final outcome. It’s also important to work in a well-lit area to ensure that you can see the damage clearly and apply the repair resin accurately.
Another tip is to avoid repairing a windshield in extreme temperatures, as this can impact the effectiveness of the repair. Finally, take your time during the repair process and follow each step with precision. Rushing through the repair can lead to unsatisfactory results.
With these precautions and tips in mind, you can successfully use a windshield repair kit to fix minor damages on your own.
Avoiding repair in extreme weather conditions
extreme weather conditions, precautions, tips, repair
Tips for preventing further damage to the windshield
When it comes to preventing further damage to your windshield, there are a few precautions and tips you can follow to ensure a successful repair. First and foremost, avoid driving over rough terrain or going over speed bumps too quickly. These actions can put unnecessary stress on the windshield and potentially cause it to crack or shatter.
Similarly, try to avoid slamming your car doors or placing heavy objects on the windshield as this can also lead to damage. Additionally, be cautious when using your windshield wipers, especially during freezing temperatures. If your windshield is covered in ice, it’s best to let it thaw completely before using the wipers to avoid damaging the blades or scratching the glass.
Finally, be mindful of extreme temperature changes. Sudden shifts from hot to cold or vice versa can cause the windshield to expand or contract rapidly, increasing the risk of damage. By following these simple precautions, you can help prolong the life of your windshield and save yourself from costly repairs in the future.
Knowing when to seek professional help
Knowing when to seek professional help can be crucial when it comes to repairs. While it can be tempting to try and fix things ourselves, there are some situations where it’s just better to call in the experts. One of the main precautions to take is to assess the severity of the problem.
If it’s a minor issue that you’re confident in your ability to fix, then DIY might be the way to go. However, if it’s a complex issue or something that could potentially be dangerous, it’s best to leave it to the professionals. Another tip is to consider your own skill level and experience.
If you have little to no experience in repairs, it’s probably best to leave it to someone who knows what they’re doing. Additionally, consider the time and effort it would take to fix the problem. Sometimes, it’s more cost-effective and efficient to hire someone to do the job rather than spend hours trying to figure it out yourself.
Ultimately, the key is to know your limits and when it’s time to call in the experts.
Conclusion
And there you have it, my friends! The secret to fixing those pesky chips and cracks on your windshield is now in your hands. With the help of a windshield repair kit, you can save yourself time, money, and the headache of dealing with a full-on replacement. Just think of it as a DIY first aid kit for your car’s glass! Now, I know what you’re thinking.
Fixing a windshield? That sounds like a job for a trained professional! Well, fear not, my fellow adventurers. The windshield repair kit is designed for us regular folks who aren’t afraid to get our hands dirty. It’s like having a superhero cape, only instead of fighting crime, it’s fighting the battle against unsightly chips and cracks.
So, how does this magical kit work, you ask? Well, it’s a combination of science, wizardry, and a little bit of elbow grease. The kit usually includes a sturdy resin, a suction cup, and some tools that resemble miniature dental instruments (cue the tiny tooth fairy). You start by cleaning the damaged area, making sure it’s free from any debris or rogue bugs that decided to kamikaze into your windshield.
Next comes the fun part – applying the resin! It’s like playing Picasso with your car’s glass canvas. You carefully fill the damaged area with the resin, making sure to cover every last inch of the chip or crack. Then, you place the suction cup over the resin, creating a seal that will help it work its magic.
Just like a magician pulling a rabbit out of a hat, you gently apply pressure, causing the resin to spread and fill any voids in the glass. And just like that, the chip or crack starts to disappear before your very eyes! Abracadabra! After some patience and a little bit of time, you remove the suction cup, wipe away any excess resin, and voila! Your windshield is as good as new (well, almost). It’s like watching a caterpillar emerge from its cocoon as a beautiful, repaired windshield.
You can now proudly drive down the road, safe in the knowledge that you have conquered the art of windshield repair. So, my dear adventurers, arm yourselves with a windshield repair kit and let the journey to a flawless windshield begin. Remember, with a little perseverance and some DIY magic, you can become the hero that saves your windshield from the clutches of damage.
FAQs
Can I use a windshield repair kit to fix a chip or crack on my car’s windshield?
Yes, a windshield repair kit is designed to fix small chips and cracks on car windshields. However, it is important to note that the effectiveness of the repair may vary depending on the size and depth of the damage.
What does a windshield repair kit typically include?
A windshield repair kit usually includes a repair resin, an applicator, curing strips, a razor blade, and instructions. Some kits may also include additional tools such as a suction cup or bridge.
How long does it take to repair a chip or crack using a windshield repair kit?
The time required to repair a chip or crack using a windshield repair kit can vary. Generally, it can take anywhere from 30 minutes to an hour or more, depending on the size and complexity of the damage.
Can I use a windshield repair kit on a windshield with multiple chips or cracks?
Yes, a windshield repair kit can be used to repair multiple chips or cracks on a single windshield. However, it is important to follow the instructions provided with the kit and assess the severity of the damage to determine if a professional repair may be necessary.
Is it possible to use a windshield repair kit on a windshield that has been previously repaired?
Yes, it is usually possible to use a windshield repair kit on a windshield that has been previously repaired. However, the effectiveness of the repair may be reduced, and it is recommended to consult a professional if the damage is extensive or the previous repair was not successful.
Can a windshield repair kit fix a chip or crack that is larger than a certain size?
Most windshield repair kits are designed to fix chips or cracks up to a certain size, typically around 1 inch in diameter. Beyond this size, it may be more difficult to achieve a successful repair, and a professional replacement may be necessary.
Can I use a windshield repair kit on a windshield that is severely cracked or shattered?
No, a windshield repair kit is not suitable for repairing severely cracked or shattered windshields. In such cases, it is recommended to have the windshield replaced by a professional auto glass technician.