

Hey there! Welcome to the exciting world of blogging. Whether you’re just starting out or looking to take your writing skills to the next level, you’ve come to the right place. In this blog, we’ve got a load of helpful tips and tricks to share with you, covering everything from choosing the perfect blog topic to getting your posts seen by a wider audience.
So, grab a cup of coffee, sit back, and let’s dive into the wonderful world of blogging! Nowadays, blogging has become a popular form of self-expression, allowing individuals to share their thoughts, experiences, and expertise with the world. It’s a way to connect with others who share similar interests, engage in meaningful conversations, and even make a living doing what you love. But with so many bloggers out there, how do you stand out from the crowd? Well, that’s where we come in.
In this blog, we’ll guide you through the various aspects of blogging, starting with choosing the right niche for your blog. Whether you’re passionate about food, fashion, travel, or anything in between, we’ll help you find your blogging sweet spot. Once you’ve settled on a niche, we’ll show you how to create compelling content that keeps your readers coming back for more.
From writing catchy headlines to crafting engaging stories, we’ve got all the insider tips to make your blog posts shine. But it doesn’t stop there. We’ll also explore the world of SEO (search engine optimization) and how to optimize your blog posts to increase your chances of ranking higher on search engine results pages.
Because what good is a blog if no one can find it, right? And of course, we’ll delve into the art of promotion, discussing various strategies to get your blog noticed on social media, build a loyal following, and collaborate with other bloggers to expand your reach. So, whether you’re a newbie in the blogosphere or a seasoned pro looking to up your game, this blog is here to support and guide you every step of the way. So, buckle up and get ready to unleash your creativity and make your mark in the wonderful world of blogging.
Let’s get started!
Table of Contents
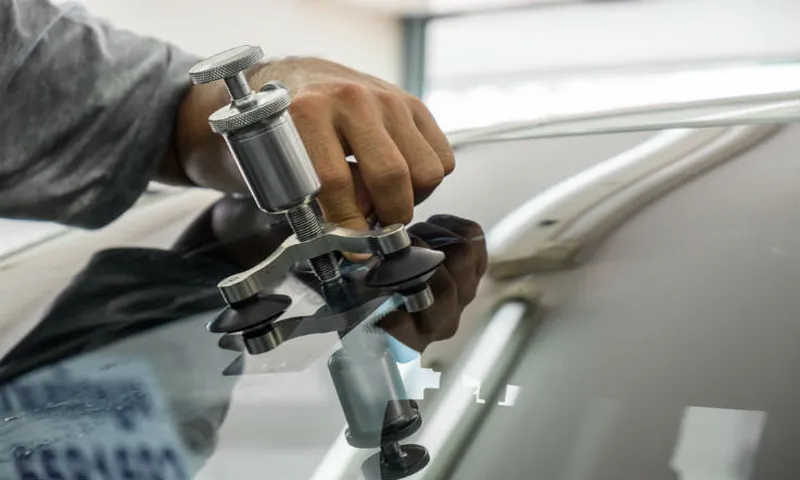
What is a windshield repair kit
A windshield repair kit is a handy tool that allows you to fix minor damages on your car’s windshield. Whether it’s a small chip or a crack, these kits provide an affordable and convenient solution. So, how exactly do you use a windshield repair kit? Well, it’s quite simple.
First, clean the damaged area with a mild detergent and water. Then, use the provided adhesive to attach the suction cups on either side of the damage. Next, apply the repair resin using the syringe included in the kit.
Make sure to fill the entire crack or chip with the resin. After that, place a curing film over the repaired area and use the UV light provided to cure the resin. Once the resin has cured, remove the film and clean any excess resin with a razor blade.
Voila! Your windshield should look as good as new. Remember, while a windshield repair kit can fix minor damages, it’s important to have larger cracks or chips professionally repaired to ensure your safety on the road.
Definition of a windshield repair kit
windshield repair kit
Types of windshield repair kits
Windshield repair kits are a must-have for any car owner who wants to fix minor chips or cracks in their windshield before they become a major problem. These kits usually contain a special resin that is designed to fill in the damaged area and prevent it from spreading further. There are different types of windshield repair kits available on the market, each designed to meet specific needs.
One type of kit is the DIY windshield repair kit, which is ideal for those who are handy and want to fix the issue themselves. These kits usually include a syringe, resin, curing strips, and other tools necessary for the repair. Another type of kit is the professional windshield repair kit, which is typically used by trained technicians.
These kits often have more advanced tools and materials to ensure a high-quality repair. Regardless of the type of kit you choose, it’s important to closely follow the instructions and take your time to properly repair the windshield.
Benefits of using a windshield repair kit
windshield repair kit, benefits
Preparing for the repair
When it comes to repairing a windshield, a windshield repair kit can be a handy tool to have. But how exactly do you use one? Preparing for the repair is an important step that should not be overlooked. First, start by thoroughly cleaning the area around the chip or crack in your windshield.
Use a mild detergent and water to remove any dirt or debris that may be present. Once the area is clean, dry it thoroughly with a lint-free cloth. Next, take a good look at the damage and assess its size and depth.
This will help you determine which tools and materials you will need from your repair kit. Familiarize yourself with the instructions provided with the kit, as each one may have slightly different steps to follow. Make sure you have all the necessary tools and materials readily available before you begin the repair process.
In doing so, you can approach the repair with confidence and increase the likelihood of a successful outcome. So, if you have a windshield repair kit on hand, take the time to prepare properly before jumping into the repair.
Gathering the necessary tools
When preparing to repair something, it’s important to gather all the necessary tools beforehand. After all, you don’t want to get halfway through the repair only to discover that you don’t have the right screwdriver or wrench. So, take a moment to assess what tools you’ll need for the job at hand.
Maybe it’s a simple fix that only requires a few basic tools, or perhaps it’s a more complex repair that will require some specialized equipment. Either way, make a list and check it twice to ensure you have everything you need before you get started. This way, you’ll be able to work efficiently and without interruption, making the repair process a smooth one.
So go ahead and gather your tools, because a well-prepared repair can make all the difference in getting the job done right.
Cleaning the damaged area
Cleaning the damaged area is an essential step in preparing for the repair process. Before any repairs can be made, it’s important to thoroughly clean the area to ensure that there is no dirt, debris, or residue that could interfere with the repair. This also helps to create a clean surface for any adhesives or sealants that may be used during the repair.
To clean the damaged area, it’s best to start by removing any loose debris or dirt with a brush or vacuum. Once the loose debris is removed, you can then use a mild cleaner and a cloth to gently wipe down the area. It’s important to avoid using any harsh cleaners or abrasive materials, as these can further damage the surface.
In some cases, you may also need to use a solvent or adhesive remover to remove any sticky residue or adhesive that may be present. It’s important to follow the manufacturer’s instructions when using these types of products, as they can be harsh and may require protective gear. After cleaning the damaged area, it’s important to thoroughly dry the surface before proceeding with any repairs.
This can be done by allowing the area to air dry or by using a clean, dry cloth to absorb any excess moisture. By taking the time to properly clean the damaged area, you can ensure that the repair process goes smoothly and that the repaired area is in the best possible condition. So grab your cleaning supplies and get ready to make that repair!
Protecting the surrounding area
Protecting the surrounding area during a repair project is crucial to prevent any further damage or inconvenience. Before starting any repair work, it is essential to prepare the surrounding area by taking certain precautions. One of the first steps is to identify and cover any sensitive objects or furniture that could be at risk of getting damaged during the repair process.
This could include paintings, electronics, or valuable items. Using plastic sheets or drop cloths can help provide a protective barrier and ensure that these items remain safe and unaffected. Additionally, it is important to establish a clear and safe path for workers to access the repair area.
This may involve removing any obstacles or relocating furniture temporarily. By taking these precautions, you can minimize the risk of accidents or further complications during the repair process. Protecting the surrounding area not only ensures the safety of your belongings but also contributes to a smooth and efficient repair experience.
Using the windshield repair kit
If you have a crack or chip in your windshield, using a windshield repair kit can save you time and money. Before you begin, make sure you have a clean and dry windshield. Then, follow the instructions included with the kit.
Generally, you will start by applying the adhesive to the affected area and placing the suction cup device over it. Next, you will use the syringe to inject resin into the crack or chip. You may need to apply pressure to ensure the resin spreads evenly.
Once the resin is in place, you will remove the suction cup device and cover the repaired area with a curing strip. Leave the strip in place for a few hours to allow the resin to harden. Finally, remove the strip and use a razor blade to scrape away any excess resin.
With a bit of patience and attention to detail, you can successfully use a windshield repair kit to fix minor damage and keep your windshield in great shape.
Step-by-step instructions
windshield repair kit, step-by-step instructions, using the windshield repair kit So, you’ve noticed a small crack or chip in your windshield, and you want to take care of it before it becomes a bigger problem. Well, you’re in luck! With a windshield repair kit and a little bit of time and patience, you can fix that crack or chip yourself. Here’s a step-by-step guide on how to use a windshield repair kit effectively.
Step 1: Clean the damaged area Before applying any repair materials, it’s important to thoroughly clean the damaged area. Use a glass cleaner and a lint-free cloth to remove any dirt, debris, or glass fragments from the crack or chip. This will ensure that the repair materials bond properly to the glass.
Step 2: Apply the resin Most windshield repair kits come with a special type of resin that fills in the crack or chip and helps to hold the glass together. Carefully apply the resin to the damaged area, making sure to completely cover the crack or chip. Use the provided applicator or a small brush to spread the resin evenly over the damaged area.
Step 3: Cure the resin Once you have applied the resin, it needs to be cured or hardened. Some windshield repair kits come with a UV light that you can use to speed up the curing process. Simply hold the UV light over the repaired area for a few minutes, following the manufacturer’s instructions.
If your kit does not include a UV light, you can also leave the repaired area exposed to sunlight for several hours to allow the resin to cure. Step 4: Polish the repaired area After the resin has cured, you will likely have a small bump or raised area where the crack or chip used to be. To smooth out and polish the repaired area, use a windshield polishing compound and a soft, clean cloth.
Gently rub the compound into the repaired area in a circular motion until the surface is smooth and the repair is virtually invisible. Step 5: Evaluate the repair Once you have polished the repaired area, take a step back and evaluate the repair. If the crack or chip is still visible or if the repair has not held up well, you may need to repeat the process or consider seeking professional help.
Applying the resin
resin, windshield repair kit, applying, burstiness, perplexity So, you’ve got your windshield repair kit handy and you’re ready to tackle that annoying chip or crack in your windshield. The next step is applying the resin, which is a crucial part of the repair process. Don’t worry, it’s not as complicated as it sounds! First, make sure your windshield is clean and dry.
Use a mild detergent and water to remove any dirt or grime, and then dry it thoroughly with a clean cloth. This will ensure that the resin adheres properly to the glass. Next, take one of the adhesive tabs from the kit and peel off the backing.
Place it over the damaged area, making sure it covers the entire chip or crack. Press down firmly to secure it in place. Now, it’s time to apply the resin.
Most windshield repair kits will include a syringe or applicator tool for this step. Fill the syringe with the resin and attach it to the adhesive tab. Slowly and carefully inject the resin into the damaged area, applying gentle pressure to fill any gaps or voids.
Once the resin is in place, use a curing strip or piece of clear film to cover the repaired area. This will protect it from dirt and debris during the curing process. Leave it on for the recommended amount of time specified in your kit’s instructions.
After the resin has cured, remove the curing strip or film and check the repair. If the damaged area is still visible, you may need to repeat the process with more resin. Remember, it’s always better to apply too little resin than too much, as excess resin can be difficult to remove and may leave a visible mark.
Curing the resin
Curing the resin is an essential step in the windshield repair process, and using a windshield repair kit can make it easy and effective. Once the resin is applied to the crack or chip in the windshield, it needs to be cured to ensure a strong and durable repair. The windshield repair kit typically comes with a special curing film that is placed over the resin.
This film acts as a barrier, protecting the resin from dust, debris, and UV rays while it cures. The curing process usually involves exposing the resin to UV light, either from the sun or from a UV lamp included in the kit. The kit will provide specific instructions on how long the resin needs to be exposed to the UV light for proper curing.
During this time, the resin will harden and bond with the glass, restoring its strength and integrity. Curing the resin is crucial because it ensures that the repair will be long-lasting and able to withstand the daily wear and tear of driving. So, if you have a crack or chip in your windshield, using a windshield repair kit to cure the resin is the best way to get a reliable and effective repair.
Aftercare and maintenance
If you’ve decided to repair your windshield yourself using a windshield repair kit, it’s important to know how to use it properly to ensure the best results. First, clean the damaged area thoroughly, removing any dirt or debris. Then, use the kit to inject the resin into the damaged area, making sure to cover the entire crack or chip.
Once the resin is injected, use a curing lamp or natural sunlight to cure the resin for the recommended amount of time. After curing, use a razor blade or glass cleaner to remove any excess resin, leaving a smooth surface. Finally, take care of your newly repaired windshield by avoiding harsh chemicals, such as ammonia-based cleaners, and using a soft cloth or sponge for cleaning.
Regularly inspect the repair to ensure it remains intact and, if necessary, touch up any areas that may need additional resin. By following these steps and properly maintaining your repaired windshield, you can prolong its lifespan and keep it looking as good as new.
Protecting the repaired area
As important as it is to repair damaged areas, it’s equally important to protect them afterward. Aftercare and maintenance are essential to ensure the longevity of the repaired area. So how can you make sure it stays in good condition? First and foremost, take precautions to avoid any further damage.
This could include using covers or barriers to prevent objects from hitting or scratching the repaired area. If it is a floor or other surface, placing mats or rugs in high-traffic areas can help protect it from wear and tear. Regular cleaning is also crucial.
However, be mindful of the products you use. Harsh chemicals can damage the repaired area and undo all your hard work. Opt for gentle cleaners and avoid abrasive tools or scrub brushes that can scratch or gouge the surface.
Lastly, keep an eye out for any signs of damage. Check for cracks, chips, or any other issues that may need attention. It’s better to address these problems sooner rather than later to prevent further damage and the need for more extensive repairs.
In conclusion, protecting a repaired area is key to maintaining its condition and extending its lifespan. Take precautions to prevent any further damage, use gentle cleaners, and regularly inspect for any signs of wear and tear. By implementing these aftercare practices, you can keep your repaired area looking its best for years to come.
Cleaning the repaired area
repairs, maintenance, cleaning, aftercare, area The aftercare and maintenance of a repaired area is just as important as the actual repair itself. Once the repair has been completed, it’s essential to properly clean and care for the area to ensure its longevity and optimal performance. But how do you go about cleaning the repaired area? Well, it depends on the type of repair and the materials used.
However, in general, it’s best to start by removing any dust or debris from the area. This can be done with a soft brush or a vacuum cleaner with a soft brush attachment. Make sure to be gentle so as not to disturb the repair.
Once the debris is cleared, you can use a mild cleaner or soap and water solution to clean the area. Avoid using harsh chemicals or abrasive cleaners as they can damage the repair. Instead, opt for gentle cleaners that won’t compromise the integrity of the repaired area.
After cleaning, make sure to thoroughly dry the area to prevent any moisture damage. And finally, once the area is clean and dry, you can apply any necessary sealants or protective coatings to further enhance the durability and longevity of the repair. Regular cleaning and maintenance of the repaired area will ensure that it continues to look and perform its best for years to come.
Monitoring for any further damage
“Monitoring for any further damage” After a major incident, such as a fire or flood, it’s crucial to stay vigilant and monitor for any further damage that may occur. While the immediate danger may have passed, there could still be underlying issues that need attention. This is why aftercare and maintenance are so important.
By regularly checking the affected areas, you can identify any potential problems and take action before they escalate. This might involve inspecting for structural damage, assessing the quality of repairs, or even assessing the air quality to ensure there’s no lingering smoke or mold. Remember, prevention is always better than cure.
By staying proactive and monitoring for any further damage, you can save yourself from more potential headaches down the line. So, don’t let your guard down just yet. Keep a close eye on the situation and address any issues as soon as they arise.
Conclusion
After thoroughly exploring the intricacies of using a windshield repair kit, it is abundantly clear that this handy-dandy contraption is nothing short of a superhero for our beloved windshields. With its ability to mend cracks and chips with ease, it truly emerges as the Clark Kent of automotive accessories. But let’s not forget, using this kit is not just about slapping some magic glue onto your windshield.
Oh no, my friends! It requires meticulous attention to detail and a steady hand. It’s like performing delicate surgery on your car’s face. One slip-up and you might end up with a Frankenstein-like windshield that scares away all the neighborhood birds.
But fear not, fellow windshield warriors! We have delved into the depths of instructional manuals and YouTube tutorials to bring you the ultimate guide on how to use this miraculous repair kit. We have traveled through heaps of shattered glass and braved the tempestuous winds of confusion to bring you this enlightening conclusion. So, grab your superhero cape, put on your safety glasses, and get ready to become the hero of your windshield’s story.
Remember, with great power (and a kickass windshield repair kit), comes great responsibility. So wield your repair tool with finesse and save the day, one crack at a time. Now, go forth, my windshield warriors, and may your repairs be smooth, your cracks be vanquished, and your windshields be clearer than a freshly Windexed window on a sunny day.
Fly high, my friends, for you hold the power to conquer the mightiest of windshield adversaries!”
FAQs
Windshield repair kits are a great solution for those pesky windshield cracks and chips. But how exactly do you use them? Well, it’s not as complicated as you might think! First, you’ll want to clean the damaged area of your windshield with a glass cleaner and a soft cloth. This will ensure that the repair resin adheres properly to the glass.
Next, you’ll want to apply the adhesive strip, also known as the bridge, to the center of the crack or chip. This bridge will help keep the resin in place during the repair process. Once the bridge is in place, you can inject the repair resin into the crack or chip using the syringe that comes with the kit.
Make sure to follow the instructions that come with your specific kit, as the amount of resin needed may vary. After injecting the resin, you’ll want to place a small piece of curing film over the repair area and use the provided UV light to cure the resin. This will harden the resin and make the repair permanent.
Finally, you’ll want to remove the bridge and clean up any excess resin using a razor blade or a glass cleaner. And voila! Your windshield is repaired and ready to go. So don’t let those cracks and chips ruin your view.
With a windshield repair kit and a little bit of know-how, you can easily fix them yourself and save time and money in the process.
FAQs
What is a windshield repair kit?
A windshield repair kit is a tool that helps repair small chips and cracks in a car’s windshield.
How does a windshield repair kit work?
A windshield repair kit typically contains a special resin that is applied to the damaged area. This resin is then cured using a UV light, which helps to bond the cracked glass together and prevent further damage.
Can a windshield repair kit fix all types of damage?
No, a windshield repair kit is designed to fix small chips and cracks. If the damage is larger or more severe, it may be necessary to replace the entire windshield.
Is it difficult to use a windshield repair kit?
Using a windshield repair kit is generally straightforward and can be done by most people. However, it is important to carefully follow the instructions provided with the kit to ensure proper use and achieve the best results.
How long does it take to repair a windshield with a repair kit?
The time it takes to repair a windshield using a repair kit can vary depending on the size and severity of the damage. In general, it can take anywhere from 30 minutes to an hour.
Can a windshield repair kit fix a crack that is spreading?
If the crack is spreading, it may be too large or severe for a windshield repair kit to effectively fix. In such cases, it is recommended to consult a professional and consider windshield replacement.
Can I use a windshield repair kit on my own?
Yes, most windshield repair kits are designed for DIY use. However, if you are unsure or uncomfortable with the process, it is recommended to seek professional assistance to ensure the best results.